2013 MERCEDES-BENZ B-CLASS SPORTS ESP
[x] Cancel search: ESPPage 81 of 336
&
button on the SmartKey, the anti-
entrapment feature will not operate. Opening and closing the side
windows
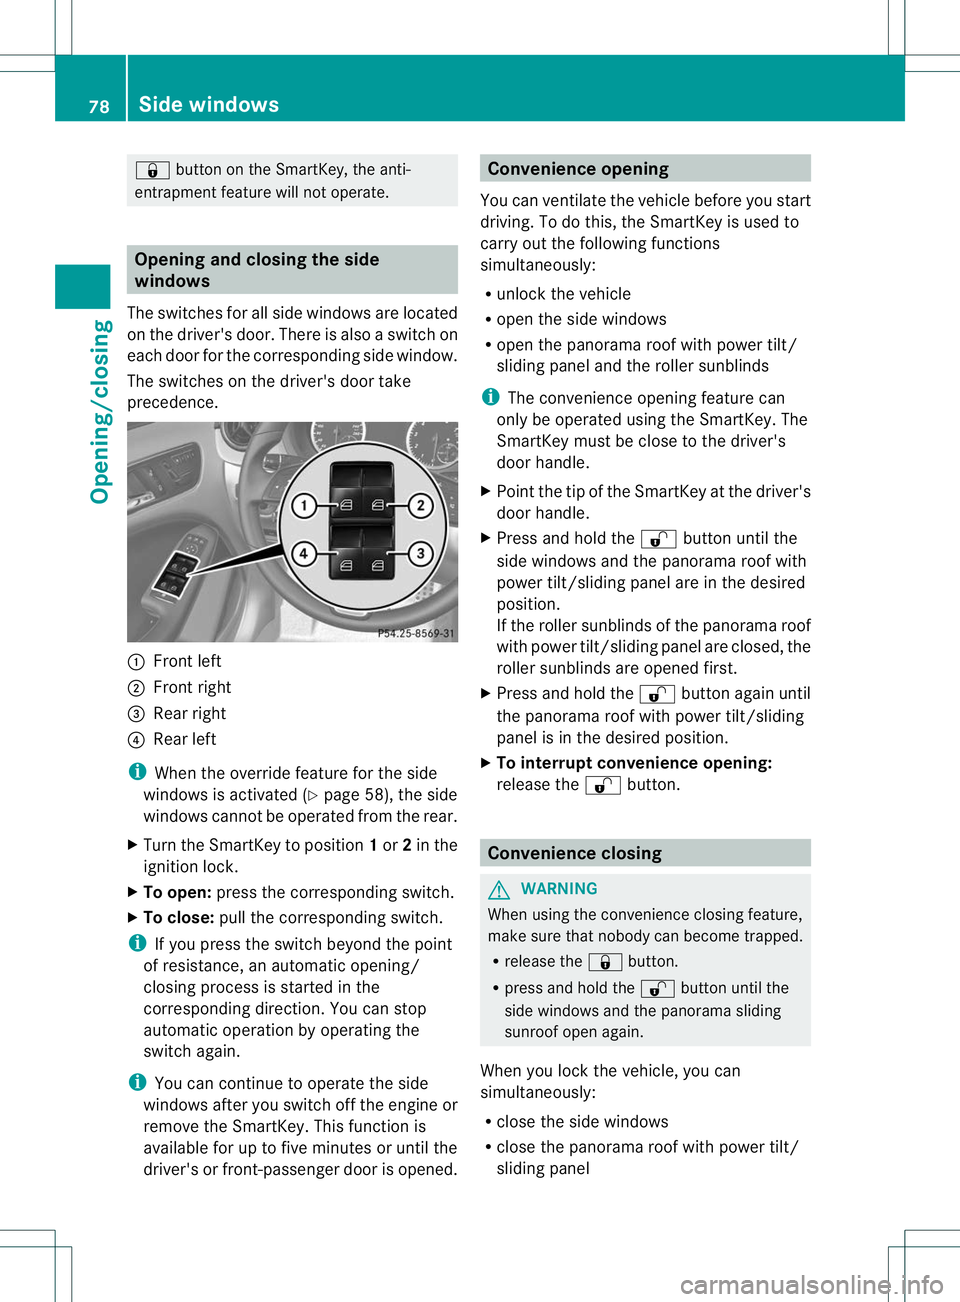
The switches for all side windows are located
on the driver's door. There is also a switch on
each door for the corresponding side window.
The switches on the driver's door take
precedence. :
Front left
; Front right
= Rear right
? Rear left
i When the override feature for the side
windows is activated (Y page 58), the side
windows cannot be operated from the rear.
X Turn the SmartKey to position 1or 2in the
ignition lock.
X To open: press the corresponding switch.
X To close: pull the corresponding switch.
i If you press the switch beyond the point
of resistance, an automatic opening/
closing process is started in the
corresponding direction. You can stop
automatic operation by operating the
switch again.
i You can continue to operate the side
windows after you switch off the engine or
remove the SmartKey. This function is
available for up to five minutes or until the
driver's or front-passenger door is opened. Convenience opening
You can ventilate the vehicle before you start
driving .To do this, the SmartKey is used to
carry out the following functions
simultaneously:
R unlock the vehicle
R open the side windows
R open the panorama roof with power tilt/
sliding panel and the roller sunblinds
i The convenience opening feature can
only be operated using the SmartKey. The
SmartKey must be close to the driver's
door handle.
X Point the tip of the SmartKey at the driver's
door handle.
X Press and hold the %button until the
side windows and the panorama roof with
power tilt/sliding panel are in the desired
position.
If the roller sunblinds of the panorama roof
with power tilt/sliding panel are closed, the
roller sunblinds are opened first.
X Press and hold the %button again until
the panorama roof with power tilt/sliding
panel is in the desired position.
X To interrupt convenience opening:
release the %button. Convenience closing
G
WARNING
When using the convenience closing feature,
make sure that nobody can become trapped.
R release the &button.
R press and hold the %button until the
side windows and the panorama sliding
sunroof open again.
When you lock the vehicle, you can
simultaneously:
R close the side windows
R close the panorama roof with power tilt/
sliding panel 78
Side windowsOpening/closing
Page 82 of 336
On vehicles with a panorama roof with power
tilt/sliding panel, you can then close the
roller sunblinds.
i
The SmartKey must be close to the
driver's door handle.
X Point the tip of the SmartKey at the driver's
door handle.
X Press and hold the &button until the
side windows and the panorama roof with
power tilt/sliding panel are fully closed.
X Make sure that all the side windows and the
panorama roof with power tilt/sliding
panel are closed.
On vehicles with a panorama roof with power
tilt/sliding panel:
X Press and hold the &button againu ntil
the rolle rsunblinds of th epanorama roof
with power tilt/sliding panel close.
X To interrup tconvenience closing:
release the &button. Resetting the side windows
You must rese teach side window if:
R the side window opens again slightly after
being closed fully.
R the side window can no longer be fully
opened or closed.
X Close all the doors.
X Turn the SmartKey to position 1or 2in the
ignition lock.
X Pull the corresponding switch on the door
control panel until the side window is
completely closed (Y page 78).
X Hold the switch for an additional second.
If the side window opens again slightly:
X Immediately pull the corresponding switch
on the door control panel until the side
window is completely closed (Y page 78).
X Hold the switch for an additional second.
X If the corresponding side window remains
closed after the butto nhas been released, the side window has been reset correctly.
If this is nott
he case, repeat the steps
above again. Problems with the side windows
G
WARNING
Closing the side windows with increased force
or without the anti-entrapment feature could
lead to serious or even fatal injury. Make sure
that nobody can become trapped when
closing the side windows. G
WARNING
Pulling and holding the switch to close the
door window immediately after it had been
blocked two times will cause the door window
to close without the anti-entrapment feature
for as long as you hold the switch.
Problem: aside window cannot be closed
because it is blocked by objects, e.g.
leaves in the window guide.
X Remove the objects.
X Close the side window.
Problem :aside window cannot be closed
and you cannot see the cause. If a side
window is obstructed during closing and
reopens again slightly:
X Immediately afte rthe window blocks, pull
the corresponding switch again until the
side window has closed.
The side window is closed with increased
force.
If a side window is obstructed again during
closing and reopens again slightly:
X Immediately after the window blocks, pull
the corresponding switch again until the
side window has closed.
The side window is closed without the anti-
entrapment feature. Side windows
79Opening/closing Z
Page 83 of 336
Sliding sunroof
Important safety notes
In the following section, the term "sliding
sunroof" refers to the panorama roof with
power tilt/sliding panel. G
WARNING
When opening or closing the sliding sunroof,
make sure that there is no danger of anyone
being harmed by the opening/closing
procedure.
The sliding sunroof is equipped with
automatic operation and the anti-entrapment
feature. If the movement of the sliding sunroof
is blocked during the closing procedure, the
sliding sunroof will stop and open slightly.
The sliding sunroof operates differently when
the sliding sunroof switch is pressed and held.
See the "Problems with the sliding sunroof"
section for more details.
The opening/closing procedure of the sliding
sunroof can be immediately halted by
releasing the sliding sunroof switch or, if the
sliding sunroof switch was moved past the
resistance point and released, by moving the
sliding sunroof switch in any direction. G
WARNING
The sliding sunroof is made out of glass. In the
event of an accident, the glass may shatter.
This may result in an opening in the roof.
In a vehicle rollover, occupants not wearing
their seat belts or not wearing them properly
may be thrown out of the opening. Such an
opening also presents a potential for injury for
occupants wearing their seat belts properly,
as entire body parts or portions of them may
protrude from the passenger compartment.
! Only open the sliding sunroof if it is free
of snow and ice. Otherwise, malfunctions
may occur.
Do not allow anything to protrude from the
sliding sunroof. Otherwise, the seals could
be damaged. !
The weather can change abruptly. It could
start to rain or snow. Make sure that the
sliding sunroof is closed when you leave the
vehicle. The vehicle electronics can be
damaged if water enters the vehicle
interior.
i Resonance noises can occur in addition
to the usual airflow noises when the sliding
sunroof is open. They are caused by minor
pressure fluctuations in the vehicle interior.
Change the position of the sliding sunroof
or open a side window slightly to reduce or
eliminate these noises. Operating the panorama roof with
power tilt/sliding panel
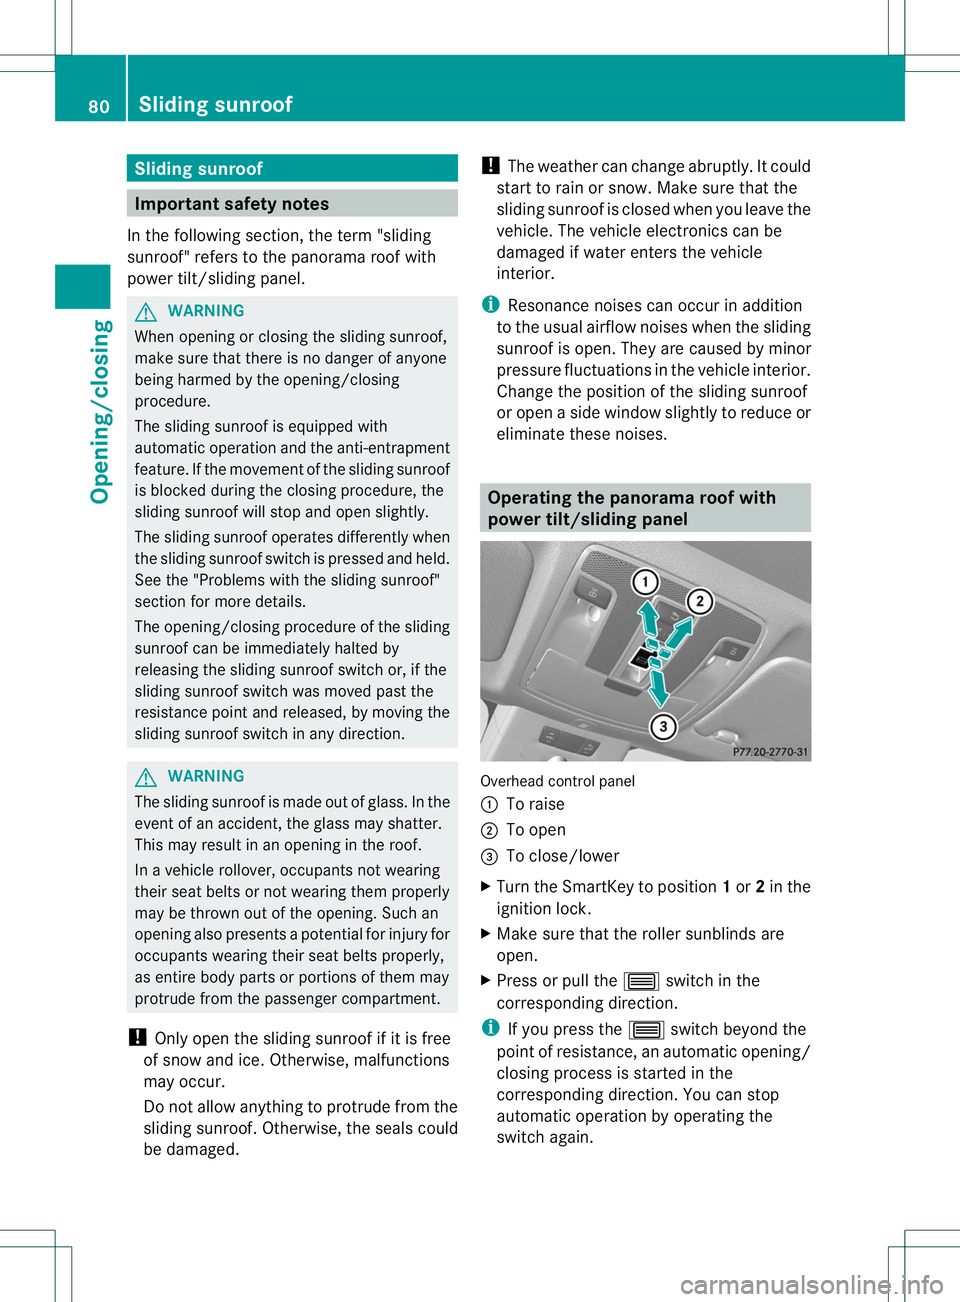
Overhead control panel
:
To raise
; To open
= To close/lower
X Turn the SmartKey to position 1or 2in the
ignition lock.
X Make sure that the roller sunblinds are
open.
X Press or pull the 3switch in the
corresponding direction.
i If you press the 3switch beyond the
point of resistance, an automatic opening/
closing process is started in the
corresponding direction. You can stop
automatic operation by operating the
switch again. 80
Sliding sunroofOpening/closing
Page 84 of 336
The automatic raising feature is available
only when the panorama roof with power
tilt/sliding panel is closed.
i You can continue to operate the
panorama roof with power tilt/sliding
panel after switching off the engine or
removing the SmartKey. This function
remains active for five minutes or until you
open a front door. Operating the roller sunblinds for the
panorama roof with power tilt/sliding
panel
Important safety notes G
WARNING
When opening or closing the roller sunblinds,
make sure that no one can be injured.
The roller sunblinds have automatic operation
and an anti-entrapment feature. If the roller
sunblinds are blocked during the closing
procedure, the anti-entrapment feature stops
the roller sunblinds and they open again
slightly.
The opening and closing of the roller
sunblinds can be terminated immediately by
releasing the button .Inautomatic operation,
press the butto nbriefly in any directio nto
stop the roller sunblinds.
The roller sunblinds shield the vehicle interior
from sunlight. The two roller sunblinds can
only be opened and closed together when the
panorama roof with power tilt/sliding panel
is closed. Opening/closing Overhead control panel
:
To open
; To open
= To close
X Turn the SmartKey to position 1or 2in the
ignition lock.
X Press or pull the 3switch in the
corresponding direction.
i If you press the 3switch beyond the
point of resistance, an automatic opening/
closing process is started in the
corresponding direction. You can stop
automatic operation by operating the
switch again.
Resetting the panorama roof with
power tilt/sliding panel and the roller
sunblinds !
If the panorama roof with power tilt/
sliding panel and the roller sunblinds
cannot be fully opened or closed after
resetting, contact a qualified specialist
workshop.
If the panorama roof with power tilt/sliding
panel or the front roller sunblinds do not move
smoothly, reset the panorama roof with
power tilt/sliding panel and the roller
sunblinds:
X Turn the SmartKey to position 1or 2in the
ignition lock.
X Press the 3switch to the point of
resistance in the direction of arrow ;and Sliding sunroof
81Opening/closing Z
Page 91 of 336
Keep the area around head restraints clear of
articles (e.g. clothing) to not obstruct the
folding operation of the head restraints.
G
WARNING
For yourp rotection, drive only with properly
positioned head restraints.
Adjust the head restraint in such a way that it
is as close to the head as possible and the
center of the head restraint supports the back
of the head at eye level .This will reduce the
potential for injury to the head and neck in the
event of an accident or similar situation.
With a rear seat occupied, make sure to move
the respective head restraint up from the
lowest non-use position and have the
occupant adjust the head restraint properly.
Do not drive the vehicle without the seat head
restraints installed when the rear seats are
occupied. Head restraints are intended to
help reduce injuries during an accident.
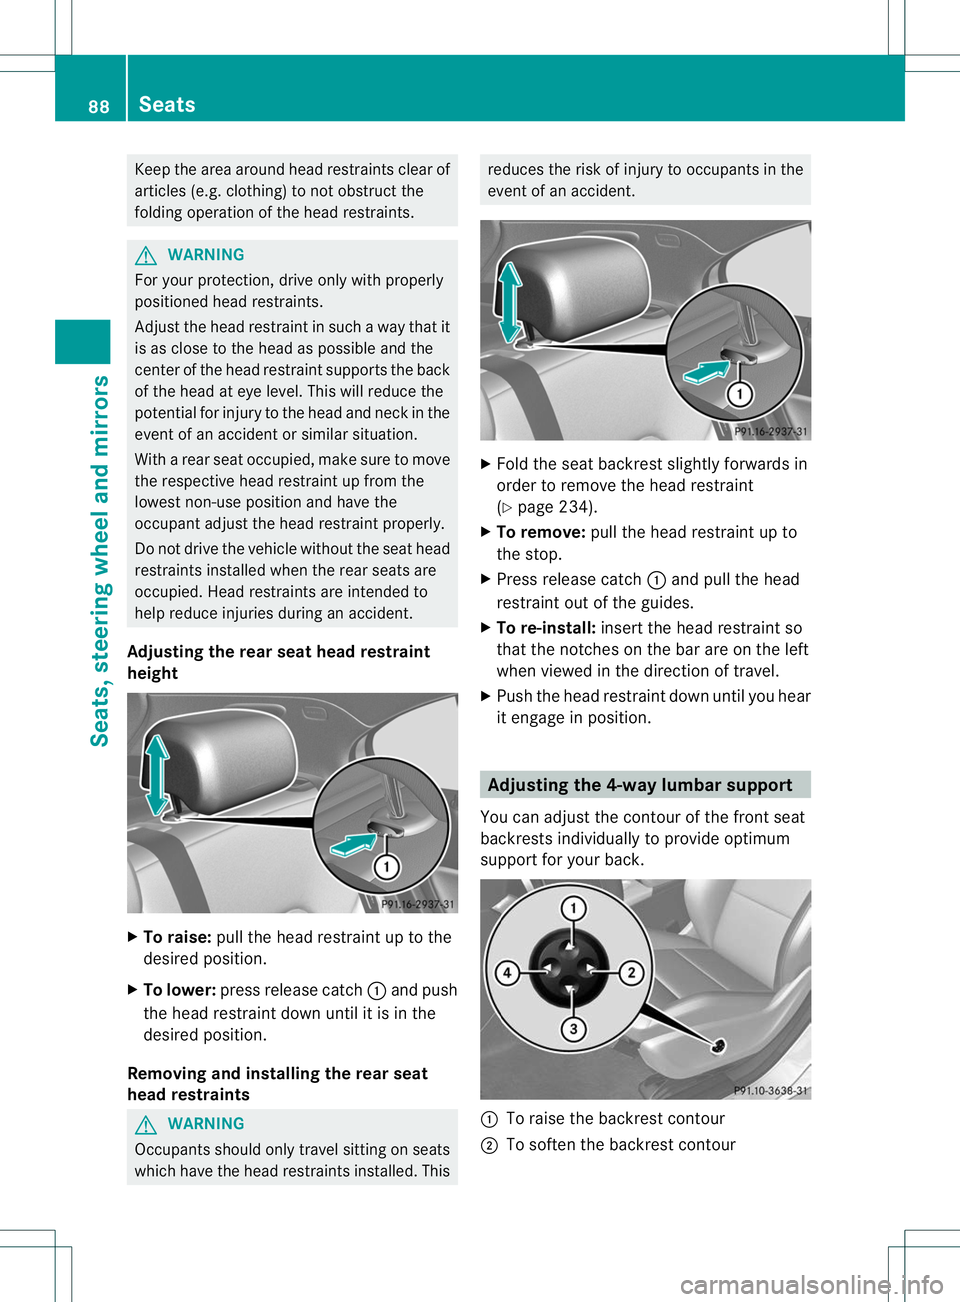
Adjusting the rear seat head restraint
height X
To raise: pull the head restraint up to the
desired position.
X To lower: press release catch :and push
the head restraint down until it is in the
desired position.
Removing and installing the rear seat
head restraints G
WARNING
Occupants should only travel sitting on seats
which have the head restraints installed. This reduces the risk of injury to occupants in the
event of an accident.
X
Fold the seat backrest slightly forwards in
order to remove the head restraint
(Y page 234).
X To remove: pull the head restraint up to
the stop.
X Press release catch :and pull the head
restraint out of the guides.
X To re-install: insert the head restraint so
that the notches on the bar are on the left
when viewed in the direction of travel.
X Push the head restraint down until you hear
it engage in position. Adjusting the 4-way lumbar support
You can adjust the contour of the front seat
backrests individually to provide optimum
support for your back. :
To raise the backrest contour
; To soften the backrest contour 88
SeatsSeats, steering wheel and mirrors
Page 93 of 336
X
Push release lever :down completely.
The steering column is unlocked.
X Adjust the steering wheel to the desired
position.
X Push release lever :up completely.
The steering column is locked.
X Check if the steering column is locked.
When doing so, try to push the steering
wheel up or down or try to move it in the
fore-and-aft direction. Mirrors
Rear-view mirror
X
Anti-glare mode: flick anti-glare lever :
forwards or back. Exterior mirrors
Adjusting the exterior mirrors G
WARNING
The exterior mirrors reduce the size of the
image. Objects are actually closer than they
appear. You could misjudge the distance from
vehicles driving behind and cause an
accident, e.g. when changing lane. For this
reason, make sure of the actual distance from
the vehicle driving behind by glancing over
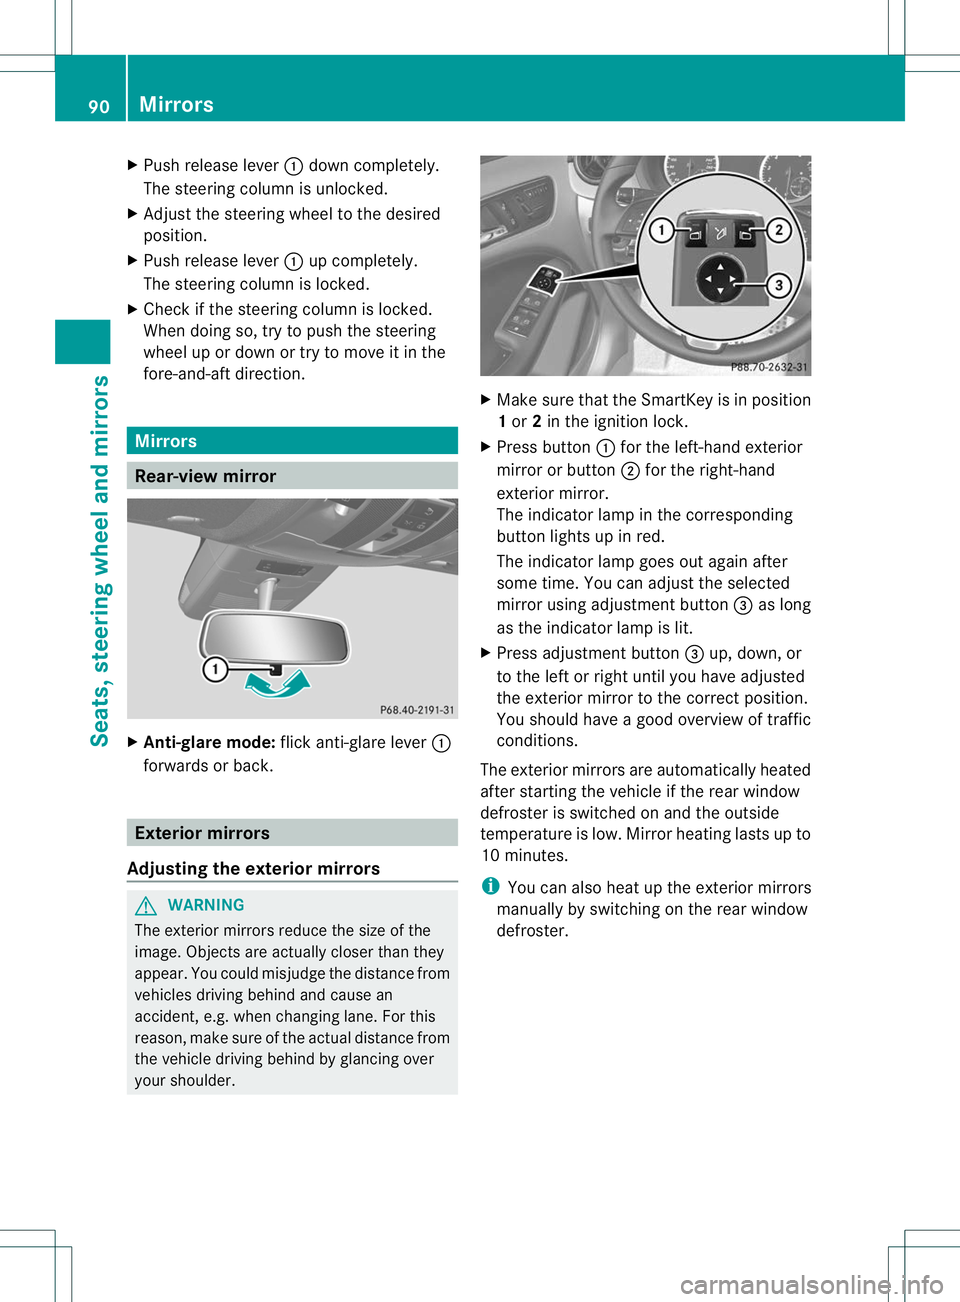
your shoulder. X
Make sure that the SmartKey is in position
1or 2in the ignition lock.
X Press button :for the left-hand exterior
mirror or button ;for the right-hand
exterior mirror.
The indicator lamp in the corresponding
button lights up in red.
The indicator lamp goes out again after
some time. You can adjust the selected
mirror using adjustment button =as long
as the indicator lamp is lit.
X Press adjustmen tbutton =up, down, or
to the left or right until you have adjusted
the exterior mirror to the correct position.
You should have a good overview of traffic
conditions.
The exterio rmirrors are automatically heated
after starting the vehicle if the rear window
defroster is switched on and the outside
temperature is low. Mirror heating lasts up to
10 minutes.
i You can also heat up the exterior mirrors
manually by switching on the rear window
defroster. 90
MirrorsSeats, steering wheel and mirrors
Page 95 of 336
Parking position for the exterior
mirror on the front-passenger side
General notes The "Parking position of the exterior mirror on
the front-passenger side" function is only
available if the vehicle is equipped with the
"Mirrors package".
Setting and storing the parking position
Using reverse gear
You can position the front-passenger side
exterior mirror in such a way that you can see
the rear wheel on that side as soon as you
engage reverse gear. You can store this
position.
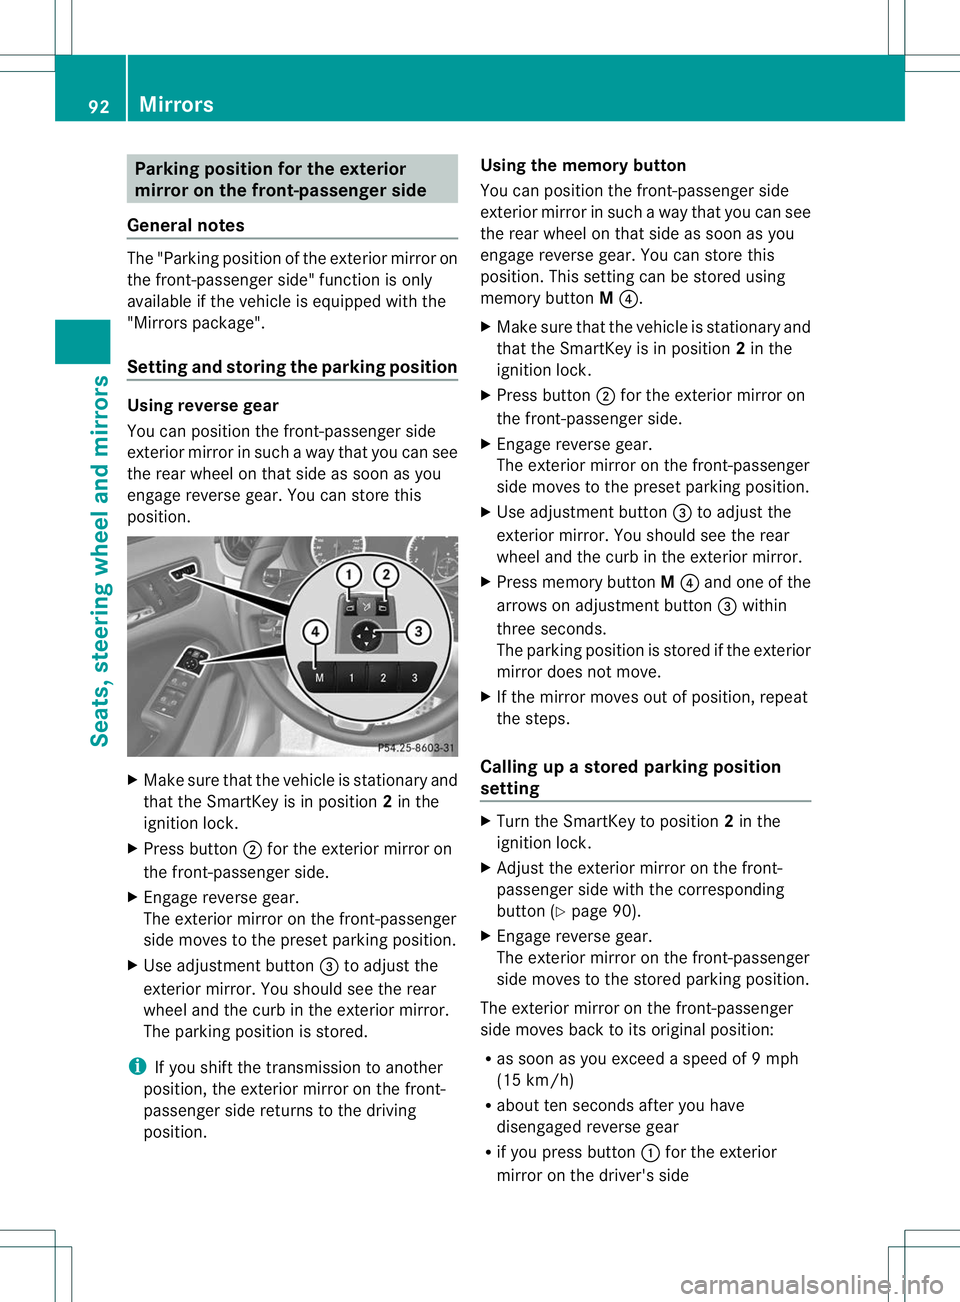
X
Make sure that the vehicle is stationary and
that the SmartKey is in position 2in the
ignition lock.
X Press button ;for the exterior mirror on
the front-passenger side.
X Engage reverse gear.
The exterior mirror on the front-passenger
side moves to the preset parking position.
X Use adjustment button =to adjust the
exterior mirror. You should see the rear
wheel and the curb in the exterior mirror.
The parking position is stored.
i If you shift the transmission to another
position, the exterior mirror on the front-
passenger side returns to the driving
position. Using the memory button
You can position the front-passenger side
exterior mirror in such a way that you can see
the rear wheel on that side as soon as you
engage reverse gear. You can store this
position. This setting can be stored using
memory button
M?.
X Make sure that the vehicle is stationary and
that the SmartKey is in position 2in the
ignition lock.
X Press button ;for the exterior mirror on
the front-passenger side.
X Engage reverse gear.
The exterior mirror on the front-passenger
side moves to the preset parking position.
X Use adjustment button =to adjust the
exterior mirror. You should see the rear
wheel and the curb in the exterior mirror.
X Press memory button M? and one of the
arrows on adjustment button =within
three seconds.
The parking position is stored if the exterior
mirror does not move.
X If the mirror moves out of position, repeat
the steps.
Calling up a stored parking position
setting X
Turn the SmartKey to position 2in the
ignition lock.
X Adjust the exterior mirror on the front-
passenger side with the corresponding
button (Y page 90).
X Engage reverse gear.
The exterior mirror on the front-passenger
side moves to the stored parking position.
The exterior mirror on the front-passenger
side moves back to its original position:
R as soon as you exceed a speed of 9mph
(15 km/h)
R about ten seconds after you have
disengaged reverse gear
R if you press button :for the exterior
mirror on the driver's side 92
MirrorsSeats, steering wheel and mirrors
Page 100 of 336
Automatic headlamp mode
G
WARNING
If the ligh tswitch is set to Ãand it is foggy,
snowing or there is poor visibility, the low-
beam headlamps will not come on
automatically. This could endange ryou and
others. In such situations turn the light switch
to L.
The automatic headlamp feature is only an
aid. The driver is responsible for the vehicle's
lighting at all times.
à is the favored light switch setting. The
light setting is automatically selected
according to the brightness of the ambient
light (exception: poor visibility due to weather
conditions such as fog, snow or spray):
R SmartKey in position 1in the ignition lock:
the parking lamps are switched on or off
automatically depending on the brightness
of the ambient light.
R With the engine running: if you have
activated the daytime running lamps
function via the on-board computer, the
daytime running lamps or the low-beam
headlamps and parking lamps are switched
on or off automatically depending on the
brightness of the ambient light.
X To switch on automatic headlamp
mode: turn the light switch to Ã.
The daytime running lamps improve the
visibility of your vehicle during the day. The
daytime running lamps function is required by
law in Canada. It cannot therefore be
deactivated.
When the engine is running and the vehicle is
stationary: if you move the selector lever from
a drive position to P, the daytime running
lamps/low-beam headlamps go out after
three minutes.
When the engine is running, the vehicle is
stationary and in high ambient light
brightness :ifyou turn the light switch
to T, you turn on the daytime running
lamps and parking lamps. If the engine is running and you turn the light
switch to
L, the manual settings take
precedence over the daytime running lamps.
Low-beam headlamps G
WARNING
If the light switch is set to Ãand it is foggy,
snowing or there is poor visibility, the low-
beam headlamps will not come on
automatically. This could endanger you and
others. In such situations turn the light switch
to L.
The automatic headlamp feature is only an
aid. The driver is responsible for the vehicle's
lighting at all times.
Even if the light sensor does not detect that
is dark, the parking lamps and low-beam
headlamps switch on when the SmartKey is
inserted into the ignition lock and the light
switch is set to the Lposition. This is a
particularly useful function in the event of rain
and fog.
X To switch on the low-beam headlamps:
turn the SmartKey in the ignition lock to
position 2or start the engine.
X Turn the light switch to L.
The green Lindicator lamp in the
instrument cluster lights up.
Front fog lamps
In conditions where visibility is poor due to
fog, snow or rain, the fog lamps improve
visibility as well as making it easier for other
road users to see you. They can be operated
together with the parking lamps or together
with the parking lamps and low-beam
headlamps.
X To switch on the front fog lamps: turn
the SmartKey in the ignition lock to position
2 or start the engine.
X Turn the light switch to LorÃ. Exterior lighting
97Lights and windshiel dwipers Z