Page 478 of 573

477
uuMaintenance Under the HooduChanging the Engine Oil and Oil Filter
Maintenance
4.Remove the oil filter and dispose of the
remaining oil.
5. Check that the filter gasket is not stuck to
the engine contact surface.
uIf it is stuck, you must detach it.
6. Wipe away dirt and dust adhering to the
contact surface of the engine block, and
install a new oil filter.
uApply a light coat of new engine oil to
the oil gasket.
7. Put a new washer on the drain bolt, then
reinstall the drain bolt.
uTightening torque:
29 lbf�ft (39 N�m, 4.0 kgf�m)
8. Pour the recommended engine oil into the
engine.
uEngine oil change capacity (including
filter):
4.2 US qt (4.0 L)
4.5 US qt (4.3 L)
9. Reinstall the engine oil fill cap securely and
start the engine.
10. Run the engine for a few minutes, and
then check that there is no leak from the
drain bolt or oil filter.
11. Stop the engine, wait for three minutes,
and then check the oil level on the
dipstick.
uIf necessary, add more engine oil.
1Changing the Engine Oil and Oil Filter
You will need a special wrench to replace the oil
filter. You can buy this wrench from a dealer.
When installing the new oil filter, follow the
instructions supplied with the oil filter.
Reinstall the engine oil fill cap. Start the engine. The
low oil pressure indicator should go off within five
seconds. If it does not, turn off the engine, and check your work.4-cylinder models
6-cylinder models
Oil Filter
Oil Filter4-cylinder models
6-cylinder models
Main MenuTable of contents
Page 479 of 573

478
uuMaintenance Under the HooduEngine Coolant
Maintenance
Engine Coolant
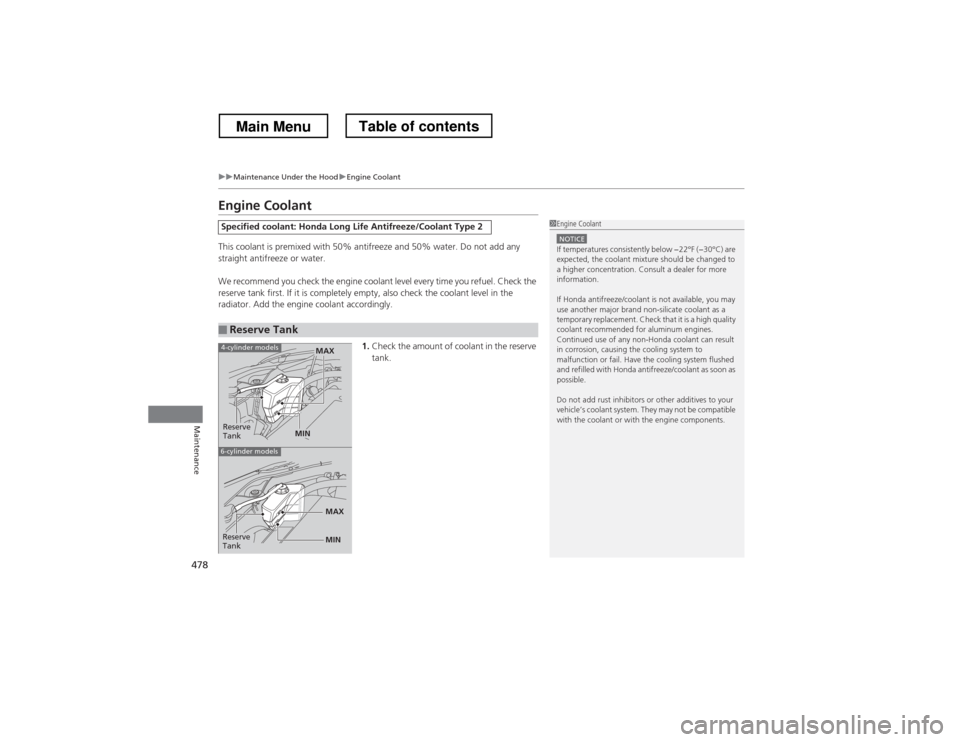
This coolant is premixed with 50% antifreeze and 50% water. Do not add any
straight antifreeze or water.
We recommend you check the engine coolant level every time you refuel. Check the
reserve tank first. If it is completely empty, also check the coolant level in the
radiator. Add the engine coolant accordingly.1.Check the amount of coolant in the reserve tank.
Specified coolant: Honda Long Life Antifreeze/Coolant Type 2
■Reserve Tank
1Engine Coolant
NOTICEIf temperatures consistently below −22°F (−30°C) are
expected, the coolant mixture should be changed to
a higher concentration. Consult a dealer for more information.
If Honda antifreeze/coolant is not available, you may
use another major brand non-silicate coolant as a
temporary replacement. Check that it is a high quality
coolant recommended for aluminum engines.
Continued use of any non-Honda coolant can result
in corrosion, causing the cooling system to
malfunction or fail. Have the cooling system flushed
and refilled with Honda antifreeze/coolant as soon as
possible.
Do not add rust inhibitors or other additives to your
vehicle’s coolant system. They may not be compatible
with the coolant or with the engine components.
Reserve
Tank
MAX
MIN
4-cylinder models
6-cylinder models
MIN
MAXReserve
Tank
Main MenuTable of contents
Page 483 of 573
482
uuMaintenance Under the HooduPower Steering Fluid Check*
Maintenance
Power Steering Fluid Check *
We recommend that you check the power steering fluid level every time you refuel.
Check when the engine is not running. 1.Look at the side of the reservoir. The fluid
should be between the UPPER LEVEL and
LOWER LEVEL .
2. Add power steering fluid if necessary to the
UPPER LEVEL mark.
uInspect the system for a leak. If the fluid
level goes below the LOWER LEVEL
frequently, have the system inspected as
soon as possible.
Specified flui d: Honda Power Steering Fluid
1Power Steering Fluid Check *
NOTICETurning the steering wheel to full left or right lock
and holding it there can damage the power steering
pump.
NOTICEPour the fluid slowly and carefully so you do not spill
any. Clean up any spills immediately; it could damage
components in the engine compartment.
4-cylinder models
LOWER
LEVEL
UPPER LEVEL
* Not available on all models
Main MenuTable of contents
Page 507 of 573

506
Maintenance
Battery
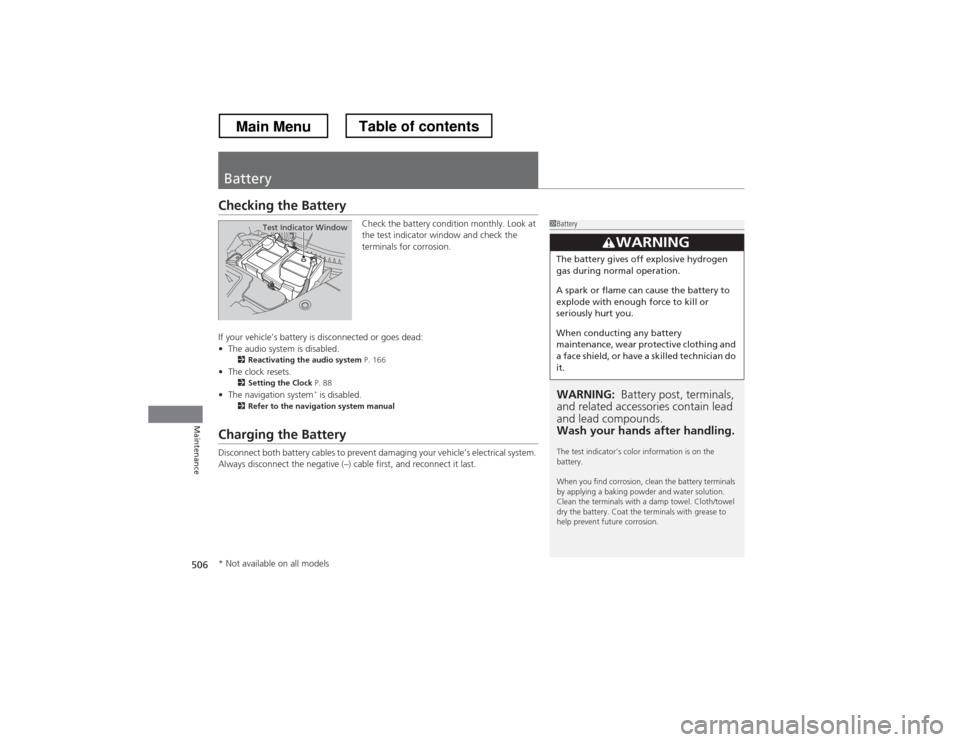
Checking the BatteryCheck the battery condition monthly. Look at
the test indicator window and check the
terminals for corrosion.
If your vehicle’s battery is disconnected or goes dead: • The audio system is disabled.
2 Reactivating the audio system P. 166
• The clock resets.
2 Setting the Clock P. 88
• The navigation system *
is disabled.
2 Refer to the navigation system manual
Charging the Battery
Disconnect both battery cables to prevent damaging your vehicle’s electrical system.
Always disconnect the negative (–) cab le first, and reconnect it last.
1Battery
WARNING: Battery post, terminals,
and related accessories contain lead and lead compounds.
Wash your hands after handling.
The test indicator’s color information is on the battery.
When you find corrosion, clean the battery terminals
by applying a baking powder and water solution.
Clean the terminals with a damp towel. Cloth/towel
dry the battery. Coat the terminals with grease to
help prevent future corrosion.
3WARNING
The battery gives off explosive hydrogen
gas during normal operation.
A spark or flame can cause the battery to
explode with enough force to kill or
seriously hurt you.
When conducting any battery
maintenance, wear protective clothing and
a face shield, or have a skilled technician do it.
Test Indicator Window
* Not available on all models
Main MenuTable of contents
Page 510 of 573
509
Maintenance
Heating and Cooling System*/Climate Control System* Maintenance
Dust and Pollen Filter
The heating and cooling system*
/climate control system *
is equipped with a dust
and pollen filter that collects pollen, dust, and other debris in the air. The
Maintenance Minder TM
messages will let you know when to replace the filter.
We recommend that you replace the dust and pollen filter sooner when using your
vehicle in areas with high concentrations of dust.
1Dust and Pollen Filter
If the airflow from the heating and cooling system *
/
climate control system *
deteriorates noticeably, and
the windows fog up easily, the filter may need to be
replaced. Please contact a dealer for replacement.
* Not available on all models
Main MenuTable of contents
Page 527 of 573
526
uuEngine Does Not StartuIf the Smart Entry Remote Battery is Weak
Handling the Unexpected
If the Smart Entry Remote Battery is Weak
If the beeper sounds, the indicator on the ENGINE START/STOP button flashes,
and the engine won’t start.
Start the engine as follows.
1.Touch the center of the ENGINE START/
STOP button with the H logo on the smart
entry remote while the indicator on the
ENGINE START/STOP button is flashing.
The buttons on the smart entry remote
should be facing you.
uThe indicator flashes for about 30
seconds.
2. Depress the brake pedal and press the
ENGINE START/STOP button within 10
seconds after the beeper sounds and the
indicator stays on.
uIf you don’t depress the pedal, the mode
will change to ACCESSORY.
Models with smart entry system
Main MenuTable of contents
Page 528 of 573
527
uuEngine Does Not StartuEmergency Engine Stop
Handling the Unexpected
Emergency Engine Stop
If you cannot stop the engine by pressing the ENGINE START/STOP button, do
either of the following operations: • Press and hold the ENGINE START/STOP button for about two seconds.
• Firmly press the ENGINE START/STOP button two times.
The steering wheel will not lock.
The power mode changes to VEHICLE OFF with the shift lever in
(P , and to
ACCESSORY with the shift lever in any position other than (P .
Models with smart entry system
1Emergency Engine Stop
Do not press the button while driving unless it is
absolutely necessary for the engine to be switched off.
Main MenuTable of contents
Page 529 of 573
528
Handling the Unexpected
Jump Starting
Turn off the power to electric devices, such as audio and lights. Turn off the engine,
then open the hood.1.Connect the first jumper cable to your vehicle’s battery + terminal.
2. Connect the other end of the first jumper
cable to the booster battery + terminal.
uUse a 12-volt booster battery only.
3. Connect the second jumper cable to the
booster battery - terminal.
■Jump Starting Procedure1Jump Starting
Securely attach the jumper cables clips so that they
do not come off when the engine vibrates. Also be
careful not to tangle the jumper cables or allow the
cable ends to touch each other while attaching or
detaching the jumper cables.
3WARNING
A battery can explode if you do not follow
the correct procedure, seriously injuring
anyone nearby.
Keep all sparks, open flames, and smoking
materials away from the battery.
Booster Battery
4-cylinder models
6-cylinder models
Booster Battery
Main MenuTable of contents