2013 DACIA SANDERO lights
[x] Cancel search: lightsPage 42 of 146
rear screendemisting .........................................................(current page)
1.38
ENG_UD5559_1tableau de bord : Témoins lumineux (B90 - Dacia)ENG_NU_817-2_NU_Dacia_1
INSTRUMENT PANEL: warning lights (continued)
The presence and operation of the warning lights DEPEND ON THE EQUIPMENT\
AND COUNTRY.
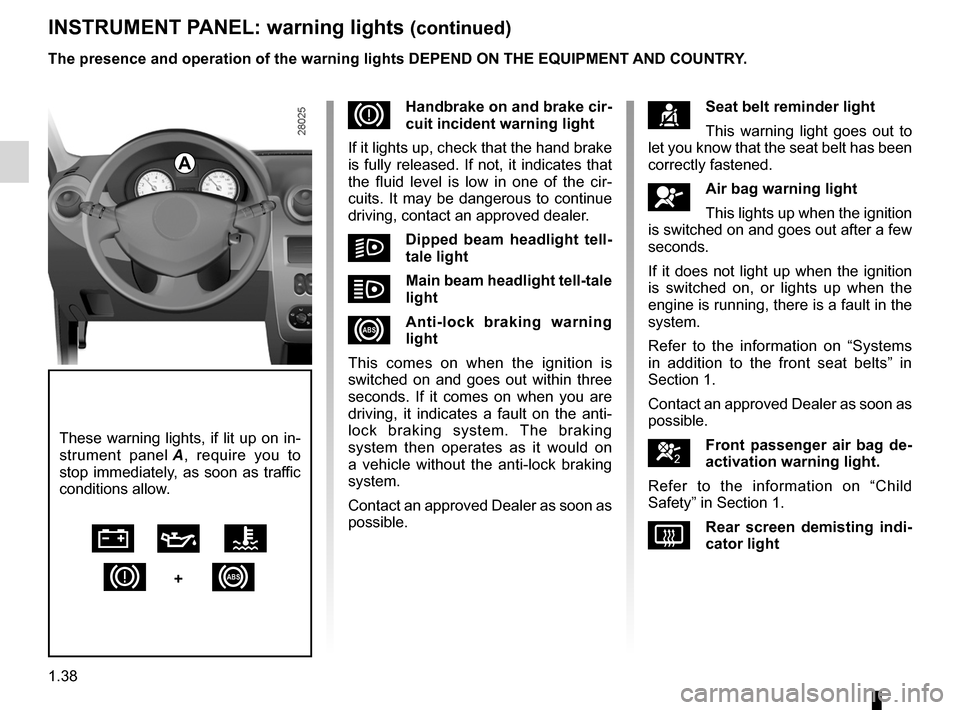
DHandbrake on and brake cir- cuit incident warning light
If it lights up, check that the hand brake is fully released. If not, it indicates that the fluid level is low in one of the cir- cuits. It may be dangerous to continue driving, contact an approved dealer.
mDipped beam headlight tell- tale light
oMain beam headlight tell-tale
light
xAnti-lock braking warning light
This comes on when the ignition is switched on and goes out within three seconds. If it comes on when you are driving, it indicates a fault on the anti- lock braking system. The braking system then operates as it would on a vehicle without the anti-lock braking system.
Contact an approved Dealer as soon as possible.
çSeat belt reminder light
This warning light goes out to let you know that the seat belt has been correctly fastened.
åAir bag warning light
This lights up when the ignition is switched on and goes out after a few seconds.
If it does not light up when the ignition
is switched on, or lights up when the engine is running, there is a fault in the system.
Refer to the information on “Systems in addition to the front seat belts” in Section 1.
Contact an approved Dealer as soon as possible.
]Front passenger air bag de- activation warning light.
Refer to the information on “Child Safety” in Section 1.
VRear screen demisting indi- cator light
These warning lights, if lit up on in-
strument panel A, require you to stop immediately, as soon as traffic conditions allow.
ÚÀÔ
D+x
A
Page 43 of 146
overspeed buzzer ..................................................(current page)control instruments ...............................(up to the end of the DU)instrument panel ...................................(up to the end of the DU)warning lights........................................(up to the end of the DU)
1.39
ENG_UD5560_1Tableau de bord : afficheur et indicateur (B90 - Dacia)ENG_NU_817-2_NU_Dacia_1
INSTRUMENT PANEL: displays and indicators
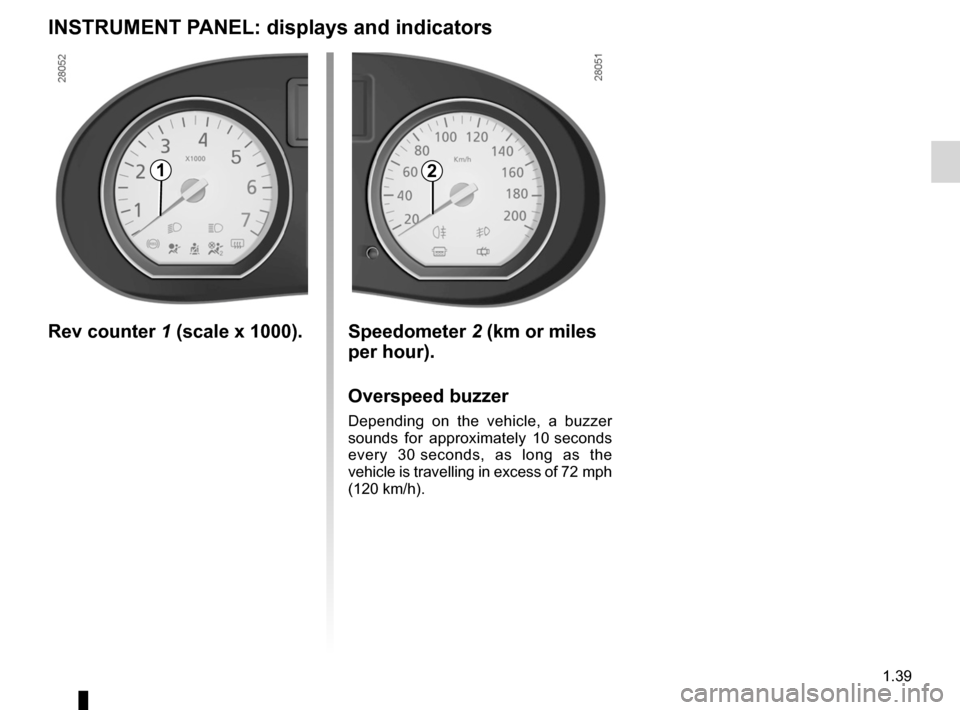
Rev counter 1 (scale x 1000). Speedometer 2 (km or miles
per hour).
Overspeed buzzer
Depending on the vehicle, a buzzer
sounds for approximately 10 seconds
every 30 seconds, as long as the
vehicle is travelling in excess of 72 mph
(120 km/h).
21
Page 45 of 146

control instruments ...............................(up to the end of the DU)trip computer and warning system........(up to the end of the DU)warning lights........................................(up to the end of the DU)
1.41
ENG_UD5561_1Ordinateur de bord (B90 - Dacia)ENG_NU_817-2_NU_Dacia_1
Ordinateur de bord
TRIP COMPUTER AND w ARNING SYSTEM
Display 1
General reset and trip
mileage recorder reset key
2
To reset the trip mileage recorder, the display must show the Trip mileometer function.
Press and hold button
2.
Display selection key 3
Keep pressing key 3 briefly to scroll through the following information (de- pending on the vehicle) in sequence:
a) total mileage recorder,b) trip mileage recorder,c) fuel used,d) average consumption,e) estimated range,f) distance travelled,g) average speed.
Refer to the table on the following pages showing display examples.
The information displayed DEPENDS ON THE VEHICLE EQUIPMENT AND COUNTRY.
1
23
Page 50 of 146
lighting:exterior ............................................(up to the end of the DU)lights:dipped beam headlights ...................................(current page)lights:side lights .........................................................(current page)lights:main beam headlights ......................................(current page)lights .....................................................(up to the end of the DU)signals and lights ..................................(up to the end of the DU)control instruments ...............................(up to the end of the DU)
1.46
ENG_UD5563_1Éclairages et signalisations extérieures (B90 - Dacia)ENG_NU_817-2_NU_Dacia_1
JauneNoirNoir texte
Éclairages et signalisations extérieurs
EXTERIOR LIGHTING AND SIGNALS
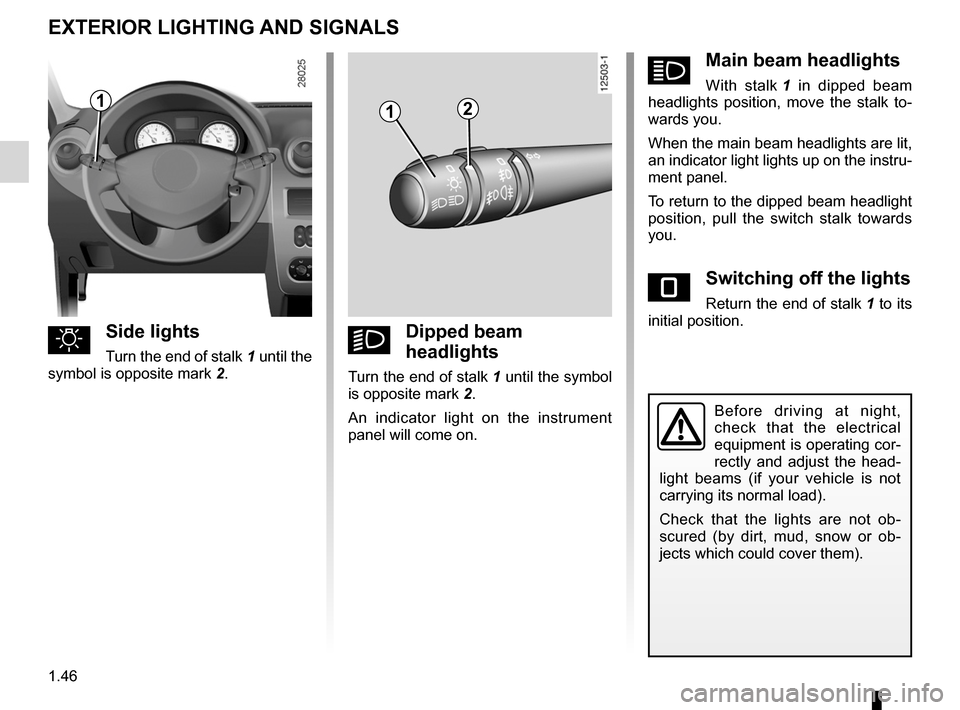
uSide lights
Turn the end of stalk 1 until the
symbol is opposite mark 2.
kDipped beam
headlights
Turn the end of stalk 1 until the symbol
is opposite mark 2.
An indicator light on the instrument panel will come on.
áMain beam headlights
With stalk 1 in dipped beam headlights position, move the stalk to- wards you.
When the main beam headlights are lit, an indicator light lights up on the instru- ment panel.
To return to the dipped beam headlight position, pull the switch stalk towards you.
eSwitching off the lights
Return the end of stalk 1 to its initial position.
Before driving at night, check that the electrical equipment is operating cor- rectly and adjust the head- light beams (if your vehicle is not
carrying its normal load).
Check that the lights are not ob- scured (by dirt, mud, snow or ob- jects which could cover them).
112
Page 51 of 146

warning buzzer ......................................................(current page)fog lights ................................................................(current page)lights:fog lights ..........................................................(current page)
JauneNoirNoir texte
1.47
ENG_UD5563_1Éclairages et signalisations extérieures (B90 - Dacia)ENG_NU_817-2_NU_Dacia_1
EXTERIOR LIGHTING AND SIGNALS (continued)
When the exterior vehicle lights are ex- tinguished, the rear fog light is extin- guished or the equipment returns to the front lights position (if they are fitted).
Lights-on reminder buzzer
A warning buzzer will sound when a front door is opened and the lights are left on after the ignition has been switched off (to prevent discharge of the battery).
gFront fog lights
Turn the centre ring of stalk 3
until the symbol is opposite mark 4.
The fog lights only light up if the exterior lights have been switched on. An indi- cator light on the instrument panel then lights up.
Do not forget to switch off the fog lights when they are no longer needed, to avoid inconveniencing other road users.
hRear fog lights
Turn the centre ring of
stalk 3 until the symbol is opposite
mark 4.
The fog lights only light up if the exterior lights have been switched on. An indi- cator light on the instrument panel then lights up.
Remember to switch off the these lights when they are no longer required to avoid inconveniencing other road users.
343
Page 52 of 146
lights:adjusting .........................................(up to the end of the DU)lights .....................................................(up to the end of the DU)lightsadjustment ......................................(up to the end of the DU)headlight beam adjustment ..................(up to the end of the DU)
1.48
ENG_UD5564_1Réglage de la hauteur des faisceaux (B90 - Dacia)ENG_NU_817-2_NU_Dacia_1
Réglage des projecteurs
ADJUSTMENT OF HEADLIGHT BEAM HEIGHT
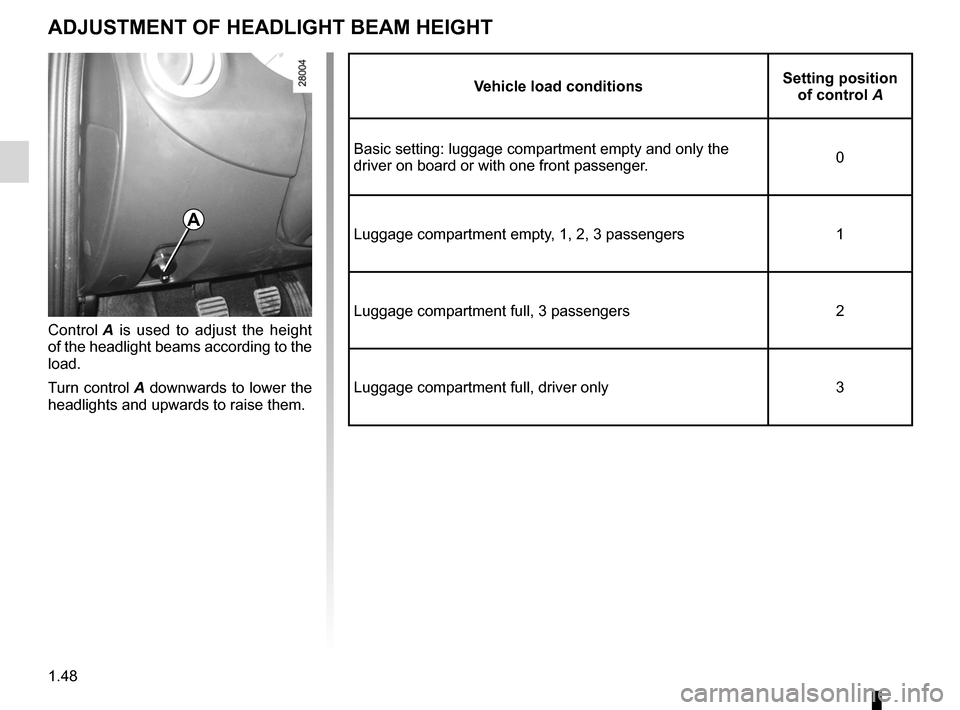
Control A is used to adjust the height of the headlight beams according to the load.
Turn control
A downwards to lower the headlights and upwards to raise them.
vehicle load conditionsSetting position of control A
Basic setting: luggage compartment empty and only the driver on board or with one front passenger.0
Luggage compartment empty, 1, 2, 3 passengers1
Luggage compartment full, 3 passengers2
Luggage compartment full, driver only3
A
Page 53 of 146
headlight flashers .................................(up to the end of the DU)horn ......................................................(up to the end of the DU)indicators ..............................................(up to the end of the DU)lights:direction indicators ..........................(up to the end of the DU)lights:hazard warning ...............................(up to the end of the DU)indicators:direction indicators ..........................(up to the end of the DU)hazard warning lights signal .................(up to the end of the DU)hazard warning lights signal .................(up to the end of the DU)
1.49
ENG_UD5565_1Avertisseurs sonore et lumineux (B90 - Dacia)ENG_NU_817-2_NU_Dacia_1
Avertisseurs sonores et lumineux
AUDIBLE AND vISUAL SIGNALS
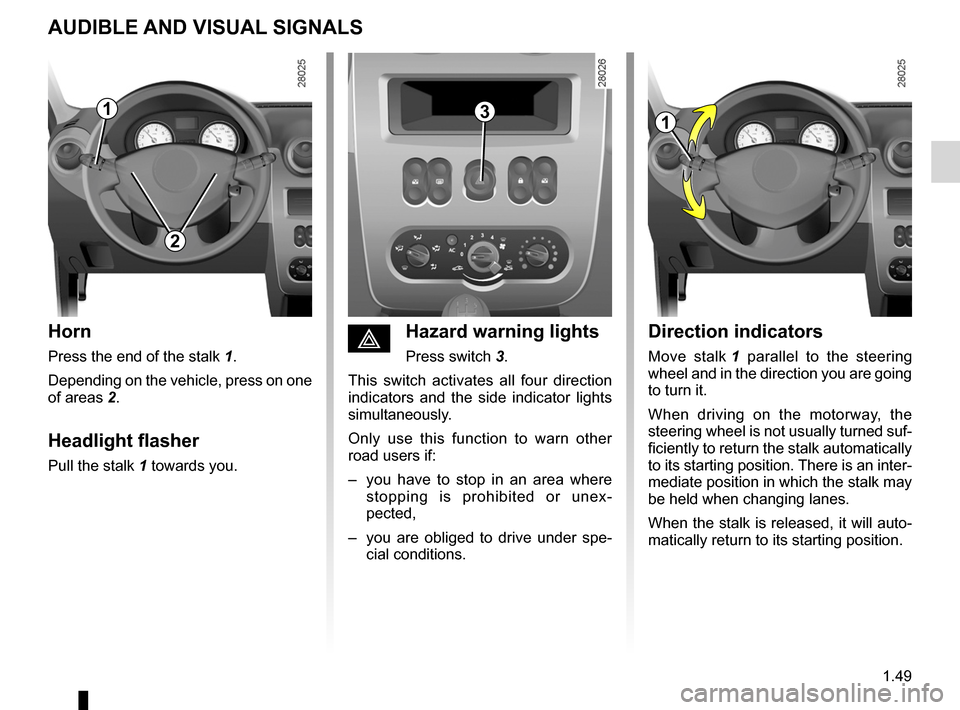
Horn
Press the end of the stalk 1.
Depending on the vehicle, press on one
of areas 2.
Headlight flasher
Pull the stalk 1 towards you.
Direction indicators
Move stalk 1 parallel to the steering wheel and in the direction you are going to turn it.
When driving on the motorway, the steering wheel is not usually turned suf- ficiently to return the stalk automatically to its starting position. There is an inter- mediate position in which the stalk may
be held when changing lanes.
When the stalk is released, it will auto- matically return to its starting position.
éHazard warning lights
Press switch 3.
This switch activates all four direction indicators and the side indicator lights simultaneously.
Only use this function to warn other road users if:
– you have to stop in an area where
stopping is prohibited or unex- pected,
– you are obliged to drive under spe
- cial conditions.
113
2
Page 54 of 146
wipers ....................................................................(current page)windscreen washer ................................................(current page)
1.50
ENG_UD7652_2Essuie-vitre/Lave-vitre/Dégivrage (B90 - L90 Ph2 - Dacia)ENG_NU_817-2_NU_Dacia_1
JauneNoirNoir texte
Wiper/Windscreen washer/De-icing
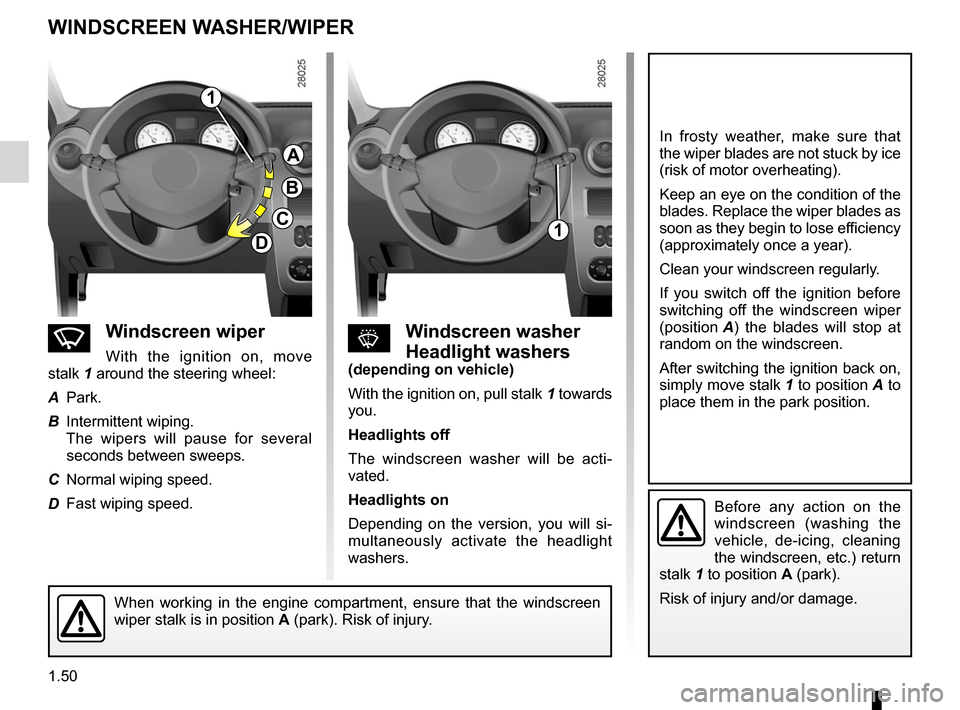
nw indscreen wiper
With the ignition on, move
stalk 1 around the steering wheel:
A
Park.
B
Intermittent wiping.
The wipers will pause for several seconds between sweeps.
C
Normal wiping speed.
D
Fast wiping speed.
sw indscreen washer
Headlight washers(depending on vehicle)
With the ignition on, pull stalk
1 towards you.
Headlights off
The windscreen washer will be acti- vated.
Headlights on
Depending on the version, you will si- multaneously activate the headlight washers.
In frosty weather, make sure that the wiper blades are not stuck by ice (risk of motor overheating).
Keep an eye on the condition of the blades. Replace the wiper blades as soon as they begin to lose efficiency (approximately once a year).
Clean your windscreen regularly.
If you switch off the ignition before switching off the windscreen wiper
(position A) the blades will stop at random on the windscreen.
After switching the ignition back on,
simply move stalk 1 to position A to place them in the park position.
Before any action on the windscreen (washing the vehicle, de-icing, cleaning the windscreen, etc.) return
stalk 1 to position A (park).
Risk of injury and/or damage.When working in the engine compartment, ensure that the windscreen wiper stalk is in position A (park). Risk of injury.
1
A
B
C
D1
wINDSCREEN w ASHER/wIPER