Page 106 of 146

changing a wheel..................................(up to the end of the DU)practical advice .....................................(up to the end of the DU)jack .......................................................(up to the end of the DU)puncture................................................(up to the end of the DU)lifting the vehiclechanging a wheel ............................(up to the end of the DU)
5.6
ENG_UD5600_1Changement de roue (B90 - Dacia)ENG_NU_817-2_NU_Dacia_5
Changement de roue
CHANGING A WHEEL
Park the vehicle away from traffic and on level ground which is not slippery (place a plank under the jack if necessary). Switch on the hazard warning lights.
Apply the hand brake and engage a gear (first or reverse).
Ask all the passengers to leave the vehicle and keep them away from traffic.
If you have a puncture, re-
place the wheel as soon as possible.
A tyre which has been punc- tured should always be inspected (and repaired, where possible) by a specialist.
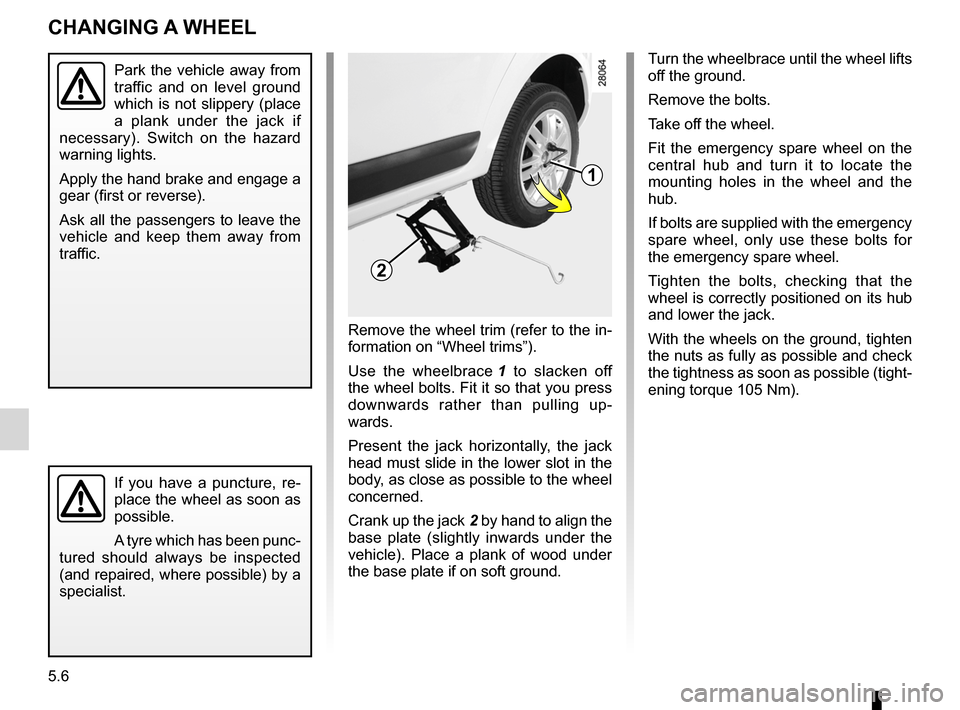
Remove the wheel trim (refer to the in- formation on “Wheel trims”).
Use the wheelbrace
1 to slacken off the wheel bolts. Fit it so that you press downwards rather than pulling up- wards.
Present the jack horizontally, the jack head must slide in the lower slot in the body, as close as possible to the wheel concerned.
Crank up the jack
2 by hand to align the base plate (slightly inwards under the vehicle). Place a plank of wood under the base plate if on soft ground.
Turn the wheelbrace until the wheel lifts off the ground.
Remove the bolts.
Take off the wheel.
Fit the emergency spare wheel on the central hub and turn it to locate the mounting holes in the wheel and the hub.
If bolts are supplied with the emergency spare wheel, only use these bolts for the emergency spare wheel.
Tighten the bolts, checking that the wheel is correctly positioned on its hub and lower the jack.
With the wheels on the ground, tighten the nuts as fully as possible and check the tightness as soon as possible (tight- ening torque 105 Nm).
1
2
Page 111 of 146

bulbschanging .........................................(up to the end of the DU)changing a bulb ....................................(up to the end of the DU)indicators ...............................................................(current page)practical advice .....................................(up to the end of the DU)lighting:exterior ............................................(up to the end of the DU)lights:dipped beam headlights ..................(up to the end of the DU)lights:direction indicators ..........................(up to the end of the DU)lights:side lights ........................................(up to the end of the DU)lights:main beam headlights .....................(up to the end of the DU)bulbschanging .........................................(up to the end of the DU)
5.11
ENG_UD5603_1Feux avant : remplacement des lampes (B90 - Dacia)ENG_NU_817-2_NU_Dacia_5
Remplacement des lampesFeux avant
Main beam headlights,
dipped beam headlights
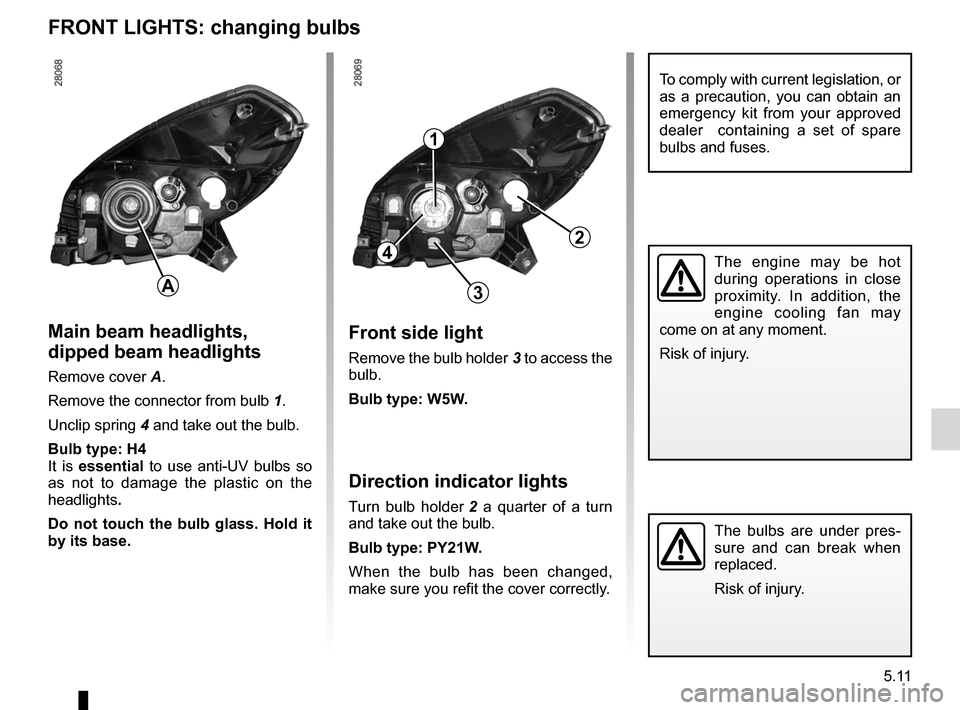
Remove cover A.
Remove the connector from bulb
1.
Unclip spring
4 and take out the bulb.
Bulb type: H4It is essential to use anti-UV bulbs so as not to damage the plastic on the headlights.
Do not touch the bulb glass. Hold it by its base.
The engine may be hot during operations in close proximity. In addition, the engine cooling fan may come on at any moment.
Risk of injury.
The bulbs are under pres- sure and can break when replaced.
Risk of injury.
Direction indicator lights
Turn bulb holder 2 a quarter of a turn and take out the bulb.
Bulb type: PY21W.
When the bulb has been changed, make sure you refit the cover correctly.
Front side light
Remove the bulb holder 3 to access the bulb.
Bulb type: W5W.
FRONT LIGHTS: changing bulbs
To comply with current legislation, or as a precaution, you can obtain an emergency kit from your approved dealer containing a set of spare bulbs and fuses.
A
1
42
3
Page 112 of 146

bulbschanging .........................................(up to the end of the DU)changing a bulb ....................................(up to the end of the DU)practical advice .....................................(up to the end of the DU)lighting:exterior ............................................(up to the end of the DU)lights:fog lights .........................................(up to the end of the DU)bulbschanging .........................................(up to the end of the DU)lightsadditional ........................................(up to the end of the DU)
5.12
ENG_UD5604_1Projecteurs antibrouillard : remplacement des lampes (B90 - Dacia)ENG_NU_817-2_NU_Dacia_5
Additional lights
If you wish to fit fog lights or long range headlights to your vehicle, consult an approved Dealer.
Feux de brouillard
FOG LIGHTS: changing bulbs
Cleaning the headlights
As the headlights are made of plastic glass, use a soft cloth or cotton wool to clean them.
If this does not clean it properly, use a soft cloth (or cotton wool) slightly mois- tened with soapy water and then wipe clean with a soft damp cloth or cotton wool.
Finally, dry off carefully with a soft dry cloth.
Cleaning products containing alco- hol must not be used under any cir- cumstances.
Front fog lights 1
Changing a bulbContact an approved dealer.
Bulb type: H11.
Any operation on (or modi- fication to) the electrical system must be performed by an approved Dealer since an incorrect connection might damage the electrical equipment
(harness, components and in partic- ular the alternator). In addition, your Dealer has all the parts required for fitting these units.
The engine may be hot during operations in close proximity. In addition, the engine cooling fan may come on at any moment.
Risk of injury.
1
Page 113 of 146

bulbschanging .........................................(up to the end of the DU)changing a bulb ....................................(up to the end of the DU)practical advice .....................................(up to the end of the DU)lighting:exterior ............................................(up to the end of the DU)lights:reversing lights .................................................(current page)lights:brake lights ......................................................(current page)bulbschanging .........................................(up to the end of the DU)
5.13
ENG_UD5605_1Feux arrière : remplacement des lampes (B90 - Dacia)ENG_NU_817-2_NU_Dacia_5
Feux arrière
Remove screw
1 and detach the rear light cluster from the outside. Detach the foam 2.
Carefully unclip the bulb holder by
pressing on the tabs 3. 4
Side light and brake lightPear-shaped, bayonet type bulb with two P 21/5 W filaments.
5
Direction indicator lightPear-shaped, bayonet type bulb,
P 21 W or PY 21 W (depending on the vehicle).
6
Reversing lightPear-shaped, bayonet type bulb,
P 21 W. orRear fog lightPear-shaped, bayonet type P 21 W bulb
REAR LIGHTS: changing bulbs
1
2
3
4
5
6
The bulbs are under pres- sure and can break when replaced.
Risk of injury.
Page 114 of 146
lights:reversing lights .................................................(current page)lights:brake lights ......................................................(current page)
5.14
ENG_UD5605_1Feux arrière : remplacement des lampes (B90 - Dacia)ENG_NU_817-2_NU_Dacia_5
Turn the bulb holder 9 a quarter of a turn, release it and take out the bulb.
Bulb type: P 21 W.
REAR LIGHTS: changing bulbs (continued)
The bulbs are under pres- sure and can break when replaced.
Risk of injury.
High-level brake light 7The bulb for the high-level brake light 7 may be accessed through the luggage compartment.Carefully unclip the bulb holder by
pressing on the tabs 8.
Number plate light 10
Release it using a flat-blade screw- driver tool or similar.
Unclip the lens
11 from the bulb holder to gain access to the bulb.
Bulb type: W 5 W.
7
89
11
10
Page 115 of 146
bulbschanging .........................................(up to the end of the DU)changing a bulb ....................................(up to the end of the DU)practical advice .....................................(up to the end of the DU)lighting:exterior ............................................(up to the end of the DU)bulbschanging .........................................(up to the end of the DU)indicator lights.......................................(up to the end of the DU)
5.15
ENG_UD5606_1Répétiteurs latéraux : remplacement des lampes (B90 - Dacia)ENG_NU_817-2_NU_Dacia_5
Répétiteurs latéraux
INDICATOR LIGHTS: changing bulbs
Unclip the indicator light 1 (using a flat- blade screwdriver or similar). Turn bulb holder
2 a quarter of a turn and take out the bulb.
Bulb type with white indicator light: WY5W.
Bulb type with orange indicator light: W5W.
The bulbs are under pres- sure and can break when replaced.
Risk of injury.
1
2
Page 116 of 146
bulbschanging .........................................(up to the end of the DU)changing a bulb ....................................(up to the end of the DU)practical advice .....................................(up to the end of the DU)lighting:interior .............................................(up to the end of the DU)bulbschanging .........................................(up to the end of the DU)
5.16
ENG_UD5607_1Eclaireurs intérieurs : remplacement des lampes (B90 - Dacia)ENG_NU_817-2_NU_Dacia_5
JauneNoirNoir texte
Éclaireurs intérieurs
INTERIOR LIGHTS: changing bulbs
Courtesy light
Unclip the cover 1 (using a flat-blade screwdriver or similar).
Remove the bulb concerned.
Bulb type 2: W5W.
12
Page 117 of 146
JauneNoirNoir texte
5.17
ENG_UD5607_1Eclaireurs intérieurs : remplacement des lampes (B90 - Dacia)ENG_NU_817-2_NU_Dacia_5
INTERIOR LIGHTS: changing bulbs (continued)
Press tab 4 to release the lens and
access bulb 5.
Bulb type: W5W.
Glove box light(depending on the vehicle)
Unclip light
3 by pressing the tab (using a flat-blade screwdriver or similar).
Disconnect the light.
4
5
3