Page 257 of 294

@ Tips
-Never use the hexagonal socket in the
handle of the screwdriver to loosen or
tighten the wheel bolts.
- If a whee l bolt is very tight, you may find
it easier to loosen by carefully pushing
down on the end of the wheel bolt
wrench w ith
one foot only. As you do so,
hold on to the car to keep your ba lance
and take ca re not to slip.
Raising the vehicle
The vehicle must be li~ed with the jack first
before the wheel can be removed .
Fig. 1 85 Sill pane ls: ma rki ngs
Fi g. 186 Sill: posit ion ing the ve hicle jack
The location of the jack point is indica ted by
a n in den ta ti on on the underside of the vehicle
Q fig . 185.
"' Activate the parking brake to prevent the
vehicle from ro lling u ninten tionally.
"' Sh ift into
1 st gear on vehicles with m anua l
transmission or move the se lector lever to
the P position on vehicles with automatic
transmission* .
"' Find the
mark ing (imprint) on the sill that
is nearest the wheel that will be changed
What do I d o now ? 255
¢ fig. 185. Behind the marking, there is a
lifting point on the sill for the vehicle jack.
"' Turn the
vehicle jack located under the lift
ing point on the sill to ra ise the jack until
the jaw ¢
fig. 186 @ covers the notch on
the vehicle
¢ & ¢ (D .
"' Align the vehicle jack so the jaw@ covers
th e notch and the base plate @ is flat on
the floor. The base plate @ must be
vertical
unde r th e lift ing po in t @ .
"' Insta ll the rod on the vehi cle jack: Insert
the rod into the opening on the handwheel.
Turn the rod left or right to secure it.
"' Cont inue raising the jack w ith the rod unt il
the wheel lifts off the ground slightly.
Position the veh icle jack
only under the desig
nated lifting points on the sill ¢
fig. 185 .
There is exactly one location for each wheel.
The jack must not be positioned at any other location
¢ ,&. ¢(I) .
Soft ground under the jack can cause the ve
hicle to slip off the jack. Always place the jack
on f irm ground. Use a f lat, stab le support if
necessary . Use a non-slip surface such as a
rubber mat on a
s lipp ery surface such as tile .
A WARNING
-You or your passengers co uld be in ju red
while c hanging a whee l if you do no t fo l
low these safety p re ca utions:
- Position t he veh icle jack on ly at the
designated lifting poi nts and align the
jack. Otherw ise, the vehicle jack could
slip a nd cause an injury if it does not
have sufficie nt hold o n the vehicle.
- A soft or unstable surface under the
jac k may cause the ve hicle to slip off
the jack . A lways prov ide a fi rm base for
the jack o n the ground. If necessa ry,
u se a st ur dy boa rd under the jack .
- On hard, sl ippery su rface (such as t iles)
u se a rubber mat or simi lar to prevent
the j ack from slipping.
- T o help preve nt injury to yo urself and
your pas sengers:
Page 258 of 294

256 What do I do now?
-Do not raise the vehicle unti l yo u are
sure the jack is securely engaged.
- Passengers must not remain in the ve
h icle when it is jacked up.
- Make sure that passengers wait in a
safe p lace away from the vehicle and
well away from the road and traffic.
- Make sure jack position is correct, ad
just as necessary and then continue to ra ise the jack.
CD Note
Do not lift the vehicle by the sill. Position
the vehicle jack only at the designated lift
ing points on the sill. Otherwise, your vehi
cle will be damaged.
Taking the wheel off/installing the spare
tire
Follow these instructions step-by-step for
changing the wheel .
Fig. 187 Changing a w hee l: usi ng the screwdriver han ·
dle (with the blade r~mo ved) to turn th e bo lts
Fig. 188 C hangin g a w hee l: alig nmen t pin inside the
to p hole
After you have loosened a ll wheel bolts and
ra ised the veh icle off the ground, remove and
replace the wheel as follows:
Removing the wheel
.,. Remove the topmost whee l bolt completely
with the
hexagonal socket in the screwdriv
er handle (vehicle tool kit)¢
fig. 187 and
set it aside on a
clean surface .
.,. Screw the threaded end of the
alignment
pin
from the tool kit hand-t ight into the
empty bolt hole ¢
fig. 188.
.,. Then remove the other wheel bolts as de
scribed above.
.,. Ta ke off the wheel leaving the alignment
pin in the bolt hole
c::>(D .
Putting on the inflatable spare tire
.,. Push the spare tire over the alignment p in.
.,. Screw on the wheel bolts and tighten them
slightly using the hexagonal socket .
.,. Remove the alignment pin and insert and
tighten the remain ing wheel bolt slightly
like the rest.
.,. Turn the jack hand le counter -clockwise to
lower the veh icle until the jack is fully re
leased .
.,. Use the wheel bolt wrench to tighten all
wheel bolts firmly
c::> page 254 . Tighten
them
in a crisscross pattern, from one bolt
to the (approximately) opposite one, to keep
the wheel centered .
.,. Perform the steps required after changing
the wheel
c::> page 253, After changing a
wheel.
T he hexagonal socket ma kes it easier to re
move the wheel bolts from the rim. Care
should be tak en when removing the reversible
blade .
CD Note
When removing or installing the wheel,
the rim could hit the brake rotor and dam
age the rotor. Work carefu lly and have a
second person to help you.
(D Tips
-When mounting tires with unidirectional
tread design
make sure the tread pat
tern is pointed the right way
c::>page257. ..,.
Page 259 of 294

-The wheel bol ts should be clean and easy
to tu rn. Check for d irt and corrosion on
t h e mat ing s urfaces of both the whee l
and t he hu b. Remove a ll dirt from these
su rfaces before remo unt ing t he wheel.
- Do n ot use the hexagonal socket in the
screwdriver ha ndle to loosen or tig hten
t h e wheel bo lts .
Tires with unidirectional tread design
Tires with unidirectional tread design must be
mounted with their tread pattern pointed in the right direction.
Using a spare tire with a tread pattern
intended for use in a specific direction
When using a spare tire w ith a t read patte rn
i ntended for use in a specific direction, please
n ot e th e follow ing:
- The direction of rotation is ma rked by an
ar
row on the s ide of the t ire .
-If the spare t i re has to be installed in the in
correct di rection, use the spare tire only
temporar ily since the t ire will not be able to
achieve its optimum perfo rma nce character
ist ics with r ega rd to aquaplani ng, noise and
wea r.
- We recommend that you pay particular at
tent io n t o this fact du ring wet weathe r and
t h at you adjus t your spee d to matc h road
cond itio ns.
- Replace th e flat tire w ith a n ew one and
have it ins talled o n your ve hicle as soon as
poss ible to re st ore the hand ling advant ages
of a uni direct io na l t ire .
Notes on wheel changing
Please rea d the information ¢ page 241, New
tires and replacing tires and wheels
if you are
going to use a spare t ire which is different
from the tires on your ve hicle.
Afte r you change a tire :
-Check the tire pressure on the spare imme
diately after installation . What do I do now? 257
- Have the wheel bolt tightening torque
checked with a torque wrench as soon a s
possible by your authorized Audi dealer or
a qualified workshop .
- With steel and alloy wheel rims , the wheel
bolts are cor rectly tightened at a torque of
90 ft lbs. (120 Nm ).
- If you notice that the wheel bolts are cor·
roded and difficult to turn while changing
a tire, they should be replaced before you
check the tightening torque .
- Replace the flat tire with a new one and
have it installed on your veh icle as soon as
possible. Remount the wheel cover.
Until then , drive with extra care and at re·
duced speeds.
A WARNING
-
- If you are going to equ ip your ve hicle
w it h tires o r rims which differ from those
which w ere fac to ry installed, t hen be
s ure to re ad the information ¢
page 241 ,
N ew tire s and re pla cing tires and
whee ls.
- Always make s ure th e da maged wheel o r
eve n a flat t ire and t he j ack and to ol ki t
a re p roperly secu red in the lugg age com
pa rtment an d are no t loose in the pas
sen ger compartment.
- In an accident or sud den maneuver they
co uld f ly forwa rd, in ju ring a nyo ne in the
ve hicle .
-A lways s to re damage d wheel, jack and
too ls sec urely in the luggage compa rt
ment . Othe rwise, in a n accident o r su d
den maneuver they co uld f ly forwa rd,
causing inju ry to passengers in the ve hi·
cle.
~ Note
Do not use comme rcially ava ilab le tire
sea lants. Ot herwise, t he e lectr ica l comp o
n ents of t he tire pressu re monitoring sys
t em * w ill no longe r work pr operly and the
senso r fo r th e tire pressure moni tor ing
syst em* will have to be replac ed by a
qu alified wor kshop . •
•
Page 260 of 294

258 Fuses a nd bulb s
Fuses and bulbs
Fuses
Replacing a fuse
Fuses that have blown will have metal strips
that have burned through.
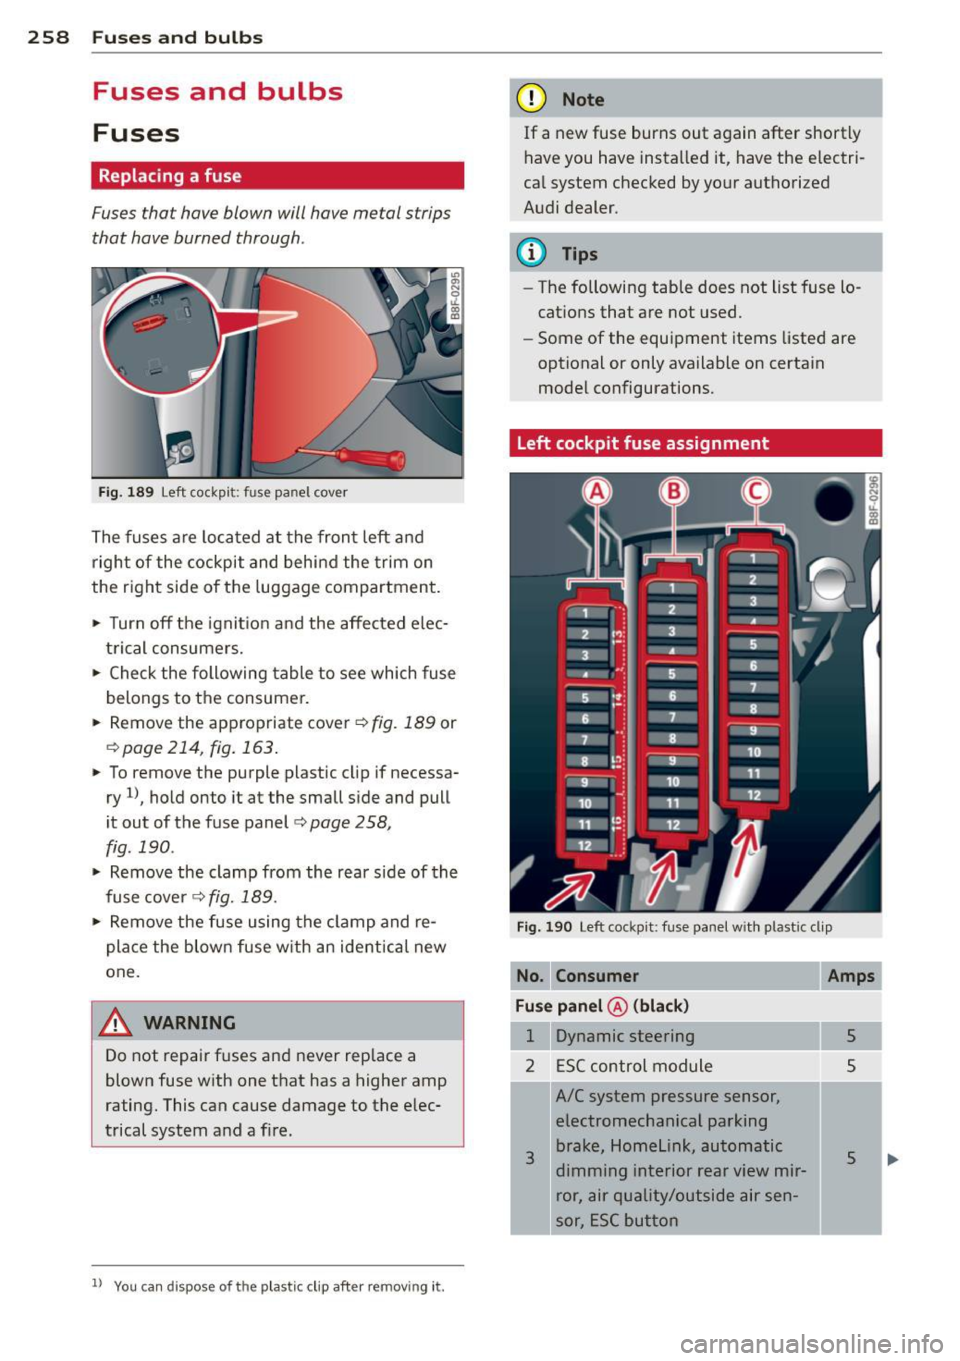
Fig. 189 Left cockpit: fuse panel cover
The fuses are located at the front left and
right of the cockpit and behi nd the trim on
the right side of the luggage compartment.
• Turn off the ignit ion and the affected elec
trical consumers.
• Check the following table to see which fuse
belongs to the consumer.
• Remove the appropriate cover ¢
fig. 189 or
¢page 214, fig.163.
• To remove the purple plastic cl ip if necessa
ry
1l, hold onto it at the small side and pull
it out of the fuse panel
c:> page 258,
fig. 190 .
• Remove the clamp from the rear side of the
fuse cover ¢
fig. 189.
• Remove the fuse using the clamp and re
pla ce the blown fuse w ith an ident ical new
one.
A WARNING
Do not repair fuses and never replace a
blown fuse with one that has a higher amp
rating. This can cause damage to the elec
trical system and a fire.
ll You can dis pose of the plastic clip after removing it.
(D Note
If a new fuse burns out again after shortly
have you have installed it, have the electri
cal system checked by your authorized
Audi dealer.
(D Tips
- The following table does not list fuse lo
cations that are not used.
- Some of the equipment items listed are
optional or only available on certain
model configurations.
Left cockpit fuse assignment
Fig. 190 Left cockpit: fuse panel with plastic clip
No. Consum er
Fu se pan el@ (bl ack)
1 Dynamic steering
2 ESC control module
3
A/C system pressure sensor,
electromechanical parking brake, Homelink, automatic
dimming interior rear view mir ror, air quality/outside air sen
sor, ESC button
Amp s
5
5
5
Page 261 of 294

Fuses and bulbs 259
-No. No. Consumer Amps
5 Sound
actuato r/exhaust sound
5/15
tuning 6
Windshield washer system,
35
headlight washer system
.
6 Headlight range control sys-
5/7,5
tern/cornering light 7 Vehicle electrical system control
20
module 1
7 Headlight (cornering light) 7,5
Control modules (electrome-
8
Vehicle electrical system control
30
module 1
'
8
chanical parking brake, shock
5
absorber, quattro sport, trailer
hitch), DCDC converter 9 Sunroof 20
10 Vehicle electrical system control
30
module
1
9 Adaptive cruise control 5
11 Sun shade motor 20
10 Shift gate
5
11 Side assist 5 12 Anti-theft alarm
warning sys-
5
tern
I 12 Headlight range control, park-
5
ing system
Right cockpit fuse assignment
13 Airbag 5
14 Rear wiper (allroad) 15
15 Auxiliary fuse (instrument pan-
10
el)
I 16 Auxiliary fuse terminal 15 (en-
40
gine area)
Fuse panel @ (brown)
2 Brake light sensor 5
3 Fuel pump
25
4
5 Left seat
heating with/without
15/30
seat ventilation
6
7 Horn Front left door (window regula-
8 tor, central locking, mirror, 30
switch, lighting)
Fig. 191 Right cockpit : fuse panel with plastic cl ip
9 Wiper motor 30
10 ESC 25
No. Consumer Amps
Two-door models: rear left win-Fuse panel @ (black)
dow regulator, Four-door mod- 5 Steering column switch module 5
11
els:
rear left door (window regu-
30
lator, central locking, switch, 7 Terminal 15 diagnostic connec-
5
tor
lighting)
12 Rain and light sensor 5
8
Gateway (Databus diagnostic
5
interface)
-..
Fuse panel © (red) 9 supplementary heater 5
3
Fuse panel @ (brown)
4 Dynamic steering
1 CD/DVD player 5
Page 262 of 294

260 Fuses a nd bulb s
I
-No. Consumer
2 Wi-Fi
3 MMI/Radio
4 Instrument cluster
5 Ga
teway (instrument cluster
control module)
6 Ignition lock
7 L igh t switch
8 Climate control system blower
9 Steer ing column lock
10 Climate control system
11 Termina
l 30 diagnostic connec-
tor
12 Steering column switch module
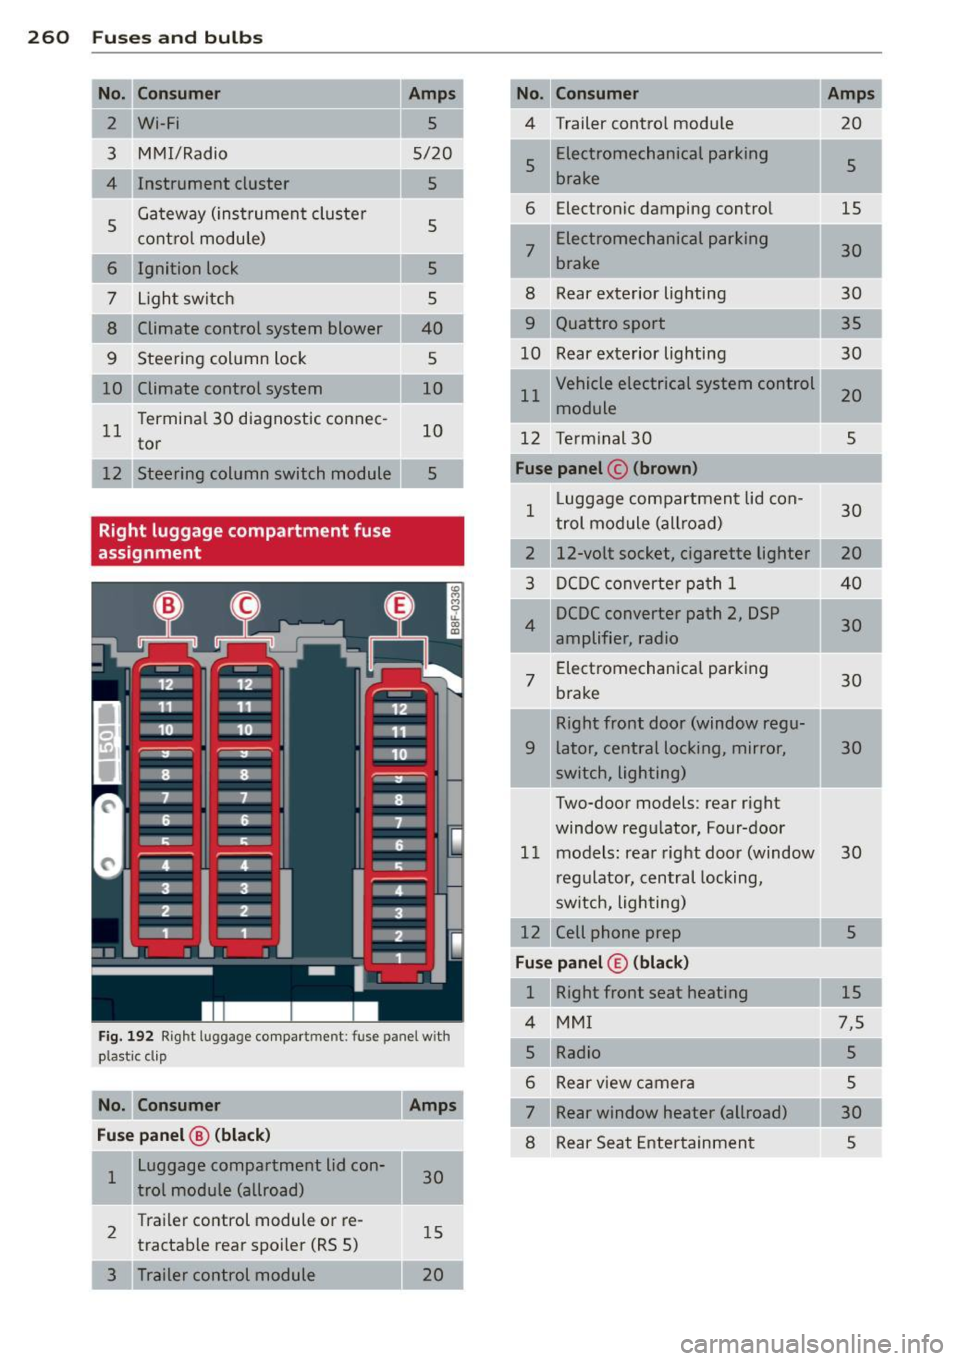
Right luggage compartment fuse
assignment
Amps
5
5/20
5
5 5
5
40 5
10
10
5
Fig. 192 R ig ht l uggag e compar tmen t: fu se pan el w ith
plas tic cl ip
No. Con sumer Amps
Fu se pan el
@ (bl ack )
1 Luggage compartment lid con-
30
trol module (allroad)
2 Trail
er control module or re-
15
tractable rear spoiler (RS 5)
3 Trailer control module
20
No . Consumer
4 Trailer contro l modu le
5 Electromechanical parking
5
brake
6 Elec tronic damping control
15
--
7 Electromechanical parking
30
brake
8 Rear exterior lighting 30
9 Quattro sport
10 Rear exterior lighting
11 Vehicle electrical system control
20
module
12 Te rminal 30 5
Fuse panel© (brown )
1 L
uggage compartment lid con-
30
trol module (all road)
2 12-volt socket, cigarette lighter
20
3 DCDC converter pa th 1 40
4 DCDC converter path 2, DSP
30
amplifier , radio
7 Electromechanical parking
30
b rake
Right front door (window regu-
9 lator, central locking, mirror, 30
switch, lighting)
Two-door models : rear righ t
window regu lator, Four-door
11 models : rear right door (window
30
regulator, central locking,
switch, lighting)
Cell phone prep 5
Fuse panel © (blac k)
1 Right front seat heating
15
4 MMI 7,5
5 Radio 5
6 Rear view camera 5
7 Rear window heater (allroad)
30
8 Rear Seat Entertainment 5
Page 263 of 294

Bulbs
Replacing bulbs
For your safety, we recommend that you have
your authorized Audi dealer replace any bulbs
for you .
It is becoming increasingly more and more
difficult to replace vehicle light bulbs since in
many cases, other parts of the car must first
be removed before you are able to get to the
bu lb . T his appl ies especially to the light bu lbs
in the front of your car which you can on ly
reach through the engine compartment .
Sheet metal and bulb ho lders can have sharp
edges that can cause ser ious cuts, parts must
be correctly taken apart and then p roperly put
back together to help prevent breakage of
parts and long term damage from water that
can enter housings that have not been proper
l y resealed.
F or your safety, we recommend that you have
your authorized Audi dealer replace any bulbs
for you, since your dealer has the proper tools,
the correct bu lbs and the expertise.
G as disch arge la mp s (Xe no n li ght s)*:
Due to the high electrical vo ltage, have the
bu lbs rep laced by a qualified technician.
H eadlights with Xenon l ight a re identified by
the high voltage sticker.
& WARNING
Changing Xenon lamps without the neces
sary equipment can cause serious personal
injury.
- Bul bs are pressurized and can exp lode
when being changed . Potential risk of in
jury!
- On vehicles equipped with gas discharge
bulbs (Xenon light) * life-threatening in
jur ies can result from improper handling
of the high-voltage portions of such
lamps!
- Only your authorized Aud i dea ler or a
qualified workshop should change the
bulbs in gas discharge lamps. There a re
Fu ses and bulb s 261
parts with sharp edges on the open ings
and on the bulb holders that can cause
serious cuts. If you are uncertain about
what to do, have the work performed by
an author ized Audi dealer or other quali
fied workshop . Ser ious personal injury
may result from improperly perfo rmed
wo rk.
(j) Tips
- If you still prefer to replace the light
bulbs yourself , be aware that the engine
compartment is a hazardous area to
work in
c::> page 208, Engine compart
ment
o=:> ,& .
-It is best to ask your authorized Audi
dealer whenever yo u want to change a
bulb .
•
•
Page 264 of 294

262 Emergency situations
Emergency situations
General
This chapter is intended for trained emer
gency crews and working personnel who
have the necessary tools and equipment to perform these operations.
Starting by pushing or
towing
Q;) Note
Vehicles with an automatic transmission
cannot be started by pushing or towing.
Starting with jumper
cables
If necessary , the engine can be started by
connecting it to the battery of another vehi
cle.
If the engine should fail to start because of a
discharged or weak battery, the battery can be
connected to the battery of
another vehicle,
using a
pair of jumper cables to start the en
gine .
Jumper cables
Use only jumper cables of sufficiently
large cross section to carry the starter current
safely. Refer to the manufacturer's specifica
ti ons.
Use only jumper cables with
insulated termi
nal clamps which are distinctly marked :
plus(+) cable in most cases colored red
minus (-) cable
in most cases colored black .
A WARNING
Batteries contain electricity, acid, and gas.
Any of these can cause very serious or fatal
injury. Follow the instructions below for
safe handling of your vehicle's battery.
- Always shield your eyes and avoid lean
ing over the battery whenever possible. -
A discharged battery can freeze at tem
peratures just below 32 °F (0 °C). Before
connecting a jumper cable, you must
thaw the frozen battery completely, oth
erwise it could explode.
- Do not allow battery acid to contact eyes
or skin . Flush any contacted area with
water immediately .
- Improper use of a booster battery to
start a vehicle may cause an explosion.
- Vehicle batteries generate explosive gas
es . Keep sparks, flame and lighted ciga
rettes away from batteries .
- Do not try to jump start any vehicle with
a low acid level in the battery .
- The voltage of the booster battery must
also have a 12-Volt rating. The capacity
(Ah) of the booster battery should not be
lower than that of the discharged bat
tery . Use of batteries of different voltage
or substantially different "Ah" rating
may cause an explosion and personal in
jury.
- Never charge a frozen battery. Gas trap
ped in the ice may cause an explosion.
- Never charge or use a battery that has
been frozen. The battery case may have
be weakened.
- Use of batteries of different voltage or
substantially different capacity (Ah) rat
ing may cause an explosion and injury.
The capacity (Ah) of the booster battery
should not be lower than that of the dis
charged battery.
- Before you check anything in the engine
compartment, always read and heed all
WARNINGS¢
page 208, Engine com
partment.
@ Note
- Applying a higher voltage booster bat
tery will cause expensive damage to sen
sitive electronic components, such as
control units, relays, radio, etc.
- There must be no electrical contact be
tween the vehicles as otherwise current
could already start to flow as soon as the
positive(+) terminals are connected. ..,.