2013.5 PEUGEOT 2008 ESP
[x] Cancel search: ESPPage 66 of 336

64
Comfort
In order for these systems to be fully effective, follow the operation and maintenance guidelines below: To obtain an even air distribution, take care not to obstruct the exterior air intake grilles located at the base of the windscreen, the nozzles, the vents and the air outlets, as well as the air extractor located in the boot. Do not cover the sunshine sensor, located on the dashboard; this is used for regulation of the air conditioning system. Operate the air conditioning system for at least 5 to 10 minutes, once or twice a month to keep it in per fect working order. Ensure that the passenger compartment filter is in good condition and have the filter elements replaced regularly. We recommend the use of a combined passenger compartment filter. Thanks to its special active additive, it contributes to the purification of the air breathed by the occupants and the cleanliness of the passenger compartment (reduction of allergic symptoms, bad odours and greasy deposits). To ensure correct operation of the air conditioning system, you are also advised to have it checked regularly as recommended in the warranty and maintenance record. If the system does not produce cold air, switch it off and contact a PEUGEOT dealer or a qualified workshop. When towing the maximum load on a steep gradient in high temperatures, switching off the air conditioning increases the available engine power and so improves the towing ability.
Recommendations for ventilation and air conditioning
If after an extended stop in sunshine, the interior temperature is very high, first ventilate the passenger compartment for a few moments. Put the air flow control at a setting high enough to quickly change the air in the passenger compartment.
The air conditioning system does not contain chlorine and does not present any danger to the ozone layer.
The condensation created by the air conditioning results in a discharge of water under the vehicle which is per fectly normal.
Stop & Start
The heating and air conditioning systems only work when the engine is running. To maintain a comfortable temperature in the passenger compartment, you can temporarily deactivate the Stop & Start system (see the corresponding section).
Page 70 of 336

68
Comfort
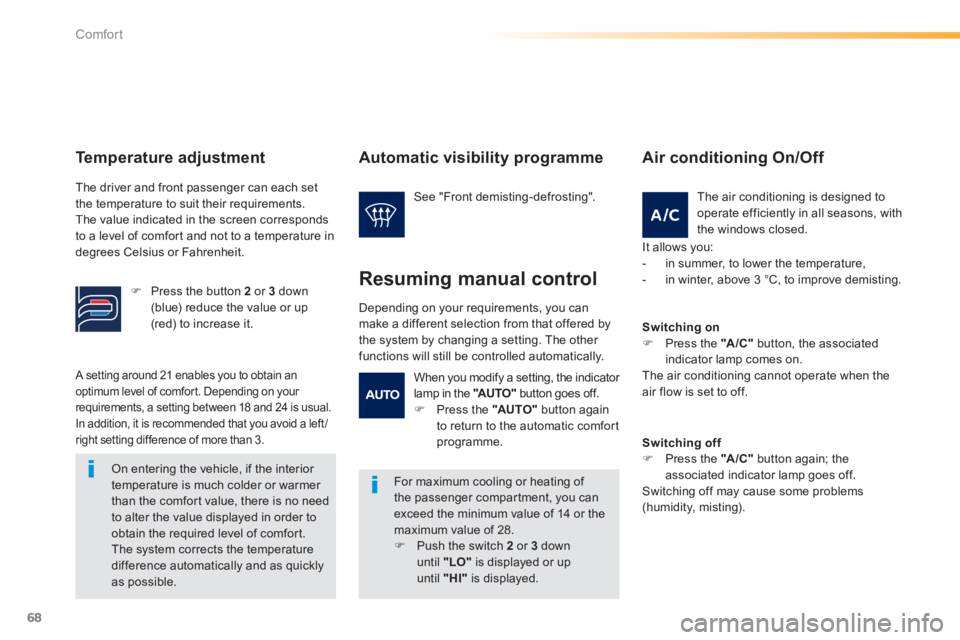
A setting around 21 enables you to obtain an optimum level of comfort. Depending on your requirements, a setting between 18 and 24 is usual. In addition, it is recommended that you avoid a left /right setting difference of more than 3.
On entering the vehicle, if the interior temperature is much colder or warmer than the comfort value, there is no need to alter the value displayed in order to obtain the required level of comfort. The system corrects the temperature difference automatically and as quickly as possible.
Automatic visibility programme
For maximum cooling or heating of the passenger compartment, you can exceed the minimum value of 14 or the maximum value of 28. Push the switch 2 or 3 down until "LO" is displayed or up until "HI" is displayed.
See "Front demisting-defrosting".
Depending on your requirements, you can make a different selection from that offered by the system by changing a setting. The other functions will still be controlled automatically.
Resuming manual control
The air conditioning is designed to operate efficiently in all seasons, with the windows closed.
Air conditioning On/Off
It allows you: - in summer, to lower the temperature, - in winter, above 3 °C, to improve demisting.
Switching on Press the "A/C" button, the associated indicator lamp comes on. The air conditioning cannot operate when the air flow is set to off.
Switching off Press the "A /C " button again; the associated indicator lamp goes off. Switching off may cause some problems (humidity, misting).
When you modify a setting, the indicator lamp in the "AUTO" button goes off. Press the "AUTO" button again to return to the automatic comfort programme.
Temperature adjustment
The driver and front passenger can each set the temperature to suit their requirements. The value indicated in the screen corresponds to a level of comfort and not to a temperature in degrees Celsius or Fahrenheit.
Press the button 2 or 3 down (blue) reduce the value or up (red) to increase it.
Page 79 of 336

77
3
Comfort
Never use the ISOFIX ring intended for fixing the upper strap of child seat to the Top Tether.
To use it in row 1: open the covers of the upper fixings 1 , unroll the high load retaining net, position one of the ends of the net's metal bar in the corresponding upper fixing 1 , then do the same with the other end, slacken the straps fully, fix the snap hook of each of the straps on the corresponding lug 3 , located under the bench seat cushion, fold the rear seats, tighten the straps without raising the
bench seat, check that the net is hooked and tightened c o r r e c t l y.
To use it in row 2: fold or remove the load space cover, open the covers of the upper fixings 2 , unroll the high load retaining net, position one of the ends of the net's metal bar in the corresponding upper fixing 2 , then do the same with the other end, attach the hook of each of the net's straps in the corresponding lower ring 4 , tighten the straps, check that the net is hooked and tightened c o r r e c t l y.
Page 91 of 336

89
4
Driving
Four-speed automatic gearbox which offers a choice between the comfort of fully automatic operation, enhanced by sport and snow programmes, or manual gear changing. There are therefore four driving modes: - automatic operation for electronic management of the gears by the gearbox, - sport programme for a more dynamic style of driving, - snow programme to improve driving when traction is poor, - sequential operation for manual changing of the gears by the driver.
Automatic gearbox
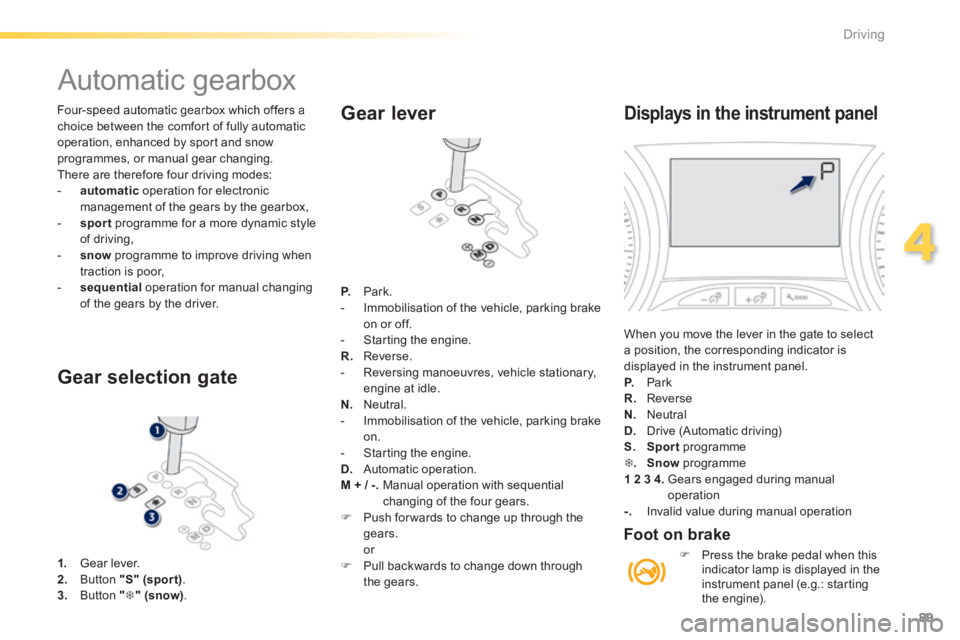
1. Gear lever. 2. Button "S" (spor t) . 3. Button "" (snow).
Gear selection gate
Gear lever
P. Park. - Immobilisation of the vehicle, parking brake on or off. - Starting the engine. R. Reverse. - Reversing manoeuvres, vehicle stationary, engine at idle. N. Neutral. - Immobilisation of the vehicle, parking brake on. - Starting the engine. D. Automatic operation. M + / -. Manual operation with sequential changing of the four gears. Push for wards to change up through the gears. or Pull backwards to change down through the gears.
Displays in the instrument panel
When you move the lever in the gate to select a position, the corresponding indicator is displayed in the instrument panel. P. Park R. Reverse N. Neutral
D. Drive (Automatic driving) S. Sport programme . Snow programme 1 2 3 4. Gears engaged during manual operation -. Invalid value during manual operation
Foot on brake
Press the brake pedal when this indicator lamp is displayed in the instrument panel (e.g.: starting the engine).
Page 94 of 336

92
Driving
Gear shift indicator
Operation
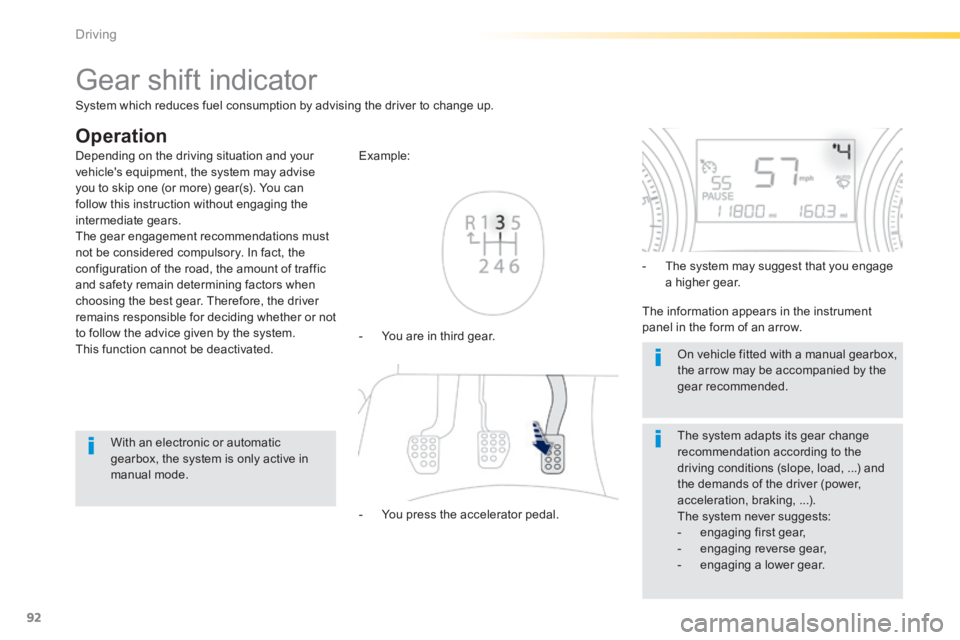
- You are in third gear.
Example:
- You press the accelerator pedal.
- The system may suggest that you engage a higher gear.
The information appears in the instrument panel in the form of an arrow.
The system adapts its gear change recommendation according to the driving conditions (slope, load, ...) and the demands of the driver (power, acceleration, braking, ...). The system never suggests: - engaging first gear, - engaging reverse gear, - engaging a lower gear.
Depending on the driving situation and your vehicle's equipment, the system may advise you to skip one (or more) gear(s). You can follow this instruction without engaging the intermediate gears. The gear engagement recommendations must not be considered compulsory. In fact, the configuration of the road, the amount of traffic and safety remain determining factors when choosing the best gear. Therefore, the driver remains responsible for deciding whether or not to follow the advice given by the system. This function cannot be deactivated.
With an electronic or automatic gearbox, the system is only active in manual mode.
On vehicle fitted with a manual gearbox, the arrow may be accompanied by the gear recommended.
System which reduces fuel consumption by advising the driver to change up.
Page 99 of 336

97
4
Driving
Speed limiter
System which prevents the vehicle from exceeding the speed programmed by the driver. When the programmed speed limit is reached, pressing the accelerator pedal in the normal manner no longer has any effect.
The speed limiter is switched on manually: the programmed speed must be at least 20 mph (30 km/h).
The speed limiter is switched off by manual switched off by manual switched offoperation of the control.
The programmed speed can be exceeded temporarily by pressing the accelerator firmly. To return to the programmed speed, simply slow down to a speed below the programmed speed.
The speed limiter cannot, in any circumstances, replace the need to respect speed limits, nor can it replace the need for vigilance and responsibility on the part of the driver.
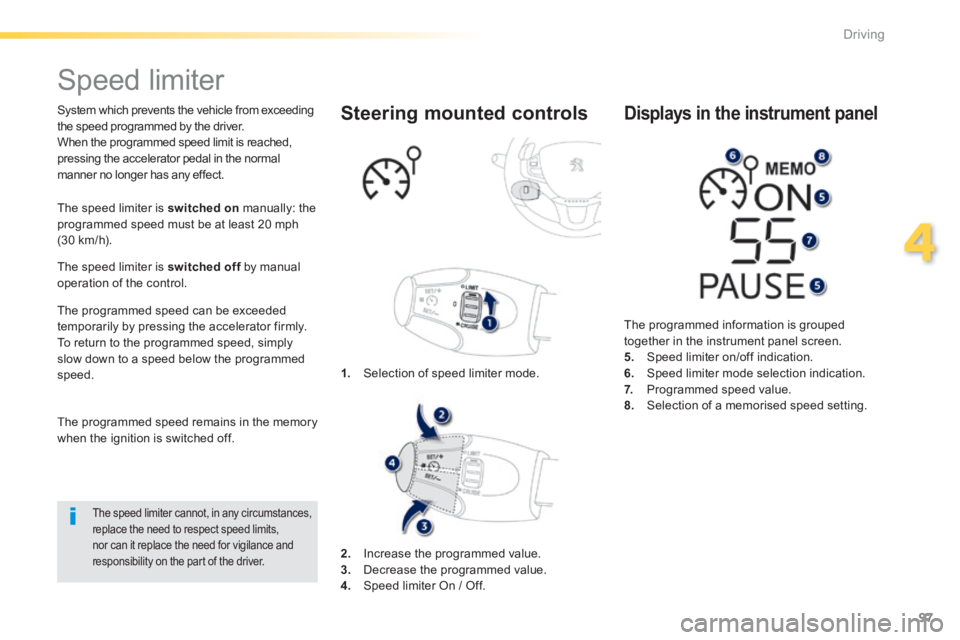
1. Selection of speed limiter mode.
Steering mounted controls
The programmed information is grouped together in the instrument panel screen. 5. Speed limiter on/off indication. 6. Speed limiter mode selection indication. 7. Programmed speed value. 8. Selection of a memorised speed setting.
Displays in the instrument panel
The programmed speed remains in the memory when the ignition is switched off.
2. Increase the programmed value. 3. Decrease the programmed value. 4. Speed limiter On / Off.
Page 101 of 336

99
4
Driving
Cruise control
System which automatically maintains the speed of the vehicle at the value programmed by the driver, without any action on the accelerator pedal.
The cruise control is switched off manually switched off manually switched offor by pressing the brake or clutch pedal or on triggering of the electronic stability system for safety reasons. It is possible to exceed the programmed speed temporarily by pressing the accelerator pedal. To return to the programmed speed, simply release the accelerator pedal. Switching off the ignition cancels any programmed speed value.
1. Selection of cruise control mode.
Steering mounted controls
The cruise control cannot, in any circumstances, replace the need to observe speed limits, nor can it replace the need for vigilance and responsibility on the part of the driver.
The programmed information is grouped together in the instrument panel screen. 5. Cruise control stopped/resumed indication. 6. Cruise control mode selection indication. 7. Programmed speed value. 8. Selecting a memorised speed setting.
Displays in the instrument panel
2. Increase the programmed value. 3. Decrease the programmed value. 4. Cruise control Off / Resume.
The cruise control is switched on manually: it requires a minimum vehicle speed of 25 mph (40 km/h), as well as the engagement of: - fourth gear on a manual gearbox, - second gear on an electronic or automatic gearbox, in manual sequential mode, - position A on an electronic gearbox or position D on an automatic gearbox.
Page 104 of 336

102
Driving
This system indicates the proximity of an obstacle (person, vehicle, tree, gate, etc.) which comes within the field of detection of sensors located in the bumper. Certain types of obstacle (stake, roadworks cone, etc.) detected initially will no longer be detected at the end of the manoeuvre due to the presence of blind spots.
Parking sensors
This function cannot, in any circumstances, take the place of the vigilance and responsibility of the driver.
The system is switched on by engaging reverse gear. This is accompanied by an audible signal. The system is switched off when you come out of reverse gear.
Rear parking sensors
Audible assistance
The proximity information is given by an intermittent audible signal, the frequency of which increases as the vehicle approaches the obstacle. The sound emitted by the speaker (right or left) indicates the side on which the obstacle is located. When the distance between the vehicle and the obstacle becomes less than approximately thirty centimetres, the audible signal becomes continuous.
Visual assistance
This supplements the audible signal by displaying bars in the multifunction screen which move progressively nearer to the vehicle. When the obstacle is near, the "Danger" symbol is displayed in the screen.