Page 73 of 196

If you cannot rectify the functional fault yourself, or the cooling capacity decrea-
ses, the cooling system must be switched off. Seek help from a
ŠKODA specialist
garage. ÐAir outlet vents
Fig. 77
Air outlet vents
Open the air outlet vents 3 and 4
› Turn the vertical wheel (air vents
3) » Fig. 77 or the horizontal wheel (air outlet
nozzles 4) into position .
Close air outlet vents 3 and 4
› Turn the vertical wheel (air vents
3) » Fig. 77 or the horizontal wheel (air outlet
nozzles 4) into position 0 .
Change air flow of air outlet vents 3 and 4
› In order to change the strength of the air flow, swivel the horizontal lamellas
with the aid of the moveable adjuster » Fig. 77 .
› In order to change the lateral direction of the air flow, swivel the vertical lamel-
las with the aid of the moveable adjuster.
Set the air supply to the individual vents with the air distribution control C
» Fig. 78 on page 71
. Air outlet vents 3 » Fig. 77 and 4 can also be opened or
closed individually.
Warmed, unwarmed or cooled air will flow out of the air outlet vents according to
the setting of the regulator of the heating or the air conditioning system and the
atmospheric conditions. Ð Heating
Using the system
Fig. 78
Heating: Control elements
Setting temperature › Turn the control dial A
» Fig. 78 to the right to increase the temperature.
› Turn the control dial A
to the left to decrease the temperature.
Controlling blower
› Turn the blower switch B
» Fig. 78
into one of the positions, 1 to 4, to switch
the blower on.
› Turn the blower switch B
into position 0 to switch the blower off.
› If you wish to shut off the fresh air supply, use the button 1
»
page 73,
in
section Recirculated air mode .
Regulating the air distribution
› The direction of the inlet air flow is controlled with air distribution regulator C
» Fig. 78 » page 71.
All controls apart from the blower switch B
» Fig. 78 can be set to any desired
intermediate position.
The blower should always be on to prevent the windows from misting up. £
71
Heating and air conditioning system
Page 74 of 196

Note
If the air distribution is positioned towards the windows, the total amount of air is
used to defrost the windows and thus no air will be fed to the footwell. This can
lead to restriction of the heating comfort. ÐSet heating
Recommended basic settings of the heating controls for the respective operating
modes:
Set-up Setting of the control dial
Button 1
Air outlet vents 4
A B C
Defrosting the windshield and side
windows
To the right up to the
stop 3
Do not switch on Open and align with the side win-
dow
Free windshield and side windows
from mist Desired temperature 2 or 3
Do not switch on Open and align with the side win-
dow
The fastest heating To the right up to the
stop 3
Briefly switch on
Opening
Comfortable heating Desired temperature 2 or 3
Do not switch on
Opening
Fresh air mode - ventilation To the left up to the
stop Desired position
Do not switch on
OpeningNote
■ Controls A
» Fig. 78 on page 71, B
, C
and the button 1
.
■ Air outlet vents 4 » Fig. 77 on page 71 .
■ We recommend that you leave the air outlet vents 3 » Fig. 77 on page 71 in the
opened position. ÐRecirculated air mode
Recirculated air mode prevents polluted air outside the vehicle from getting into
the vehicle, for example when driving through a tunnel or when standing in a
traffic jam. Switching on
› Press the button
1
» Fig. 78 on page 71
and the warning light in the button
illuminates.
Switching off
› Press the button
1
» Fig. 78 on page 71again - the warning light in the but-
ton goes out.
Recirculated air mode is switched off automatically if the air distribution control C
» Fig. 78 on page 71
is turned to position . Recirculated air mode can be
switched on again from this setting by repeatedly pressing the button .
£
72 Using the system
Page 75 of 196

WARNING
Do not leave recirculated air mode on over a longer period of time, as “stale”
air can cause fatigue of the driver and passengers, reduce attention levels and
also cause the windows to mist up. The risk of having an accident increases.
Switch off recirculated air mode as soon as the windows start to mist up. ÐAir conditioning system (manual air conditioning
system) Introductory information
The cooling system only operates if the button AC 2
» Fig. 79 on page
73 is
pressed, and the following conditions are met:
› engine running;
› outside temperature above approx. +2 °C;
› blower switch switched on (positions 1 to 4).
Under certain circumstances, air at a temperature of about 5 °C can flow out of
the vents when the cooling system is switched on. Lengthy and uneven distribu-
tion of the air flow out of the vents and large differences in temperature, for ex-
ample when getting out of the vehicle, can result in chills in sensitive persons. Note
We recommend that you have the air conditioning system cleaned by a ŠKODA
specialist garage once every year. Ð Using the system
Fig. 79
The air conditioning system: Control elements
Setting temperature
› Turn the control dial A
» Fig. 79 to the right to increase the temperature.
› Turn the control dial A
to the left to decrease the temperature.
Controlling blower
› Turn the blower switch B
» Fig. 79
into one of the positions, 1 to 4, to switch
the blower on.
› Turn the blower switch B
into position 0 to switch the blower off.
› Press the button
1
to close the fresh air supply
» Fig. 79.
Regulating the air distribution
› The direction of the inlet air flow is controlled with air distribution regulator C
» Fig. 79 » page 71.
Switching the cooling system on and off
› Press the button
AC 2
» Fig. 79
and the warning light in the button illumi-
nates.
› Pressing the button
AC 2
again switches off the cooling system - the indica-
tor light in the button goes out. £
73
Heating and air conditioning system
Page 76 of 196
Note
■ The whole heat output will be needed to defrost the windscreen and side win-
dows. No warm air will be fed to the footwell. This can lead to restriction of the
heating comfort. ■ The warning light AC lights after activation, even if not all of the conditions for
the function of the cooling system have been met » page 73, Introductory infor-
mation . The operational readiness of the cooling system is signalled when the
warning light in the button lights up. Ð74
Using the system
Page 77 of 196

Setting the air conditioning system
Recommended basic settings of the control elements of the air conditioning sys-
tem for the respective operating modes:
Set-up Setting of the control dial
Button
Air outlet vents 4 A B C 1 2
Defrost/defog windscreen and
side windows
a) Desired tempera-
ture 3 or 4
Do not switch on Automatically switched
on Open and align with the side
window
The fastest heating To the right up to
the stop 3
Briefly switch on Switched off
Opening
Comfortable heating Desired tempera-
ture 2 or 3
Do not switch on Switched off
Opening
The fastest cooling To the left up to
the stop briefly 4, then
2 or 3 Briefly switch on
b)
Activated Opening
Optimal cooling Desired tempera-
ture 1, 2 or 3
Do not switch on Activated Open and align to the roof
Fresh air mode - ventilation To the left up to
the stop Desired position
Do not switch on Switched off
Openinga)
We recommend that you do not use this setting in countries with high humidity levels. This can result in heavy cooling of the window glass and the following fogging from outside.
b) Under certain conditions, recirculated air mode » page 75 may come on automatically; the warning light will then light up in the button.
Note
■ Controls A
» Fig. 79 on page 73
, B
, C
and buttons 1
and 2
.
■ Air outlet vents 4 » Fig. 77 on page 71 .
■ We recommend that you leave the air outlet vents 3 » Fig. 77 on page 71 in the
opened position. ÐRecirculated air mode
Recirculated air mode prevents polluted air outside the vehicle from getting into
the vehicle, for example when driving through a tunnel or when standing in a
traffic jam.
Switching on
› Press the button
1
» Fig. 79 on page 73
and the warning light in the button
illuminates. Switching off
› Press the button
1
» Fig. 79 on page 73
again - the warning light in the but-
ton goes out.
Recirculated air mode is switched off automatically if the air distribution control C
» Fig. 79 on page 73
is turned to position . Recirculated air mode can be
switched on again from this setting by repeatedly pressing the button .
WARNING
Do not leave recirculated air mode on over a longer period of time, as “stale”
air can cause fatigue of the driver and passengers, reduce attention levels and
also cause the windows to mist up. The risk of having an accident increases.
Switch off recirculated air mode as soon as the windows start to mist up. Ð
75
Heating and air conditioning system
Page 78 of 196

Introductory information
The Climatronic maintains fully automatically a convenience temperature. This is
achieved by automatically varying the temperat")
Climatronic (automatic air conditioning system)
Introductory information
The Climatronic maintains fully automatically a convenience temperature. This is
achieved by automatically varying the temperature of the air flow, the blower
stages and air distribution. The system also takes sunlight into account, which
eliminates the need to alter the settings manually. The automatic
mode » page 77 ensures maximum well-being of the occupants at all times of
the year.
Description of Climatronic system
The cooling system only operates if the following conditions are met:
› engine running;
› outside temperature above approx. +2 °C;
› AC 18
» Fig. 80 on page 76 switched on.
The AC compressor is switched off at a high coolant temperature in order to pro-
vide cooling at a high load of the engine.
Recommended setting for all periods of the year.
› Set the desired temperature, we recommend 22 °C.
› Press the button
AUTO 12
» Fig. 80
on page 76.
› Move the air outlet vents
3 » Fig. 77 on page 71
and 4 so that the air flow is di-
rected slightly upwards.
Switching between Celsius and Fahrenheit
Press and hold the buttons AUTO and
AC » Fig. 80
on page 76 at the same time.
The information in the desired temperature measuring unit appears in the display. Note
We recommend that you have the Climatronic system cleaned by a ŠKODA spe-
cialist garage once every year. Ð Overview of the control elements
Fig. 80
Climatronic: Control elements
The buttons/control dial Setting the interior temperature
The displays Display of selected interior temperature
Degrees Celsius or Fahrenheit
Automatic air conditioning mode
De-mist or de-ice the windshield
Direction of air flow
Recirculated air mode
Cooling system on/off
Set blower speed
The buttons/control dial Setting the blower speed
Interior temperature sensor
Automatic mode
De-mist or de-ice the windshield
Air flow to the windows
Air flow to head
Air flow in the footwell £ 1
2
3
4
5
6
7
8
9
10
11
12
13
14
15
16
76
Using the system
Page 79 of 196

Recirculated air mode
Switch cooling system on/off
Note
The interior temperature sensor 11
» Fig. 80
is located in the bottom part of the
device. Do not stick anything on or cover the sensor, otherwise it could have an
unfavourable effect on the Climatronic. ÐAutomatic mode
The automatic mode is used in order to maintain a constant temperature and to
demist the windows in the interior of the car.
Switching automatic mode on
› Set a temperature between +18 °C and +29
℃.
› Move the air outlet vents
3 » Fig. 77 on page 71 and 4 so that the air flow is
directed slightly upwards.
› Press the button
AUTO 12
» Fig. 80
on page
76; AUTO is shown in the display.
Automatic mode is switched off by pressing one of the buttons for the air distri-
bution or by increasing/decreasing the blower speed. The temperature is never-
theless regulated. ÐSetting temperature
› The required interior temperature can be set with the control dial 1
» Fig. 80
on page 76 after switching on the ignition.
The interior temperature can be set between +18 °C and +29 ℃. The interior tem-
perature is regulated automatically within this range. If you select the tempera-
ture below +18 ℃, “LO
” appears in the display. If you select the temperature high-
er than +29 ℃, “HI” appears in the display. In both limit positions the Climatronic
operates at maximum cooling or heating capacity, respectively. The temperature
is not controlled in this case.
Lengthy and uneven distribution of the air flow out of the vents (especially
around the feet) and large differences in temperature, for example, when getting
out of the vehicle, can cause susceptible individuals to catch a cold. Ð17
18 Recirculated air mode
Recirculated air mode prevents polluted air outside the vehicle from getting into
the vehicle, for example when driving through a tunnel or when standing in a
traffic jam.
Switching on
› Press the button
17
» Fig. 80
on page
76; the symbol appears in the dis-
play.
Switching off
› Press the button
17
» Fig. 80
on page
76 again and the symbol disap-
pears from the display. WARNING
Do not leave recirculated air mode on over a longer period of time, as “stale”
air can cause fatigue of the driver and passengers, reduce attention levels and
also cause the windows to mist up. The risk of having an accident increases.
Switch off recirculated air mode as soon as the windows start to mist up. Note
If recirculated air mode is switched on for around 15 minutes, the symbol will
begin to flash in the display as a sign that the recirculated air mode is switched on
long-term. If the recirculated air mode is not switched off, the symbol flashes for
around 5 minutes. Ð Controlling blower
The Climatronic system controls the blower stages automatically in line with the
interior temperature. However, the blower stages can be manually adapted to
suit your particular needs.
› Turn the control dial 10
» Fig. 80 on page 76 to the left (reduce blower speed)
or right (increase blower speed).
If the blower is switched off, the Climatronic system is switched off. £
77
Heating and air conditioning system
Page 80 of 196
WARNING
■ “ Stale air” may result in fatigue in the driver and occupants, reduce attention
levels and also cause the windows to mist up. The risk of having an accident
increases.
■ Do not switch off the Climatronic system for longer than necessary.
■ Switch on the Climatronic system as soon as the windows mist up. ÐDefrosting windscreen
Switching on › Press the button
13
» Fig. 80
on page 76.
Switching off
› Once again press the button
13
» Fig. 80 on page 76 or the button
AUTO .
The temperature control is controlled automatically. More air flows out of the air
outlet vents 1 » Fig. 77 on page 71 and 2. Ð78
Using the system
 1
1 2
2 3
3 4
4 5
5 6
6 7
7 8
8 9
9 10
10 11
11 12
12 13
13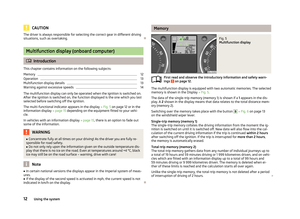 14
14 15
15 16
16 17
17 18
18 19
19 20
20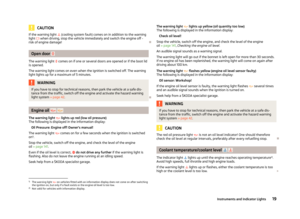 21
21 22
22 23
23 24
24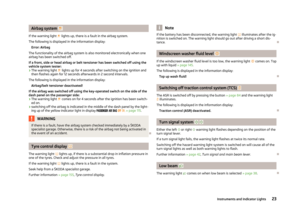 25
25 26
26 27
27 28
28 29
29 30
30 31
31 32
32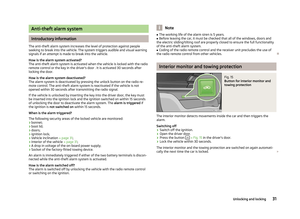 33
33 34
34 35
35 36
36 37
37 38
38 39
39 40
40 41
41 42
42 43
43 44
44 45
45 46
46 47
47 48
48 49
49 50
50 51
51 52
52 53
53 54
54 55
55 56
56 57
57 58
58 59
59 60
60 61
61 62
62 63
63 64
64 65
65 66
66 67
67 68
68 69
69 70
70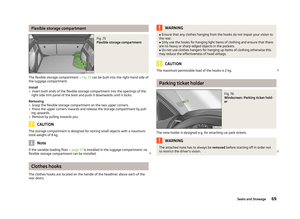 71
71 72
72 73
73 74
74 75
75 76
76 77
77 78
78 79
79 80
80 81
81 82
82 83
83 84
84 85
85 86
86 87
87 88
88 89
89 90
90 91
91 92
92 93
93 94
94 95
95 96
96 97
97 98
98 99
99 100
100 101
101 102
102 103
103 104
104 105
105 106
106 107
107 108
108 109
109 110
110 111
111 112
112 113
113 114
114 115
115 116
116 117
117 118
118 119
119 120
120 121
121 122
122 123
123 124
124 125
125 126
126 127
127 128
128 129
129 130
130 131
131 132
132 133
133 134
134 135
135 136
136 137
137 138
138 139
139 140
140 141
141 142
142 143
143 144
144 145
145 146
146 147
147 148
148 149
149 150
150 151
151 152
152 153
153 154
154 155
155 156
156 157
157 158
158 159
159 160
160 161
161 162
162 163
163 164
164 165
165 166
166 167
167 168
168 169
169 170
170 171
171 172
172 173
173 174
174 175
175 176
176 177
177 178
178 179
179 180
180 181
181 182
182 183
183 184
184 185
185 186
186 187
187 188
188 189
189 190
190 191
191 192
192 193
193 194
194 195
195
