Page 57 of 249

56Controls and displays
For the sake of the environment
Changing to higher gears in advance helps to reduce fuel consumption and
noise levels, helps to protect the environment and benefits both the useful
life and the reliability of the engine.
Speedometer
Speed warning
An audible warning will be heard on exceeding 120 km/h (75 mph). If the
speed falls below this limit, the audible warning switches off.
Note
This function is only valid for certain countries.
Coolant temperature gauge
The coolant temperature gauge 4
⇒ Fig. 31
⇒ page 55 only works when
the ignition is switched on.
Damage to the engine can be avoided by observing the indications regard-
ing the temperature zones.
Engine cold
If the needle is still on the left of the scale, the engine has not yet reached
operating temperature. Avoid high engine speeds, hard acceleration and
submitting the engine to high loads.
Operating temperature zone
When the needle has reached the central part of the scale, this means the
engine has reached operating temperature. Running the engine at full throt- tle and the high temperatures involved can cause the needle to be posi-
tioned in the zone on the right.
CAUTION
The additional headlights and other parts placed in front of the fresh air in-
lets reduce the effect of engine cooling. With high outside temperatures
and engine speeds a risk becomes present of the engine overheating
⇒ page 68, Coolant level and temperature .
Fuel gauge
The fuel gauge 7 ⇒ Fig. 31 ⇒
page 55 operates only when the ignition is
switched on.
The fuel tank has a capacity of approx. 55 litres. When the needle reaches
the reserve area, the warning symbol ⇒ page 71 lights up on the gener-
al instrument panel and an audible warning can be heard.
CAUTION
Never completely empty the tank! An irregularity in the fuel supply system
can cause irregularities when the engine is running. Unburned fuel can
reach the exhaust gas system, which can cause deterioration of the catalytic
converter.
Note
Some vehicles come fitted with the fuel gauge on the general instrument
panel.
Page 58 of 249

The daily trip counter indicates the journey that has been covered since the
last time the function was reset in 100 metre sections.
In")
57
Controls and displays
Trip counter*
Daily trip counter (trip)
The daily trip counter indicates the journey that has been covered since the
last time the function was reset in 100 metre sections.
In order to reset the daily distance covered keep the button 6
⇒ Fig. 31
⇒ page 55 pressed down.
Odometer
The odometer indicates the total number of kilometres (or mileage) that the
vehicle has covered until now.
Fault indication
In the event of a fault in the informative display the word Error will appear
permanently. Please take the vehicle to a specialised Technical Service to
solve this fault.
Note
In vehicles equipped with an informative display, if the indicator of the sec-
ond speed in mph or in kph are activated respectively, this speed will be
displayed in place of the odometer.
Service interval display*
Service interval display
Before reaching the service interval, when the ignition is switched on the
key symbol appears on the screen for several seconds together with the
indication of the number of kilometres (miles) remaining. The number of
days remaining until the service inspection is indicated simultaneously.
The informative display indicates:
Service in … km (miles) or… days. The indication of kilometres (miles) or time remaining until the inspection
reduces in intervals of 100km (miles) or 1 day.
If the service interval is reached, when the ignition is switched on the key
symbol
appears flashing on the screen together with the word Service.
The informative display indicates: Service now!
Indication of number of kilometres (miles) or time remaining until the
service inspection
The number of kilometres (miles) or time remaining until the service inspec-
tion can always be displayed when the ignition is switched on by pressing
the button 5
⇒ Fig. 31 ⇒
page 55.
The key symbol and indication of the number of kilometres (miles) re-
maining appear on the display for several seconds. The number of days re-
maining until the service inspection is indicated simultaneously.
In vehicles equipped with an informative display this information can be ac-
cessed from the menu, Settings ⇒ page 63.
Resetting service interval display
The service interval display can be reset only after a service message or pre-
warning has been displayed in the general instrument panel display.
It is advisable to visit a Technical Service to reset the display.
The specialised Technical Service:
● resets the display memory after performing the following inspection
● stores the information in the Maintenance Programme
● places a sticker on the side of the instrument panel in the driver area in-
dicating the date of the next inspection
The service intervals display can be reset by pressing the button, 6
⇒ Fig. 31 ⇒
page 55.
Safety FirstOperating instructionsPractical TipsTechnical specifications
Page 59 of 249

58Controls and displays
In vehicles equipped with an informative display the service interval display
can be reset from the menu, Settings ⇒ page 63.
CAUTION
We advise against resetting the service interval display yourself, given that
this action could cause an imbalance in the service intervals, and as a re-
sult, faults in the vehicle.
Note
● Never reset the display between service intervals as this could lead to
erroneous indications.
● After disconnecting the battery of the vehicle, the service interval dis-
play values remain stored.
● If the general instrument panel is changed after a repair, the correct val-
ues must be input in the service interval display. This operation is carried
out by a specialised service.
● After resetting the display with flexible service intervals, the information
will be indicated in the same way as vehicles with fixed service intervals.
Therefore, we recommend that a SEAT Authorised Service resets the service
interval display, who will do so correctly using diagnostics equipment.
● For more detailed information please consult the Maintenance Pro-
gramme.
Digital clock
The clock is set using the buttons 5 to 6
⇒ Fig. 31
⇒ page 55.
Select the indication you want to change with button 5
and make the ad-
justment with button 6.
In vehicles equipped with an informative display this can be reset from the
menu, Time ⇒ page 63. Recommended gear display
Fig. 32 Recommended
gear display
The general instrument panel display indicates the engaged gear A
⇒ Fig. 32.
In order to optimally reduce the fuel consumption, the recommended gear is
displayed on the screen.
If the control unit analysis decides that a gear change is required, an arrow
appears on the display A
. This arrow can point up or down indicating
whether a lower or higher gear is recommended.
Simultaneously, the gear currently engaged is indicated B
in the place of
the recommended gear.
CAUTION
However, the driver is always responsible for choosing the appropriate gear
for each situation, (i.e. when overtaking).
Page 60 of 249

Introduction
The multifunction display can only be operated when the ignition is switch-
ed on. When the ignition is switched on th")
59
Controls and displays
Multi-function display* (on board computer)
Introduction
The multifunction display can only be operated when the ignition is switch-
ed on. When the ignition is switched on the last function selected before it
was switched off is displayed.
The multifunction display data is shown on the screen ⇒ Fig. 33
⇒ page 59.
In vehicles fitted with an informative display ⇒ page 62 the system can be
adjusted so that certain data is not shown.
WARNING
● Always keep your attention on driving! As the driver, you have the full
responsibility for the safety of traffic.
● Do not rely only on the outside temperature indicator to verify wheth-
er the road surface is frozen. This is because with an outside temperature
of +4 °C (+39 °F) ice can generate on the road - Warning of frozen road
surface!
Note
● Models for certain countries can show the values in imperial units.
● If the second speed in mph (km/h) is displayed, the current speed in
km/h (mph) is not displayed on the screen. Memory
Fig. 33 Multifunction
display
The multifunction display has two automatic memories. The selected mem-
ory is displayed on the screen ⇒ Fig. 33.
The current journey data (memory 1) is always displayed when the number
1 appears on the display. When number 2 appears on the display, the total
distance travelled is shown (memory 2).
The memory is selected by pressing button B
⇒ Fig. 34 ⇒
page 60.
Current journey memory (memory 1)
The current journey memory collects data from the moment the ignition is
switched on until it is switched off. If the journey is continued within two
hours of switching off the ignition, the new values will be added to the ex-
isting trip recorder memory. The memory will automatically be deleted if the
journey is interrupted for more than two hours.
Total distance travelled memory (memory 2)
The total distance travelled memory collects journey data from any number
of individual journeys up to a maximum of 19 hours and 59 minutes and
1999 km (miles) or until 99 hours and 59 minutes and 9999 km (miles) in
cars with an informative display. The memory will automatically be deleted
if one of the named values is reached, resetting the data collected.
Safety FirstOperating instructionsPractical TipsTechnical specifications
Page 61 of 249

60Controls and displays
Unlike the current journey memory, this memory is not deleted, even when
the ignition is switched off for more than two hours.
Note
After disconnecting the battery, all the values stored in the memories 1 and
2 are deleted.
Operation
Fig. 34 Multifunction
display: controls
The button to change the functions A
⇒ Fig. 34 and the button to
delete the memory B are located on the window wiper lever.
Selecting a memory
– Briefly press the station button, B
⇒ Fig. 34.
Selecting functions
– Briefly press the rocker switch A
⇒
Fig. 34 up or down. This
displays the multifunction display functions in consecutive or-
der on the screen. Resetting
–
Select the required memory.
– Keep the button B
⇒ Fig. 34 pressed.
The following values of the selected memory are reset using the B
button.
● the average fuel consumption
● journey distance covered
● average speed
● duration of the journey
Multifunction display data
Outside temperature
The display indicates the outside temperature.
At temperatures below +4 °C (+39 °F), the snowflake symbol is also dis-
played (frozen road surface warning symbol) and an audible warning is giv-
en. Pressing the rocker switch A
⇒ Fig. 34 ⇒
page 60 shows the last dis-
played function.
Journey duration
The display shows the time you have covered since the memory was last re-
set. If you wish to measure the duration of a journey from a specific mo-
ment, the memory must be deleted by pressing the button, B
⇒ Fig. 34
⇒ page 60.
The maximum time indicated by the two memories is 19 hours 59 minutes
or 99 hours and 59 minutes for vehicles fitted with an informative display.
The memory is reset if this value is exceeded.
Page 62 of 249
 1)
. You can adapt your driving style to the required consumption wit")
61
Controls and displays
Current fuel consumption
The current fuel consumption is indicated on the display in litres/100km
(miles) 1)
. You can adapt your driving style to the required consumption with
the assistance of this indicator.
The consumption is displayed in litres per hour while the vehicle is stopped
or at idling speed 2)
.
Average fuel consumption
The display shows the average fuel consumption in litres/100km (miles) 1)
calculated since the memory was last reset ⇒ page 59.
If you wish to measure the average fuel consumption from a specific period,
the memory must first be deleted by pressing the button, B
⇒ Fig. 34
⇒ page 60. While driving the first 300 m after deleting the memory this val- ue is not shown on the display.
The value is updated regularly while the vehicle is in motion.
Operating range
The approximate operating range is indicated in kilometres (miles) on the
display. It shows how far the vehicle can travel with the available fuel using
the same driving conditions as a reference.
The operating range is calculated in sections of 10 kilometres (miles). When
the fuel gauge enters the reserve zone, the operating range is displayed in
sections of 5 kilometres (miles).
The operating range is calculated based on the fuel consumption during the
last 50 kilometres (miles). The operating range increases when driving in a
more economical manner. When the memory is reset (after disconnecting the battery), the operating
range is calculated with a 10 litres per 100 km (miles) consumption and ad-
justs to represent the current driving style.
Distance
The display shows the distance you have covered since the memory was last
reset
⇒ page 59. If you wish to measure the duration of a journey from a
specific moment, the memory must be deleted by pressing the button, B
⇒ Fig. 34 ⇒
page 60.
The maximum value for both memories is 1999 km (miles), or 9999 km
(miles) in vehicles fitted with an informative display. The memory is reset if
this value is exceeded.
Average speed
The display shows the average speed in km/h (mph) calculated from the
last time the memory was reset ⇒ page 59. If you wish to measure the aver-
age speed from a specific period, the memory must first be deleted by
pressing the button, B
⇒ Fig. 34 ⇒
page 60.
While driving the first 300 m after deleting the memory this value is not
shown on the display.
The value is updated regularly while the vehicle is in motion.
Driving speed
The current driving speed, the same as indicated on the speedometer, is
shown on the display 3
⇒ Fig. 31 ⇒
page 55.
Oil temperature
If the oil temperature is lower than 50 °C (+122 °F) or if a fault appears on
the oil temperature control, in place of the temperature indication, the sign -
-.- is shown.
1)
The indication of consumption is given in kms (miles)/litres in models for certain countries.
2) The indication of the consumption when the vehicle is stationary is given in - -.- kms
(miles)/litres. in models for certain countries.
Safety FirstOperating instructionsPractical TipsTechnical specifications
Page 63 of 249

62Controls and displays
Speed warning
Adjust the speed limit while the vehicle is stopped
–Press the button, A
⇒ Fig. 34 ⇒
page 60 select Speed warning.
– Press the button, B
to activate the possibility of adjusting the
speed limit.
– Press the button, A
to select the required speed limit, i.e.
50 km/h (31 mph).
– Press the button, B
to confirm the selected speed or wait sev-
eral seconds until the adjustment is automatically stored.
The speed limit can be adjusted in 5 km/h (mph) intervals.
Adjust the speed limit while driving
– Press the button, A
⇒ Fig. 34 ⇒
page 60 select Speed warning.
– Drive to the required speed, i.e. 50 km/h (31 mph).
– Press the button B
to set the current driving speed as the
speed limit.
If you want to change the speed limit, this will be regulated in 5
km/h (mph) intervals (i.e. the speed set at 47 km/h increases to
50 km/h or decreases to 45 km/h).
– Press the button, B
to confirm the selected speed or wait sev-
eral seconds until the adjustment is automatically stored.
Changing or resetting the speed limit
– Press the button, A
⇒ Fig. 34 ⇒
page 60 select Speed warning.
– Press the button, B
to reset the speed limit. –
Press the button, B
again to activate the possibility of adjust-
ing the speed limit.
If the indicated speed is exceeded at any time, an audible warning is given.
The message Speed warning appears simultaneously on the display with
the imputed speed limit.
The speed limit stays in the memory even after switching the ignition off
and on.
MAXI DOT* (Informative display) Introduction
The informative display informs about the current operational status of your
vehicle. Additionally, the screen also displays the information for the radio,
the multifunction display, the telephone, the navigation system, the devices
connected to the MDI input and the automatic gearbox ⇒ page 143.
WARNING
Always keep your attention on driving! As the driver, you have the full re-
sponsibility for the safety of traffic.
Page 64 of 249

63
Controls and displays
Main menu
Fig. 35 Window wiper
lever: informative display
controls
– Main menu is activated by keeping the rocker switch A
pressed
down ⇒ Fig. 35.
– The menu items can be selected with the button, A
. Briefly
press the button, B to display the selected information.
The following items can be selected:
■ MFD ⇒ page 59
■ Audio ⇒ Booklet audio system Instruction Manual
■ Navigation ⇒ Booklet Navigation system Instruction Manual
■ Telephone ⇒ Booklet Bluetooth system Instruction Manual
■ Vehicle status ⇒ page 64
■ Settings ⇒ page 63
The Audio and Navigation options are only displayed when these factory-fit-
ted systems are switched on.
Note
● If the multifunction display is not operated during 10 seconds, the menu
automatically returns to one of the superior levels. Settings
You can make certain adjustments using the informative display. The cur-
rent values are displayed directly in their respective places above or below
the line.
The following items can be selected:
■ Language
■ MFD data
■ Time
■ Winter tyres
■ Units
■ Second speed
■ Inspec. Service
■ Factory settings
■ Back
Select the option Back to return to the superior menu level.
Language
Here the language used to display the warning and information texts can be
selected.
MFD data
Here certain data shown on the multifunction display can be switched on or
off.
Time
In this menu you can set, the time, the display format (24 or 12 hours) and
changes from winter to summer time.
Winter tyres
The speed at which an audible warning is given can be adjusted here. This
function can be used with winter tyres, whose maximum permitted speed is
lower than the maximum speed of the vehicle.
Safety FirstOperating instructionsPractical TipsTechnical specifications
 1
1 2
2 3
3 4
4 5
5 6
6 7
7 8
8 9
9 10
10 11
11 12
12 13
13 14
14 15
15 16
16 17
17 18
18 19
19 20
20 21
21 22
22 23
23 24
24 25
25 26
26 27
27 28
28 29
29 30
30 31
31 32
32 33
33 34
34 35
35 36
36 37
37 38
38 39
39 40
40 41
41 42
42 43
43 44
44 45
45 46
46 47
47 48
48 49
49 50
50 51
51 52
52 53
53 54
54 55
55 56
56 57
57 58
58 59
59 60
60 61
61 62
62 63
63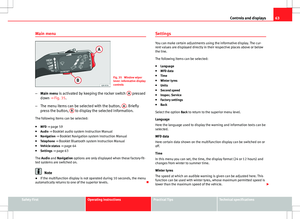 64
64 65
65 66
66 67
67 68
68 69
69 70
70 71
71 72
72 73
73 74
74 75
75 76
76 77
77 78
78 79
79 80
80 81
81 82
82 83
83 84
84 85
85 86
86 87
87 88
88 89
89 90
90 91
91 92
92 93
93 94
94 95
95 96
96 97
97 98
98 99
99 100
100 101
101 102
102 103
103 104
104 105
105 106
106 107
107 108
108 109
109 110
110 111
111 112
112 113
113 114
114 115
115 116
116 117
117 118
118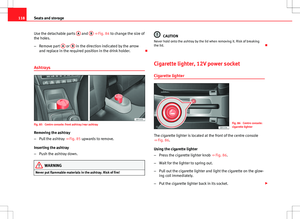 119
119 120
120 121
121 122
122 123
123 124
124 125
125 126
126 127
127 128
128 129
129 130
130 131
131 132
132 133
133 134
134 135
135 136
136 137
137 138
138 139
139 140
140 141
141 142
142 143
143 144
144 145
145 146
146 147
147 148
148 149
149 150
150 151
151 152
152 153
153 154
154 155
155 156
156 157
157 158
158 159
159 160
160 161
161 162
162 163
163 164
164 165
165 166
166 167
167 168
168 169
169 170
170 171
171 172
172 173
173 174
174 175
175 176
176 177
177 178
178 179
179 180
180 181
181 182
182 183
183 184
184 185
185 186
186 187
187 188
188 189
189 190
190 191
191 192
192 193
193 194
194 195
195 196
196 197
197 198
198 199
199 200
200 201
201 202
202 203
203 204
204 205
205 206
206 207
207 208
208 209
209 210
210 211
211 212
212 213
213 214
214 215
215 216
216 217
217 218
218 219
219 220
220 221
221 222
222 223
223 224
224 225
225 226
226 227
227 228
228 229
229 230
230 231
231 232
232 233
233 234
234 235
235 236
236 237
237 238
238 239
239 240
240 241
241 242
242 243
243 244
244 245
245 246
246 247
247 248
248