Page 217 of 249

216Fuses and bulbs
Changing side light bulbs
Fig. 147 Changing side
light bulbs
– Raise the bonnet.
– Remove the protective cover ⇒ Fig. 147.
– Remove the bulb holder ⇒ Fig. 147 1
by pulling it outwards.
– Remove the bulb by pulling it out and fit the new one.
– Installation involves all of the above steps in reverse sequence.
– Fit the protective cover. Make sure that the cover fits correctly
on the housing during the operation.
– Check that the new bulb works properly. Changing main beam headlight bulbs
Fig. 148 Changing main
beam headlight bulbs
– Raise the bonnet.
– Remove the protective cover.
– Remove the connector ⇒ Fig. 148 1
by pulling it outwards.
– Extract the bulb and fit the replacement so that it fits correctly
into the recess on the reflector.
– Installation involves all of the above steps in reverse sequence.
– Fit the protective cover. Make sure that the cover fits correctly
on the housing during the operation.
– Check that the new bulb works properly.
Page 218 of 249

217
Fuses and bulbs
Changing dipped beam headlight bulbs
Fig. 149 Changing dip-
ped beam headlight
bulbs: wheel housing
Fig. 150 Changing dip-
ped beam headlight
bulbs
– Turn the wheel for access to the wheel housing cover and re-
move the cover ⇒ Fig. 149.
– Remove the protective cover from the headlight ⇒
Fig. 150.
– Remove the connector ⇒
Fig. 150 1
by pulling it outwards.
– Unclip the retainer spring ⇒
Fig. 150 2
pressing clockwise and
inwards. –
Extract the bulb and fit the replacement so that the lug on the
base fits into the recess on the reflector.
– Fit the connector.
– Fit the protective cover. Make sure that the cover fits correctly
on the housing during the operation.
– Replace the wheel housing cover.
– Check that the new bulb works properly.
Changing turn signal light bulbs
Fig. 151 Changing turn
signal light bulbs
– Raise the bonnet.
– Turn the bulb holder ⇒ Fig. 151 1
anti-clockwise and remove
it.
– Remove the bulb by pressing on the bulb holder and turning it
anti-clockwise at the same time.
Safety FirstOperating instructionsPractical TipsTechnical specifications
Page 219 of 249
218Fuses and bulbs
–Fit the replacement bulb in the bulb holder and turn clockwise
as far as it will go.
– Check that the new bulb works properly.
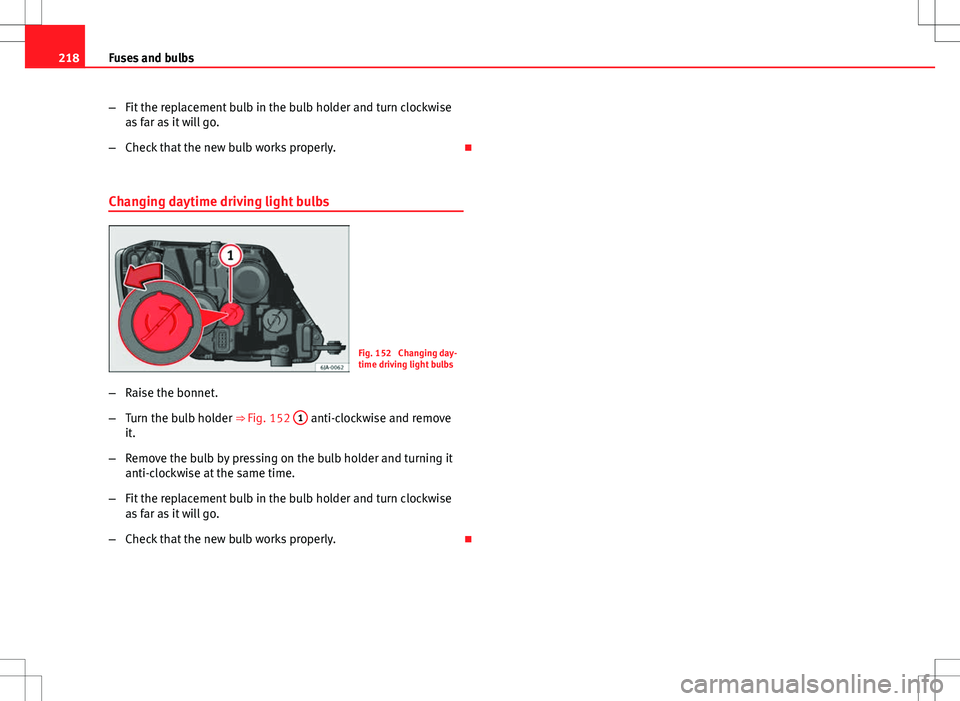
Changing daytime driving light bulbs
Fig. 152 Changing day-
time driving light bulbs
– Raise the bonnet.
– Turn the bulb holder ⇒ Fig. 152 1
anti-clockwise and remove
it.
– Remove the bulb by pressing on the bulb holder and turning it
anti-clockwise at the same time.
– Fit the replacement bulb in the bulb holder and turn clockwise
as far as it will go.
– Check that the new bulb works properly.
Page 220 of 249
219
Fuses and bulbs
Changing front fog light bulbs
Front fog light bulb
Fig. 153 Front fog light
Fig. 154 Front fog light –
Remove the screw ⇒ Fig. 153 A
from the fog light grill with a
screwdriver.
– Subsequently, remove the clips located on the edge of the grill
with gentle leverage.
– Remove the screws (3x) ⇒ Fig. 154 B
to remove the front fog
light.
– Remove the metal clip located at the top of the front fog light by
pulling it towards you ⇒ Fig. 154 C
.
Removing the bulb holder
Fig. 155 Front fog light
– Remove the connector ⇒ Fig. 155 A
from the bulb.
– Turn the bulb holder ⇒ Fig. 155 A
anti-clockwise and pull it out
of the fog light housing.
Safety FirstOperating instructionsPractical TipsTechnical specifications
Page 221 of 249

220Fuses and bulbs
–Remove the bulb by pressing on the bulb holder and turning it
anti-clockwise at the same time.
– Installation involves all of the above steps in reverse sequence.
– Check that the bulb works properly.
Changing bulbs for rear lights (in side panel) Removing tail light
Fig. 156 Remove rear
light unit from side panel
Check which of the bulbs is defective.
– Open the luggage compartment to access the rainduct area.
– Take the screwdriver or a Torx 20 key (T20) from the vehicle tool
kit and loosen (turning anti-clockwise) and remove the two re-
taining screws that secure the front of the light ⇒ Fig. 156 1
,
taking care not to lose them. –
Pull the rear light unit backwards ( ⇒ Fig. 156 2
) to remove the
light from its housing.
Removing the bulb holder
Fig. 157 Light connector
at the rear of the rear
light unit
Fig. 158 Retaining
screws on reverse side of
rear light unit
– Disconnect the light connector A
⇒ Fig. 157 by moving its side
levers (arrows) and pulling the connector outwards.
– Place the light on a level, horizontal surface on top of a soft
cloth so as not to scratch the outer glass.
Page 222 of 249

221
Fuses and bulbs
– Unscrew the four retaining screws from the bulb holder anti-
clockwise using a screwdriver or a Torx 20 key (T20) from the ve-
hicle tool kit ⇒ Fig. 158. Take care not to lose the bulb holder
retaining screws.
Changing bulbs
All bulbs can be changed easily in the bulb holder.
Fig. 159 Position of the
bulbs in the bulb holder
The bulbs are secured with a bayonet fastener. The table below
gives an overview of the bulbs.
– Lightly press the defective bulb into the bulb holder, then turn it
anti-clockwise and remove it.
– Fit the new bulb, pressing it into the bulb holder and turn it
clockwise as far as it will go.
– Use a cloth to remove any fingerprints from the glass part of the
bulb. –
Check that the new bulb works properly.
– Replace the bulb holder.
– Screw in the bulb holder using the four screws, turning them
clockwise.
List of bulbs
Position: ⇒ Fig. 159Bulb functionATurn signals: PY21W NA LLBSide lights-brake lights: P21/5WCSide lights: P21/5W
Note
Check the condition of the seal. If damaged, a replacement can be acquired
from an Official Service.
Safety FirstOperating instructionsPractical TipsTechnical specifications
Page 223 of 249
222Fuses and bulbs
Fitting rear light
Fig. 160 Fitting tail light
unit
Fig. 161 Fitting tail light
unit
– Make sure the connector is correctly in place.
– Press the rear light unit backwards (driving direction) by fitting
the fastenings into the rubber mountings ⇒ Fig. 160 A
.
– Take the screwdriver or a Torx 20 key (T20) from the vehicle tool
kit and tighten (turning clockwise ⇒
Fig. 161) the two retaining
screws that secure the front of the light.
Page 224 of 249
223
Fuses and bulbs
Changing rear lights (in rear lid) Removing the bulb holder
The rear lid must be open to change the bulbs.
Fig. 162 Remove the
cover from the rear lid
Fig. 163 Remove the bulb holder You can access the bulb holder for the inner rear lights from the in-
side of the rear lid.
–
Check which of the bulbs is defective.
– Open the cover to access the lights, turning it by hand in the di-
rection indicated by the arrows.
– Access the lights by disconnecting the connector 1
⇒ Fig. 163
and unscrewing the bulb holder ⇒ Fig. 163 . Take care not
to lose the bulb holder retaining screw.
– Change the bulbs ⇒ page 223.
Changing bulbs
All bulbs can be changed easily in the bulb holder.
Fig. 164 Position of the
bulbs in the bulb holder
The bulbs are secured with a bayonet fastener. The table below
gives an overview of the bulbs ⇒ table on page 224.
Safety FirstOperating instructionsPractical TipsTechnical specifications