2012 Seat Leon 5D change time
[x] Cancel search: change timePage 4 of 49

Table of Contents
General information . . . . . . . . . . . . . . . . 4
Important Information . . . . . . . . . . . . . . 5
Introduction . . . . . . . . . . . . . . . . . . . . . . . . . . 6
Before using the unit for the first time . . . . . . 6
Safety notes . . . . . . . . . . . . . . . . . . . . . . . . . . . . . . 6
Unit overview . . . . . . . . . . . . . . . . . . . . . . . . . . . . . 8
General operating information . . . . . . . . . . . . . 10
Audio mode . . . . . . . . . . . . . . . . . . . . . . . . . . . 12
FM and AM Radio mode . . . . . . . . . . . . . . . . . . . . 12
RDS* and TP* radio data services (Traffic
Programme) . . . . . . . . . . . . . . . . . . . . . . . . . . . . . . . 17
DAB* radio mode . . . . . . . . . . . . . . . . . . . . . . . . . . 20
Media mode . . . . . . . . . . . . . . . . . . . . . . . . . . . . . . 23
External audio sources (AUX and audio
Bluetooth ®
) . . . . . . . . . . . . . . . . . . . . . . . . . . . . . . . 30
MEDIA-IN multimedia interface . . . . . . . . . . . . . 32
External CD changer* . . . . . . . . . . . . . . . . . . . . . . 36
Settings menus . . . . . . . . . . . . . . . . . . . . . . 39
Sound settings (SOUND) . . . . . . . . . . . . . . . . . . . 39
System and function settings (SETUP) . . . . . . 40Abbreviations
. . . . . . . . . . . . . . . . . . . . . . . . 44
Abbreviations . . . . . . . . . . . . . . . . . . . . . . . . . . . . . 44
Index . . . . . . . . . . . . . . . . . . . . . . . . . . . . . . . . . . . 45
3
Table of Contents
Page 7 of 49

6Introduction
Introduction
Before using the unit for the first time
Before using the unit for the first time, carry out the following steps. This
will enable you to use the unit safely and make full use of the functions it
provides:
Observe the basic safety notes .⇒ page 6.
Familiarise yourself with the unit overview.⇒ page 8.
Use suitable data media for Media mode.⇒ page 23.
Safety notes
WARNING
Distracting the driver in any way can lead to an accident and cause inju-
ries. Operating the infotainment system while driving can distract your
attention from the traffic.
● Always drive carefully and responsibly.
● Select volume settings that allow you to easily hear signals from out-
side the vehicle at all times (e.g. emergency service sirens).
● If you set the volume excessively high you may suffer damage to your
ears. This can also happen if you are exposed to an excessively high vol-
ume even for a short time.
WARNING
The volume level may suddenly change when you switch audio source or
connect a new audio source.
● Reduce the base volume before switching audio source or connecting
a new audio source ⇒ page 10.
WARNING
Connecting, inserting or removing a data medium while driving can dis-
tract your attention from the traffic and cause an accident.
WARNING
Connecting leads for external devices may obstruct the driver.
● Arrange the connecting leads so that they do not obstruct the driver.
WARNING
External devices that are placed loose in the vehicle or not properly se-
cured could be flung though the interior during a sudden driving or brak-
ing manoeuvre, or in the event of an accident.
● Never, for any reason, fit the external units on the doors, on the wind-
screen, on or near the area marked “AIRBAG” on the steering wheel, on
the dash panel, on the seat backrests or between these areas and the
passengers. These units may cause serious injury in the event of an acci-
dent, especially if the airbag is activated.
Page 15 of 49

14Audio mode
StatusFunctionRadio mode with ... displayed in
the centre line of the screen
⇒ fig. 4.Switches to the next available station
on the current frequency band. As you
scroll through the subsequent sta-
tions will be shown.
Radio mode with ... displayed in
the bottom line of the screen
⇒ fig. 5.Switches to the next stored station
⇒ page 15.
Radio mode with ... displayed in
the centre line of the screen and TP
indication ⇒ fig. 4.Switches to the next available traffic
news station ⇒ page 17.
AM mode: quickly browsing the frequency band
In AM mode it is possible to skip stations.
●Press and hold the SEEK / ...
rocker switch.
● When the rocker switch SEEK / ... is released,
a search will be performed
until the next tunable station is found.
Tuning to a station frequency manually
● Select the desired frequency band ⇒ page 12.
● Turn the setting knob ⇒ fig. 1 8
until the desired station frequency
(e.g. 89.9 MHz) is displayed on the screen. Scan function (SCAN)
Fig. 6 Additional radio functions and scan in progress (SCAN).
Starting and stopping the scan function
● Select the desired frequency band in Radio mode ⇒ page 12.
● Press the setting knob ⇒ fig. 1 8
to start the scan function.
● ALTERNATIVELY: Press the MENU unit button
⇒ fig. 1 2 and start the
scan function with the SCAN function button ⇒ fig. 6.
The scan function commences with the following available station. The func-
tion button SCAN
is underlined.
In general all the stations that can be received on the selected frequency
band are played for approximately 5 seconds.
● Press the setting knob or the SCAN
function button again to stop the
scan function at the station that is currently tuned.
Selecting SCAN PRE
or SCAN ALLIf when you start the scan function a stored station is played, in some units
you can select whether to play
only the stored stations or all the stations
that can be received by pressing several times. The function button display
will change accordingly:
SCAN PRE
: Only the stored stations will be played.
Page 24 of 49
23
Audio mode
Media mode Introduction
Media sources are audio sources containing audio files on various different
data media (e.g. CD, external MP3 player). These audio files can be played
by the radio system from its corresponding players or audio input sockets
(internal CD player, external CD changer, AUX-IN multimedia socket).
Additional information and warnings:
● Safety notes ⇒ page 6
● Unit overview ⇒ page 8
● External audio sources (AUX, MDI) ⇒ page 30
● MEDIA-IN multimedia interface ⇒ page 32
● External CD changer ⇒ page 36
● System and function settings (SETUP) ⇒ page 40
Note
The audio coding technology MPEG-4 HE-AAC and patents have a Fraunhof-
er IIS licence.
Note
This product is protected by copyright and is property of Microsoft Corpora-
tion. This use and marketing of technology of this type beyond the configu-
ration of this product is prohibited without the permission of Microsoft or an
authorised branch of Microsoft. Requirements for media sources and audio files
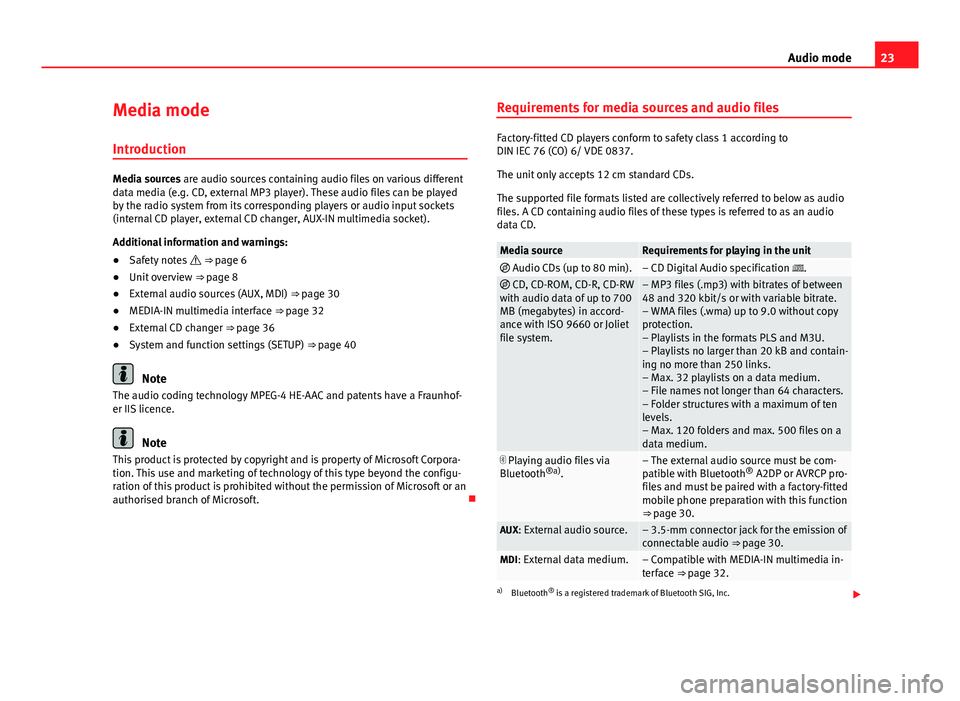
Factory-fitted CD players conform to safety class 1 according to
DIN IEC 76 (CO) 6/ VDE 0837.
The unit only accepts 12 cm standard CDs.
The supported file formats listed are collectively referred to below as audio
files. A CD containing audio files of these types is referred to as an audio
data CD.
Media sourceRequirements for playing in the unit
Audio CDs (up to 80 min).– CD Digital Audio specification . CD, CD-ROM, CD-R, CD-RW
with audio data of up to 700
MB (megabytes) in accord-
ance with ISO 9660 or Joliet
file system.– MP3 files (.mp3) with bitrates of between
48 and 320 kbit/s or with variable bitrate.
– WMA files (.wma) up to 9.0 without copy
protection.
– Playlists in the formats PLS and M3U.
– Playlists no larger than 20 kB and contain-
ing no more than 250 links.
– Max. 32 playlists on a data medium.
– File names not longer than 64 characters.
– Folder structures with a maximum of ten
levels.
– Max. 120 folders and max. 500 files on a
data medium.
Playing audio files via
Bluetooth ®a)
.– The external audio source must be com-
patible with Bluetooth ®
A2DP or AVRCP pro-
files and must be paired with a factory-fitted
mobile phone preparation with this function
⇒ page 30.
AUX: External audio source.– 3.5-mm connector jack for the emission of
connectable audio ⇒ page 30.
MDI: External data medium.– Compatible with MEDIA-IN multimedia in-
terface ⇒ page 32.
a) Bluetooth ®
is a registered trademark of Bluetooth SIG, Inc.
Page 26 of 49
25
Audio mode
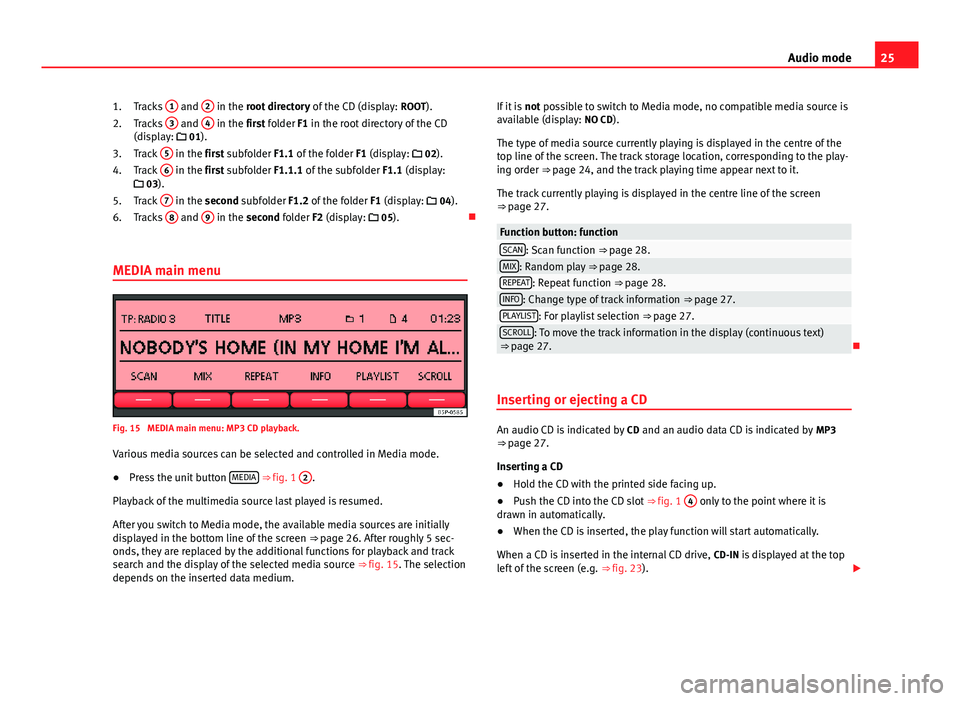
Tracks 1
and 2 in the root directory
of the CD (display: ROOT).
Tracks 3 and 4 in the first folder F1 in the root directory of the CD
(display: 01).
Track 5
in the first subfolder F1.1 of the folder
F1 (display: 02).
Track 6 in the first subfolder F1.1.1 of the subfolder
F1.1 (display:
03).
Track 7
in the second subfolder F1.2 of the folder
F1 (display: 04).
Tracks 8 and 9 in the second folder F2 (display:
05).
MEDIA main menu
Fig. 15 MEDIA main menu: MP3 CD playback. Various media sources can be selected and controlled in Media mode.
● Press the unit button MEDIA
⇒ fig. 1
2.
Playback of the multimedia source last played is resumed.
After you switch to Media mode, the available media sources are initially
displayed in the bottom line of the screen ⇒ page 26. After roughly 5 sec-
onds, they are replaced by the additional functions for playback and track
search and the display of the selected media source ⇒ fig. 15. The selection
depends on the inserted data medium. 1.
2.
3.
4.
5.
6. If it is
not possible to switch to Media mode, no compatible media source is
available (display: NO CD).
The type of media source currently playing is displayed in the centre of the
top line of the screen. The track storage location, corresponding to the play-
ing order ⇒ page 24, and the track playing time appear next to it.
The track currently playing is displayed in the centre line of the screen
⇒ page 27.
Function button: functionSCAN: Scan function ⇒ page 28.MIX: Random play ⇒ page 28.REPEAT: Repeat function ⇒ page 28.INFO: Change type of track information ⇒ page 27.PLAYLIST: For playlist selection ⇒ page 27.SCROLL: To move the track information in the display (continuous text)
⇒ page 27.
Inserting or ejecting a CD
An audio CD is indicated by CD and an audio data CD is indicated by MP3
⇒ page 27.
Inserting a CD
● Hold the CD with the printed side facing up.
● Push the CD into the CD slot ⇒ fig. 1 4
only to the point where it is
drawn in automatically.
● When the CD is inserted, the play function will start automatically.
When a CD is inserted in the internal CD drive, CD-IN is displayed at the top
left of the screen (e.g. ⇒ fig. 23).
Page 27 of 49
26Audio mode
Ejecting CDs
● Press the EJECT
unit button
⇒ fig. 1.
● The CD in the drive will be ejected and must be removed within 10 sec-
onds.
If the CD is not removed within 10 seconds, it is retracted again for safety
reasons.
Error messages on the display
A reading error is indicated by ERROR in the title bar.
An error message in the bottom line of the screen indicates the possible
cause of the error.
MessageMeaning and consequencesNO CDNo compatible data medium.
It is not possible to switch to Media mode.
CD ROMData CD inserted.
CD will be ejected.
CHECK CDThe inserted CD cannot be read.
CD will be ejected.
Check for damage.
TEMPERATURECD drive is too hot.
CD playback is disabled.
Another audio source will be played.
SERVICEMechanical fault in the CD drive.
Contact a specialised workshop.
Note
Uneven road surfaces and strong vibrations may cause the CD to jump. Selecting the media source
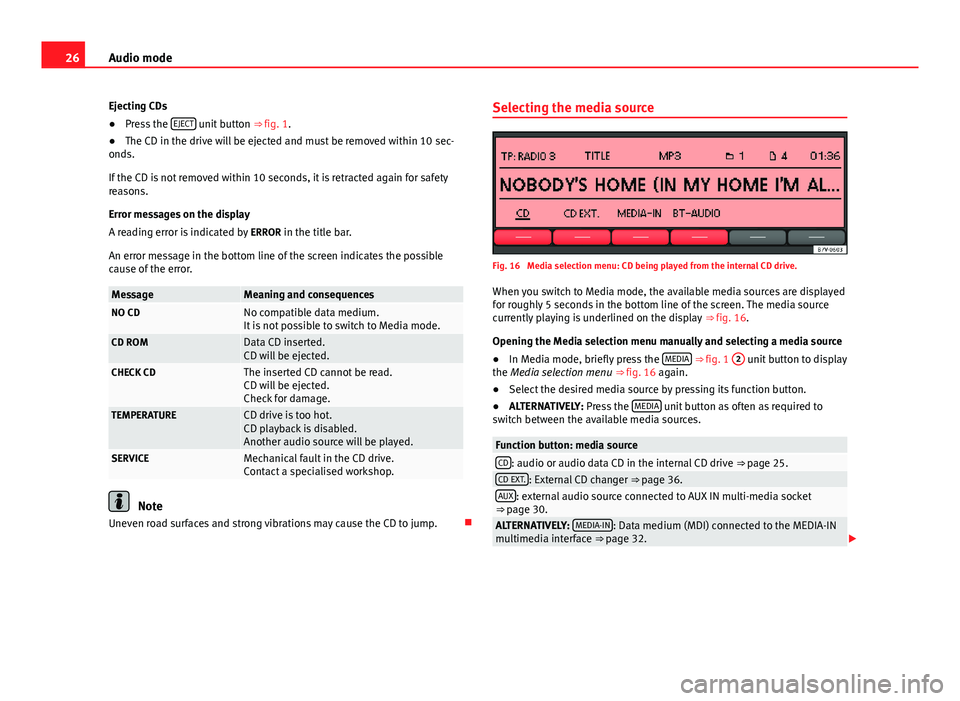
Fig. 16 Media selection menu: CD being played from the internal CD drive.
When you switch to Media mode, the available media sources are displayed
for roughly 5 seconds in the bottom line of the screen. The media source
currently playing is underlined on the display ⇒ fig. 16.
Opening the Media selection menu manually and selecting a media source
● In Media mode, briefly press the MEDIA
⇒ fig. 1
2 unit button to display
the Media selection menu ⇒ fig. 16 again.
● Select the desired media source by pressing its function button.
● ALTERNATIVELY: Press the MEDIA
unit button as often as required to
switch between the available media sources.
Function button: media sourceCD: audio or audio data CD in the internal CD drive ⇒ page 25.CD EXT.: External CD changer ⇒ page 36.AUX: external audio source connected to AUX IN multi-media socket
⇒ page 30.
ALTERNATIVELY: MEDIA-IN: Data medium (MDI) connected to the MEDIA-IN
multimedia interface ⇒ page 32.
Page 29 of 49
28Audio mode
Browsing tracks
Press the ... / TRACK
⇒ fig. 1 rocker switch to the left or right.
How to access itFunctionBriefly pressing to the
left.Goes to the start of the current track.Briefly pressing to the right.Next track.Briefly pressing twice in quick suc-
cession to the left.Goes to the start of the previous track.
Pressing and holding to the left.Rewind.Pressing and holding to the right.Fast forward.
You can also change track by turning the setting knob ⇒ fig. 1 8.
Changing folder in audio data CD mode
● Press the FOLDER
or ... / FLDR ⇒ fig. 1
9 rocker switch to the right
or left to switch to the first track of the next or previous folder respectively.
After changing folder or track, the storage location corresponding to the
playing order of the audio data CD is briefly displayed (in fig. 18: folder 1
and track number 5). After roughly 5 seconds, the selected track informa-
tion is displayed again.
Playing playlists
Playlists on data media do not play automatically.
● Press the PLAYLIST
function button to start playing the playlists on data
media.
● Press the FOLDER
or ... / FLDR rocker switch to the right or left to
switch to the first track of the next or previous playlist respectively.
The scan function (SCAN) and random playback (MIX) are only available for
the playlist you are listening to ⇒ page 28.
● Press the PLAYLIST
function button again to stop playing the playlists.
Note
● Selecting tracks and CDs from an external CD changer ⇒ page 36.
● Selecting tracks and CDs via MEDIA-IN multimedia interface
⇒ page 32.
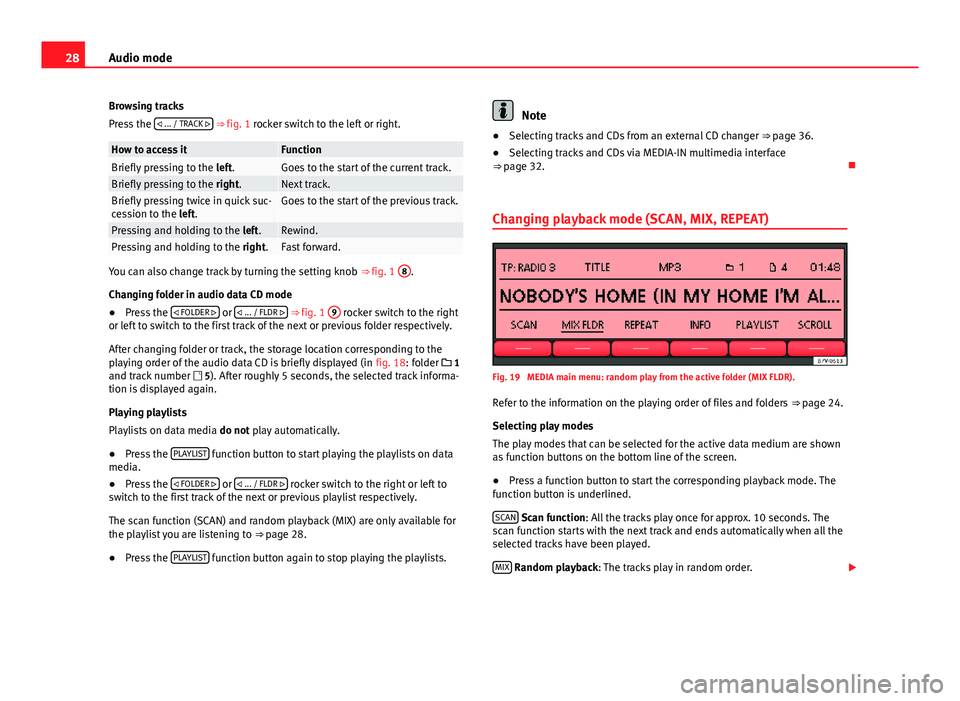
Changing playback mode (SCAN, MIX, REPEAT)
Fig. 19 MEDIA main menu: random play from the active folder (MIX FLDR).
Refer to the information on the playing order of files and folders ⇒ page 24.
Selecting play modes
The play modes that can be selected for the active data medium are shown
as function buttons on the bottom line of the screen.
● Press a function button to start the corresponding playback mode. The
function button is underlined.
SCAN
Scan function: All the tracks play once for approx. 10 seconds. The
scan function starts with the next track and ends automatically when all the
selected tracks have been played.
MIX
Random playback: The tracks play in random order.
Page 30 of 49
29
Audio mode
REPEAT
Repeat function : Playback is repeated once all the tracks have been
played once. In data media with compressed audio files (MP3 and WMA),
only folders can be repeated, not the full content of the media.
The repeat (Repeat) and random playback (Mix) functions remain active for
the corresponding media source until they are closed for that source.
● Press the SCAN
, MIX or RPT ... function button again to stop the current
playback mode at the track currently playing.
The scan function can also be started and stopped by pressing the setting
button ⇒ fig. 1 8
.
Limiting the playback mode to the folders, playlists or tracks
Depending on the audio source that is being played, playback can be limi-
ted to the files, folders or playlists by pressing the playback mode function
button several times. The display of the function button changes according-
ly (for example in fig. 19: MIX FLDR
).
Display on the function button: function... CD or ... ALL: All the tracks on the active data medium are played in the
selected playback mode.
... FLD: Only the tracks in the active folder are played in the selected play-
back mode.
... PLS: Only the tracks of the active playlists are played in the selected
playback mode. Playing playlists ⇒ page 28.
... TRACK: Repeats the track (title) that is playing (only with REPEAT).
Displays on the function buttons may vary with equipment model.
Compatibility with all encoding/recording software, recording devices and
recording media cannot be guaranteed. Incompatible USB devices can
make noise, interrupt playback or not playback at all.