Page 169 of 239

battery................................................... (up to the end of the DU)
4.11
ENG_UD11753_3
Batterie (X95 - B95 - D95 - Renault)
ENG_NU_837-6_BDK95_Renault_4
The battery 1 does not require any
maintenance.label A
Observe the indications on the battery:
– 2 naked flames and smoking forbid -
den;
– 3 eye protection required;
– 4 keep away from children;
– 5 explosive materials;
– 6 refer to the handbook;
– 7 corrosive materials.
Battery
The battery is a specific
type , please ensure it is
replaced with the same
type. Consult an approved
dealer.
Handle the battery with care
as it contains sulphuric acid,
which must not come into
contact with eyes or skin. If
it does, wash the affected area with
plenty of cold water. If necessary,
consult a doctor.
Ensure that naked flames, red hot
objects and sparks do not come into
contact with the battery as there is a
risk of explosion.
BA tteR y
Depending on the vehicle, a system
continuously checks the battery charge
status. If the level drops, the message
“Battery low start engine ” is displayed
on the instrument panel. In this case,
start the engine. Then the message
“ Battery charging ” appears on the in -
strument panel for the duration of the
charging time.
The charge status of your battery can
decrease especially if you use your ve-
hicle:
– for short journeys;
– for driving in town;
– when the temperature drops;
– after extended use of consumers
(radio etc.) with the engine switched
off.
Replacing the battery
As this operation is complex, we advise
you to contact an approved Dealer.
1
The engine may be hot
during operations in close
proximity. In addition, the
engine cooling fan may
start at any moment.
Risk of injury.
A234
567
Page 170 of 239

maintenance:bodywork ........................................ (up to the end of the DU)
washing ................................................ (up to the end of the DU)
paintwork maintenance ................................... (up to the end of the DU)
anti-corrosion protection ....................... (up to the end of the DU)
4.12
ENG_UD10494_3
Entretien de la carrosserie (X45 - H45 - Renault)
ENG_NU_837-6_BDK95_Renault_4
Jaune NoirNoir texte
Bodywork maintenance
BODyWORk MAintenAnCe (1/2)
– Use solvents not approved by our
Technical Department to remove
stains as this could damage the
paintwork.
– Drive frequently in snow or muddy
conditions without washing the ve -
hicle, particularly under the wheel
arches and body.y ou should not:
– Degrease or clean mechanical com-
ponents (e.g. the engine compart -
ment), underneath the body, parts
with hinges (e.g. inside the fuel tank
flap) and painted plastic external
fittings (e.g. bumpers) using high-
pressure cleaning equipment or by
spraying on products not approved
by our Technical Department. If ade-
quate precautions are not taken, this
could give rise to corrosion or opera -
tional faults.
– Wash the vehicle in bright sunlight or
freezing temperatures.
– Scrape off mud or dirt without
prewetting.
– Allow dirt to accumulate.
– Allow rust to form following minor im-
pacts.
protection against the effects
of corrosive agents
Although your vehicle has been treated
with very effective anti-corrosion prod -
ucts, it nevertheless remains subject to
the effects of:
– corrosives in the atmosphere
– atmospheric pollution (urban and
industrial areas),
– saline atmospheres (near the
sea, particularly in hot weather),
– seasonal and damp climatic con-
ditions, (e.g.: road salt in winter,
water from road cleaners, etc.).
– abrasives
Wind-borne dust and sand, mud,
road grit thrown up by other vehi -
cles, etc.
– minor impacts
You should take a minimum number of
precautions in order to safeguard your
vehicle against such risks and not to
lose the benefit of your vehicle’s anti -
corrosion protection.
Page 171 of 239

JauneNoirNoir texte
4.13
ENG_UD10494_3
Entretien de la carrosserie (X45 - H45 - Renault)
ENG_NU_837-6_BDK95_Renault_4
– Before going through a roller type car
wash, return the windscreen wiper
stalk to the Off position (refer to
the information on the “Windscreen
wash/wipe” in Section 1). Check the
mounting of external accessories,
additional lights and mirrors, and
ensure that the wiper blades are se-
cured with adhesive tape.
Remove the radio aerial mast if your
vehicle is fitted with this equipment.
Remember to remove the tape and
refit the antenna after washing.
– Spray mechanical components,
hinges, etc., with products approved
by our Technical Department to
protect them after they have been
cleaned.
BODyWORk MAintenAnCe (2/2)
We have selected special products
to care for your vehicle and you can
obtain these from the manufactur -
er’s accessory outlets.
– Observe the vehicle stopping dis -
tances when driving on gravelled
surfaces to prevent paint damage.
– Repair, or have repaired quickly,
areas where the paint has been
damaged, to prevent corrosion
spreading.
– Remember to visit the body shop
periodically if your vehicle has an
anti-corrosion warranty. Refer to the
Maintenance Service Booklet.
– Respect local regulations about
washing vehicles (e.g. do not wash
your vehicle on a public highway).you should
– Wash your car frequently, with the
engine off , with cleaning products
recommended by our Technical
Department (never use abrasive
products) and be sure to jet-rinse off:
– spots of tree resin and industrial
grime;
– bird droppings, which cause a
chemical reaction with the paint
that rapidly discolours paint -
work and may even cause the
paint to peel off;
Wash the vehicle immediately
to remove these marks since it
is impossible to remove them by
polishing;
– salt, particularly in the wheel
arches and underneath the body
after driving in areas where the
roads have been gritted;
– mud in the wheel arches and un-
derneath the body which form
damp patches.
Page 172 of 239

maintenance:interior trim ...................................... (up to the end of the DU)
interior trim maintenance ................................... (up to the end of the DU)
4.14
ENG_UD14353_2
Entretien des garnitures intérieures (X95 - B95 - D95 - J95 - R95 - \
L38 - E33 - X33 - X38 - X62 - X32 - B32 - Renault)
ENG_NU_837-6_BDK95_Renault_4
Interior trim maintenance
– Seat belts
These must be kept clean.
Use products selected by our
Technical Department (Approved
outlets) or warm, soapy water and a
sponge and wipe with a dry cloth.
Detergents or dyes must not be
used under any circumstances.
Whatever type of stain is on the trim,
use soapy water (if possible, warm
water) containing:
–
natural soap,
– washing up liquid (with one part
washing up liquid to 200 parts water).
Rinse off with a soft, damp cloth.
Special instructions
– glass instrument panels (e.g. in-
strument panel, clock, exterior tem -
perature display, radio display)
Use a soft cloth (or cotton wool).
If this does not clean it properly, use
a soft cloth (or cotton wool) slightly
moistened with soapy water and
then wipe clean with a soft damp
cloth or cotton wool.
Finally, carefully dry off with a soft
dry cloth.
Cleaning products containing al -
cohol must not be used under any
circumstances.
inteRiOR tRiM MAintenAnCe
y ou should not:
You are strongly advised not to po -
sition objects such as deodorants,
scents, etc. near air vents, as this could
damage your dashboard trim.
You are strongly advised
not to use high-pressure or
spray cleaning equipment
inside the passenger com -
partment: use of such equipment
could impair the correct functioning
of the electrical or electronic compo-
nents in the vehicle, or have other
detrimental effects.
Page 173 of 239

5.1
ENG_UD19031_7
Sommaire 5 (X95 - B95 - D95 - Renault)
ENG_NU_837-6_BDK95_Renault_5
Section 5: Practical advice
Puncture . . . . . . . . . . . . . . . . . . . . . . . . . . . . . . . . . . . . . . . . . . . . . . . . . . . . . . . . . . . . . . . . . . . . . . 5.2
Emergency spare wheel . . . . . . . . . . . . . . . . . . . . . . . . . . . . . . . . . . . . . . . . . . . . . . . . . . . . . . . . . . 5.2
Tyre inflation kit . . . . . . . . . . . . . . . . . . . . . . . . . . . . . . . . . . . . . . . . . . . . . . . . . . . . . . . . . . . . . . . . . 5.3
Tool kit (jack - wheelbrace, etc.) . . . . . . . . . . . . . . . . . . . . . . . . . . . . . . . . . . . . . . . . . . . . . . . . . . . . 5.6
Wheel trim . . . . . . . . . . . . . . . . . . . . . . . . . . . . . . . . . . . . . . . . . . . . . . . . . . . . . . . . . . . . . . . . . . . . . 5.6
Changing a wheel . . . . . . . . . . . . . . . . . . . . . . . . . . . . . . . . . . . . . . . . . . . . . . . . . . . . . . . . . . . . . . . 5.7
Tyres (tyre and wheel safety, use in winter) . . . . . . . . . . . . . . . . . . . . . . . . . . . . . . . . . . . . . . . . . . . 5.9
Headlights (changing bulbs) . . . . . . . . . . . . . . . . . . . . . . . . . . . . . . . . . . . . . . . . . . . . . . . . . . . . . . . 5.12
Rear lights (changing bulbs) . . . . . . . . . . . . . . . . . . . . . . . . . . . . . . . . . . . . . . . . . . . . . . . . . . . . . . . 5.15
Indicator lights (changing bulbs) . . . . . . . . . . . . . . . . . . . . . . . . . . . . . . . . . . . . . . . . . . . . . . . . . . . . 5.20
Interior lights (changing bulbs) . . . . . . . . . . . . . . . . . . . . . . . . . . . . . . . . . . . . . . . . . . . . . . . . . . . . . 5.21
Fuses . . . . . . . . . . . . . . . . . . . . . . . . . . . . . . . . . . . . . . . . . . . . . . . . . . . . . . . . . . . . . . . . . . . . . . . . . 5.23
Battery . . . . . . . . . . . . . . . . . . . . . . . . . . . . . . . . . . . . . . . . . . . . . . . . . . . . . . . . . . . . . . . . . . . . . . . . 5.25
RENAULT card: battery . . . . . . . . . . . . . . . . . . . . . . . . . . . . . . . . . . . . . . . . . . . . . . . . . . . . . . . . . . . 5.27
Fitting a radio . . . . . . . . . . . . . . . . . . . . . . . . . . . . . . . . . . . . . . . . . . . . . . . . . . . . . . . . . . . . . . . . . . . 5.28
Accessories . . . . . . . . . . . . . . . . . . . . . . . . . . . . . . . . . . . . . . . . . . . . . . . . . . . . . . . . . . . . . . . . . . . . 5.29
Wiper (replacing blades) . . . . . . . . . . . . . . . . . . . . . . . . . . . . . . . . . . . . . . . . . . . . . . . . . . . . . . . . . . 5.30
Towing . . . . . . . . . . . . . . . . . . . . . . . . . . . . . . . . . . . . . . . . . . . . . . . . . . . . . . . . . . . . . . . . . . . . . . . . 5.31
Operating faults . . . . . . . . . . . . . . . . . . . . . . . . . . . . . . . . . . . . . . . . . . . . . . . . . . . . . . . . . . . . . . . . . 5.33
Page 174 of 239

emergency spare wheel ....................... (up to the end of the DU)
puncture ................................................ (up to the end of the DU)
5.2
ENG_UD18913_3
Roue de secours (X95 - B95 - D95 - Renault)
ENG_NU_837-6_BDK95_Renault_5
Puncture
Emergency spare wheel
Puncture, emergency sP are wheel
special note:
The Tyre Pressure Monitor function
does not check the emergency spare
wheel (the wheel replaced by the emer-
gency spare wheel disappears from the
instrument panel display).
Refer to the information on the “Tyre
pressure monitor” in Section 2.In the event of a puncture,
depending on the vehicle,
you will have:
An emergency spare wheel or tyre in -
flation kit (refer to the information on the
following pages).
emergency spare wheel
This is located in the luggage compart-
ment. To access it:
– open the tailgate;
– depending on the vehicle, unscrew
the anchorage points;
– fold back the luggage compartment
carpet using tab 1;
– unscrew the central mounting;
– remove the emergency spare wheel.
If the emergency spare wheel has been stored for several years, have it checked by your Dealer to ensure that it is
safe to use.
Vehicles fitted with an emergency spare wheel smaller than the four other\
wheels:
– Never fit more than one emergency spare wheel to the same vehicle.
– Replace the emergency spare wheel as soon as possible with a wheel with the same dimensions as the original.
– When this is fitted to the vehicle, which must only be a temporary measure, the driving speed must not exceed the speed
indicated on the label on the wheel.
– Fitting an emergency spare wheel may alter the way the vehicle usually runs. Avoid sudden acceleration or deceleration and
reduce your speed when cornering.
– If you need to use snow chains, fit the emergency spare wheel to the rear axle and check the tyre pressure.
1
Page 175 of 239

tyre inflation kit...................................... (up to the end of the DU)
5.3
ENG_UD18914_3
Kit de gonflage (X61 - X95 - B95 - D95 - L38 - X38 - X32 - B32 - Renaul\
t)
ENG_NU_837-6_BDK95_Renault_5
Tyre inflation kit
tyre Pressure KIt (1/3)
Do not attempt to use the
inflation kit if the tyre has
been damaged as a result
of driving with a puncture.
You should therefore carefully check
the condition of the tyre sidewalls
before any operation.
Driving with underinflated, flat or
punctured tyres can be dangerous
and may make the tyre impossible
to repair.
this repair is temporary
A tyre which has been punctured
should always be inspected (and
repaired, where possible) by a spe-
cialist.
When taking a tyre which has been
repaired using this kit to be replaced,
you must inform the specialist.
When driving, vibration may be felt
due to the presence of the repair
product injected into the tyre.The kit is only approved for
inflating the tyres of the ve-
hicle originally equipped
with the kit.
It must never be used to inflate
the tyres of another vehicle, or any
other inflatable object (rubber ring,
rubber boat, etc.).
Avoid spillage on skin when han -
dling the repair liquid bottle. If drop-
lets do leak out, rinse them off with
plenty of water.
Keep the repair kit away from chil -
dren.
Do not dispose of the empty bottle
in the countryside. Return it to your
approved dealer or to a recycling or-
ganisation.
The bottle has a limited service
life which is indicated on its label.
Check the expiry date.
Contact an approved dealer to re -
place the inflation tube and repair
product bottle.
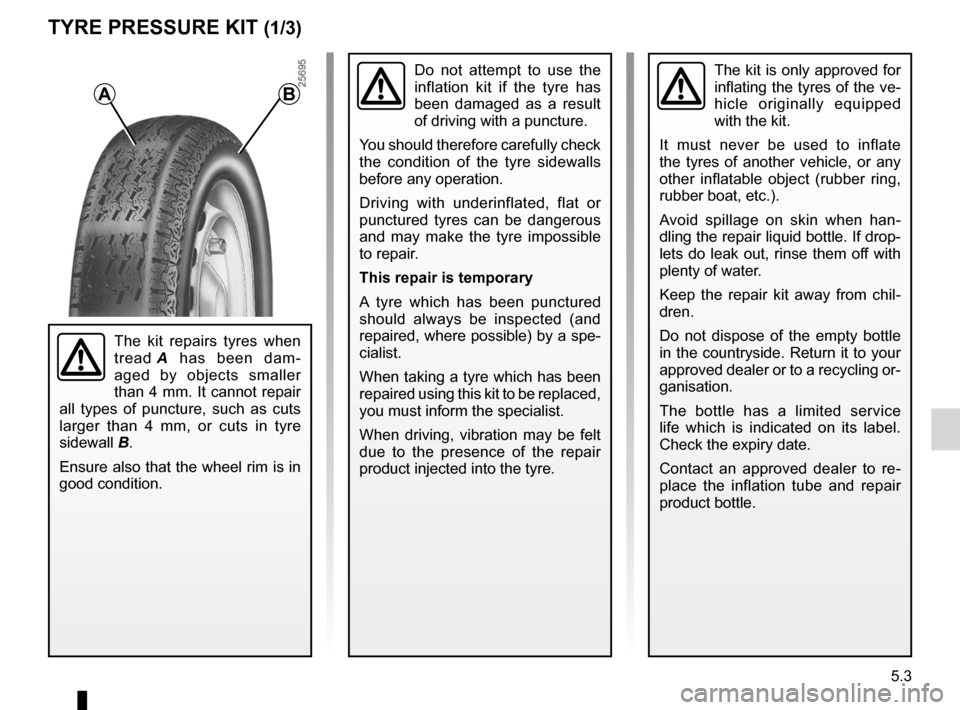
The kit repairs tyres when
tread A has been dam -
aged by objects smaller
than 4 mm. It cannot repair
all types of puncture, such as cuts
larger than 4 mm, or cuts in tyre
sidewall B.
Ensure also that the wheel rim is in
good condition.
aB
Page 176 of 239

5.4
ENG_UD18914_3
Kit de gonflage (X61 - X95 - B95 - D95 - L38 - X38 - X32 - B32 - Renaul\
t)
ENG_NU_837-6_BDK95_Renault_5
Jaune NoirNoir texte
Depending on the vehicle, in the event
of a puncture, use the kit located under -
neath the luggage compartment carpet.
Depending on the vehicle, remove the
central partition in the storage compart-
ment to access the inflation kit.
Open the kit, remove caps 1 and 3 (the
cap must not be removed from the
bottle) then screw bottle 2 to its base 3.
tyre Pressure KIt (2/3)
Do not pull out the foreign
body causing the puncture
if it is still in the tyre.
143
5
6
78
2
Before using this kit, park
the vehicle at a sufficient
distance from traffic, switch
on the hazard warning
lights, apply the handbrake, ask all
passengers to leave the vehicle and
keep them away from traffic.
w ith the ignition on,
– connect adapter 8 to the accessories
socket on the dashboard of the vehi-
cle;
– unscrew the valve cap on the wheel
concerned and screw inflation
adapter 6 onto the valve;
– press switch 5 to inflate the tyre to
the recommended pressure (check
the label affixed to the edge of the
driver’s door);
– after a maximum of 7 minutes, stop
inflating and read the pressure (on
pressure gauge 4);
n ote: while the bottle is emptying
(approximately 30 seconds), pres -
sure gauge 4 will briefly indicate a
pressure of 6 bar, then the pressure
will drop.
– adjust the pressure: to increase
it, continue inflating with the kit, to
reduce it, turn button 7 located on
the inflation adapter.
If the correct pressure cannot be
achieved, repair is impossible. Do
not drive the vehicle. consult an ap-
proved dealer.