Page 29 of 235

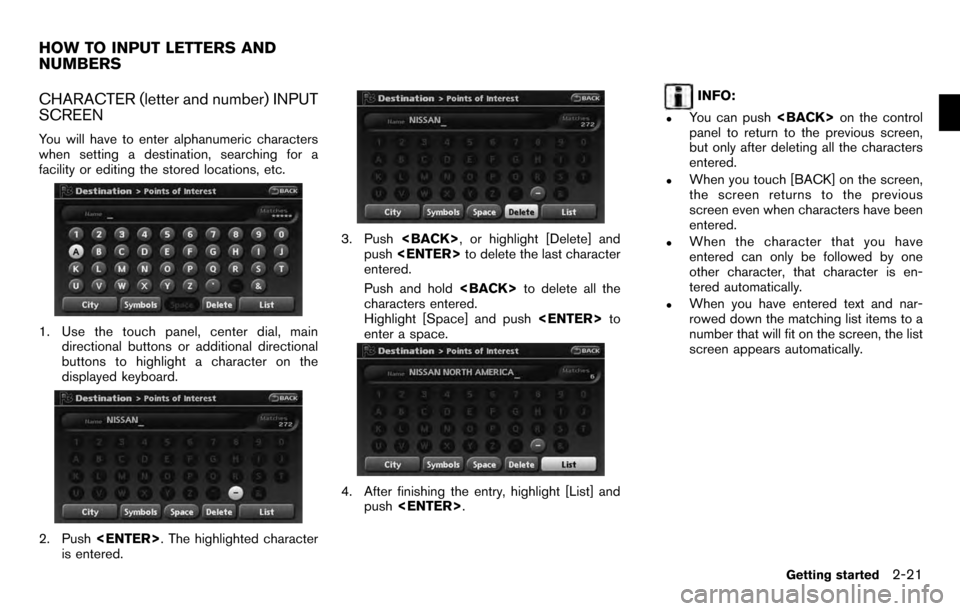
CHARACTER (letter and number) INPUT
SCREEN
You will have to enter alphanumeric characters
when setting a destination, searching for a
facility or editing the stored locations, etc.
1. Use the touch panel, center dial, maindirectional buttons or additional directional
buttons to highlight a character on the
displayed keyboard.
2. Push . The highlighted character
is entered.
3. Push , or highlight [Delete] and
push to delete the last character
entered.
Push and hold to delete all the
characters entered.
Highlight [Space] and push to
enter a space.
4. After finishing the entry, highlight [List] and push .
INFO:
.You can push on the control
panel to return to the previous screen,
but only after deleting all the characters
entered.
.When you touch [BACK] on the screen,
the screen returns to the previous
screen even when characters have been
entered.
.When the character that you have
entered can only be followed by one
other character, that character is en-
tered automatically.
.When you have entered text and nar-
rowed down the matching list items to a
number that will fit on the screen, the list
screen appears automatically.
HOW TO INPUT LETTERS AND
NUMBERS
Getting started2-21
Page 30 of 235
.Symbol keys are displayed by high-
lighting [Symbols] and pushing
. Alphabet keys are displayed
by highlighting [A-Z] and pushing
.
Symbol input screen
PHONE NUMBER INPUT SCREEN
You can enter a phone number as a search
method to look for a point of interest.
INFO:
Only the locations included in the database in
the map data can be searched by the phone
number.
1. Use the touch panel, center dial, main directional buttons or additional directional
buttons to highlight a number on the
displayed keyboard.
2. Push . The highlighted number is
entered.
3. Push , or highlight [Delete] and
push to delete the last number
entered.
Push and hold to delete all the
numbers entered.
4. After finishing the entry, highlight [Map] and push .
2-22Getting started
Page 32 of 235

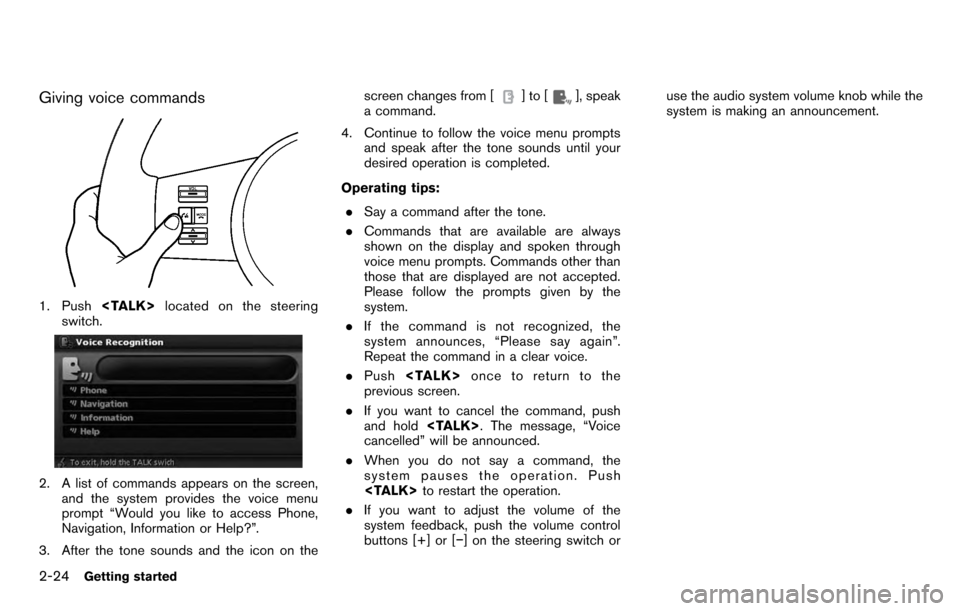
Giving voice commands
1. Push located on the steering
switch.
2. A list of commands appears on the screen, and the system provides the voice menu
prompt “Would you like to access Phone,
Navigation, Information or Help?”.
3. After the tone sounds and the icon on the screen changes from [
]to[], speak
a command.
4. Continue to follow the voice menu prompts and speak after the tone sounds until your
desired operation is completed.
Operating tips: . Say a command after the tone.
. Commands that are available are always
shown on the display and spoken through
voice menu prompts. Commands other than
those that are displayed are not accepted.
Please follow the prompts given by the
system.
. If the command is not recognized, the
system announces, “Please say again”.
Repeat the command in a clear voice.
. Push once to return to the
previous screen.
. If you want to cancel the command, push
and hold . The message, “Voice
cancelled” will be announced.
. When you do not say a command, the
system pauses the operation. Push
to restart the operation.
. If you want to adjust the volume of the
system feedback, push the volume control
buttons [+] or [−] on the steering switch or use the audio system volume knob while the
system is making an announcement.
2-24Getting started
Page 41 of 235

3 Map settings
Map types........................................................ 3-2
Plan View ..................................................... 3-2
Birdview
TM.................................................... 3-3
Building graphics ........................................... 3-3
Returning to the current vehicle location .................. 3-4
Operating with the touch operation .................... 3-5
Moving a map ................................................... 3-5
Plan View ..................................................... 3-5
Birdview
TM.................................................... 3-7
Changing the scale of a map ................................ 3-9
Operating with the buttons on the control panel .... 3-9
Operating with the center dial .........................3-10Operating with the touch operation
..................3-10
Map scale .................................................. 3-11
Other settings for the map screen ........................3-12
Switching the map view ................................. 3-12
Settings of heading/long range map view ...........3-14
Changing the Birdview
TMangle ....................... 3-16
Operation with split screen display ...................3-18
Looking at information on the map .......................3-19
Displaying landmark icons ..............................3-19
Map scrolling information ...............................3-20
Map symbols. .............................................. 3-22
Page 45 of 235
mode)
OPERATING WITH THE TOUCH OP-
ERATION
Touch [BACK] on the map screen to display the
current location map screen.
The operations for moving across the map are
different between Plan View and BirdviewTM.
PLAN VIEW
Operating with the multi-function con-
troller
Push one of the main directional buttons or
additional directional buttons corresponding to
the direction that you want to move across the
map. Hold down the button to continuously
move across the map in that direction.
Once you start moving across the map, thecross pointer appears.
If the map scale is set to 1/8 mile (200 m) or
less, the cross pointer will blink in pink when
positioned on a street, and the street name will
be displayed.
Screen information:&1Cross pointer
&2Distance from the current location to the
cross pointer
MOVING A MAP
Map settings3-5
Page 47 of 235
BirdviewTM
Operating with the multi-function con-
troller
The main directional buttons and additional
directional buttons allow movement in the
following ways.
Hold down one of the main directional buttons
or additional directional buttons to continue to
rotate or move across the map in that direction.
Rotates the map clockwise.
Rotates the map counterclockwise.
The cross pointer moves in the direc-
tion of the arrow.
Once you start moving on the map, the cross
pointer appears. Screen information:
&1Cross pointer
&2Distance from the vehicle position to the
cross pointer
&3Street name
Operating with the touch operation
1. Touch the screen.
Displays the cross pointer and 8-directional
key.
Map settings3-7
Page 49 of 235
OPERATING WITH THE BUTTONS ON
THE CONTROL PANEL
Push or . A scale
appears on the left side of the screen.
To view the map in detail, push .
To view a wider area, push .
The scale will automatically disappear when
neither nor has
been pushed for several seconds.
If the scaling operation is not performed for a
specified period of time, the scale display
disappears.
INFO:
Free zoom:
Once the [Small Step Zoom by Dial] is set to ON
in the setting screen, the scale can be changed
in smaller steps when you push and hold
or than when
you briefly push the button.
If you briefly push the button, the operation
returns to normal.
CHANGING THE SCALE OF A MAP
Map settings3-9
Page 53 of 235
![NISSAN PATHFINDER 2012 R52 / 4.G 06IT Navigation Manual 2. Highlight [Map Settings] and push<ENTER> .
3. Highlight [Change View] and push the right
button of the directional buttons.
4. Highlight the preferred map view and push <ENTER> . The indicator of t NISSAN PATHFINDER 2012 R52 / 4.G 06IT Navigation Manual 2. Highlight [Map Settings] and push<ENTER> .
3. Highlight [Change View] and push the right
button of the directional buttons.
4. Highlight the preferred map view and push <ENTER> . The indicator of t](/manual-img/5/280/w960_280-52.png)
2. Highlight [Map Settings] and push .
3. Highlight [Change View] and push the right
button of the directional buttons.
4. Highlight the preferred map view and push . The indicator of the selected
map view illuminates.
5. Push