Page 209 of 370
 Folder selection order/MP3 file playback order
(Example)Root folder (root directory)
Tree 4
Tree 3
Tree 2
Tree 1 Folder selection
In the order
File selection
In the order
To select a desired folder (M")
Folder selection order/MP3 file playback order
(Example)Root folder (root directory)
Tree 4
Tree 3
Tree 2
Tree 1 Folder selection
In the order
File selection
In the order
To select a desired folder (MP3 CDs only)
Folder up
Press
the FOLDER button (4) until the desired fold-
er number appears on the display. Folder down
Press
the FOLDER button (3) until the desired fold-
er number appears on the display.
To select a desired track
Track up
Press the button (9) repeatedly until the desired
track number appears on the display.
Track down
Press
the button (10) repeatedly until the de-
sired track number appears on the display.
NOTE
l Pressing
the button (10) once during the
song
will cause the CD player to restart play-
back from the beginning of the song.
To find a file (MP3 CDs only)
Press the following buttons to select desired file.
The selected folder or file is shown in the display. but-
ton (14) : To start this mode or cancel the se-
lection. but-
ton
(9)
or button
(10)
: To show the folder or file. but-
ton (15) : To select the folder or file. NOTE
l If
no operation is performed for 10 seconds
or more or another button is operated after
the button or button has been pressed,
searching of the desired file is cancelled.
l If
no operation is performed for 5 seconds or
more after the file is displayed, playback
starts.
To repeat a track
Press the RPT button (7) briefly while the track is
playing. “RPT” will appear on the display.
To exit the repeat mode, press the RPT button.
To repeat a folder (MP3 CDs only)
Press the RPT button (7) for 1 second or longer (un-
til you hear a beep). “F-RPT” will appear on the dis-
play. You can listen to all the files in the currently
selected folder repeatedly.
NOTE l With a disc that contains both CD-DA and
MP3 files, the repeat mode causes only files
of the same format (CD-DA only or MP3
files only) to be repeated.
To play tracks in random order
Random playback for a disc (music CDs only)
Press the RDM button (8) briefly. “RDM” will ap-
pear on the display. Tracks on the currently selec-
ted disc will be played in a random sequence.
To exit the random mode, press the RDM button
again.
Random playback for a folder (MP3 CDs only)
Press the RDM button (8) briefly. “F-RDM” will ap-
pear on the display. Files on the currently selected
folder will be played in a random sequence. For pleasant driving
5-25 5
OCRE12E1
Page 210 of 370
 To exit the random mode, press the RDM button
again.
Random playback for all folders on a disc (MP3
CDs only)
Press
the RDM button (8) for 1 second or longer
(until you hear a bee")
To exit the random mode, press the RDM button
again.
Random playback for all folders on a disc (MP3
CDs only)
Press
the RDM button (8) for 1 second or longer
(until you hear a beep). “RDM” will appear on the
display. Files from all the folders on the currently
selected disc will be played in a random sequence.
To exit the random mode, briefly press the RDM
button again.
NOTE
l With a disc that contains both CD-DA and
MP3 files, the random mode causes only
files of the same format (CD-DA only or
MP3 files only) to be played in a random se-
quence.
To eject a disc
When the CD eject button (1) is pressed, the disc
automatically stops and is ejected.
NOTE l If you do not remove the disc before
15 seconds have elapsed, the CD player will
automatically reload the disc and stop.
CD text and MP3 title display E00725000676
This CD player can display CD text and MP3 titles
including ID3 tag information. CD text
The
CD player can display disc and track titles for
discs encoded with disc and track title information.
Press the TEXT button (5) repeatedly to make se-
lections in the following sequence: disc name track name normal display mode.
Example
Disc
name
Track
name
NOTE
l The
display can show up to 16 characters. If
a disc name or track name has more than 16
characters, press the PAGE button (6) to
view the next 16 characters.
l When there is no title information to be dis-
played, the display shows “NO TITLE”.
l Characters that the CD player cannot display
are shown as “ ”. MP3 title
The
CD player can display folder and file titles for
discs encoded with folder and file information.
Press the TEXT button (5) for less than 1 second re-
peatedly to make selections in the following se-
quence: folder name file name normal dis-
play mode.
Example
Folder
name
File
name ID3 tag information
The
CD player can display ID3 tag information for
files that have been recorded with ID3 tag informa-
tion. 1. Press the TEXT button (5) for 2 seconds orlonger to switch to the ID3 tag information.
2. Then press the TEXT button for less than 1 second repeatedly to make selections in the
following sequence: album name title
name artist name normal display mode.
NOTE l To
return from ID3 tag information to the
folder name, press the TEXT button (5)
again for 2 seconds or longer.
l When there is no title information to be dis-
played, the display shows “NO TITLE”. For pleasant driving
5-26
5
OCRE12E1
Page 211 of 370
 l
The display can show up to 16 characters. If
a folder name, track name, or item of ID3 tag
information has more than 16 characters,
press the PAGE button (6) to view the next
16")
l
The display can show up to 16 characters. If
a folder name, track name, or item of ID3 tag
information has more than 16 characters,
press the PAGE button (6) to view the next
16 characters.
l Folder names and track names can each be
displayed up to a length of 32 characters.
Items of ID3 tag information can each be dis-
played up to a length of 30 characters.
l Characters that the CD player cannot display
are shown as “ ”. To play tracks from USB device*
E00756100149
You
can connect your iPod or USB memory device
to the USB input terminal and play music files stor-
ed in the iPod or USB memory device.
See the following section for the types of connecta-
ble devices and supported files.
Refer to “Types of connectable devices and suppor-
ted file specifications” on page 5-68.
See the following sections for the connecting meth-
ods, “How to connect an iPod” on page 5-67 and
“How to connect a USB memory device” on page
5-67.
If your vehicle is equipped with a Bluetooth ®
2.0
interface, you can play music files in your iPod or
USB memory device via voice operation.
Refer to “To play iPod tracks via voice operation”
on page 5-30 and “To play USB memory device
tracks via voice operation” on page 5-35.
NOTE
l The protected file by copyright might not be
able to start playback.
l It is recommended to adjust the equalizer of
the connected device is flat. For pleasant driving
5-27 5
OCRE12E1
Page 212 of 370
iPod control panel and display
E007562002381- PWR (On-Off) button
2-
FOLDER (Folder down) button
3- FOLDER (Folder up) button
4- TEXT button
5- PAGE (Title scroll) button
6- RPT (Repeat) button
7- RDM (Random) button
8- (Fast-forward/Track up) button
9- (Fast-reverse/Track down) button
10-
RADIO button
11- CD (Mode change) button
12- (Return) button
13- (Select) button
14-
iPod indicator
15- TRACK indicator
16- RPT/SHUFFLE/A-SHUFFLE indicator For pleasant driving
5-28
5
OCRE12E1
Page 213 of 370
 To play from an iPod
E00756300372
1. Press
the PWR button (1) to turn on the au-
dio system. The system turns on in the last
mode used.
2. Connect your iPod to the USB input terminal.")
To play from an iPod
E00756300372
1. Press
the PWR button (1) to turn on the au-
dio system. The system turns on in the last
mode used.
2. Connect your iPod to the USB input terminal. Refer to “How to connect an iPod” on page
5-67.
3. Press the CD button (11) several times to switch to the iPod mode. The mode changes
every time the CD button is pressed.
CD mode → iPod mode → Bluetooth ®
mode*
NOTE l If your vehicle is equipped with Auxiliary Au-
dio connector (RCA), pressing and holding
the CD button for 2 seconds or more
switches the system to the AUX mode.
4. Once the device is selected, playback starts and “iPod” appears on the display.
NOTE l Depending on the condition of your iPod, it
may take a longer time before the playback
starts.
5. To stop the playback, change over to a differ- ent mode.
NOTE l Buttons on the iPod are disabled while the
iPod is connected to the audio system.
l To adjust the volume and tone, refer to “To
adjust the volume” and “To adjust the tone”. To fast-forward/reverse the track
E00756400113
Fast-forward
To
fast-forward the current track, press the but-
ton
(8). While the button is pressed, the track will
be fast-forwarded.
Fast-reverse
To fast-reverse the current track, press the but-
ton
(9). While the button is pressed, the track will
be fast-reversed.
To select a desired track E00756500097
Track up
Press
the button (8) repeatedly until the desired
track number appears on the display.
Track down
Press
the button (9) repeatedly until the desired
track number appears on the display.
NOTE
l Pressing
the button (9) once during the
song
will cause the audio system to restart
playback from the beginning of the song.
To find a track from the iPod menu E00756600186
You can select desired tracks from the “Playlists”,
“Artists”,“Albums”,
“Songs” or “Genre” (vehicles
with Bluetooth ®
2.0 interface) menus on your iPod.
Press the following buttons to select desired tracks.
The selected menu or category or track is shown in
the display. button (12)
: To start this mode or cancel the
selection. button (8)
or button (9)
: To show the menu or category
or track. button (13)
: To select the menu or category
or track.
NOTE l If
no operation is performed for 10 seconds
or more or another button is operated after
the button or button has been pressed,
searching of the desired tracks is cancelled.
l If
no operation is performed for 5 seconds or
more after the track is displayed, playback
starts.
To play the same track repeatedly E00756700099
Press the RPT button (6) during playback to show
“RPT” in the display.
To exit this mode, press the button again.
To play tracks in random order E00756900091
Press the RDM button (7) to show “SHUFFLE” in
the
display.The iPod randomly selects tracks from
the current category and plays the selected tracks.
To exit this mode, press the button again.
To play tracks in each album in random order E00757000099
Press and hold the RDM button (7) until you hear a
beep to show “A-SHUFFLE” in the display.
The
iPod randomly selects tracks in the album
from the current category and play the selected
tracks.
To exit this mode, press the button again. For pleasant driving
5-29 5
OCRE12E1
Page 214 of 370
 To switch the display
E00757100090
The
display changes as follows every time the
TEXT button (4) is pressed during playback.
Album title → Track name → Artist name →
Genre (vehic")
To switch the display
E00757100090
The
display changes as follows every time the
TEXT button (4) is pressed during playback.
Album title → Track name → Artist name →
Genre (vehicles with Bluetooth ®
2.0 interface) →
Normal display
Example
Album title NOTE
l Up
to 16 characters are shown in the display
at once. If the title is cut off in the middle,
press the PAGE button (5). The next charac-
ters are displayed every time this button is
pressed.
l If no title is stored, “NO TITLE” is shown in
the display.
l Characters that cannot be displayed are sub-
stituted by “ ”. To play iPod tracks via voice opera-
tion
(vehicles with Bluetooth ®
2.0 inter-
face) E00757200046
Desired tracks can be selected and played from
your iPod by “Artist”, “Album”, “Playlist” and
“Genre” using voice commands.
For information concerning the voice recognition
function or speaker enrollment function, refer to
“Bluetooth ®
2.0 interface” on page 5-51.
The following explains how to prepare for voice op-
eration and play the tracks.
Preparation for voice operation E00757300135
To use the voice operation, press the SPEECH but-
ton (1) first. To search by artist name
E00757400019
1. Say “Play” on the main menu. NOTE
l The
Bluetooth®
2.0 interface starts recogniz-
ing the connected device.
If the connected device cannot be recognized
or a connection error occurs, the Bluetooth ®
2.0 interface starts an appropriate voice
guide. Follow the voice guide.
2. After the voice guide says “Would you like to play by Artist, Album, Playlist or
Genre?,” say “Artist”.
NOTE l If you say “Artist ,” you can skip
step 3.
3. After the voice guide says “What Artist would you like to play?,” say the artist name.
4. If there is only one match, the system pro- ceeds to step 6.
5. If there are two or more matches, the voice guide will say “More than one match was
found, would you like to play
name>?” If you say “Yes,” the system pro-
ceeds to step 6.
If you say “No,” the next matching artist is
uttered by the system.
NOTE l If you say “No” to three or all artist names ut-
tered by the system, the voice guide will say
“Artist not found, please try again” and the
system returns to step 2.
l Search time is dependant on the number of
songs on your connected device. Devices con-
taining a large number of songs may take lon-
ger to return search results. For pleasant driving
5-30
5
OCRE12E1
Page 215 of 370
 6. After the voice guide says “Playing <artist
name>,” the system creates a playlist index
for the artist.
NOTE l If the confirmation function is active, the
voice guide confirms")
6. After the voice guide says “Playing
name>,” the system creates a playlist index
for the artist.
NOTE l If the confirmation function is active, the
voice guide confirms if the artist name is cor-
rect. If the artist name is correct, say “Yes”.
If not, say “No”. After the voice guide says
“Artist not found, please try again,” the sys-
tem returns to step 2.
7. The system exits the voice recognition mode and starts playback.
To search by album title E00757500010
1. Say “Play” on the main menu.
NOTE l The
Bluetooth ®
2.0 interface starts recogniz-
ing the connected device.
If the connected device cannot be recognized
or a connection error occurs, the Bluetooth ®
2.0 interface starts an appropriate voice
guide. Follow the voice guide.
2. After the voice guide says “Would you like to play by Artist, Album, Playlist or
Genre?,” say “Album”.
NOTE l If you say “Album
,” you can skip step<br />
3.<br />
3. After the voice guide says “What Album would you like to play?” say the album title. 4. If <br />
there is only one match, the system pro-<br />
ceeds to step 6.<br />
5. If there are two or more matches, the voice guide will say “More than one match was<br />
found, would you like to play <album ti-<br />
tle>?” If you say “Yes,” the system proceeds<br />
to step 6.<br />
If you say “No,” the next matching album is<br />
uttered by the system.<br />
NOTE l If you say “No” to three or all album titles ut-<br />
tered by the system, the voice guide will say<br />
“Album not found, please try again” and the<br />
system returns to step 2.<br />
6. After the voice guide says “Playing <album title>,” the system creates a playlist index for<br />
the album title.<br />
NOTE l If the confirmation function is active, the<br />
voice guide confirms if the album title is cor-<br />
rect. If the album title is correct, say “Yes”.<br />
If not, say “No”. After the voice guide says<br />
“Album not found, please try again,” the sys-<br />
tem returns to step 2.<br />
7. The system exits the voice recognition mode and starts playback.<br />
To search by playlist E00757600011<br />
1. Say “Play” on the main menu. NOTE<br />
l The <br />
Bluetooth®<br />
2.0 interface starts recogniz-<br />
ing the connected device.<br />
If the connected device cannot be recognized<br />
or a connection error occurs, the Bluetooth ®<br />
2.0 interface starts an appropriate voice<br />
guide. Follow the voice guide.<br />
2. After the voice guide says “Would you like to play by Artist, Album, Playlist or<br />
Genre?,” say “Playlist”.<br />
NOTE l If you say “Playlist <playlist>,” you can skip<br />
step 3.<br />
If the device has no playlist, the voice guide<br />
will say “There are no playlists stored on de-<br />
vice” and the system returns to step 2.<br />
3. After the voice guide says “What Playlist would you like to play?,” say the playlist<br />
name.<br />
4. If there is only one match, the system pro- ceeds to step 6.<br />
5. If there are two or more matches, the voice guide will say “More than one match was<br />
found, would you like to play <playlist>?” If<br />
you say “Yes,” the system proceeds to step 6.<br />
If you say “No,” the next matching playlist<br />
name is uttered by the system.<br />
NOTE l If you say “No” to three or all playlist names<br />
uttered by the system, the voice guide will<br />
say “Playlist not found, please try again” and<br />
the system returns to step 2. For pleasant driving<br />
5-31 5<br />
OCRE12E1 <p></div><script>$(document).on('click', '#a215', function(){
$(this).hide();
$('#b215').height($('#a215').height()-22);
$('#b215').show();
});
$(document).on('click', '#b215', function(){
$(this).hide();
$('#a215').show();
});
$(document).ready(function(){
$('#b215').height($('#a215').height()-22);
});
</script>
<div style="height: 250px">
<script async src="//pagead2.googlesyndication.com/pagead/js/adsbygoogle.js"></script>
<ins class="adsbygoogle"
style="display:block; min-height: 280px"
data-ad-client="ca-pub-1094764738794676"
data-ad-slot="8211391741"
data-ad-format="auto"></ins>
<script>
(adsbygoogle = window.adsbygoogle || []).push({});
</script></div>
<a name='216'></a><h3>Page 216 of 370</h3><div id='a216'><img loading='lazy' width='960' height='679' style='border: 1px solid #444444; max-width: 100%; display:block; height: auto;' alt='MITSUBISHI L200 2012 Owners Manual (in English) 6. After the voice guide says “Playing <play-
list>,” the system creates an index for the play-
list.
NOTE l If the confirmation function is active, the
voice guide confirms if the ' title='MITSUBISHI L200 2012 Owners Manual (in English) 6. After the voice guide says “Playing <play-
list>,” the system creates an index for the play-
list.
NOTE l If the confirmation function is active, the
voice guide confirms if the ' src='/manual-img/19/34874/w960_34874-215.png' /></div><div id='b216' style='overflow: auto; width: 962px; border: 1px solid rgb(68, 68, 68); padding: 10px; background-color: rgb(238, 238, 238); max-width: 100%; height: 677.143px; display: none;'><p>6. After the voice guide says “Playing <play-<br />
list>,” the system creates an index for the play-<br />
list.<br />
NOTE l If the confirmation function is active, the<br />
voice guide confirms if the playlist name is<br />
correct. If the playlist name is correct, say<br />
“Yes”. If not, say “No”. After the voice<br />
guide says “Playlist not found, please try<br />
again,” the system returns to step 2. Refer to<br />
“Confirmation function setting” on page<br />
5-53.<br />
7. The system exits the voice recognition mode and starts playback.<br />
To search by genre E00757700041<br />
1. Say “Play” on the main menu.<br />
NOTE l The <br />
<br />
Bluetooth ®<br />
2.0 interface starts recogniz-<br />
ing the connected device.<br />
If the connected device cannot be recognized<br />
or a connection error occurs, the Bluetooth ®<br />
2.0 interface starts an appropriate voice<br />
guide. Follow the voice guide.<br />
2. After the voice guide says “Would you like to play by Artist, Album, Playlist or<br />
Genre?,” say “Genre”.<br />
NOTE l If you say “Genre <type>,” you can skip step<br />
3. 3. After <br />
the voice guide says “What Genre<br />
would you like to play?,” say the music type.<br />
4. If there is only one match, the system pro- ceeds to step 6.<br />
5. If there are two or more matches, the voice guide will say “More than one match was<br />
found, would you like to play <genre>?” If<br />
you say “Yes,” the system proceeds to step 6.<br />
If you say “No,” the next matching genre is<br />
uttered by the system.<br />
NOTE l If you say “No” to three or all genres uttered<br />
by the system, the voice guide will say<br />
“Genre not found, please try again” and the<br />
system returns to step 2.<br />
6. After the voice guide says “Playing <genre>,” the system creates an index for the<br />
genre.<br />
NOTE l If the confirmation function is active, the<br />
voice guide confirms if the genre is correct.<br />
If the genre is correct, say “Yes”. If not, say<br />
“No”. After the voice guide says “Genre not<br />
found, please try again,” the system returns<br />
to step 2. Refer to “Confirmation function set-<br />
ting” on page 5-53.<br />
7. The system exits the voice recognition mode and starts playback. For pleasant driving<br />
5-32<br />
5<br />
OCRE12E1 <p></div><script>$(document).on('click', '#a216', function(){
$(this).hide();
$('#b216').height($('#a216').height()-22);
$('#b216').show();
});
$(document).on('click', '#b216', function(){
$(this).hide();
$('#a216').show();
});
$(document).ready(function(){
$('#b216').height($('#a216').height()-22);
});
</script>
<div style="height: 250px">
<script async src="//pagead2.googlesyndication.com/pagead/js/adsbygoogle.js"></script>
<ins class="adsbygoogle"
style="display:block; min-height: 280px"
data-ad-client="ca-pub-1094764738794676"
data-ad-slot="8211391741"
data-ad-format="auto"></ins>
<script>
(adsbygoogle = window.adsbygoogle || []).push({});
</script></div>
<div class="text-center mt-3 mb-4">
<a class="btn btn-primary btn-lg" href="/2012-mitsubishi-l200-owner-s-manual-in-english/28" role="button">
Load next 8 pages
</a>
</div>
<div style="text-align: center" class="text-center my-2">
<span class="article-section">
Page:
</span><a href="/2012-mitsubishi-l200-owner-s-manual-in-english/26">< prev</a> <a class='text-dark' href="/2012-mitsubishi-l200-owner-s-manual-in-english/">1-10</a> ... <a class='text-dark' href="/2012-mitsubishi-l200-owner-s-manual-in-english/23">177-184</a> <a class='text-dark' href="/2012-mitsubishi-l200-owner-s-manual-in-english/24">185-192</a> <a class='text-dark' href="/2012-mitsubishi-l200-owner-s-manual-in-english/25">193-200</a> <a class='text-dark' href="/2012-mitsubishi-l200-owner-s-manual-in-english/26">201-208</a> <strong>209-216</strong> <a class='text-dark' href="/2012-mitsubishi-l200-owner-s-manual-in-english/28">217-224</a> <a class='text-dark' href="/2012-mitsubishi-l200-owner-s-manual-in-english/29">225-232</a> <a class='text-dark' href="/2012-mitsubishi-l200-owner-s-manual-in-english/30">233-240</a> <a class='text-dark' href="/2012-mitsubishi-l200-owner-s-manual-in-english/31">241-248</a> ... <a class='text-dark' href="/2012-mitsubishi-l200-owner-s-manual-in-english/47">376</a> <a class='text-dark' href="/2012-mitsubishi-l200-owner-s-manual-in-english/28">next ></a></div><div class="clear"></div>
</div></div>
<div class="row mt-4 mb-5">
<div class="col-md-10">
<div class="mb-3">
<form class="form-inline mb-2 form-search" action="/2012-mitsubishi-l200-owner-s-manual-in-english/" method="get">
<label class="my-1 mr-3" for="srch">Search:</label>
<div class="input-group">
<input type="search" name="srch" id="srch2" pattern=".{3,}" required title="3 characters minimum" name="srch" placeholder="search in this manual" class="form-control">
<div class="input-group-append">
<button type="submit" value="search" class="btn btn-secondary border-left-0" alt="Search">
<svg xmlns="http://www.w3.org/2000/svg" width="20" height="20" fill="currentColor" class="bi bi-search" viewBox="0 0 16 16">
<path d="M11.742 10.344a6.5 6.5 0 1 0-1.397 1.398h-.001c.03.04.062.078.098.115l3.85 3.85a1 1 0 0 0 1.415-1.414l-3.85-3.85a1.007 1.007 0 0 0-.115-.1zM12 6.5a5.5 5.5 0 1 1-11 0 5.5 5.5 0 0 1 11 0z"/>
</svg>
</button>
</div>
</div>
</form>
<div class="d-inline-block">
<a class='badge badge-pill badge-primary mr-1 mb-1' href='/2012-mitsubishi-l200-owner-s-manual-in-english/?srch=jump+start+terminals'>jump start terminals</a><a class='badge badge-pill badge-primary mr-1 mb-1' href='/2012-mitsubishi-l200-owner-s-manual-in-english/?srch=coolant+level'>coolant level</a><a class='badge badge-pill badge-primary mr-1 mb-1' href='/2012-mitsubishi-l200-owner-s-manual-in-english/?srch=ESP+inoperative'>ESP inoperative</a><a class='badge badge-pill badge-primary mr-1 mb-1' href='/2012-mitsubishi-l200-owner-s-manual-in-english/?srch=spark+plugs'>spark plugs</a><a class='badge badge-pill badge-primary mr-1 mb-1' href='/2012-mitsubishi-l200-owner-s-manual-in-english/?srch=parking+sensors'>parking sensors</a><a class='badge badge-pill badge-primary mr-1 mb-1' href='/2012-mitsubishi-l200-owner-s-manual-in-english/?srch=fog+light+bulb'>fog light bulb</a></div>
</div >
<div class="mb-3"><div class="d-inline-block mb-1 mr-2">Popular search:</div> <div class="d-inline-block"><a class='badge badge-pill badge-primary mr-1 mb-1' href='/2012-mitsubishi-l200-owner-s-manual-in-english/?srch=manual+radio+set'>manual radio set</a><a class='badge badge-pill badge-primary mr-1 mb-1' href='/2012-mitsubishi-l200-owner-s-manual-in-english/?srch=cooling'>cooling</a><a class='badge badge-pill badge-primary mr-1 mb-1' href='/2012-mitsubishi-l200-owner-s-manual-in-english/?srch=bluetooth'>bluetooth</a><a class='badge badge-pill badge-primary mr-1 mb-1' href='/2012-mitsubishi-l200-owner-s-manual-in-english/?srch=oil+additives'>oil additives</a><a class='badge badge-pill badge-primary mr-1 mb-1' href='/2012-mitsubishi-l200-owner-s-manual-in-english/?srch=diesel+particulate+filter'>diesel particulate filter</a><a class='badge badge-pill badge-primary mr-1 mb-1' href='/2012-mitsubishi-l200-owner-s-manual-in-english/?srch=jump+cable'>jump cable</a><a class='badge badge-pill badge-primary mr-1 mb-1' href='/2012-mitsubishi-l200-owner-s-manual-in-english/?srch=brake+sensor'>brake sensor</a></div></div>
</div></div>
<script>
ga('send', 'event', 'view', 'MITSUBISHI', '2012-mitsubishi-l200-owner-s-manual-in-english', {
nonInteraction: true
});</script>
</div>
<hr class="divider">
<!-- FOOTER -->
<footer class="container">
<p class="float-right">
<a class="btn btn-primary shadow text-white" href="#" role="button">
<svg xmlns="http://www.w3.org/2000/svg" width="32" height="32" fill="currentColor" class="bi bi-arrow-up-short" viewBox="0 0 16 16">
<path fill-rule="evenodd" d="M8 12a.5.5 0 0 0 .5-.5V5.707l2.146 2.147a.5.5 0 0 0 .708-.708l-3-3a.5.5 0 0 0-.708 0l-3 3a.5.5 0 1 0 .708.708L7.5 5.707V11.5a.5.5 0 0 0 .5.5z"/>
</svg>
</a>
</p>
<p class="text-center mt-5">All product names, logos, and brands are property of their respective owners. <a href="/privacy-policy">Privacy Policy & Contact Us</a></p>
</footer>
</main>
<script src="/assets/js/vendor/bootstrap.min.js"></script>
<!-- <script src="/assets/js/app.min.js"></script> -->
</body>
</html>
 1
1 2
2 3
3 4
4 5
5 6
6 7
7 8
8 9
9 10
10 11
11 12
12 13
13 14
14 15
15 16
16 17
17 18
18 19
19 20
20 21
21 22
22 23
23 24
24 25
25 26
26 27
27 28
28 29
29 30
30 31
31 32
32 33
33 34
34 35
35 36
36 37
37 38
38 39
39 40
40 41
41 42
42 43
43 44
44 45
45 46
46 47
47 48
48 49
49 50
50 51
51 52
52 53
53 54
54 55
55 56
56 57
57 58
58 59
59 60
60 61
61 62
62 63
63 64
64 65
65 66
66 67
67 68
68 69
69 70
70 71
71 72
72 73
73 74
74 75
75 76
76 77
77 78
78 79
79 80
80 81
81 82
82 83
83 84
84 85
85 86
86 87
87 88
88 89
89 90
90 91
91 92
92 93
93 94
94 95
95 96
96 97
97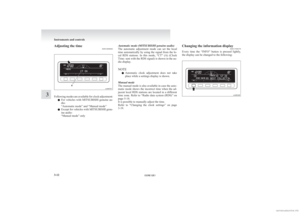 98
98 99
99 100
100 101
101 102
102 103
103 104
104 105
105 106
106 107
107 108
108 109
109 110
110 111
111 112
112 113
113 114
114 115
115 116
116 117
117 118
118 119
119 120
120 121
121 122
122 123
123 124
124 125
125 126
126 127
127 128
128 129
129 130
130 131
131 132
132 133
133 134
134 135
135 136
136 137
137 138
138 139
139 140
140 141
141 142
142 143
143 144
144 145
145 146
146 147
147 148
148 149
149 150
150 151
151 152
152 153
153 154
154 155
155 156
156 157
157 158
158 159
159 160
160 161
161 162
162 163
163 164
164 165
165 166
166 167
167 168
168 169
169 170
170 171
171 172
172 173
173 174
174 175
175 176
176 177
177 178
178 179
179 180
180 181
181 182
182 183
183 184
184 185
185 186
186 187
187 188
188 189
189 190
190 191
191 192
192 193
193 194
194 195
195 196
196 197
197 198
198 199
199 200
200 201
201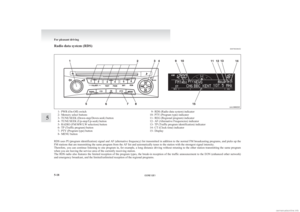 202
202 203
203 204
204 205
205 206
206 207
207 208
208 209
209 210
210 211
211 212
212 213
213 214
214 215
215 216
216 217
217 218
218 219
219 220
220 221
221 222
222 223
223 224
224 225
225 226
226 227
227 228
228 229
229 230
230 231
231 232
232 233
233 234
234 235
235 236
236 237
237 238
238 239
239 240
240 241
241 242
242 243
243 244
244 245
245 246
246 247
247 248
248 249
249 250
250 251
251 252
252 253
253 254
254 255
255 256
256 257
257 258
258 259
259 260
260 261
261 262
262 263
263 264
264 265
265 266
266 267
267 268
268 269
269 270
270 271
271 272
272 273
273 274
274 275
275 276
276 277
277 278
278 279
279 280
280 281
281 282
282 283
283 284
284 285
285 286
286 287
287 288
288 289
289 290
290 291
291 292
292 293
293 294
294 295
295 296
296 297
297 298
298 299
299 300
300 301
301 302
302 303
303 304
304 305
305 306
306 307
307 308
308 309
309 310
310 311
311 312
312 313
313 314
314 315
315 316
316 317
317 318
318 319
319 320
320 321
321 322
322 323
323 324
324 325
325 326
326 327
327 328
328 329
329 330
330 331
331 332
332 333
333 334
334 335
335 336
336 337
337 338
338 339
339 340
340 341
341 342
342 343
343 344
344 345
345 346
346 347
347 348
348 349
349 350
350 351
351 352
352 353
353 354
354 355
355 356
356 357
357 358
358 359
359 360
360 361
361 362
362 363
363 364
364 365
365 366
366 367
367 368
368 369
369 iPod control panel and display
E007562002381- PWR (On-Off) button
2-
FOLDER (Folder down) button
3- FOLDER (Folder up) button
4- TEXT button
5- PAGE (Title scroll) button
6- RPT (Repeat) button
7- RDM")