Page 193 of 370
When  the  blower  speed  selection  dial  is  set  to  the
“OFF” position, all fan-driven airflow will stop.
Temperature control dial
E00703000575
Turn 
the  temperature  control  dial  clockwise  to
make  the  air  warmer.  Turn  it  anticlockwise  to
make the air cooler.
Type 1
Type 2  NOTE
l While 
the engine coolant temperature is low,
the  temperature  of  the  air  from  the  heater
will  be  cool/cold  until  the  engine  warms  up,
even  if  you  have  selected  warm  air  with  the
dial.
Mode selection dial E00703200274
To  change  the  position  and  amount  of  air  flowing
from 
the  ventilators,  turn  the  mode  selection  dial.
(Refer  to  “Changing  the  mode  selection”  on  page
5-02.) Air selection switch
E00703400638
To change the air selection, simply press the air se-
lection switch.
l Outside air {Indication lamp (A) is OFF}
Outside 
air  is  introduced  into  the  passenger
compartment. For pleasant driving
5-09 5  
OCRE12E1  


        Page 194 of 370

l
Recirculated air {Indication lamp (A) is ON}
Air 
is  recirculated  inside  the  passenger  com-
partment. CAUTION
l
Normally, use the outside position to keep
the 
windscreen  and  side  windows  clear
and  quickly  remove  fog  or  frost  from  the
windscreen.
If high cooling performance is desired, or
if the outside air is dusty or otherwise con-
taminated  use  the  recirculation  position.
Switch to the outside position periodically
to  increase  ventilation  so  that  the  win-
dows do not become fogged up.
l Use of the recirculation position for exten-
ded time may cause the windows to fog up. Air conditioning switch
E00703501128
Push 
the  switch,  and  the  air  conditioning  compres-
sor  will  turn  on.  The  air  conditioning  indication
lamp (A) will come on. Push the switch again, and the air conditioning com-
pressor will stop and the indication lamp goes off.
CAUTION
l
When 
 using  the  air  conditioning,  the
idling  speed  may  slightly  increase  as  the
air  conditioning  compressor  is  switched
on/off  automatically.  While  the  vehicle
with  an  A/T  is  stationary,  fully  depress
the  brake  pedal  to  prevent  the  vehicle
from creeping. Operating the system in automatic
mode
E00704100919 In  normal  conditions,  use  the  system  in  the  AUTO
mode and follow these procedures:
1. Set 
the blower speed selection dial to the “AU-
TO” position.
2. Select  the  temperature  control  dial  to  the  de- sired  temperature.  The  temperature  can  be
set within a range of 17 to 27 (Type 1) or 20
to 30 (Type 2). The temperature will gradual-
ly increase as the dial is turned to the right.
3. Set  the  mode  selection  dial  to  the  “AUTO” position.
4. Push  the  air  conditioning  switch  to  operate the  air  conditioning.  When  the  air  condition-
ing operates, the indication lamp (A) in the di-
al will come on.
The  outlet  port  (except  “ ”) 
and  blower  speed,
and  ON/OFF  of  air  conditioning  will  be  controlled
automatically. For pleasant driving
5-10
5      
OCRE12E1  


        Page 195 of 370

NOTE
l Set 
the  temperature  at  about  22  (Type  1)  or
25 (Type 2) under normal conditions.
l When the temperature is set to the highest or
the  lowest  setting  under  the  AUTO  opera-
tion, the air selection, mode selection, blower
speed  and  the  air  conditioning  will  be  auto-
matically changed as follows.
Also, if manually operated after an automatic
changeover,  manual  operation  will  be  selec-
ted.
• Quick  Heating  (When  the  temperature  isset to the highest setting)
Outside  air  will  be  introduced,  the  air
flow  will  select  foot  position,  and  the  air
conditioning will stop.
• Quick  Cooling  (When  the  temperature  is set to the lowest setting)
Inside  air  will  be  recirculated,  the  air
flow  will  select  face  position,  and  the  air
conditioning will operate.
Operating the system in manual mode E00704200040
Blower  speed  and  ventilator  mode  may  be  control-
led 
manually  by  setting  the  blower  speed  selection
dial and the mode selection dial to the desired posi-
tions. To return to automatic operation, set the dials
to the “AUTO” position.
Demisting of the windscreen and door windows E00704300689CAUTION
l
For 
 safety,  make  sure  you  have  a  clear
view through all the windows. To  remove  frost  or  mist  from  the  windscreen  and
door 
windows,  use  the  mode  selection  dial  (“ ”
or “ ”).
For ordinary demisting
Use 
this  setting  to  keep  the  windscreen  and  door
windows clear of mist, and to keep the leg area heat-
ed (when driving in rain or snow). 1. Set 
the air selection switch (A) to the outside
position.
2. Set the mode selection dial to the “ ” 
posi-
tion.
3. Select  your  desired  blower  speed  by  turning the blower speed selection dial.
4. Select  your  desired  temperature  by  turning the temperature control dial.
5. Push the air conditioning switch (B). For quick demisting
1.
Set 
 the mode selection dial to the “ ” posi-
tion.
2.
Set the blower to the maximum speed.
3. Set the temperature to the highest position.
NOTE l While  the  mode  selection  dial  is  set  to  the
“ ” 
position, the air conditioning will oper-
ate automatically and the outside air position
will also be selected automatically.
l To  demist  effectively,  direct  the  air  flow
from the side ventilators towards the door win-
dows.
l Do not set the temperature control dial to the
max.  cool  position.  Cool  air  will  blow
against the window glasses and form mist on
them. For pleasant driving
5-11 5        
OCRE12E1  


        Page 196 of 370

Important operation tips for the
air conditioning E00708300951
l Park the vehicle in the shade.
Parking 
in  the  hot  sun  will  make  the  vehicle
inside extremely hot, and it will require more
time to cool the interior.
If  it  is  necessary  to  park  in  the  sun,  open  the
windows for the first few minutes of air con-
ditioning operation to expel the hot air.
l Close the windows when the air conditioning
is  in  use.  The  entry  of  outside  air  through
open  windows  will  reduce  the  cooling  effi-
ciency.
l Too much cooling is not good for the health.
The  inside  air  temperature  should  only  be  5
to 6 °C below the outside air temperature.
l When  operating  the  system,  make  sure  the
air  intake,  which  is  located  in  front  of  the
windscreen,  is  free  of  obstructions  such  as
leaves and snow. Leaves collected in the air-
intake  plenum  may  reduce  air  flow  and  plug
the plenum water drains.
Air conditioning system refrigerant
and lubricant recommendations
If the air conditioning seems less effective than usu-
al, the cause might be a refrigerant leak. We recom-
mend you to have the system inspected.
The  air  conditioning  system  in  your  vehicle  must
be  charged  with  the  refrigerant  HFC-134a  and  the
lubricant ZXL-100PG.
Use of any other refrigerant or lubricant will cause
severe  damage  which  will  result  in  the  need  to  re-
place your vehicle’s entire air conditioning system.
The  release  of  refrigerant  into  the  atmosphere
should be prevented. It is recommended that the refrigerant be recovered
and recycled for further use.
During a long period of disuse
The 
air conditioning should be operated for at least
five minutes each week, even in cold weather. This
is to prevent poor lubrication of the compressor in-
ternal  parts  and  to  maintain  the  air  conditioning  in
the best operating condition. Air purifier*
E00708400675
An 
air filter has been incorporated into this air con-
ditioning  so  that  dirt  and  dust  are  cleaned  from  the
air.
Replace  the  air  filter  periodically  as  its  ability  to
clean  the  air  will  be  reduced  as  it  collects  pollen
and  dirt.  For  the  maintenance  interval,  refer  to  the
“SERVICE BOOKLET”.
NOTE
l Operation  in  certain  conditions  such  as  driv-
ing  on  a  dusty  road  and  frequent  use  of  the
air conditioning can lead to reduction of serv-
ice  life  of  the  filter.  When  you  feel  that  the
air  flow  is  lower  than  normal  or  when  the
windscreen or windows start to fog up easily,
replace the air filter.
We recommend you to have it checked. For pleasant driving
5-12
5
OCRE12E1  


        Page 197 of 370

LW/MW/FM electronic tuning radio with CD player*
E00708501745
The audio system can be used when the ignition switch is in the “ON” or “ACC” position. A- Display window
B- Audio system
NOTE l To listen to the audio system while the engine is stopped, turn the ignition key to the “ACC” position.
l If 
a  cellular  phone  is  used  inside  the  vehicle,  it  may  create  noise  from  the  audio  equipment.  This  does  not  mean  that  anything  is  wrong  with  your  audio
equipment. In such a case, use the cellular phone at a place as far away as possible from the audio equipment.
l If  foreign  objects  or  water  get  into  the  audio  equipment,  or  if  smoke  or  a  strange  odour  comes  from  it,  immediately  turn  off  the  audio  system.  We  recom-
mend your to have it checked. Never try to repair it by yourself. Avoid continuous usage without inspection by a qualified person.
l The audio system’s control knob can be removed to deter thieves. For details, refer to “Audio system anti-theft feature” on page 5-48.
l The audio amplifier (if so equipped) is located under the front right seat.
Do not subject the amplifier to a strong impact.
It could damage the amplifier or malfunctioning could result. For pleasant driving
5-13 5 
OCRE12E1  


        Page 198 of 370
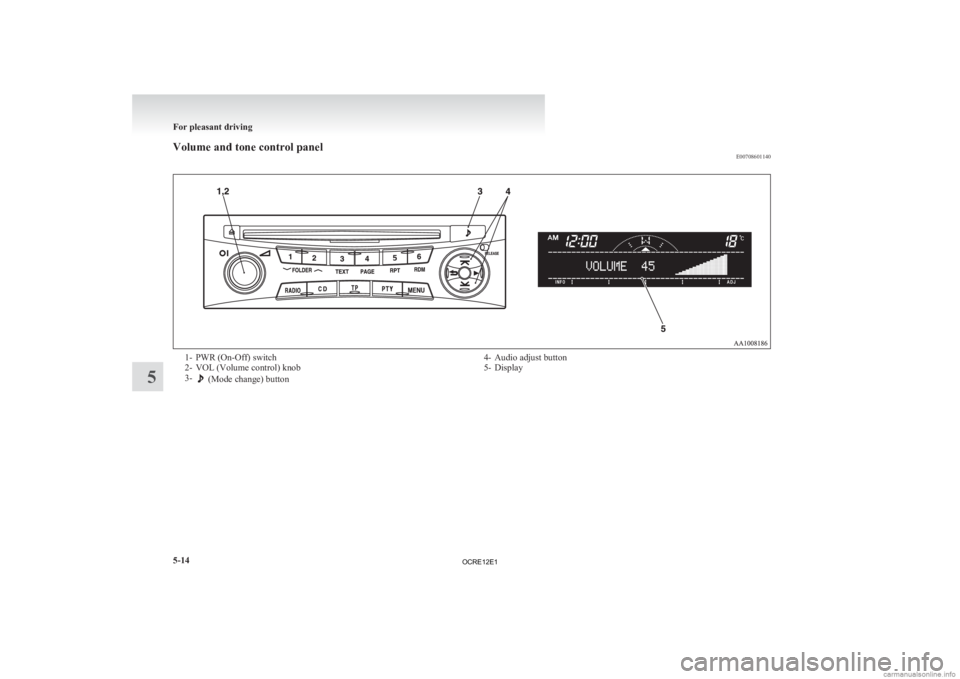
Volume and tone control panel
E007086011401- PWR (On-Off) switch
2-
VOL (Volume control) knob
3-  (Mode change) button
4- Audio adjust button
5-
Display For pleasant driving
5-14
5  
OCRE12E1  


        Page 199 of 370

To adjust the volume
E00708700665
VOL (Volume control)
Turn 
the  VOL  knob  (2)  clockwise  to  increase  the
volume;
anticlockwise  to  decrease  the  volume.  The  status
will be displayed in the display (5).
To adjust the tone E00708801269
Press  the    button  (3)  to  select  BASS    TRE-
BLE   FADER   BALANCE  SCV   Audio
adjust 
mode off. The status will be displayed in the
display (5).
BASS (Bass tone control)
Press the audio adjust button (4) either   or   to
select the desired bass level. TREBLE (Treble tone control)
Press 
the audio adjust button (4) either   or   to
select the desired treble level.
FADER (Front/Rear balance control)
Press 
the audio adjust button (4) either   or   to
balance 
the volume of sound from the front and the
rear speakers.
BALANCE (Left/Right balance control)
Press the audio adjust button (4) either   or   to
balance 
the  volume  of  sound  from  the  left  and  the
right speakers. SCV (Speed Compensated Volume) function
The 
Speed Compensated Volume function is a fea-
ture  that  automatically  adjusts  the  VOL,  BASS,
MID, and TREBLE settings in accordance with the
vehicle speed.
The effects of the SCV function can be selected ei-
ther of three levels (LOW, MID and HIGH). Select
the degree of your choice by pressing the audio ad-
just  button  (4)  either    or  .  If  you  want  to  stop
the SCV function, select the OFF.
NOTE
l Audio 
adjust mode will be cancelled when an-
other mode is selected or no adjustment is per-
formed for more than 10 seconds. For pleasant driving
5-15 5                
OCRE12E1  


        Page 200 of 370
Radio control panel and display
E007089012281- PWR (On-Off) switch
2-
Memory select buttons
3- TUNE/SEEK (Up-step/Up-seek) button
4- TUNE/SEEK (Down-step/Down-seek) button
5- RADIO (FM/MW/LW selection) button 6- FM/MW/LW indicator
7-
Preset memory number display
8- ST (Stereo) indicator
9- Frequency display window For pleasant driving
5-16
5 
OCRE12E1