2012 MINI COUPE ROADSTER CONVERTIBLE ESP
[x] Cancel search: ESPPage 234 of 283

Replacing componentsMOBILITY
233
Light-emitting diodes LEDs
Light-emitting diodes installed behind translu-
cent lenses serve as the light sources for many of
the controls and displays in your vehicle. These
light-emitting diodes are related to conven-
tional laser diodes, and legislation defines them
as Class 1 light-emitting diodes.
Do not remove the covers or expose the
eyes directly to the unfiltered light source
for several hours; otherw ise, this could cause
irritation of the retina. <
Headlamp glass lens
In cool or humid weather, condensation may
occur on the interiors of the headlamps. The
condensation disappears a short time after the
light is switched on. The headlamps do not need
to be changed.
Do not remove the condensation from head-
lamps, despite driving with lights on, and if
condensation increases, e.g., because of water
droplets, have this checked by your MINI dealer.
Xenon lamps
The service life of these bulbs is very long and
the probability of failure very low, provided that
they are not switched on and off an excessive
number of times. If a xenon lamp fails neverthe-
less, switch on the fog lamps and continue the
journey with great care, provided that local leg-
islation does not prohibit this.
Work on the xenon lighting system,
including lamp replacem ent, is only to be
carried out only by your MINI dealer. Due to high
voltage, there is a risk of fatal injury if work on
the xenon lamps is carried out improperly. <
Halogen low beams and high beams
H13 bulb, 60/5 watts
The H13 bulb is pressurized. Therefore,
wear safety glasses an d protective gloves.
Otherwise, there is a risk of injury if the bulb is
damaged. < Be careful when inst
alling the cover;
otherwise, leaks could occur and cause
damage to the headlamp system. <
Accessing the lamp from the engine
compartment
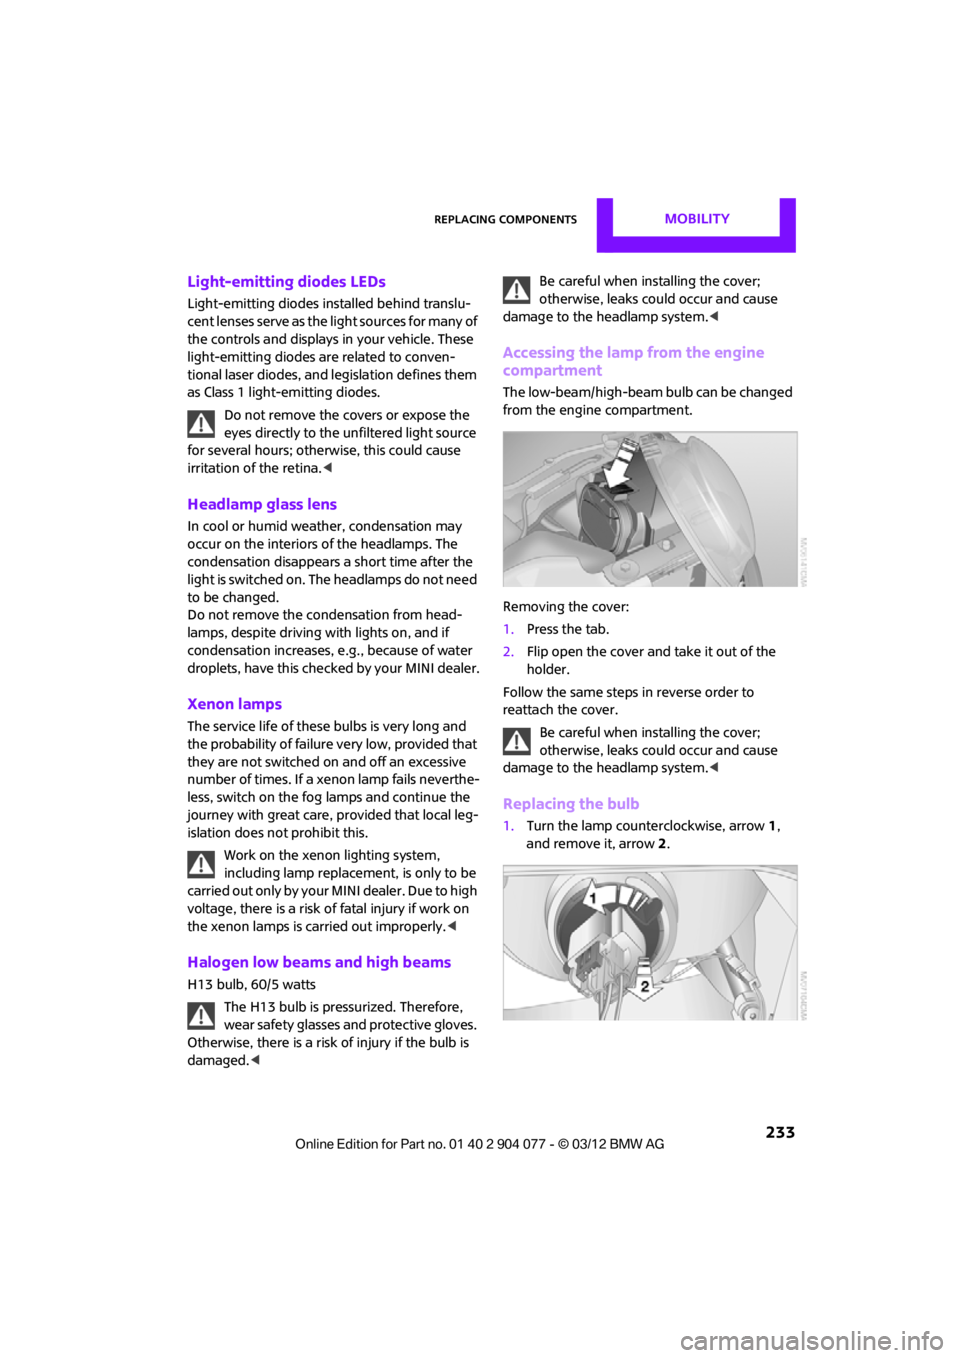
The low-beam/high-beam bulb can be changed
from the engine compartment.
Removing the cover:
1.Press the tab.
2. Flip open the cover and take it out of the
holder.
Follow the same steps in reverse order to
reattach the cover.
Be careful when inst alling the cover;
otherwise, leaks could occur and cause
damage to the headlamp system. <
Replacing the bulb
1.Turn the lamp counterclockwise, arrow 1,
and remove it, arrow 2.
00320051004F004C00510048000300280047004C0057004C005200510003
Page 243 of 283

MOBILITYReplacing components
242
Starting-aid terminals
Only charge the battery in the vehicle when the
engine is off. Connections, refer to Jump-start-
ing on page 243.
Charger
The use of a charger ensures that the battery has
a sufficient charge even when it is used for fre-
quent short-distance driv es, for example. Charg-
ers that have been developed especially for the
vehicle and adapted to the vehicle electrical
system are available at your MINI dealer.
Disposal
After replacing old batteries, return the
used batteries to your MINI dealer or to a
recycling center. Maintain the battery in an
upright position for transport and storage.
Always secure the battery against tipping over
during transport. <
Power failure
After a temporary power loss, some equipment
may not be fully functional and may require
initialization. Individual se ttings are also lost and
must be reprogrammed:
> Time and date
These values must be updated, page 76.
> Onboard monitor
Operability must be waited for, page124.
Indicator and warning lamps
Lights up in red:
Battery is no longer being charged.
Alternator malfunction.
Switch off all unnecessary electrical consumers.
Have the battery checked without delay. Lights up in yellow:
Battery charge level very low, battery
aged, or battery not securely con-
nected.
Charge it by taking a long er drive or by using an
external charger. If the display appears again,
have the battery checked as soon as possible.
Fuses
Do not attempt to repair a blown fuse or
replace it with a fuse of a different color or
Ampere rating. To do this could cause a fire in
the vehicle resulting from a circuit overload.
Have fuses replaced by your MINI dealer. <
A fuse assignment diag ram is located on the
inside of the fuse box cover panels.
In the engine compartment
Opening the cover
Press the latch.
In the vehicle interior
On the right side of the footwell.
Opening the cover
Press out at the recess.
00320051004F004C00510048000300280047004C0057004C005200510003
Page 272 of 283

Everything from A to ZREFERENCE
271
Data250
– capacities 259
– dimensions 251
– engine 250
– weights 257
Data memory 226
Date
– setting 77
– setting format 77
Daytime running lights 97
DBC Dynamic Brake Control, refer to Brake Assist 83
Deactivating front passenger
airbags 93
Deadlocking, refer to Locking 30
Defect
– door lock 32
– fuel filler flap 206
Defining a home address 195
Defogging windows 103,105
Defrosting windows 103,105
Defrosting windows and removing condensation
– air conditioner 103
– automatic climate control 105
Defrosting windshield, refer to
Defrosting
windows 103,105
Defrost position, refer to Defrosting
windows 103,105
Deleting contacts 179,196
Destination address
– entering 126,132
Destination for navigation
– entering 126
– entering via map 131
Differential, breaking in 114
Digital radio, refer to HD Radio 150
Dimensions 251
Dipstick, engine oil 222
Directional indicators, refer to
Turn signals 65 Direction announcements,
refer to Voice
instructions 139
Direction instructions, refer to
Voice instructions 139
Directory for navigation, refer to Address book 128
Displacement, re fer to Engine
data 250
Display, refer to Onboard
computer controls 17
Disp laying cont
act
pictures 196
Displaying contacts 178
Displaying special destinations 131
Display lighting, refer to Instrument lighting 99
Displays 12
– instrument cluster 12
– on the Control Display 17
Displays, care 230
Displays and controls 10
Disposal
– of coolant 224
– remote control battery 38
– vehicle battery 242
Distance remaining to service,
refer to Service
requirements 75
Distance warning, refer to Park Distance Control PDC 82
Door key, refer to Integrated
key/remote control 28
Door lock 31
Door lock, confirmation
signals 30
Doors, manual operation 32
DOT Quality Grades 217
Drinks holders, refer to Cupholders 109
Drive-off assistant, refer to Hill
Assist 85
Driving dynamics control, refer to Sport button 85
Driving lamps, refer to Parking lamps/low beams 96Driving notes
114
Driving off on inclines, refer to Hill Assist 85
Driving stability control
systems 83
Driving through water 115
Driving tips, refer to Driving
notes 114
Dry air, refer to Cooling function 105
DSC Dynamic Stability Control 83
DTC Dynamic Traction
Control 84
Dynamic Brake Control DBC, refer to Brake Assist 83
Dynamic route guidance 142
Dynamic Stability Control DSC 83
Dynamic Traction Control DTC 84
E
Eject button, refer to Buttons
on the CD player 146
Electrical malfunction
– convertible top 41,48
– door lock 32
– fuel filler flap 206
– tailgate 33
Electric power windows
– initializing 39
Electronic brake-force distribution 83
Electronic Stability Program
ESP, refer to Dynamic
Stability Control DSC 83
E-mail 197
Emergency operation, refer to Manual operation
– convertible top 41,48
– door lock 32
– fuel filler flap 206
– tailgate 33
– transmission lock, automatic transmission 64
00320051004F004C00510048000300280047004C0057004C005200510003
Page 273 of 283

REFERENCEEverything from A to Z
272
Emergency services, refer to Roadside Assistance 243
Emergency unlocking 34
Ending a call 174,186
Engine
– breaking in 114
– data 250
– overheated, refer to Coolant temperature 224
– speed 250
– starting, Comfort Access 36
Engine compartment 221
Engine coolant, refer to
Coolant 224
Engine malfunction
– indicator lamp 13
Engine oil
– additives, refer to Approved engine oils 223
– alternative oil types 223
– approved engine oils 223
– capacity 223
– checking level 222
– dipstick 222
– intervals between changes,
refer to Service
requirements 75
– MINI Maintenance
System 225
Engine oil level, checking 222
Engine output, refer to Engine data 250
Engine starti ng, refer to
Starting the engine 61
Entering destination 126
Entering intersection 127
Entertainment sound output on/off 146
Entry map for destination 131
ESP Electronic Stability Program, refer to Dynamic
Stability Control DSC 83
Exhaust system, refer to Hot exhaust system 115 Exterior mirrors
54
– adjusting 54
– automatic heating 54
– folding in and out 54
External audio device 108
External audio de vice, refer to
AUX-In connection 159
External care 227
External devices
– random play sequence 162
– software update 166
External temperature display
– change units of measure 74
– in the onboard computer 74
Eyes
– for tow-starting and towing
away 245
– for tying down loads 119
F
Failure messages, refer to
Check Control 77
Failure of an electrical consumer 242
Fastening safety belts, refer to Safety belts 53
Fastest route for
navigation 135
Fast forward
– CD player 158
Fault messages, refer to Check Control 77
Filter
– microfilter/activated- charcoal filter for automatic
climate control 105
– microfilter for air conditioner 103
Fine wood, care 230
First aid pouch 243
Fixture for remote control,
refer to Ignition lock 60
Flash when locking/ unlocking 30 Flat tire
– run-flat tires
218
– Tire Pressure Monitor TPM 89
Flat Tire Monitor FTM 87
– indicating a flat tire 88
– initializing the system 87
– snow chains 87
– system limits 87
Flat tires, refer to Tire condition 217
Floor mats, care 230
FM, waveband 149
Fog lamps
– replacing bulb 234,236
Folding roof, refer to Convertible top with
integrated sliding sunroof 39
Footbrake, refer to Braking safely 115
Footwell lamps 99
For your own safety 5
Front airbags 93
Front fog lamps 98,99
– replacing bulb 234
Front seat adjustment 51
Frost on windows, refer to Defrosting
windows 103,105
FTM, refer to Flat Tire Monitor 87
Fuel 207
– gauge 70
– high-quality brands 207
– quality 207
– specifications 207
– tank
capaci
ty 259
Fuel clock, refer to Fuel gauge 70
Fuel consumption display
– average fuel consumption 72
Fuel display, refer to Fuel gauge 70
Fuel filler flap 206
– releasing in the event of electrical malfunction 206
Fuses 242
00320051004F004C00510048000300280047004C0057004C005200510003