2012 MINI COUPE ROADSTER CONVERTIBLE ESP
[x] Cancel search: ESPPage 14 of 283

CockpitAT A GLANCE
13
Indicator and warning
lamps
The concept
Indicator and warning lamps can light up in
various combinations and colors in indicator
area 1 or 2.
Some lamps will be tested for proper functioning
when the engine is started or the ignition is
switched on and will therefore light up briefly.
Explanatory text messages
Text messages at the uppe r edge of the Control
Display explain the mean ing of the displayed
indicator and warning lamps. You can call up more information, e.g. on the
cause of a malfunction and on how to respond,
via Check Control, page
77.
In urgent cases, this information will be shown
as soon as the corresponding lamp lights up.
Indicator lamps without text messages
The following indicator lamps in display area 1
indicate certain functions:
High beams/headlamp flasher 98
Front fog lamps 99
Rear fog lamp 99
Lamp flashes:
DSC or DTC is regulating the drive
forces in order to maintain driving
stability 83
Parking brake applied 62
Engine malfunction with adverse effect
on exhaust emissions 226
Cruise control 68
Turn signals 65
00320051004F004C00510048000300280047004C0057004C005200510003
Page 24 of 283
Voice activation systemAT A GLANCE
23
Voice activation system
Vehicle equipment
In this chapter, all production, country, and
optional equipment that is offered in the model
range is described. Equipment is also described
that is not available because of, for example,
selected options or count ry version. This also
applies to safety related functions and systems.
The concept
> By using the voice activation system, individ-
ual functions that are displayed on the
Control Display can be operated via voice
commands. The system supports the entry
process by means of announcements.
> Functions that can only be used while the
vehicle is not moving cannot be operated via
the voice activation system.
> The system includes a special microphone in
the vicinity of the rearview mirror.
Prerequisite
So that voice commands can be identified, set a
language on the Control Display that is sup-
ported by the voice activation system.
To set the language, see page 80.
Symbols in the Owner's Manual
Saying commands
Activating voice activation system
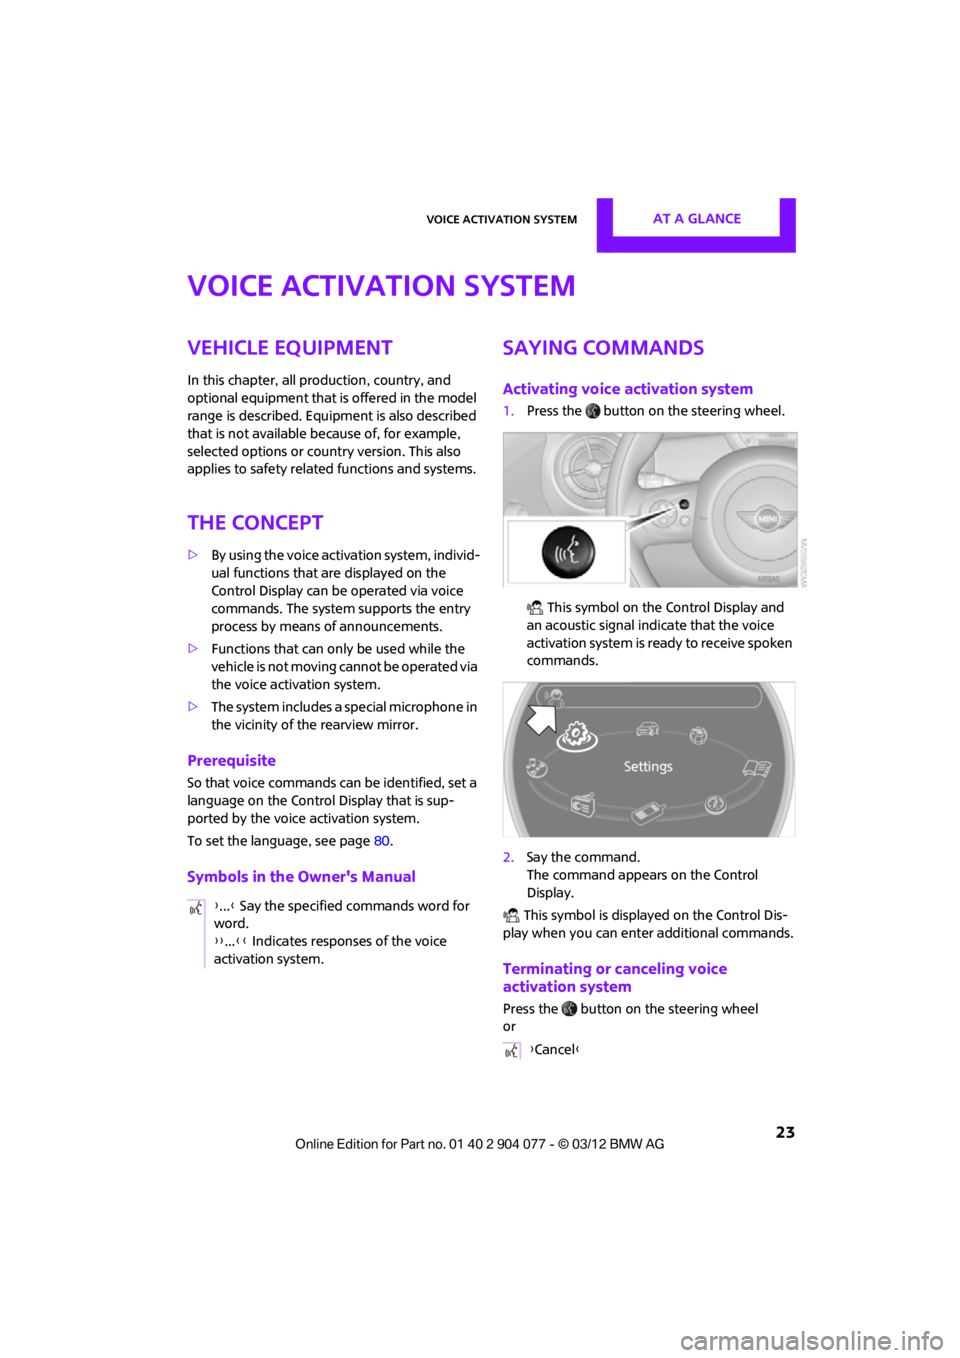
1.Press the button on the steering wheel.
This symbol on the Control Display and
an acoustic signal indicate that the voice
activation system is ready to receive spoken
commands.
2. Say the command.
The command appears on the Control
Display.
This symbol is displayed on the Control Dis-
play when you can ente r additional commands.
Terminating or canceling voice
activation system
Press the button on the steering wheel
or
{
...} Say the specified commands word for
word.
{{ ...}} Indicates responses of the voice
activation system.
{ Cancel }
00320051004F004C00510048000300280047004C0057004C005200510003
Page 25 of 283
AT A GLANCEVoice activation system
24
Commands
Individual menu items on the Control Display
can be voiced as commands.
The commands that are possible depend upon
which menu is currently shown on the Control
Display.
There are short commands for functions in the
main menu.
Some list items, for example telephone book
listings, can also be selected using the voice acti-
vation system. In particular, say the list items
exactly as they are displayed in the respective
list.
Having the possible commands
read aloud
Having the possible co mmands read aloud:
For example if you have selected "CD" the sys-
tem will read aloud the possible commands for
operating the CD player.
Help for the voice activation system
Calling up Help:
Additional commands for Help:
> {Help with examples }: information about
the current operating options and the most
important commands for them are
announced.
> {Help with voice activation }: information
regarding the principles behind the voice
activation system is announced.
Using alternative commands
There are often a number of commands to run a
function, e.g.:
Carrying out functions through short
commands
Main menu functions can be executed immedi-
ately by short commands, almost regardless
of which menu item is selected, e.g., {Vehicle
status }.
List of voice activation system short commands,
see page 260.
Opening the main menu
Example: selecting the track of a CD
1.Switch on Entertainment sound output if
necessary.
2. Press the button on the steering wheel.
Setting the voice dialog
You can set whether the voice activation system
uses the standard dialog or the short version.
With the short version of the spoken dialog, the
requests and responses of the voice activation
system are shortened.
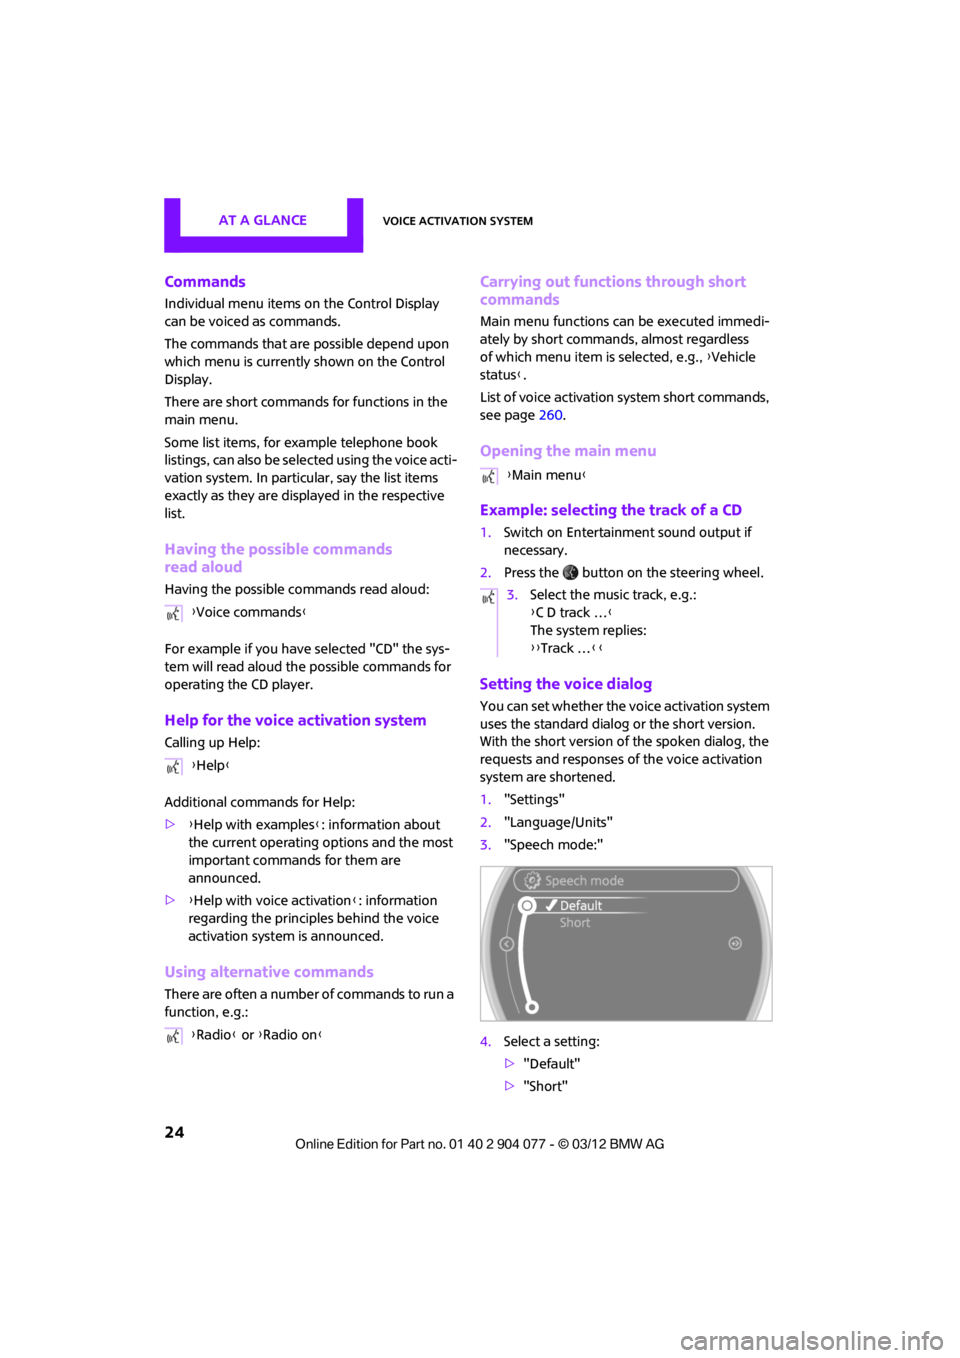
1."Settings"
2. "Language/Units"
3. "Speech mode:"
4. Select a setting:
>"Default"
> "Short"
{
Voice commands }
{ Help }
{ Radio } or {Radio on }
{Main menu }
3. Select the music track, e.g.:
{C D track … }
The system replies:
{{ Track … }}
00320051004F004C00510048000300280047004C0057004C005200510003
Page 30 of 283

Opening and closingCONTROLS
29
This means that your settings will be activated
for you, even if in the meantime your car was
used by someone else with another remote
control and the corresponding settings.
At most three remote co ntrols can be set for
three different people. A prerequisite is that
each person uses a separate remote control.
Personal Profile settings
For more information on specific settings, refer
to the specified pages.
> Response of the central locking system
when the car is being unlocked 30
> Automatic locking of the vehicle 33
> Triple turn signal activation 65
> Settings for the displays on the onboard
computer, in the speedometer and in the
tachometer:
>12 h/24 h mode of the clock 76
> Date format 77
> Brightness of the Control Display 80
> Language on the Control Display 80
> Units of measure for fuel consumption,
distance covered/re maining distances
and temperature 74
> Light settings:
>Pathway lighting 97
> Daytime running lights 97
> Automatic climate control: activating/
deactivating the AUTO program, setting the
temperature, air volume and air
distribution 103
> Entertainment:
>Tone control 147
> Adjusting vo lume levels 147
Central locking system
The concept
The central locking system is ready for operation
whenever the driver's door is closed.
The system simultaneously engages and
releases the locks on the following:
>Doors
> Tailgate
> Fuel filler flap
Operating from outside
>Via the remote control
> Using the door lock
> In cars with Comfor t Access, via the door
handles on the driver's and passenger's
sides
The anti-theft system is also operated at the
same time. It prevents the doors from being
unlocked using the lock buttons or door han-
dles. The remote control can also be used to
switch on/off the welcome lamps and interior
lamps. The alarm system is also activated or
deactivated, page 34.
Operating from inside
Button for central locking system, page 32.
In the event of a sufficiently severe accident,
the central locking system unlocks automati-
cally. In addition, the hazard warning flashers
and interior lamps come on.
Opening and closing:
from outside
Persons or animals in a parked vehicle
could lock the doors from the inside. Take
the key with you when you leave the vehicle
so that the vehicle can be opened from the
outside. <
00320051004F004C00510048000300280047004C0057004C005200510003
Page 38 of 283

Opening and closingCONTROLS
37
Unlocking
Press button 1.
Depending on the setting, refer to Unlocking
mode on page 30, only the driver's door or the
entire vehicle is unlocked.
Press the button again to lock the vehicle
again. <
Convenient opening with the remote control,
refer to page 30.
Locking
Press button 1.
If there is a remote control inside the vehicle,
then windows can be opened and closed after
radio readiness is achieved. In addition, the
convertible top on the MINI Cabrio and MINI
Roadster can be closed.
Unlocking the tailgate separately
Press the button on the outside of the tailgate.
Corresponds to pressing the button. If the vehicle detects that a remote control
has been accidentally left inside the
locked vehicle's cargo area after the tailgate is
closed, the tailgate will reopen slightly. The haz-
ard warning flashers flash and an acoustic signal
sounds. <
Windows, electric
If the engine is switched off, you can still operate
the windows so long as a door or the tailgate has
not been opened.
If the doors and tailgate are closed again and the
remote control is located inside the vehicle, the
windows can be operated again. Insert the remote control into the ignition lock to
be able to operate the windows when the
engine is switched off
and the doors are open.
Switching on radio readiness
Switch on radio readiness by pressing the
Start/Stop button, page 60.
Do not depress the brake or the clutch;
otherwise, the engine will start. <
Starting the engine
The engine can be started or the ignition can be
switched on when a remote control is inside the
vehicle. It is not necessa ry to insert a remote
control into the ignition lock, page 60.
Switching off the engine in cars with
automatic transmission
The engine can only be switched off when the
selector lever is in position P, page62.
To switch the engine off when the selector lever
is in position N, the remote control must be in
the ignition lock.
Before driving a vehicle with automatic
transmission into a car wash
1. Insert remote control into ignition lock.
2. Depress the brake.
3. Move the selector lever to position N.
4. Switch off the engine.
The vehicle can roll.
Malfunction
Comfort Access may malfunction due to local
radio waves, e. g. due to the presence of a
mobile phone in the imme diate vicinity of the
remote control or the charging of a mobile
phone in the vehicle.
If this happens, open or close the vehicle via the
buttons on the remote control or using the inte-
grated key.
Insert the remote control into the ignition lock
and start the engine.
00320051004F004C00510048000300280047004C0057004C005200510003
Page 42 of 283
Opening and closingCONTROLS
41
Operating while driving
The convertible top may be opened or closed
while driving not faster than 20 mph/30 km/h.
While operating the convertible top, pay
close attention to the surrounding traffic;
otherwise, an accident may happen. Try to avoid
operating the convertible top while reversing
the vehicle since the rear view is very limited
during the convertible top's movement. Do not
operate the convertible top when driving on
winding and rough roads or during windy
conditions. <
For better control
>The LED lights up during convertible top
operation until the opening or closing
procedure is completely finished.
> The LED flashes after releasing the switch.
The opening or closing procedure has not
yet been completed. The procedure can be
continued in the desired direction by press-
ing the appropriate switch.
> The Convertible top not locked indicator
lamp lights up and a message appears on
the Control Display.
Interruption
A convertible top which is not completely
open or closed is hazardous. <
The automatic movement is immediately inter-
rupted when the switch for the convertible top
operation is released. The procedure can be
continued in the desired direction by pressing
the appropriate switch.
If the opening or closing procedure is inter-
rupted by releasing the respective switch, the
convertible top stays in its current position for
several seconds before it slowly moves into a
more stable position. The procedure can be
continued by pressing the appropriate switch.
The opening and cl osing procedure is also inter-
rupted in case of a mech anical blockage. In this
case, in order to operate the convertible top
again: 1.
Switch off the ignition and then switch it on
again.
2. Press the switch to continue the procedure
in the desired direction.
Opening and closing procedure
Do not interrupt and restart the closing
procedure several times one after
another, or the convertible top mechanism
could be damaged. <
If the convertible top can be moved in only
one direction after several consecutive
attempts to operate it, the convertible top
system has overheated. Allow the system to cool
down for approx. 4 minutes. <
If the battery was disconnected, e.g. for
changing batteries or vehicle storage,
reinitialize the power windows, refer to page 39.
Otherwise, the windows cannot be lowered or
the convertible top cannot be opened. <
Convenience operation
For convenience operation using the remote
control, refer to page30; for operation via the
door lock, refer to page 31.
Manual closing in the event of an
electrical malfunction
Only close the convertible top manually if
it is absolutely necessary. Never open it
manually. Improper handling of the convertible
top can result in damage. The closing procedure
must be completely finished. Otherwise,
damage or injury could result.<
Before closing
1.Remove Allen key and screwdriver from
vehicle tools, refer to page 231.
2. Pry out luggage compartment lamp from
the left side trim using the screwdriver.
00320051004F004C00510048000300280047004C0057004C005200510003
Page 44 of 283
Opening and closingCONTROLS
43
Closing the convertible top
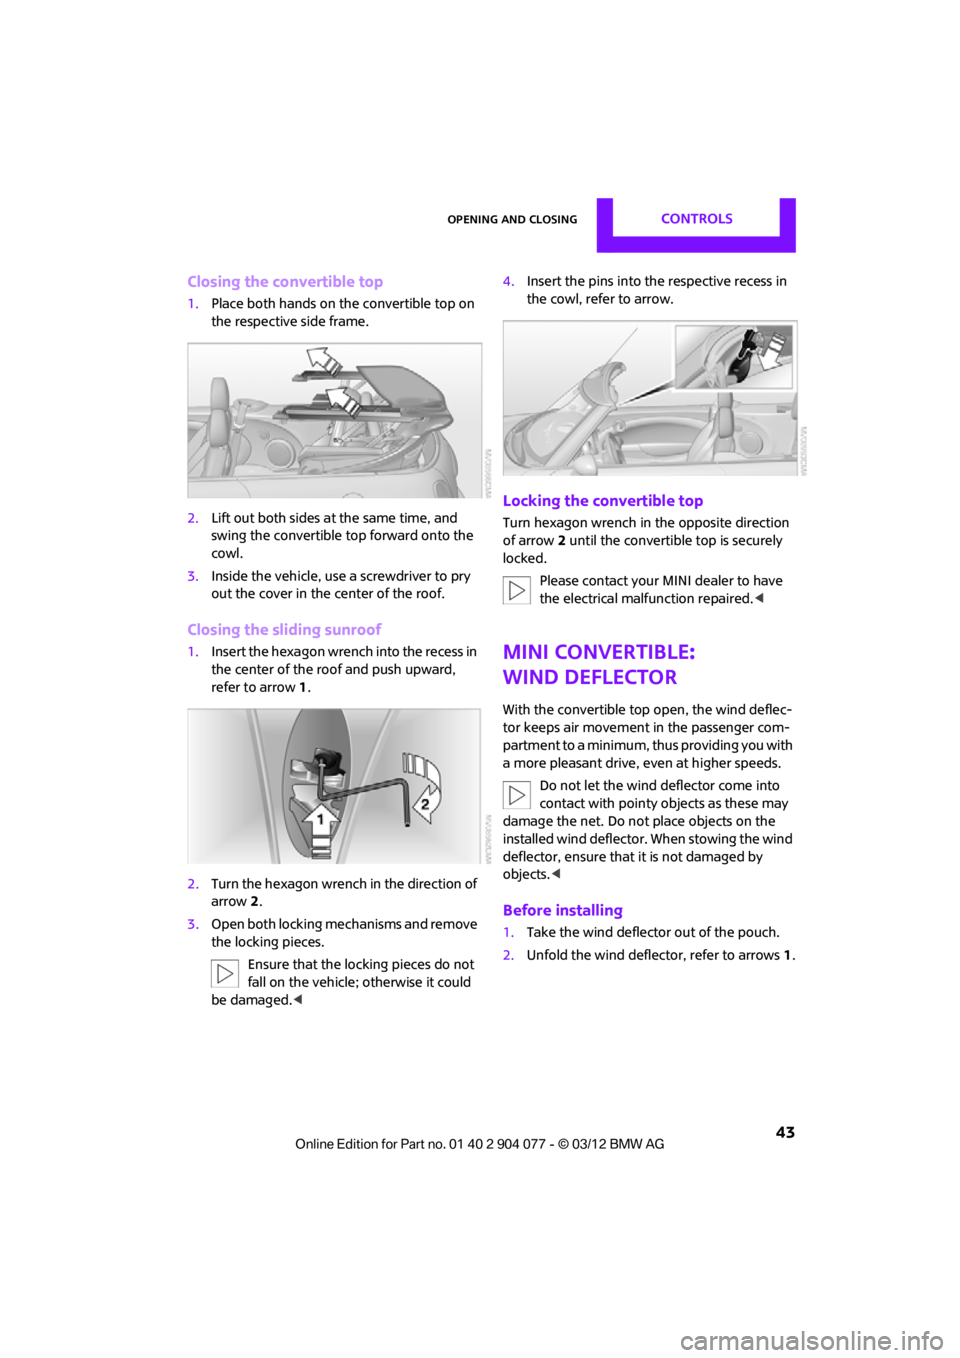
1.Place both hands on the convertible top on
the respective side frame.
2. Lift out both sides at the same time, and
swing the convertible top forward onto the
cowl.
3. Inside the vehicle, use a screwdriver to pry
out the cover in the center of the roof.
Closing the sliding sunroof
1.Insert the hexagon wren ch into the recess in
the center of the roof and push upward,
refer to arrow 1.
2. Turn the hexagon wrench in the direction of
arrow 2.
3. Open both locking me chanisms and remove
the locking pieces.
Ensure that the locking pieces do not
fall on the vehicle; otherwise it could
be damaged. < 4.
Insert the pins into the respective recess in
the cowl, refer to arrow.
Locking the convertible top
Turn hexagon wrench in the opposite direction
of arrow 2 until the convertible top is securely
locked.
Please contact your MINI dealer to have
the electrical malfunction repaired. <
MINI Convertible:
Wind deflector
With the convertible top open, the wind deflec-
tor keeps air movement in the passenger com-
partment to a minimum, thus providing you with
a more pleasant drive, even at higher speeds.
Do not let the wind deflector come into
contact with pointy objects as these may
damage the net. Do not place objects on the
installed wind deflector. When stowing the wind
deflector, ensure that it is not damaged by
objects. <
Before installing
1.Take the wind deflector out of the pouch.
2. Unfold the wind deflector, refer to arrows 1.
00320051004F004C00510048000300280047004C0057004C005200510003
Page 52 of 283
AdjustmentsCONTROLS
51
injure the abdomen. Avoid wearing bulky cloth-
ing and regularly pull the belt in the upper-body
area taut; otherwise, its restraining effect could
be impaired. <
Safety belts, refer to page 53.
Seats
Note before adjusting
Never attempt to adjust your seat while
the vehicle is moving. The seat could
respond with unexpected movement, and the
ensuing loss of vehicle control could lead to an
accident.
On the front passenger seat as well, do not
incline the backrest too far to the rear while the
vehicle is being driven; otherwise, there is a
danger in the event of an accident of sliding
under the safety belt, el iminating the protection
normally provided by the belt.<
Comply with the instruct ions on head restraint
height on page 52 and on damaged safety belts
on page 54.
Seat adjustment
Observe the instructions on page 51 to
ensure the best possible personal
protection.<
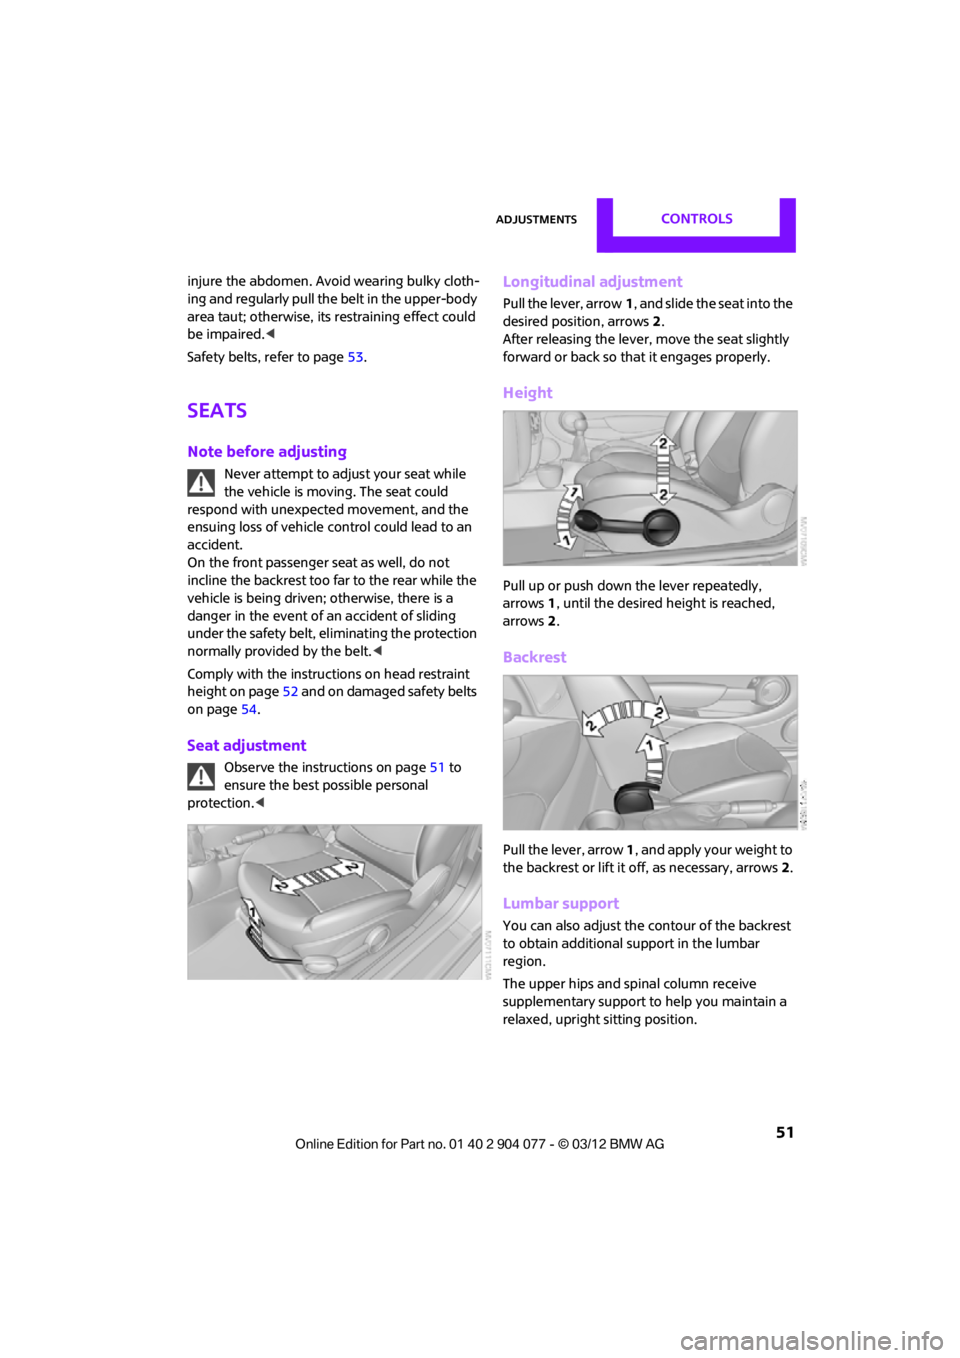
Longitudinal adjustment
Pull the lever, arrow 1, and slide the seat into the
desired position, arrows 2.
After releasing the lever, move the seat slightly
forward or back so that it engages properly.
Height
Pull up or push down the lever repeatedly,
arrows 1, until the desired height is reached,
arrows 2.
Backrest
Pull the lever, arrow 1, and apply your weight to
the backrest or lift it off, as necessary, arrows 2.
Lumbar support
You can also adjust the contour of the backrest
to obtain additional support in the lumbar
region.
The upper hips and spinal column receive
supplementary support to help you maintain a
relaxed, upright sitting position.
00320051004F004C00510048000300280047004C0057004C005200510003