2012 MINI COUPE ROADSTER CONVERTIBLE ESP
[x] Cancel search: ESPPage 90 of 283
Technology for driving comfort and safetyCONTROLS
89
Vibrations or loud noises while driving can
indicate final failure of the tire. Reduce
your speed and bring the vehicle to a stop; oth-
erwise, pieces of tire may come off, which could
result in an accident. Do not continue driving
and contact your MINI dealer. <
Tire Pressure Monitor
TPM
The concept
Measuring the inflation pressure in the four
mounted tires. The system notifies you if there is
a significant loss of pressure in one or more tires.
Functional requirement
The system must have been reset while the
inflation pressure was correct; otherwise,
reliable signaling of a fl at tire is not ensured.
Always use wheels with TPM electronics to
ensure that the system will operate properly.
Reset the system again after each correction of
the tire inflation pressure and after every tire or
wheel change.
System limitations
Sudden, serious tire damage caused by
external influences ca nnot be indicated in
advance. <
The system does not operate correctly if it has
not been reset. For example, a flat tire may be
indicated despite correct tire inflation pressures.
The system is inactive and cannot indicate a flat
tire:
> If a wheel without TPM electronics, e.g. a
compact spare wheel, is mounted.
> Interference with TP M by other systems
or devices with the same transmission
frequency.
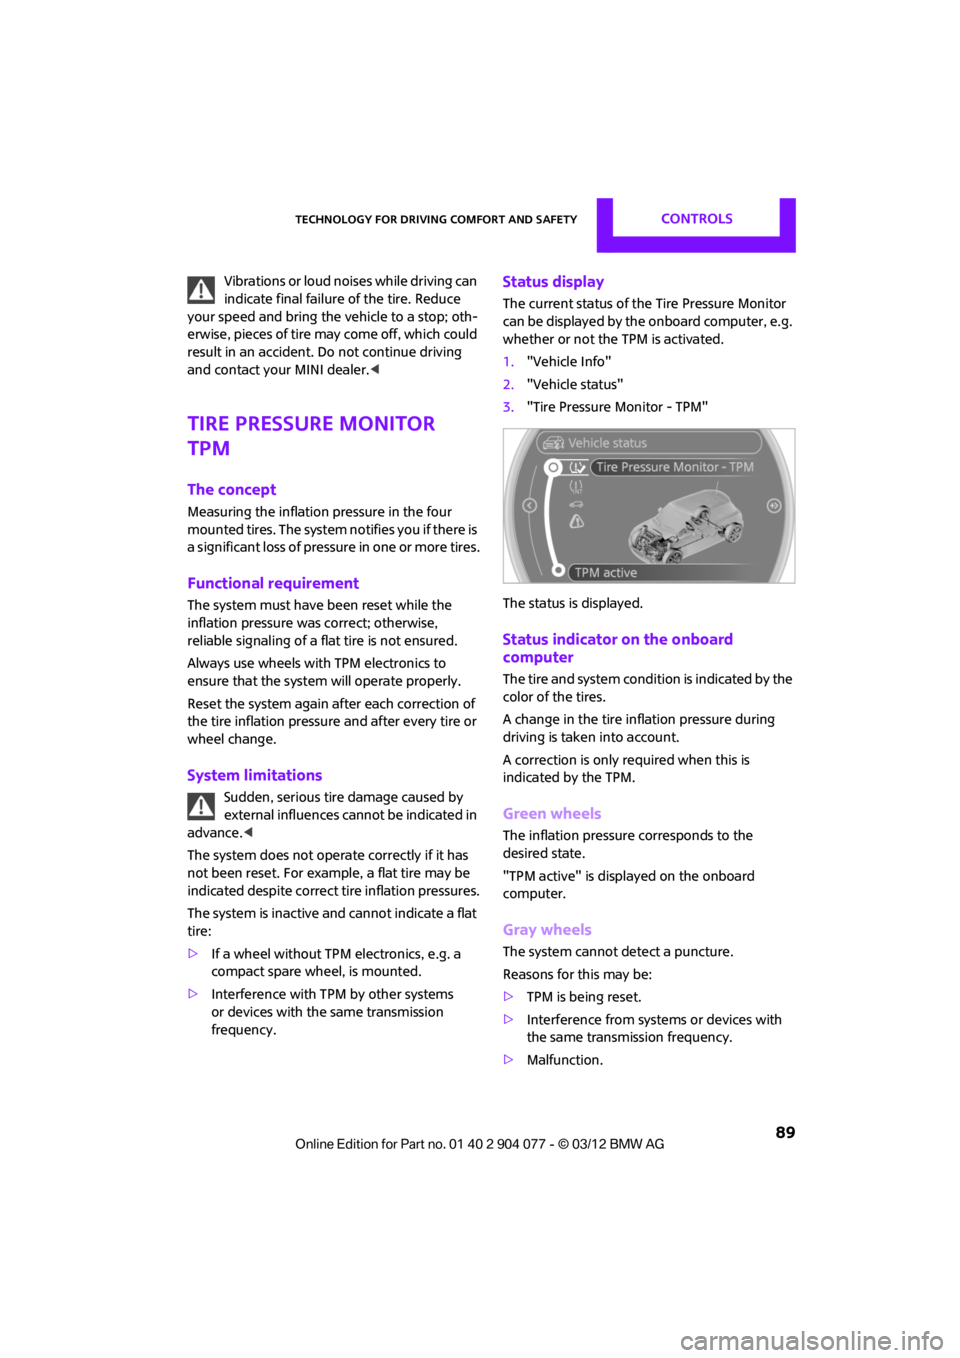
Status display
The current status of th e Tire Pressure Monitor
can be displayed by the onboard computer, e.g.
whether or not the TPM is activated.
1. "Vehicle Info"
2. "Vehicle status"
3. "Tire Pressure Monitor - TPM"
The status is displayed.
Status indicator on the onboard
computer
The tire and system condit ion is indicated by the
color of the tires.
A change in the tire in flation pressure during
driving is taken into account.
A correction is only required when this is
indicated by the TPM.
Green wheels
The inflation pressure corresponds to the
desired state.
"TPM active" is displayed on the onboard
computer.
Gray wheels
The system cannot detect a puncture.
Reasons for this may be:
> TPM is being reset.
> Interference from systems or devices with
the same transmission frequency.
> Malfunction.
00320051004F004C00510048000300280047004C0057004C005200510003
Page 92 of 283
Technology for driving comfort and safetyCONTROLS
91
Continued driving with a flat tire
When driving with a damaged tire:
1.Avoid sudden braking and steering
maneuvers.
2. Do not exceed a speed of 50 mph/80 km/h.
3. At the next opportunity, check the air
pressure in all four tires.
If the inflation pressure is correct in all four
tires, then the Tire Pressure Monitor may not
have been reset. The system must then be
reset.
Possible driving distance with complete loss of
tire inflation pressure:
The distance it is possible to drive with a flat tire
depends on the load and the stress on the vehi-
cle while driving.
With an average load, it may be possible to drive
for approx. 50 miles/80 km.
When driving with damaged tires, the handling
characteristics change, e. g. the vehicle will skid
sooner when braking, braking distances will be
longer, or self-steering response will change.
Adapt your driving style accordingly. Avoid turn-
ing abruptly and driving over obstacles such as
curbs, potholes, etc.
Since the possible driving distance depends to a
considerable degree on the strain exerted on
the vehicle while driving, it can be shorter or,
with a gentle dr iving style, can also be longer,
depending on the speed, road condition, exter-
nal temperature, vehicle load, etc.
Drive cautiously and do not exceed a
speed of 50 mph/80 km/h.
A loss of tire inflation pr essure results in a change
in the handling characteristics, e.g. reduced lane
stability during braking, a longer braking dis-
tance and altered self-steering properties. <
Vibrations or loud noises while driving can
indicate complete failure of the tire.
Reduce your speed and bring the vehicle to a
stop; otherwise, pieces of tire may come off,
which could result in an accident. Do not con-
tinue driving and contact your MINI dealer. <
Malfunction
The small warning lamp flashes in yel-
low and then lights up continuously; the
larger warning lamp lights up in yellow.
On the onboard computer, the tires are
shown in gray and a message appears.
No punctures can be detected.
Display in the following situations:
> Wheel without TPM electronics is mounted:
If need be, have it checked by your MINI
dealer.
> Malfunction:
Have the system checked.
> TPM was unable to complete the resetting
procedure; reset the system again.
The small warning lamp flashes in yel-
low and then lights up continuously; the
larger warning lamp lights up in yellow.
On the onboard computer, the tires are
shown in gray and a message appears.
No punctures can be detected.
Display in the following situation:
> Malfunction because of other equipment or
devices, same radio frequency:
After leaving the inte rference area, the
system is again active automatically.
Message for unsuccessful system reset
Yellow warning lamp comes on. A
message appears on the onboard
computer.
The system has detected a wheel change, but
has not yet been reset. It is not possible to
provide a reliable warn ing about the current
inflation pressure.
Check the tire inflation pressure and reset the
system, page 90.
00320051004F004C00510048000300280047004C0057004C005200510003
Page 93 of 283

CONTROLSTechnology for driving comfort and safety
92
Declaration according to NHTSA/
FMVSS 138 Tire Pressure Monitoring
Systems
Each tire, including the spare, should be
checked monthly when cold and inflated to the
inflation pressure recommended by the vehicle
manufacturer on the vehicle placard or tire infla-
tion pressure label. If your vehicle has tires of a
different size than the size indicated on the vehi-
cle placard or tire inflation pressure label, you
should determine the proper tire inflation pres-
sure for those tires. As an added safety feature,
your vehicle has been equipped with a tire pres-
sure monitoring system TPMS that illuminates a
low tire pressure telltal e when one or more of
your tires are significantly underinflated.
Accordingly, when the low tire pressure telltale
illuminates, you should st op and check your tires
as soon as possible, and inflate them to the
proper pressure. Driving on a significantly
underinflated tire causes the tire to overheat
and can lead to tire fail ure. Underinflation also
reduces fuel efficiency and tire tread life and
may affect the vehicle’s handling and stopping
ability. Please note that the TPMS is not a substi-
tute for proper tire maintenance, and it is the
driver’s responsibility to maintain correct tire
pressure, even if underi nflation has not reached
the level sufficient to trigger illumination of the
TPMS low tire pressure telltale. The TPMS malfunction indicator is combined
with the low tire pressure telltale. When the sys-
tem detects a malfunction, the telltale will flash
for approximately one minute and then remain
continuously lit. This
sequence will continue
upon subsequent vehicle startups as long as the
malfunction exists. When the malfunction indi-
cator is illuminated, the system may not be able
to detect or signal low tire pressure as intended.
TPMS malfunctions may occur for a variety of
reasons, including the installation of replace-
ment or alternate tires or wheels on the vehicle
that prevent the TPMS from functioning prop-
erly. Always check the TP MS malfunction telltale
after replacing one or mo re tires or wheels on
your vehicle to ensure that the replacement or
alternate tires and wheels allow the TPMS to
continue to function properly.
00320051004F004C00510048000300280047004C0057004C005200510003
Page 94 of 283
Technology for driving comfort and safetyCONTROLS
93
Airbags
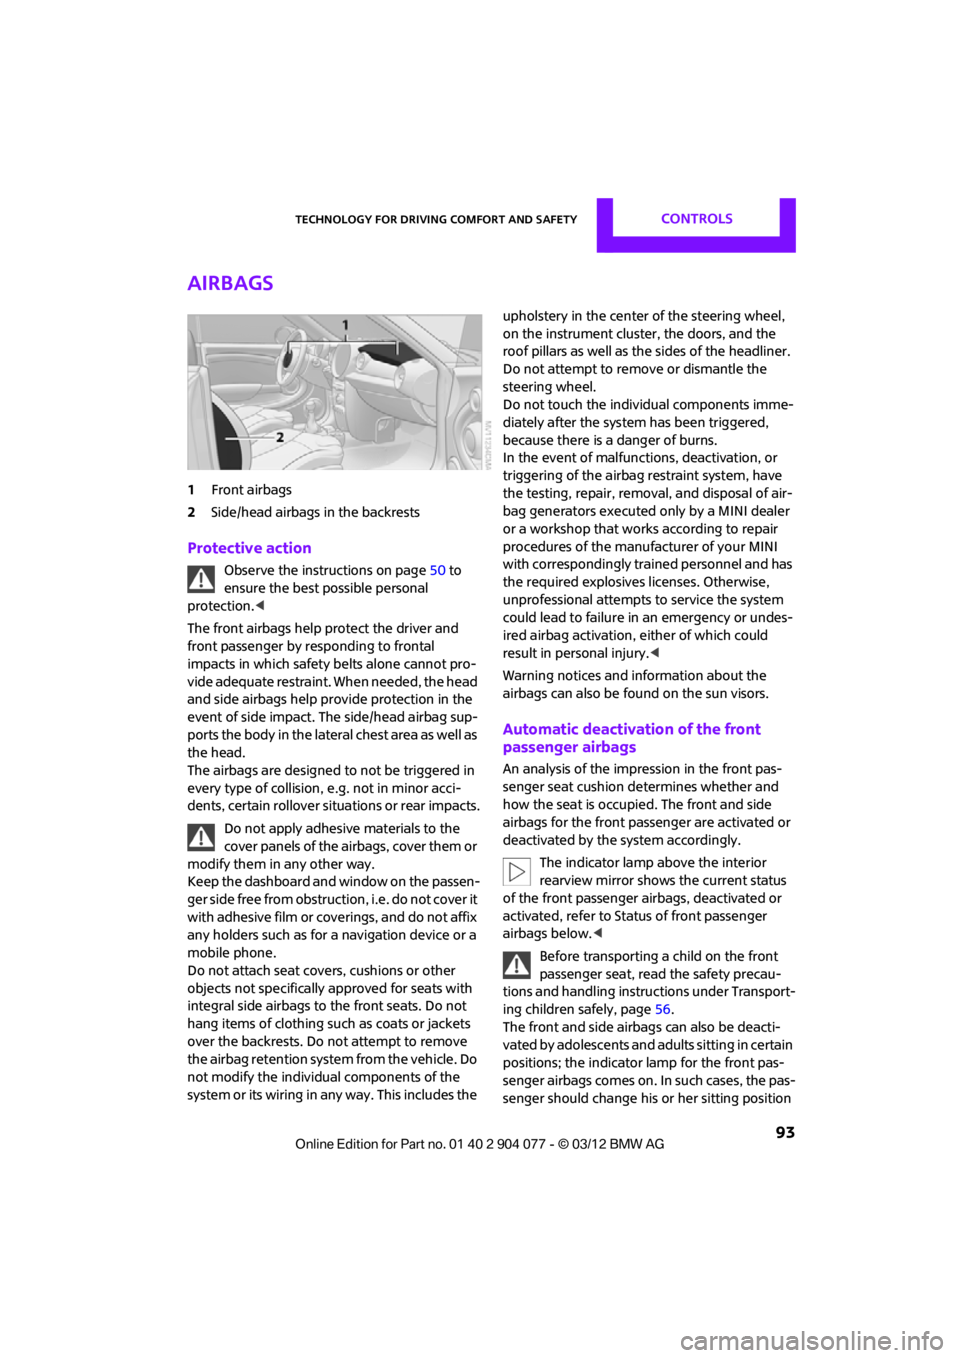
1Front airbags
2 Side/head airbags in the backrests
Protective action
Observe the instructions on page 50 to
ensure the best possible personal
protection.<
The front airbags help protect the driver and
front passenger by responding to frontal
impacts in which safety belts alone cannot pro-
vide adequate restraint. When needed, the head
and side airbags help provide protection in the
event of side impact. The side/head airbag sup-
ports the body in the lateral chest area as well as
the head.
The airbags are designed to not be triggered in
every type of collision, e.g. not in minor acci-
dents, certain rollover si tuations or rear impacts.
Do not apply adhesive materials to the
cover panels of the airbags, cover them or
modify them in any other way.
Keep the dashboard and window on the passen-
g e r s i d e f r e e f r o m o b s t r u c t i o n , i . e . d o n o t c o v e r i t
with adhesive film or coverings, and do not affix
any holders such as for a navigation device or a
mobile phone.
Do not attach seat covers, cushions or other
objects not specifically approved for seats with
integral side airbags to the front seats. Do not
hang items of clothing such as coats or jackets
over the backrests. Do not attempt to remove
the airbag retention system from the vehicle. Do
not modify the individual components of the
system or its wiring in any way. This includes the upholstery in the center of the steering wheel,
on the instrument cluster, the doors, and the
roof pillars as well as the sides of the headliner.
Do not attempt to remove or dismantle the
steering wheel.
Do not touch the individual components imme-
diately after the system has been triggered,
because there is a danger of burns.
In the event of malfuncti
ons, deactivation, or
triggering of the airbag restraint system, have
the testing, repair, remova l, and disposal of air-
bag generators executed only by a MINI dealer
or a workshop that work s according to repair
procedures of the manufacturer of your MINI
with correspondingly trained personnel and has
the required explosives licenses. Otherwise,
unprofessional attempts to service the system
could lead to failure in an emergency or undes-
ired airbag activation, either of which could
result in personal injury.<
Warning notices and in formation about the
airbags can also be found on the sun visors.
Automatic deactivation of the front
passenger airbags
An analysis of the impression in the front pas-
senger seat cushion determines whether and
how the seat is occupied. The front and side
airbags for the front passenger are activated or
deactivated by the system accordingly.
The indicator lamp above the interior
rearview mirror shows the current status
of the front passenger airbags, deactivated or
activated, refer to Status of front passenger
airbags below. <
Before transporting a child on the front
passenger seat, read the safety precau-
tions and handling instructions under Transport-
ing children safely, page 56.
The front and side airbag s can also be deacti-
vated by adolescents and adults sitting in certain
positions; the indicator lamp for the front pas-
senger airbags comes on. In such cases, the pas-
senger should change his or her sitting position
00320051004F004C00510048000300280047004C0057004C005200510003
Page 97 of 283
CONTROLSLamps
96
Lamps
Vehicle equipment
In this chapter, all production, country, and
optional equipment that is offered in the model
range is described. Equipment is also described
that is not available because of, for example,
selected options or coun try version. This also
applies to safety relate d functions and systems.
Parking lamps/low beams
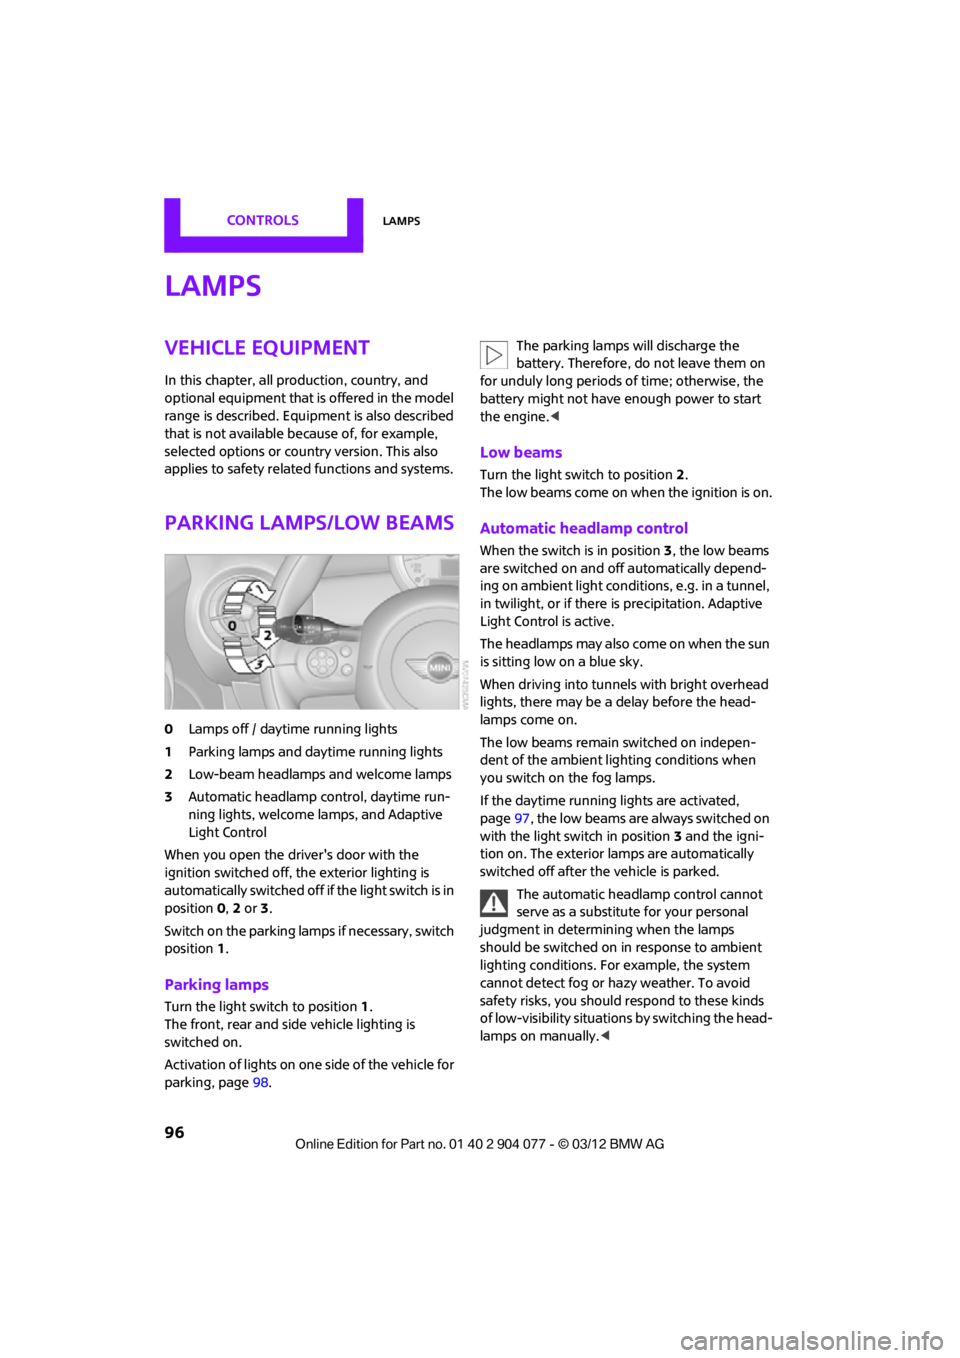
0Lamps off / daytime running lights
1 Parking lamps and daytime running lights
2 Low-beam headlamps and welcome lamps
3 Automatic headlamp control, daytime run-
ning lights, welcome lamps, and Adaptive
Light Control
When you open the driver's door with the
ignition switched off, the exterior lighting is
automatically switched off if the light switch is in
position 0, 2 or 3.
Switch on the parking lamps if necessary, switch
position 1.
Parking lamps
Turn the light switch to position 1.
The front, rear and side vehicle lighting is
switched on.
Activation of lights on on e side of the vehicle for
parking, page 98. The parking lamps will discharge the
battery. Therefore, do not leave them on
for unduly long periods of time; otherwise, the
battery might not have enough power to start
the engine. <
Low beams
Turn the light switch to position 2.
The low beams come on when the ignition is on.
Automatic headlamp control
When the switch is in position 3, the low beams
are switched on and off automatically depend-
ing on ambient light condit ions, e.g. in a tunnel,
in twilight, or if there is precipitation. Adaptive
Light Control is active.
The headlamps may also come on when the sun
is sitting low on a blue sky.
When driving into tunnels with bright overhead
lights, there may be a delay before the head-
lamps come on.
The low beams remain switched on indepen-
dent of the ambient lighting conditions when
you switch on the fog lamps.
If the daytime running lights are activated,
page 97, the low beams are always switched on
with the light switch in position 3 and the igni-
tion on. The exterior lamps are automatically
switched off after the vehicle is parked.
The automatic headlamp control cannot
serve as a substitute for your personal
judgment in determining when the lamps
should be switched on in response to ambient
lighting conditions. For example, the system
cannot detect fog or hazy weather. To avoid
safety risks, you should respond to these kinds
of low-visibility situations by switching the head-
lamps on manually. <
00320051004F004C00510048000300280047004C0057004C005200510003
Page 99 of 283
CONTROLSLamps
98
Activating Adaptive Light Control
With the ignition switched on, turn the light
switch to position 3, refer to page 96.
Standstill function: to avoid blinding oncoming
traffic, the Adaptive Light Control does not pivot
toward the driver's side when the vehicle is at a
standstill.
In reverse, the Adaptive Light Control is not
activated.
Malfunction
A message is displayed.
The Adaptive Light Control is malfunctioning or
failed. Have the system checked as soon as
possible.
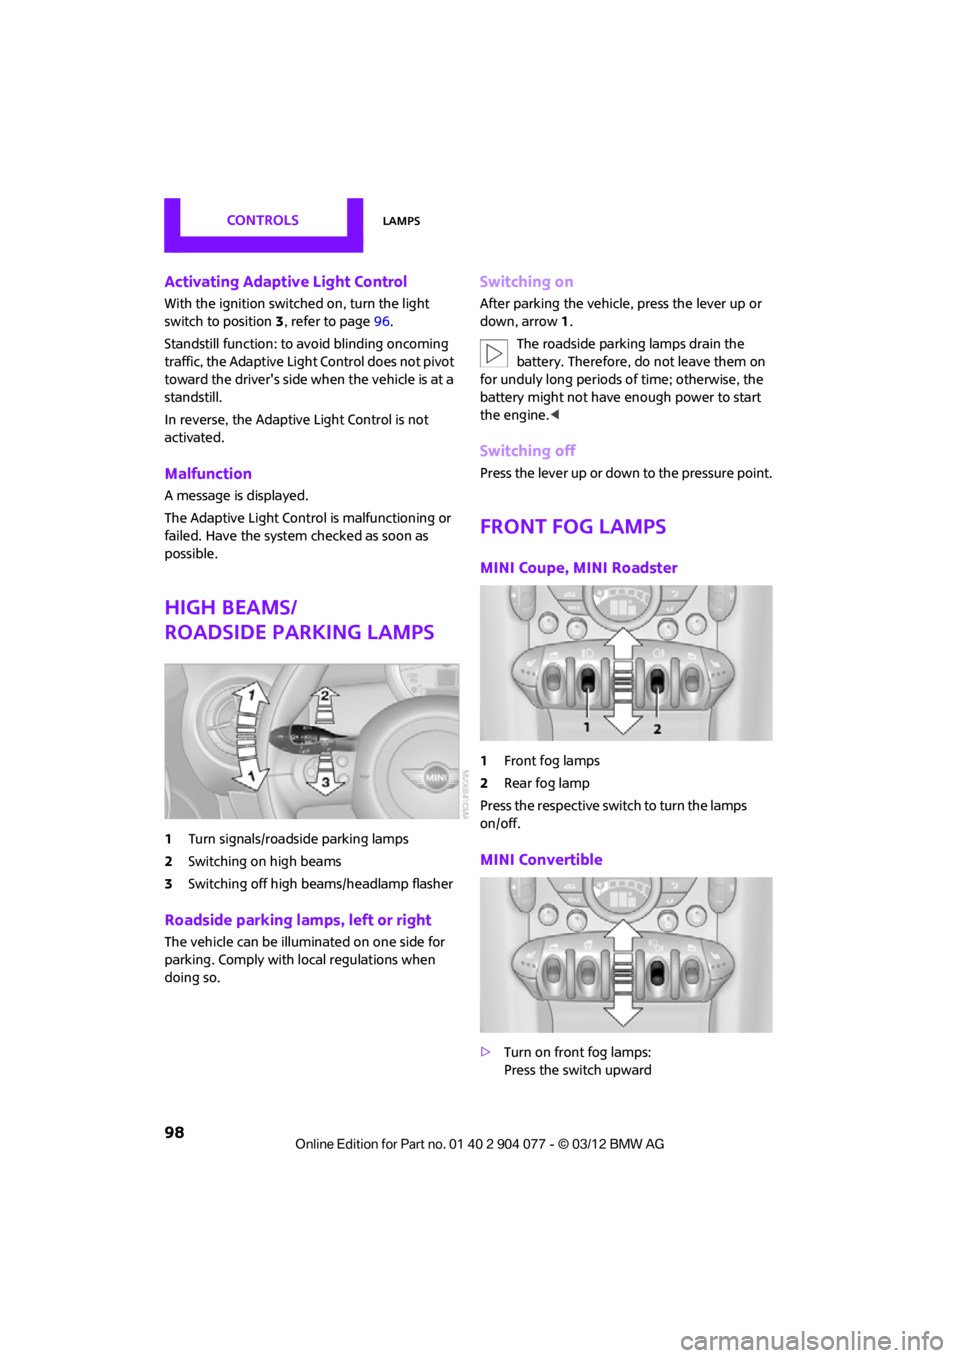
High beams/
roadside parking lamps
1 Turn signals/roadside parking lamps
2 Switching on high beams
3 Switching off high beams/headlamp flasher
Roadside parking lamps, left or right
The vehicle can be illuminated on one side for
parking. Comply with local regulations when
doing so.
Switching on
After parking the vehicle, press the lever up or
down, arrow 1.
The roadside parking lamps drain the
battery. Therefore, do not leave them on
for unduly long periods of time; otherwise, the
battery might not have enough power to start
the engine. <
Switching off
Press the lever up or down to the pressure point.
Front fog lamps
MINI Coupe, MINI Roadster
1Front fog lamps
2 Rear fog lamp
Press the respective swit ch to turn the lamps
on/off.
MINI Convertible
> Turn on front fog lamps:
Press the switch upward
00320051004F004C00510048000300280047004C0057004C005200510003
Page 116 of 283
Things to remember when drivingDRIVING TIPS
115
Hot exhaust system
As in all vehicles, extremely high tempera-
tures are generated on the exhaust sys-
tem. Do not remove the heat shields installed
adjacent to various se ctions of the exhaust
system, and never apply undercoating to them.
Make sure that when driving, idling or when
parking, no easily flamma ble materials, such as
hay, leaves, grass, etc. come into contact with
the hot exhaust system. Such contact could lead
to a fire, with the risk of serious personal injuries
and property damage. Do not touch hot exhaust
tail pipes. Otherwise, there is a risk of burns. <
Hydroplaning
When driving on wet or slushy roads,
reduce road speed. If you do not, a wedge
of water can form betw een tires and road sur-
face. This situation, known as hydroplaning, can
cause partial or complete loss of tire contact
with the road surface, so that the car cannot be
steered or braked properly. <
The risk of hydroplaning increases with declining
tread depth on the tires, refer also to Tread
depth on page 218.
Driving through water
Drive through water on the road only if it is
not deeper than 1 ft/30 cm, and then only
at walking speed at the most. Otherwise, the
vehicle's engine, the electrical systems and the
transmission may be damaged. <
Parking brake on inclines
On inclines, do not hold the vehicle with
the clutch; use the parking brake. Other-
wise, greater clutch wear will result. <
For information on drivin g off using Hill Assist,
refer to page 85.
Braking safely
Your MINI is equipped with ABS. If you are in a
situation which requires full braking, it is best to
brake using maximum brake pressure. Since the vehicle maintains stee
ring responsiveness,
you can still avoid possi ble obstacles with a
minimum of steering effort.
The pulsation of the brake pedal, together with
the sound of hydraulic regulation, indicates that
ABS is functioning properly.
Objects in the movement range of
the pedals
Keep floor mats, carp et, and other objects
out of the movement range of the pedals;
otherwise, they may inhi bit the function of the
pedals during driving.
Do not place additional floor mats onto an
existing one or onto other objects.
Only use floor mats that have been approved for
the vehicle and can be appropriately fastened.
Make sure that the floo r mats are securely fas-
tened again after they have been removed, e.g.
for cleaning.<
Driving in wet conditions
When roads are wet or ther e is heavy rain, briefly
exert gentle pressure on the brake pedal every
few miles. Monitor traffic conditions to ensure
that this maneuver does not endanger other
road users. The heat generated in this process
helps dry the pads and rotors to ensure that.
Then full braking force will be immediately
available when it is needed.
Hills
To prevent overheatin g and the resulting
reduced efficiency of the brake system,
drive long or steep downhill gradients in the
gear in which the least braking is required. Even
light but consistent brake pressure can lead to
high temperatures, brake wear and possibly
even brake failure. <
You can increase the engine's braking effect by
shifting down, all the way to first gear if neces-
sary. This strategy helps you avoid placing
excessive loads on the brake system. Downshift-
ing in manual mo de of the automatic transmis-
sion, page 64.
00320051004F004C00510048000300280047004C0057004C005200510003
Page 117 of 283
DRIVING TIPSThings to remember when driving
116
Never drive with the clutch held down,
with the transmission in neutral or with
the engine switched off; otherwise, engine brak-
ing action will not be present or there will be no
power assistance to the brakes or steering.
Never allow floor mats, carpets or any other
objects to protrude into the area around the
pedals; otherwise, pedal function could be
impaired. <
Corrosion on brake rotors
When the vehicle is driven only occasionally,
during extended periods when the vehicle is not
used at all, and in op erating conditions where
brake applications are less frequent, there is an
increased tendency for corrosion to form on
rotors, while contaminants accumulate on the
brake pads. This occurs because the minimum
pressure which must be exerted by the pads
during brake applications to clean the rotors is
not reached.
Should corrosion form on the brake rotors, the
brakes will tend to respond with a pulsating
effect that even extended application will fail to
cure.
When the vehicle is parked
Condensation forms while the automatic climate
control is in operation, and then exits under the
vehicle. Traces of condensed water under the
vehicle are therefore normal.
In the MINI Cooper S, the coolant pump may
continue to run for some time after the engine is
switched off. This will generate noise in the
engine compartment.
Cargo loading
To avoid loading the tires beyond their
approved carrying ca pacity, never over-
load the vehicle. Overloading can lead to over-
heating and increases the rate at which damage
develops inside the tires. The ultimate result can
assume the form of a sudden blowout.
<
MINI Coupe: cargo area cover
Do not place any objects on the cover;
otherwise, they could endanger the car's
occupants, e.g. in the case of braking or sudden
swerving, or they may damage the cover. <
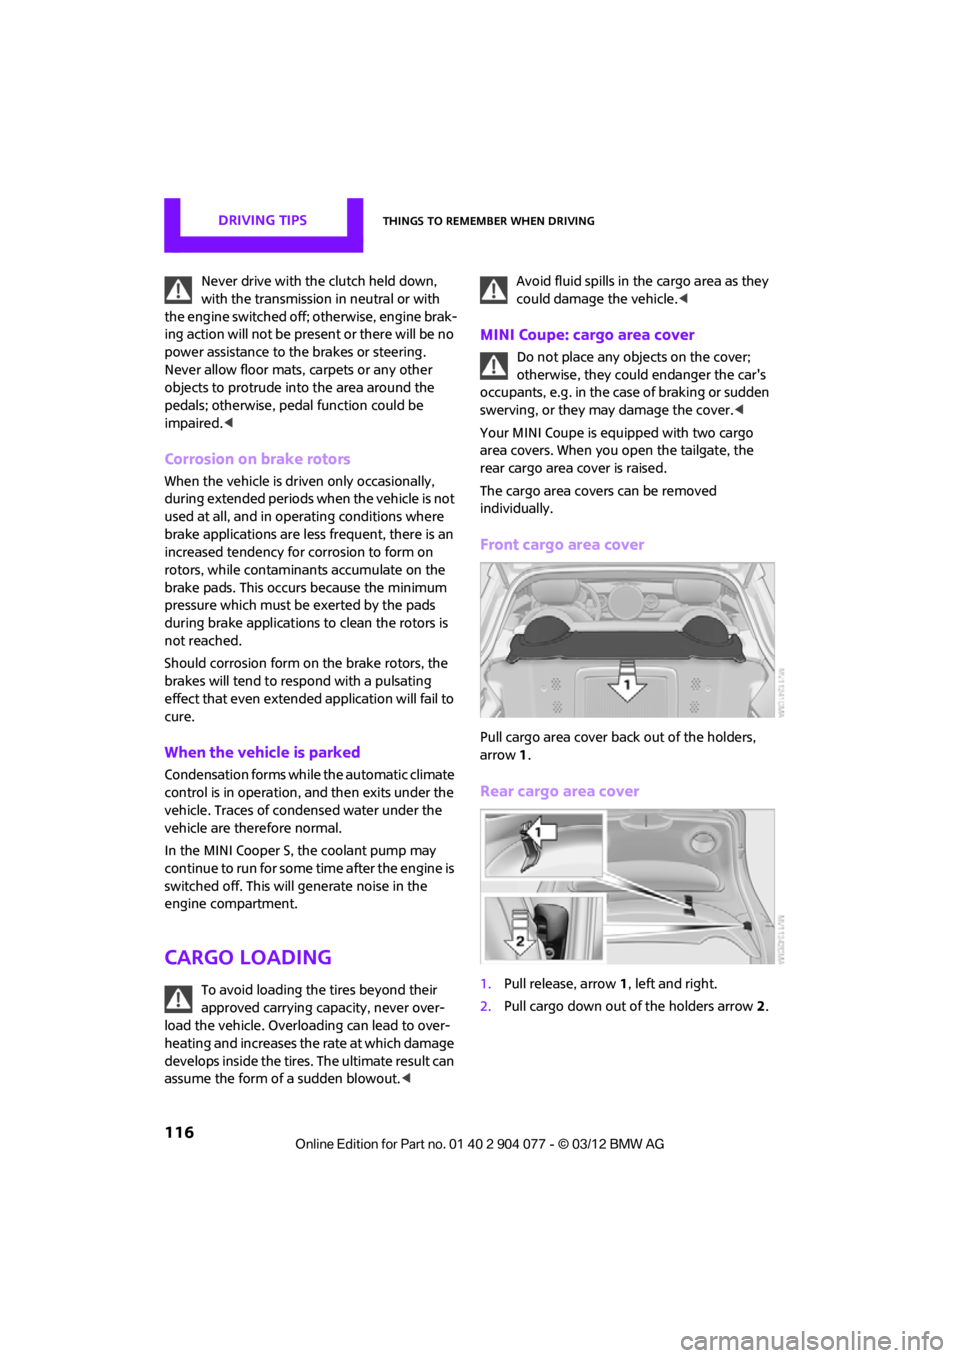
Your MINI Coupe is equipped with two cargo
area covers. When you open the tailgate, the
rear cargo area cover is raised.
The cargo area covers can be removed
individually.
Front cargo area cover
Pull cargo area cover back out of the holders,
arrow 1.
Rear cargo area cover
1. Pull release, arrow 1, left and right.
2. Pull cargo down out of the holders arrow 2.
00320051004F004C00510048000300280047004C0057004C005200510003