2012 MINI COUPE ROADSTER CONVERTIBLE fuse
[x] Cancel search: fusePage 64 of 283

DrivingCONTROLS
63
Removing the key
To remove the key from the ignition lock, first
move the selector lever into position P and then
switch off the engine: interlock. Remove the key
from the ignition lock, refer to page60.
Selector lever positions
P R N D M/S + –
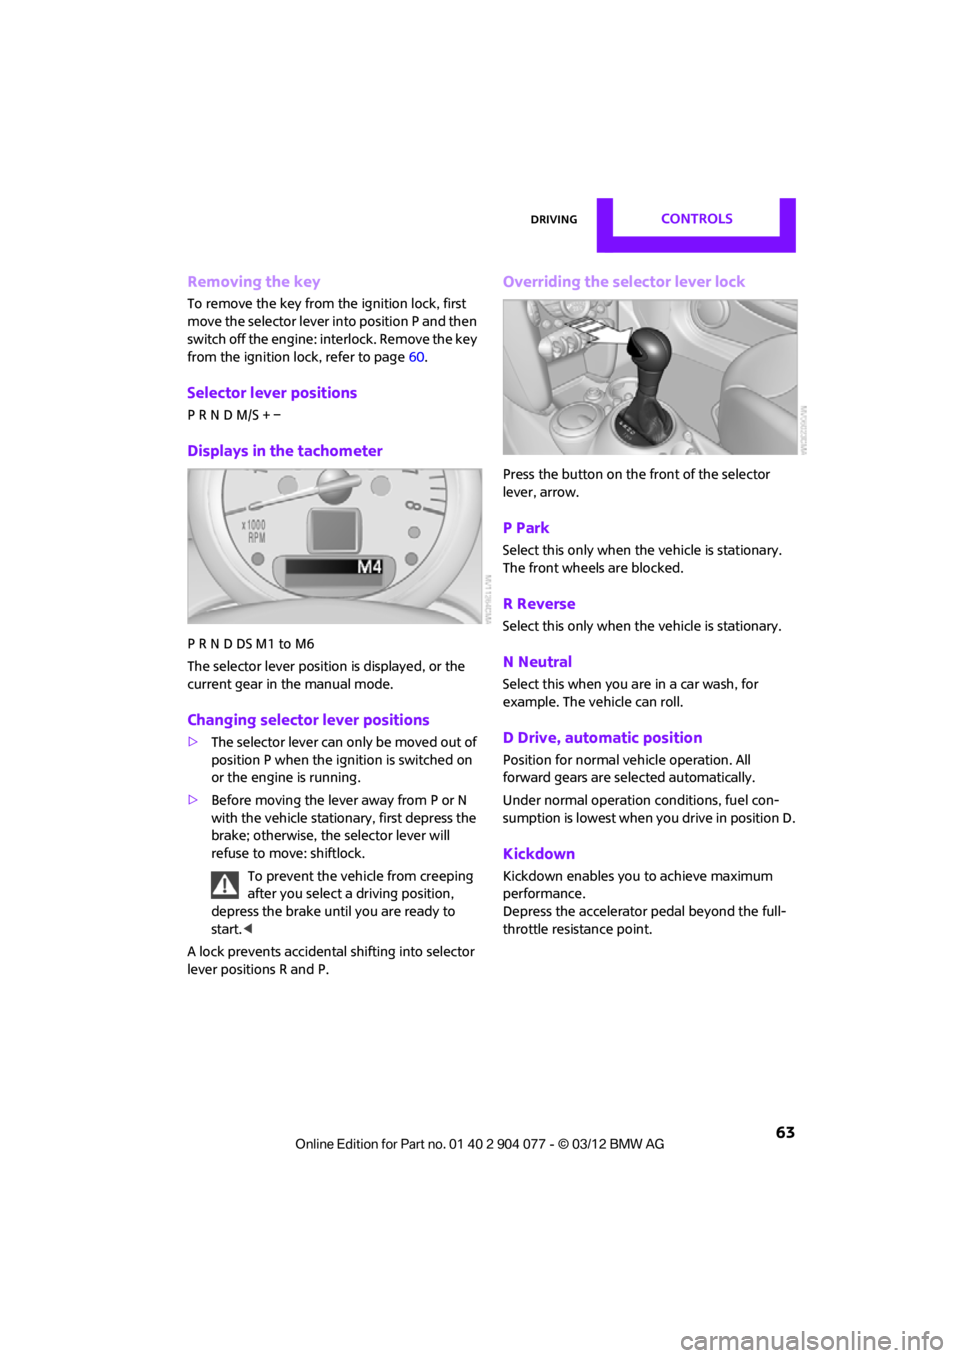
Displays in the tachometer
P R N D DS M1 to M6
The selector lever position is displayed, or the
current gear in the manual mode.
Changing selector lever positions
>The selector lever can only be moved out of
position P when the ignition is switched on
or the engine is running.
> Before moving the lever away from P or N
with the vehicle stationary, first depress the
brake; otherwise, the selector lever will
refuse to move: shiftlock.
To prevent the vehicle from creeping
after you select a driving position,
depress the brake until you are ready to
start. <
A lock prevents accidental shifting into selector
lever positions R and P.
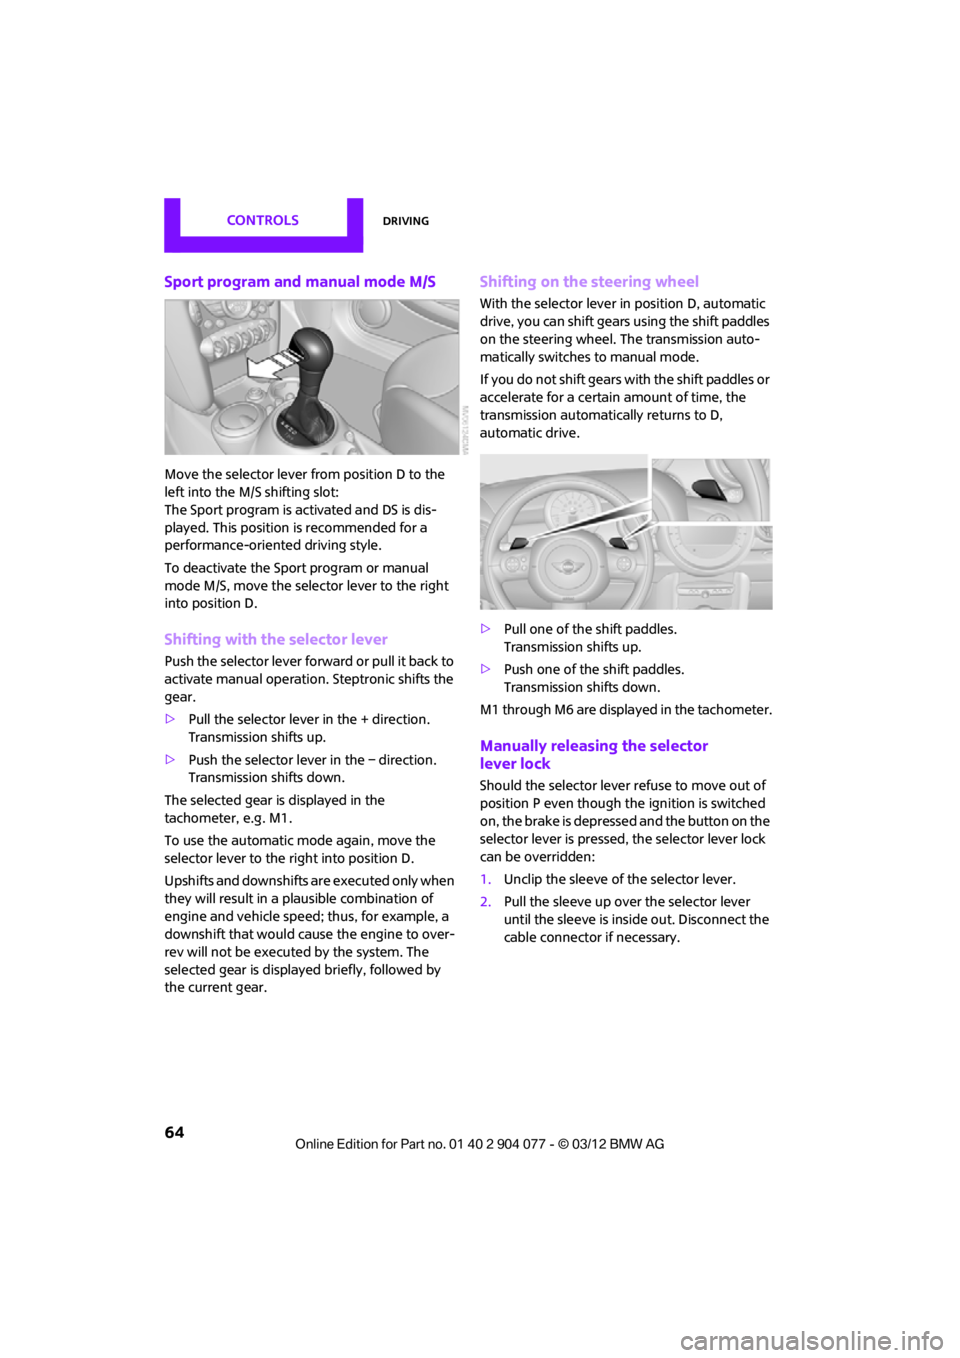
Overriding the selector lever lock
Press the button on the front of the selector
lever, arrow.
P Park
Select this only when the vehicle is stationary.
The front wheels are blocked.
R Reverse
Select this only when the vehicle is stationary.
N Neutral
Select this when you are in a car wash, for
example. The vehicle can roll.
D Drive, automatic position
Position for normal ve hicle operation. All
forward gears are selected automatically.
Under normal operation conditions, fuel con-
sumption is lowest when you drive in position D.
Kickdown
Kickdown enables you to achieve maximum
performance.
Depress the accelerator pedal beyond the full-
throttle resistance point.
00320051004F004C00510048000300280047004C0057004C005200510003
Page 65 of 283

CONTROLSDriving
64
Sport program and manual mode M/S
Move the selector lever from position D to the
left into the M/S shifting slot:
The Sport program is activated and DS is dis-
played. This position is recommended for a
performance-oriented driving style.
To deactivate the Sport program or manual
mode M/S, move the selector lever to the right
into position D.
Shifting with the selector lever
Push the selector lever forward or pull it back to
activate manual operation. Steptronic shifts the
gear.
> Pull the selector lever in the + direction.
Transmission shifts up.
> Push the selector leve r in the – direction.
Transmission shifts down.
The selected gear is displayed in the
tachometer, e.g. M1.
To use the automatic mode again, move the
selector lever to the right into position D.
Upshifts and downshifts are executed only when
they will result in a plausible combination of
engine and vehicle speed; thus, for example, a
downshift that would cause the engine to over-
rev will not be executed by the system. The
selected gear is displayed briefly, followed by
the current gear.
Shifting on the steering wheel
With the selector lever in position D, automatic
drive, you can shift gears using the shift paddles
on the steering wheel. The transmission auto-
matically switches to manual mode.
If you do not shift gears with the shift paddles or
accelerate for a certai n amount of time, the
transmission automatically returns to D,
automatic drive.
> Pull one of the shift paddles.
Transmission shifts up.
> Push one of the shift paddles.
Transmission shifts down.
M1 through M6 are displayed in the tachometer.
Manually releasing the selector
lever lock
Should the selector lever refuse to move out of
position P even though the ignition is switched
on, the brake is depressed and the button on the
selector lever is pressed, the selector lever lock
can be overridden:
1. Unclip the sleeve of the selector lever.
2. Pull the sleeve up over the selector lever
until the sleeve is insi de out. Disconnect the
cable connector if necessary.
00320051004F004C00510048000300280047004C0057004C005200510003
Page 222 of 283

Engine compartmentMOBILITY
221
Engine compartment
Vehicle equipment
In this chapter, all production, country, and
optional equipment that is offered in the model
range is described. Equipment is also described
that is not available because of, for example,
selected options or count ry version. This also
applies to safety related functions and systems.
General information
Never attempt to perform any service or
repair operations on your vehicle without
the required professional technical training. If
you do not know how to follow the specified
instructions, then have the work carried out
by your MINI dealer. If this work is not carried
out properly, there is a danger of subsequent
damage and related safety hazards. <
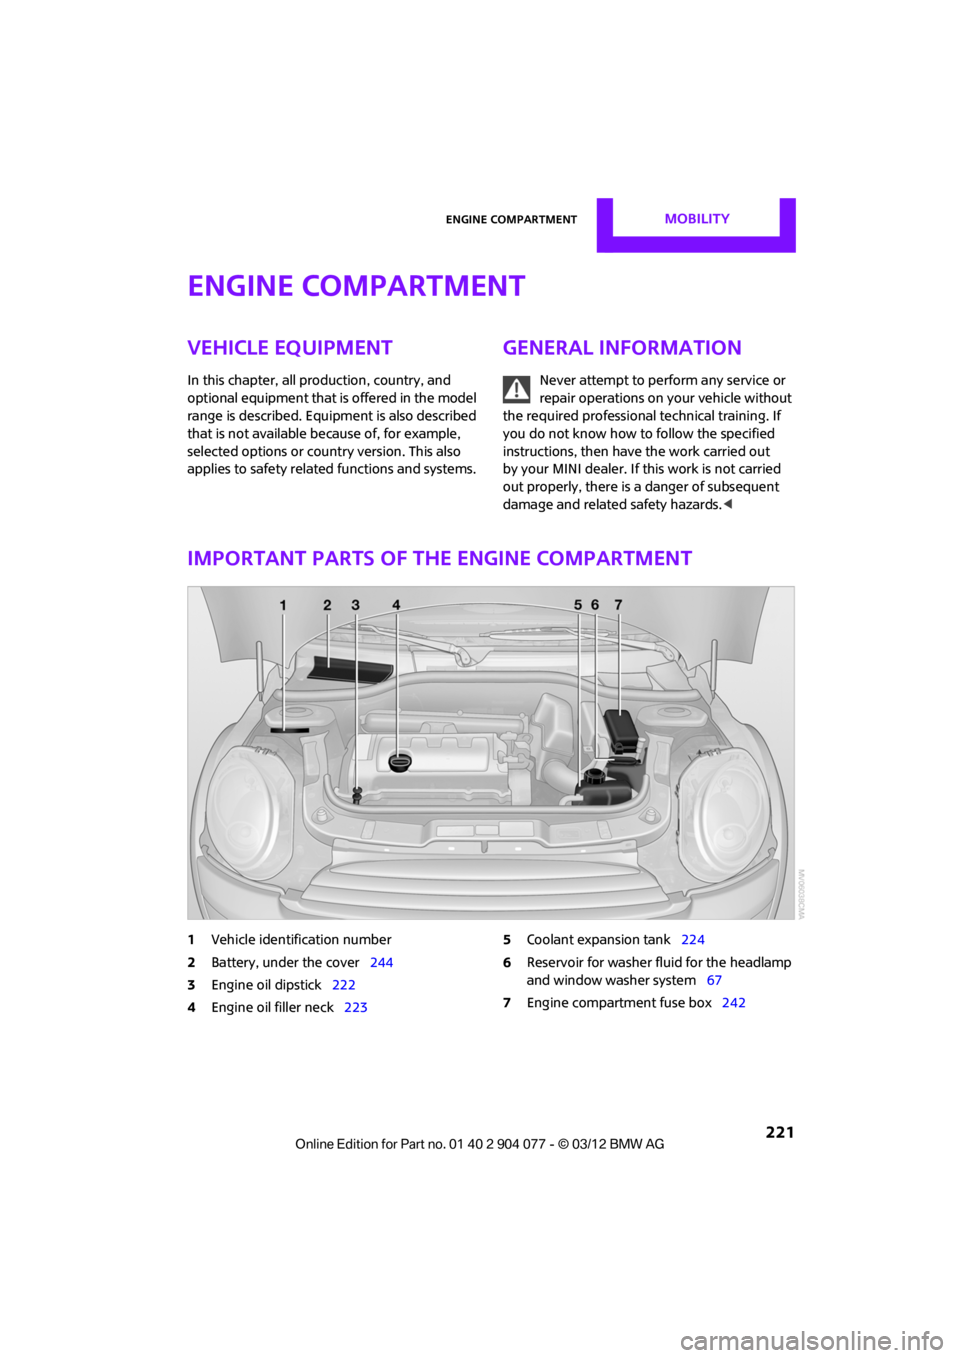
Important parts of the engine compartment
1Vehicle identification number
2 Battery, under the cover 244
3 Engine oil dipstick 222
4 Engine oil filler neck 223 5
Coolant expansion tank 224
6 Reservoir for washer fl uid for the headlamp
and window washer system 67
7 Engine compartment fuse box 242
00320051004F004C00510048000300280047004C0057004C005200510003
Page 243 of 283

MOBILITYReplacing components
242
Starting-aid terminals
Only charge the battery in the vehicle when the
engine is off. Connections, refer to Jump-start-
ing on page 243.
Charger
The use of a charger ensures that the battery has
a sufficient charge even when it is used for fre-
quent short-distance driv es, for example. Charg-
ers that have been developed especially for the
vehicle and adapted to the vehicle electrical
system are available at your MINI dealer.
Disposal
After replacing old batteries, return the
used batteries to your MINI dealer or to a
recycling center. Maintain the battery in an
upright position for transport and storage.
Always secure the battery against tipping over
during transport. <
Power failure
After a temporary power loss, some equipment
may not be fully functional and may require
initialization. Individual se ttings are also lost and
must be reprogrammed:
> Time and date
These values must be updated, page 76.
> Onboard monitor
Operability must be waited for, page124.
Indicator and warning lamps
Lights up in red:
Battery is no longer being charged.
Alternator malfunction.
Switch off all unnecessary electrical consumers.
Have the battery checked without delay. Lights up in yellow:
Battery charge level very low, battery
aged, or battery not securely con-
nected.
Charge it by taking a long er drive or by using an
external charger. If the display appears again,
have the battery checked as soon as possible.
Fuses
Do not attempt to repair a blown fuse or
replace it with a fuse of a different color or
Ampere rating. To do this could cause a fire in
the vehicle resulting from a circuit overload.
Have fuses replaced by your MINI dealer. <
A fuse assignment diag ram is located on the
inside of the fuse box cover panels.
In the engine compartment
Opening the cover
Press the latch.
In the vehicle interior
On the right side of the footwell.
Opening the cover
Press out at the recess.
00320051004F004C00510048000300280047004C0057004C005200510003
Page 273 of 283

REFERENCEEverything from A to Z
272
Emergency services, refer to Roadside Assistance 243
Emergency unlocking 34
Ending a call 174,186
Engine
– breaking in 114
– data 250
– overheated, refer to Coolant temperature 224
– speed 250
– starting, Comfort Access 36
Engine compartment 221
Engine coolant, refer to
Coolant 224
Engine malfunction
– indicator lamp 13
Engine oil
– additives, refer to Approved engine oils 223
– alternative oil types 223
– approved engine oils 223
– capacity 223
– checking level 222
– dipstick 222
– intervals between changes,
refer to Service
requirements 75
– MINI Maintenance
System 225
Engine oil level, checking 222
Engine output, refer to Engine data 250
Engine starti ng, refer to
Starting the engine 61
Entering destination 126
Entering intersection 127
Entertainment sound output on/off 146
Entry map for destination 131
ESP Electronic Stability Program, refer to Dynamic
Stability Control DSC 83
Exhaust system, refer to Hot exhaust system 115 Exterior mirrors
54
– adjusting 54
– automatic heating 54
– folding in and out 54
External audio device 108
External audio de vice, refer to
AUX-In connection 159
External care 227
External devices
– random play sequence 162
– software update 166
External temperature display
– change units of measure 74
– in the onboard computer 74
Eyes
– for tow-starting and towing
away 245
– for tying down loads 119
F
Failure messages, refer to
Check Control 77
Failure of an electrical consumer 242
Fastening safety belts, refer to Safety belts 53
Fastest route for
navigation 135
Fast forward
– CD player 158
Fault messages, refer to Check Control 77
Filter
– microfilter/activated- charcoal filter for automatic
climate control 105
– microfilter for air conditioner 103
Fine wood, care 230
First aid pouch 243
Fixture for remote control,
refer to Ignition lock 60
Flash when locking/ unlocking 30 Flat tire
– run-flat tires
218
– Tire Pressure Monitor TPM 89
Flat Tire Monitor FTM 87
– indicating a flat tire 88
– initializing the system 87
– snow chains 87
– system limits 87
Flat tires, refer to Tire condition 217
Floor mats, care 230
FM, waveband 149
Fog lamps
– replacing bulb 234,236
Folding roof, refer to Convertible top with
integrated sliding sunroof 39
Footbrake, refer to Braking safely 115
Footwell lamps 99
For your own safety 5
Front airbags 93
Front fog lamps 98,99
– replacing bulb 234
Front seat adjustment 51
Frost on windows, refer to Defrosting
windows 103,105
FTM, refer to Flat Tire Monitor 87
Fuel 207
– gauge 70
– high-quality brands 207
– quality 207
– specifications 207
– tank
capaci
ty 259
Fuel clock, refer to Fuel gauge 70
Fuel consumption display
– average fuel consumption 72
Fuel display, refer to Fuel gauge 70
Fuel filler flap 206
– releasing in the event of electrical malfunction 206
Fuses 242
00320051004F004C00510048000300280047004C0057004C005200510003