2012 MERCEDES-BENZ SLK ROADSTER ESP
[x] Cancel search: ESPPage 81 of 321
X
Pull the corresponding switch on the door
control panel until the side window is com-
pletely closed. (Y page 76).
X Hold the switch for an additional second.
If the side window opens again slightly:
X Immediately pull the corresponding switch
on the door control panel until the side win-
dow is completely closed (Y page 76).
X Hold the switch for an additional second.
X If the corresponding side window remains
closed after the button has been released,
the side window has been reset correctly.
If this is not the case, repeat the steps
above again. Problems with the side windows
Problem: aside window cannot be closed
because it is blocked by objects, e.g.
leaves in the window guide.
X Remove the objects.
X Close the side window.
Problem :aside window cannot be closed
and you cannot see the cause. G
WARNING
Closing the side windows with increased force
or without the anti-entrapment feature could
lead to serious or even fatal injury. Make sure
that nobody can become trapped when clos-
ing the side windows.
If a side window is obstructed during closing
and reopens again slightly:
X Immediately afte rthe window blocks, pull
the corresponding switch again until the
side window has closed.
The side window is closed with increased
force. If a side window is obstructed again during
closing and reopens again slightly:
X
Immediately after the window blocks, pull
the corresponding switch again until the
side window has closed.
The side window is closed without the anti-
entrapment feature. Roof
Important safety notes
For safety reasons, the roof can only be
opened or closed when the vehicle is station-
ary. G
WARNING
Always open or close the roof fully before
driving.
If the roof does not open or close fully, the
roof hydraulic system is depressurised and
the roof is lowered:
R after about seven minutes if the ignition is
switched on
R after about
15 seconds if the ignition is switched off
Aw arning tone sounds shortly beforehand.
The K symbol and Vario-roof lower‐ ing message appear in the multifunction dis-
play.
Lock the roof again before driving on. Other-
wise, the unlocked roo fcould open during the
journey and cause you to lose control of your
vehicle. You and/or other persons could be
injured as a result. G
WARNING
Closing the roof manually is a complex, tech-
nically challenging procedure. Attempting to
manually close the roof may cause damage to
the roof and/or injury.
For this reason, the manual closing process
should only be carried out at a qualified spe-
cialist workshop. 78
RoofOpening and closing
Page 86 of 321
Fitting and removing the draught stop
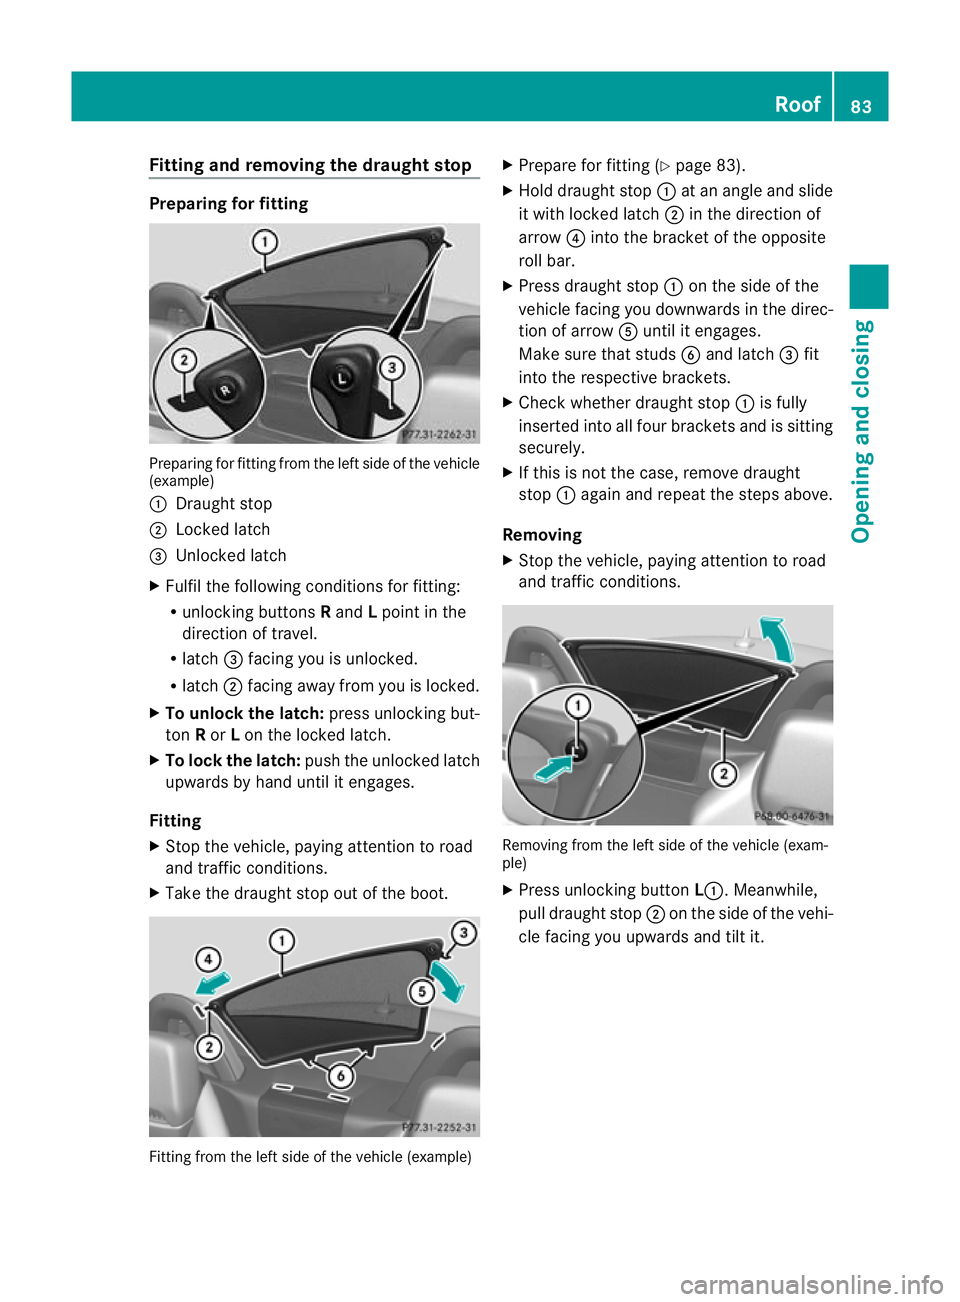
Preparing for fitting
Preparing for fitting from the lef
tside of the vehicle
(example)
: Draught stop
; Locked latch
= Unlocked latch
X Fulfil the following conditions for fitting:
R unlocking buttons Rand Lpoint in the
direction of travel.
R latch =facing you is unlocked.
R latch ;facing away from you is locked.
X To unlock the latch: press unlocking but-
ton Ror Lon the locked latch.
X To lock th elatch: push the unlocked latch
upwards by hand until it engages.
Fitting
X Stop the vehicle, paying attention to road
and traffic conditions.
X Take the draugh tstop ou tofthe boot. Fitting from the left side of the vehicle (example) X
Prepare for fitting (Y page 83).
X Hold draught stop :at an angle and slide
it with locked latch ;in the direction of
arrow ?into the bracket of the opposite
roll bar.
X Press draught stop :on the side of the
vehicle facing you downwards in the direc-
tion of arrow Auntil it engages.
Make sure that studs Band latch =fit
into the respective brackets.
X Check whether draught stop :is fully
inserted into all four brackets and is sitting
securely.
X If this is not the case, remove draught
stop :again and repeat the steps above.
Removing
X Stop the vehicle, paying attention to road
and traffic conditions. Removing from the left side of the vehicle (exam-
ple)
X
Press unlocking button L:.Meanwhile,
pull draught stop ;on the side of the vehi-
cle facing you upwards and tilt it. Roof
83Opening and closing Z
Page 96 of 321
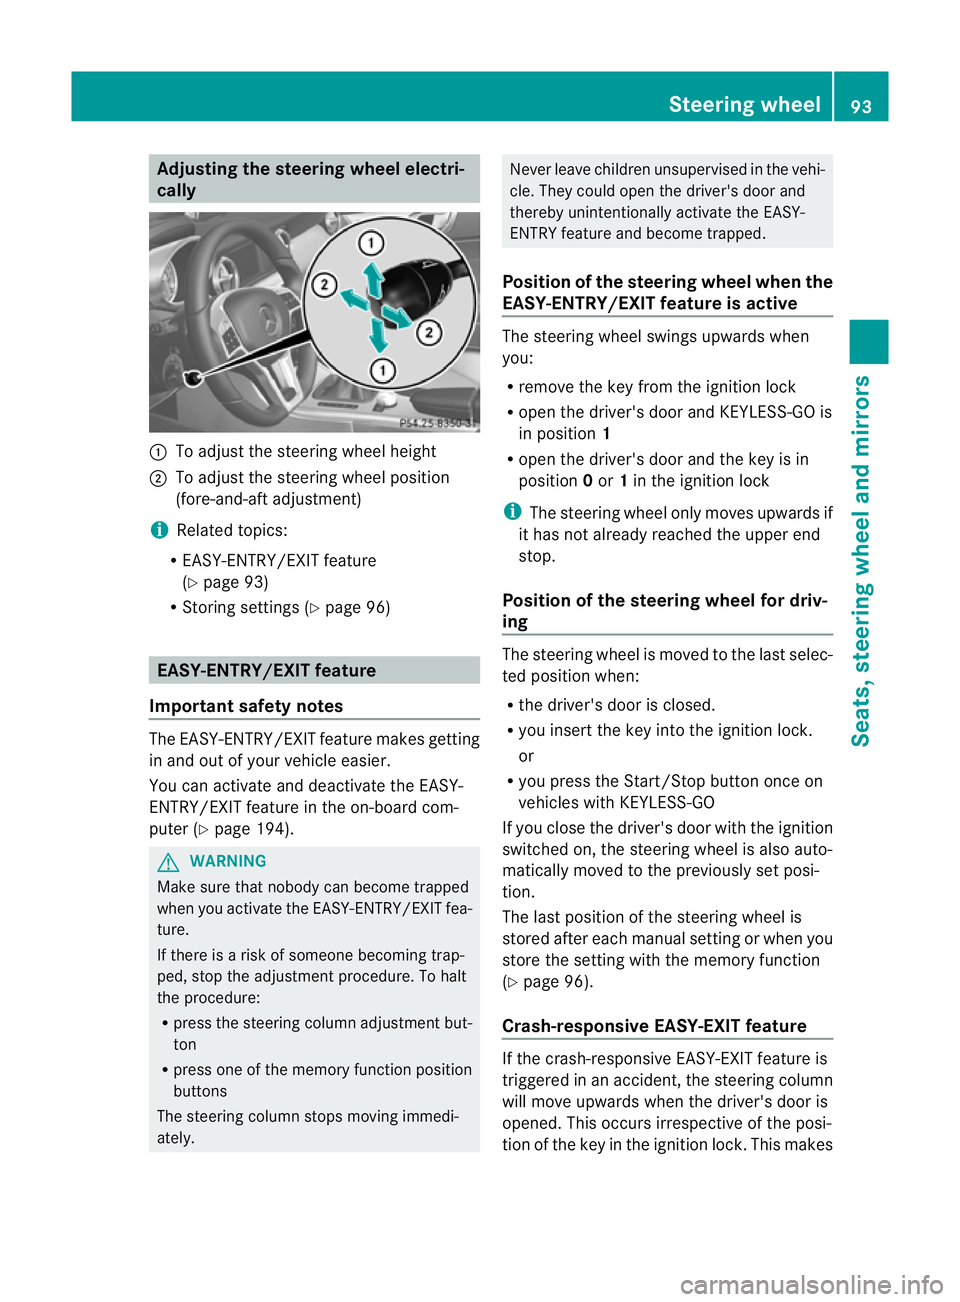
Adjusting the steering wheel electri-
cally :
To adjust the steering wheel height
; To adjust the steering wheel position
(fore-and-aft adjustment)
i Related topics:
R EASY-ENTRY/EXIT feature
(Y page 93)
R Storing settings (Y page 96) EASY-ENTRY/EXIT feature
Important safety notes The EASY-ENTRY/EXIT feature makes getting
in and out of your vehicle easier.
You can activate and deactivate the EASY-
ENTRY/EXIT feature in the on-board com-
puter (Y page 194). G
WARNING
Make sure that nobody can become trapped
when you activate the EASY-ENTRY/EXIT fea-
ture.
If there is a risk of someone becoming trap-
ped, stop the adjustmen tprocedure. To halt
the procedure:
R press the steering colum nadjustment but-
ton
R press one of the memory function position
buttons
The steering column stops moving immedi-
ately. Never leave children unsupervised in the vehi-
cle. They could open the driver's door and
thereby unintentionally activate the EASY-
ENTRY feature and become trapped.
Position of the steering wheel when the
EASY-ENTRY/EXIT feature is active The steering wheel swings upwards when
you:
R
remove the key from the ignition lock
R open the driver's door and KEYLESS-GO is
in position 1
R open the driver's door and the key is in
position 0or 1in the ignition lock
i The steering wheel only moves upwards if
it has not already reached the upper end
stop.
Position of the steering wheel for driv-
ing The steering wheel is moved to the last selec-
ted position when:
R
the driver's door is closed.
R you insert the key int othe ignition lock.
or
R you press the Start/Stop button once on
vehicles with KEYLESS-GO
If you close the driver's door with the ignition
switched on, the steering wheel is also auto-
matically moved to the previously set posi-
tion.
The last position of the steering wheel is
stored after each manual setting or when you
store the setting with the memory function
(Y page 96).
Crash-responsive EASY-EXIT feature If the crash-responsive EASY-EXIT feature is
triggered in an accident, the steering column
will move upwards when the driver's door is
opened. This occurs irrespective of the posi-
tion of the key in the ignition lock. This makes Steering wheel
93Seats, steering wheel and mirrors Z
Page 97 of 321
it easier to exit the vehicle and rescue the
occupants.
The crash-responsive EASY-EXIT feature is
only operational after an accident if the EASY-
EXIT/ENTRY feature is activated in the on-
board computer. Mirrors
Rear-view mirror
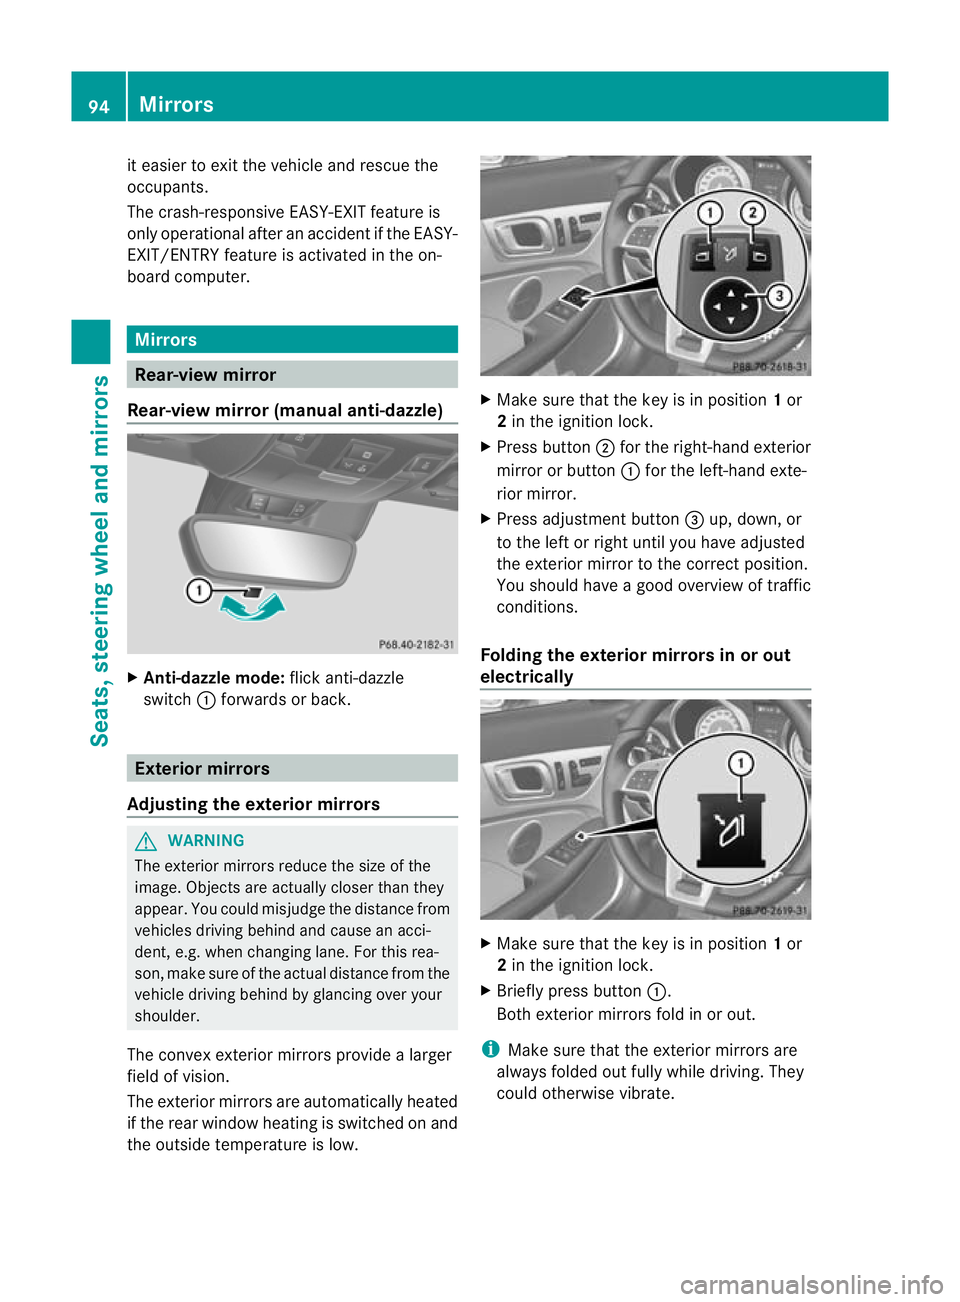
Rear-view mirror (manual anti-dazzle) X
Anti-dazzle mode: flick anti-dazzle
switch :forwards or back. Exterior mirrors
Adjusting the exterior mirrors G
WARNING
The exterior mirrors reduce the size of the
image. Objects are actually closer than they
appear. You could misjudge the distance from
vehicles driving behind and cause an acci-
dent, e.g. when changing lane. For this rea-
son, make sure of the actual distance fro mthe
vehicle driving behind by glancing over your
shoulder.
The convex exterior mirrors provide a larger
field of vision.
The exterior mirrors are automatically heated
if the rear window heating is switched on and
the outside temperature is low. X
Make sure that the key is in position 1or
2 in the ignition lock.
X Press button ;for the right-hand exterior
mirror or button :for the left-hand exte-
rior mirror.
X Press adjustment button =up, down, or
to the left or right until you have adjusted
the exterior mirror to the correct position.
You should have a good overview of traffic
conditions.
Folding the exterior mirrors in or out
electrically X
Make sure that the key is in position 1or
2 in the ignition lock.
X Briefly press button :.
Both exterior mirrors fold in or out.
i Make sure that the exterior mirrors are
always folded out fully while driving. They
could otherwise vibrate. 94
MirrorsSeats, steering wheel and mirrors
Page 99 of 321
X
Engage reverse gear.
The exterior mirror on the front-passenger
side moves to the prese tparking position.
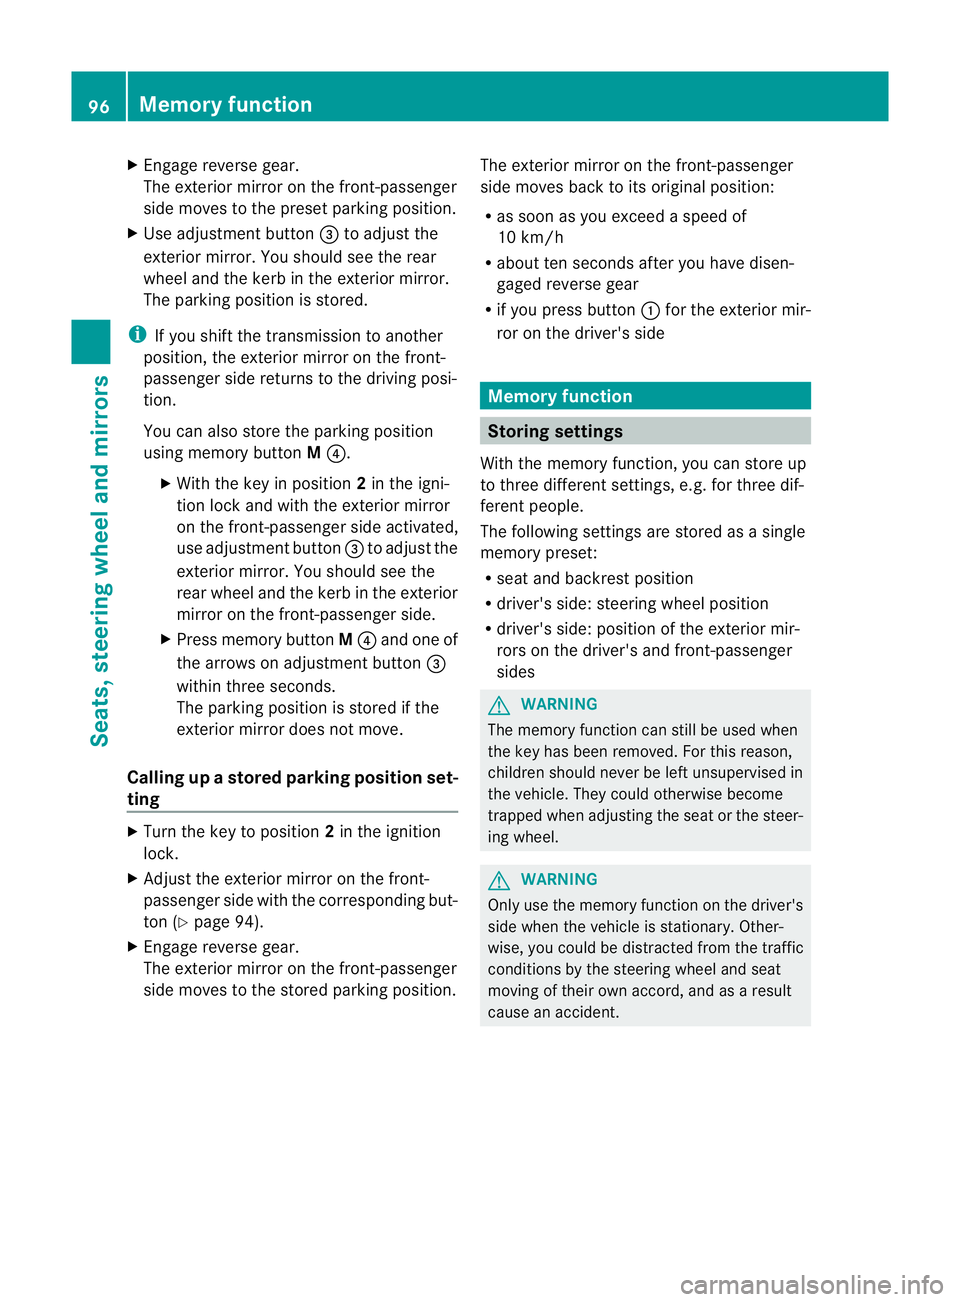
X Use adjustment button =to adjust the
exterior mirror .You should see the rear
wheel and the kerb in the exterior mirror.
The parking position is stored.
i If you shift the transmission to another
position, the exterior mirror on the front-
passenger side returns to the driving posi-
tion.
You can also store the parking position
using memory button M?.
X With the key in position 2in the igni-
tion lock and with the exterior mirror
on the front-passenger side activated,
use adjustmen tbutton =to adjust the
exterio rmirror. You should see the
rear wheel and the kerb in the exterior
mirror on the front-passenger side.
X Press memory button M? and one of
the arrows on adjustment button =
within three seconds.
The parking position is stored if the
exterior mirror does not move.
Calling up astore dparking position set-
ting X
Tur nthe key to position 2in the ignition
lock.
X Adjust the exterior mirror on the front-
passenger side with the corresponding but-
ton (Y page 94).
X Engage reverse gear.
The exterior mirror on the front-passenger
side moves to the stored parking position. The exterior mirror on the front-passenger
side moves back to its original position:
R
as soon as you exceed a speed of
10 km/h
R about ten seconds after you have disen-
gaged reverse gear
R if you press button :for the exterior mir-
ror on the driver's side Memory function
Storing settings
With the memory function, you can store up
to three different settings, e.g. for three dif-
ferent people.
The following settings are stored as a single
memory preset:
R seat and backrest position
R driver's side: steering wheel position
R driver's side: position of the exterior mir-
rors on the driver's and front-passenger
sides G
WARNING
The memory function can still be used when
the key has been removed. For this reason,
children should never be left unsupervised in
the vehicle. They could otherwise become
trapped when adjusting the seat or the steer-
ing wheel. G
WARNING
Only use the memory function on the driver's
side when the vehicle is stationary. Other-
wise, you could be distracted from the traffic
conditions by the steering wheel and seat
moving of their own accord, and as a result
cause an accident. 96
Memory functionSeats, steering wheel and mirrors
Page 104 of 321
4Ã
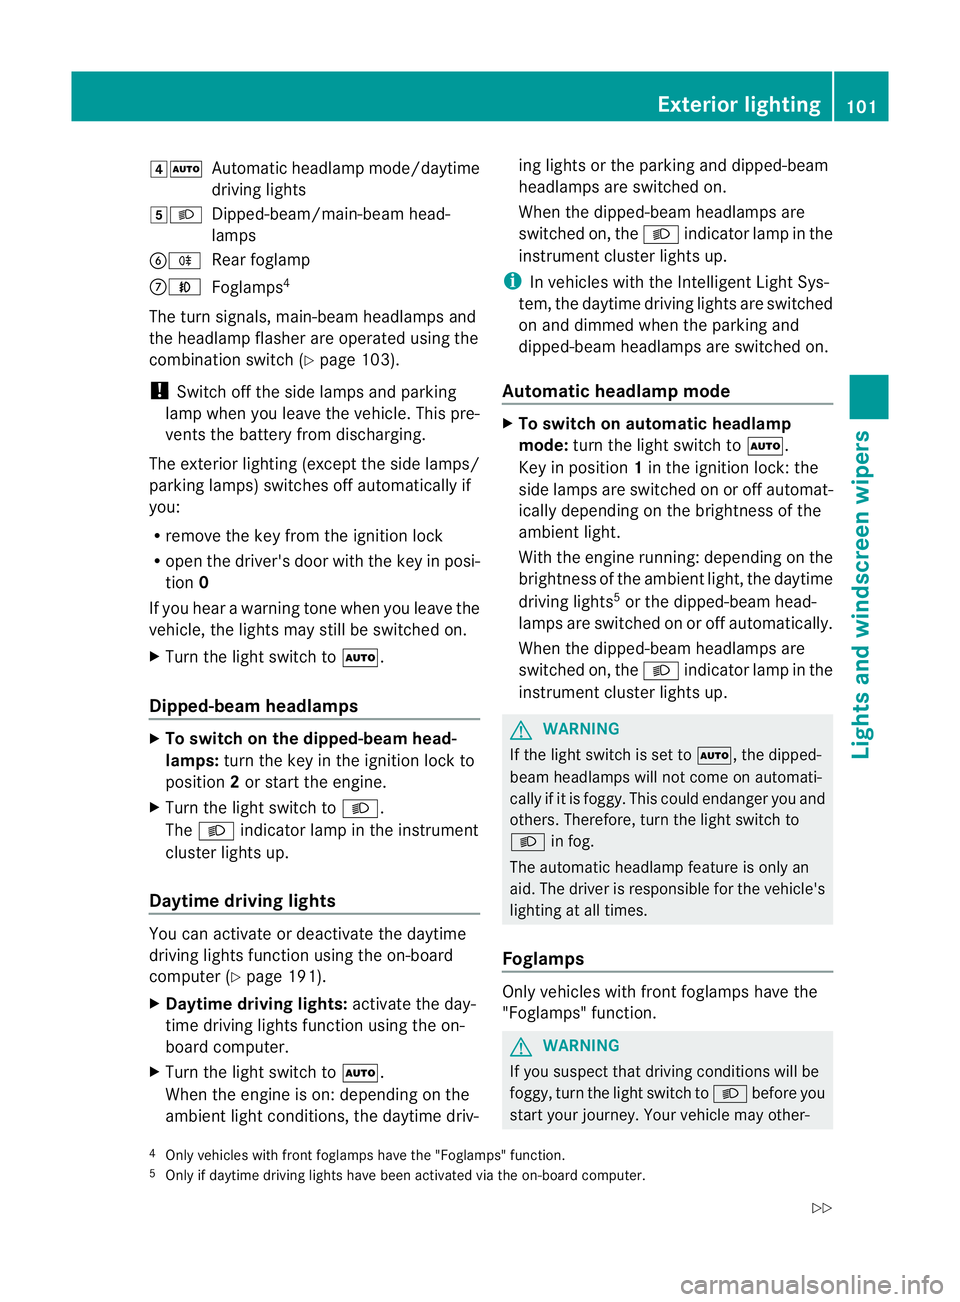
Automatic headlamp mode/daytime
driving lights
5L Dipped-beam/main-bea mhead-
lamps
BR Rear foglamp
CN Foglamps 4
The turn signals, main-beam headlamps and
the headlamp flasher are operated using the
combination switch (Y page 103).
! Switch off the side lamps and parking
lamp when you leave the vehicle. This pre-
vents the battery from discharging.
The exterior lighting (except the side lamps/
parking lamps) switches off automatically if
you:
R remove the key from the ignition lock
R open the driver's door with the key in posi-
tion 0
If you hear a warning tone when you leave the
vehicle, the lights may still be switched on.
X Turn the light switch to Ã.
Dipped-beam headlamps X
To switch on the dipped-beam head-
lamps: turn the key in the ignition lock to
position 2or start the engine.
X Turn the light switch to L.
The L indicator lamp in the instrument
cluster lights up.
Daytime driving lights You can activate or deactivate the daytime
driving lights function using the on-board
computer (Y page 191).
X Daytime driving lights: activate the day-
time driving lights function using the on-
board computer.
X Turn the light switch to Ã.
When the engine is on: depending on the
ambient light conditions, the daytime driv- ing lights or the parking and dipped-beam
headlamps are switched on.
When the dipped-beam headlamps are
switched on, the
Lindicator lamp in the
instrument cluster lights up.
i In vehicles with the Intelligent Light Sys-
tem, the daytime driving lights are switched
on and dimmed when the parking and
dipped-beam headlamps are switched on.
Automatic headlamp mode X
To switch on automatic headlamp
mode: turn the light switch to Ã.
Key in position 1in the ignition lock: the
side lamps are switched on or off automat-
ically depending on the brightness of the
ambient light.
With the engine running: depending on the
brightness of the ambient light, the daytime
driving lights 5
or the dipped-beam head-
lamps are switched on or off automatically.
When the dipped-beam headlamps are
switched on, the Lindicator lamp in the
instrument cluster lights up. G
WARNING
If the light switch is set to Ã, the dipped-
beam headlamps will not come on automati-
cally if it is foggy. This could endanger you and
others. Therefore, turn the light switch to
L in fog.
The automatic headlamp feature is only an
aid. The driver is responsible for the vehicle's
lighting at all times.
Foglamps Only vehicles with fron
tfoglamps have the
"Foglamps" function. G
WARNING
If you suspect that driving conditions will be
foggy, turn the light switch to Lbefore you
start your journey. Your vehicle may other-
4 Only vehicles with front foglamps have the "Foglamps" function.
5 Only if daytime driving lights have been activated via the on-board computer. Exterior lighting
101Lights and windscreen wipers
Z
Page 105 of 321
wise not be visible and you could endanger
yoursel
fand others.
X To switch on the foglamps: turn the key
in the ignition lock to position 2or start the
engine.
X Turn the light switch to T,Lor
Ã.
X Press the Nbutton.
The green Nindicator lamp in the instru-
ment cluster lights up.
X To switch off the front foglamps: press
the N button.
The green Nindicator lamp in the instru-
ment cluster goes out.
i If you switch the engine off (key in posi-
tion 1in the ignition lock) and then restart
it, the previous foglamp settings are
restored.
Rear foglamp X
To switch on the rear foglamp: turn the
key in the ignition lock to position 2or start
the engine.
X Turn the light switch to LorÃ.
X Press the Rbutton.
The yellow Rindicator lamp in the
instrument cluster lights up.
X To switch off the rear foglamp: press the
R button.
The yellow Rindicator lamp in the
instrument cluster goes out.
Vehicles with front foglamps :when the light
switch is in the Tposition, the rear fog-
lamp can only be switched on if the foglamps
(without dipped-beamh eadlamps) are
switched on.
i If you switch the engin eoff (key in posi-
tion 1in the ignition lock) and then restart
it, the previous rear foglamp settings are
restored. Adjusting the headlamp range (halogen
headlamps) The headlamp range control allows you to
adjust the cone of light from the headlamps
to sui
tthe vehicle load. X
Start the engine.
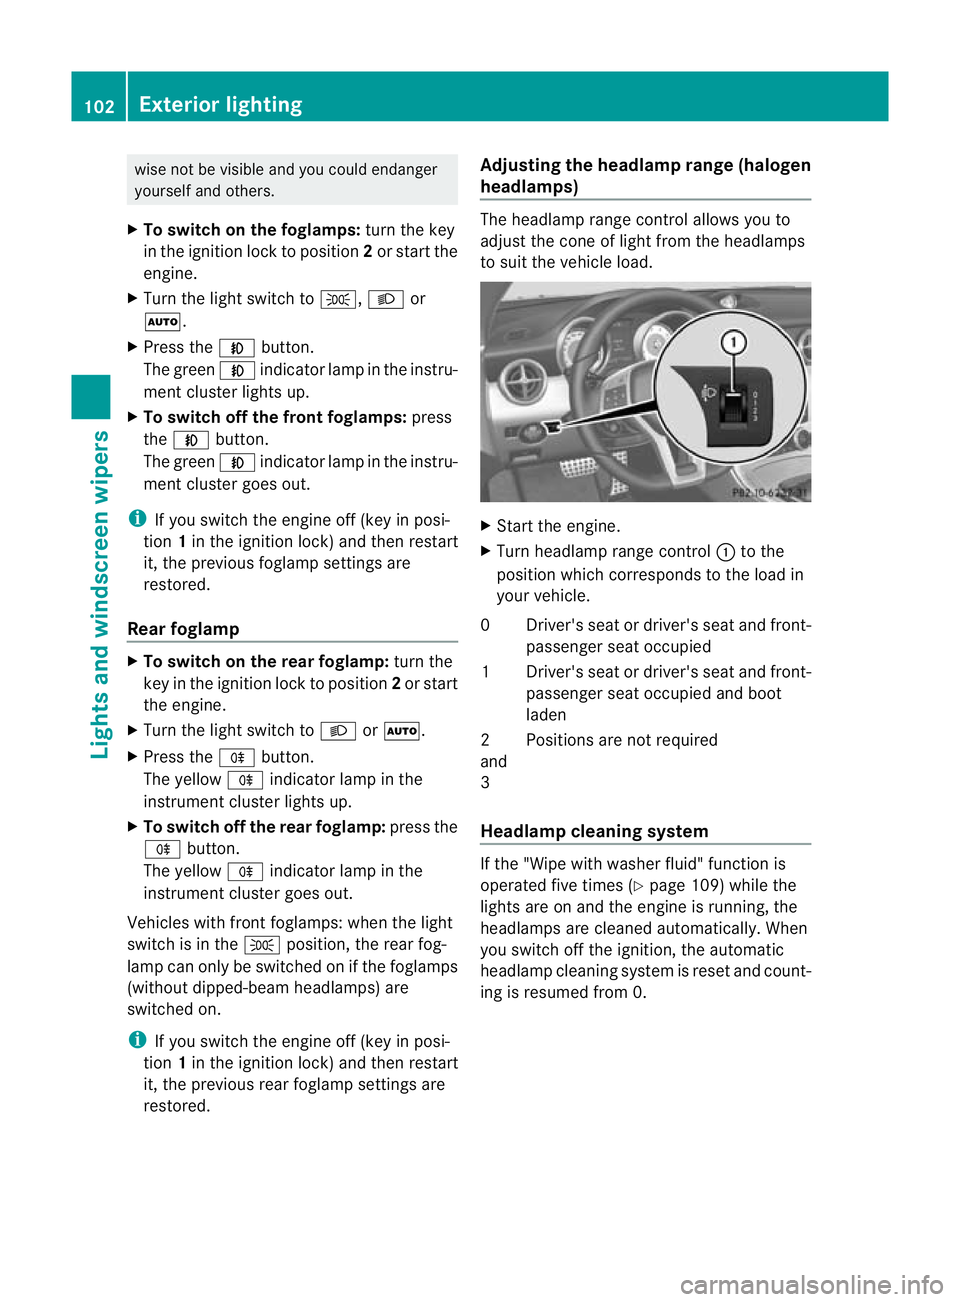
X Turn headlamp range control :to the
position which corresponds to the load in
your vehicle.
0D river's seat or driver's seat and front-
passenger seat occupied
1D river's seat or driver's seat and front-
passenger seat occupied and boot
laden
2
and
3 Positions are not required
Headlamp cleaning system If the "Wipe with washer fluid" function is
operated five times (Y
page 109) while the
lights are on and the engine is running, the
headlamps are cleaned automatically.W hen
you switch off the ignition, the automatic
headlamp cleaning system is reset and count-
ing is resumed from 0. 102
Exterior lightingLights and windscreen wipers
Page 106 of 321
Combination switch
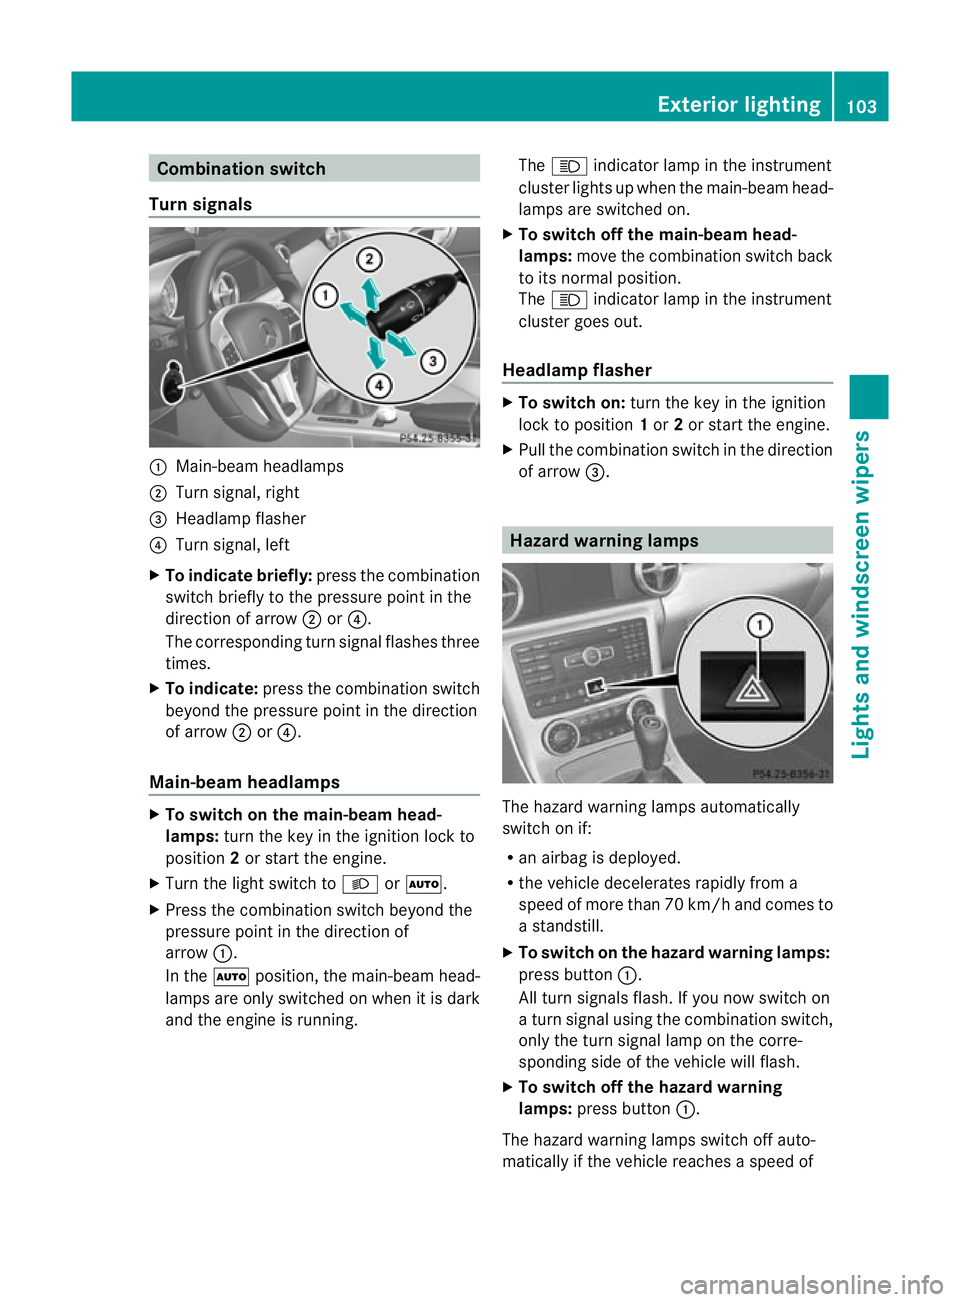
Turn signals :
Main-beam headlamps
; Turn signal, right
= Headlamp flasher
? Turn signal, left
X To indicate briefly: press the combination
switch briefly to the pressure poin tinthe
direction of arrow ;or?.
The corresponding turn signal flashes three
times.
X To indicate: press the combination switch
beyond the pressure point in the direction
of arrow ;or?.
Main-beam headlamps X
To switch on the main-beam head-
lamps: turn the key in the ignition lock to
position 2or start the engine.
X Turn the light switch to LorÃ.
X Press the combination switch beyond the
pressure point in the direction of
arrow :.
In the Ãposition, the main-beam head-
lamps are only switched on when it is dark
and the engine is running. The
K indicator lamp in the instrument
cluster lights up when the main-beam head-
lamps are switched on.
X To switch off the main-beam head-
lamps: move the combination switch back
to its normal position.
The K indicator lamp in the instrument
cluster goes out.
Headlamp flasher X
To switch on: turn the key in the ignition
lock to position 1or 2or start the engine.
X Pull the combination switch in the direction
of arrow =. Hazard warning lamps
The hazard warning lamps automatically
switch on if:
R
an airbag is deployed.
R the vehicle decelerates rapidly from a
speed of more than 70 km/h and comes to
a standstill.
X To switch on the hazard warning lamps:
press button :.
All turn signals flash. If you now switch on
a turn signal using the combination switch,
only the turn signal lamp on the corre-
sponding side of the vehicle will flash.
X To switch off the hazard warning
lamps: press button :.
The hazard warning lamps switch off auto-
matically if the vehicle reaches a speed of Exterior lighting
103Lights and windscreen wipers Z