2012 MERCEDES-BENZ SLK ROADSTER ESP
[x] Cancel search: ESPPage 109 of 321
The interior lighting automatically switches
on if you:
R unlock the vehicle
R open a door
R remove the key from the ignition lock
The interior light is activated for a short while
when the key is removed from the ignition
lock. You can activat ethis delayed switch-off
using the on-board computer (Y page 193).
Manual interior lighting control X
To switch the interior lighting on/off:
press the cbutton.
X To switch the reading lamps on/off:
press the pbutton. Crash-responsive emergency lighting
The interior lighting is activated automatically
if the vehicle is involved in an accident.
X To switch off the crash-responsive
emergency lighting: press the hazard
warning lamp button.
or
X Lock and then unlock the vehicle using the
key. Replacing bulbs
Important safety notes
Xenon bulbs G
DANGER
Xenon bulbs are under high voltage. If you
touch the electrical contacts of a xenon bulb,
you could suffer an electric shock and be seri-
ously or even fatally injured. For this reason,
do not remove the cover of xenon bulbs.
Do not change the xenon bulbs yourself, but
have them replaced at a qualified workshop.
If your vehicle is equipped with xenon bulbs,
you can recognise this by the following: the cone of light from the xenon bulbs moves
from the top to the bottom and back again
when you start the engine. For this to be
observed, the lights must be switched on
before starting the engine.
Bulbs and lamps are an important aspect of
vehicle safety. You must therefore make sure
that these function correctly at all times.
Have the headlamp setting checked regularly.
Other bulbs
There are bulbs other than the xenon bulbs
that you cannot replace. Replace only the
bulbs listed (Y
page 107). Have the bulbs that
you cannot replace yourself changed at a
qualified specialist workshop.
If you require assistance changing bulbs, con-
sult a qualified specialist workshop.
Do not touch the glass tube of new bulbs with
your bare hands. Even minor contamination
can burn into the glass surface and reduce
the service life of the bulbs. Always use a lint-
free cloth or only touch the base of the bulb
when fitting.
Only use bulbs of the correct type.
If the new bulb still does not light up, consult
a qualified specialist workshop.
Bulbs and lamps are an important aspect of
vehicle safety. You must therefore make sure
that these function correctly at all times.
Have the headlamp setting checked regularly. G
WARNING
Bulbs and lamps can be very hot. You should
therefore allow them to cool down before you
change them. Otherwise, you could be burned
if you touch them.
Keep bulbs out of the reach of children. Oth-
erwise, they could damage the bulbs, for
example, and injure themselves.
Never use a bulb which has been dropped.
Such a bulb may break or even explode and
injure you.
Halogen bulbs are pressurised and can
explode when you change them, particularly
if they are very hot. You should therefore wear 106
Replacing bulbsLights and windscreen wipers
Page 122 of 321
Setting the air distribution
Air distribution settings Air-conditioning system
¯
Directs the airflow through the demis-
ter vents
O Directs the airflow through the foot-
well air vents
P Directs the airflow through the centre
and side air vents
i You can also activate several of the air
distribution settings simultaneously .In
order to do this, press several of the air
distribution buttons. The air is then routed
through different air vents.
THERMOTRONIC automatic climate con-
trol
P Directs the airflow through the centre
and side air vents
O Directs the airflow through the foot-
well air vents
S Directs the airflow through the centre
and side air vents and the footwell air
vents
¯ Directs the airflow through the demis-
ter vents
b Directs the airflow through the centre
and side air vents as well as the demis-
ter vents
a Directs the airflow through the foot-
well and demister vents
_ Directs the airflow through the demis-
ter, centre and side air vents as well as
the footwell air vents
i Regardless of the air distribution setting,
airflow is always directed through the side
air vents. You can only close the side air
vents, by fully closing the adjuster on the
side air vents (Y page 123). Air-conditioning system X
Turn the key to position 2in the ignition
lock.
X Press one or more of the P,O,
¯ buttons.
The corresponding indicator lamp comes
on.
THERMOTRONIC automatic climate
control X
Turn the key to position 2in the ignition
lock.
X Press the _button repeatedly until the
desired symbol appears in the display. Setting the airflow
Air-conditioning system X
Turn the key to position 2in the ignition
lock.
X To increase/reduce: turn thumbwheel
C clockwise or anti-clockwise
(Y page 115).
THERMOTRONIC automatic climate
control X
Turn the key to position 2in the ignition
lock.
X To increase/reduce: press theKor
I button. Switching the ZONE function on/off
This function is only available with the
THERMOTRONIC automatic climate control.
X To switch on: press theábutton.
The indicator lamp in the ábutton lights
up.
The temperature setting for the driver's
side is not adopted for the front-passenger
side. Operating the climate control system
119Climate control Z
Page 130 of 321
not be able to brake, declutch or accelerate
as intended. This could lead to accidents and
injury. G
WARNING
Do not change down for additional engine
braking on a slippery roa dsurface. This could
cause the drive wheels to lose their grip and
the vehicle could skid. This could cause you
to lose control of your vehicle and cause an
accident.
! Warm up the engine quickly. Do no tuse
the engine's full performance until it has
reached operating temperature.
Only set the automatic transmission to the
respective drive positions when the vehicle
is stationary.
Where possible, avoid spinning the drive
wheels when pulling away on slippery
roads. Otherwise, you could damage the
drive train.
! AMG vehicles: at low engine oil temper-
atures (below +20 †), the maximum
engine speed is restricted in order to pro-
tect the engine. To protect the engine and
maintain smooth engine operation, avoid
driving at full throttle when the engine is
cold. Key positions
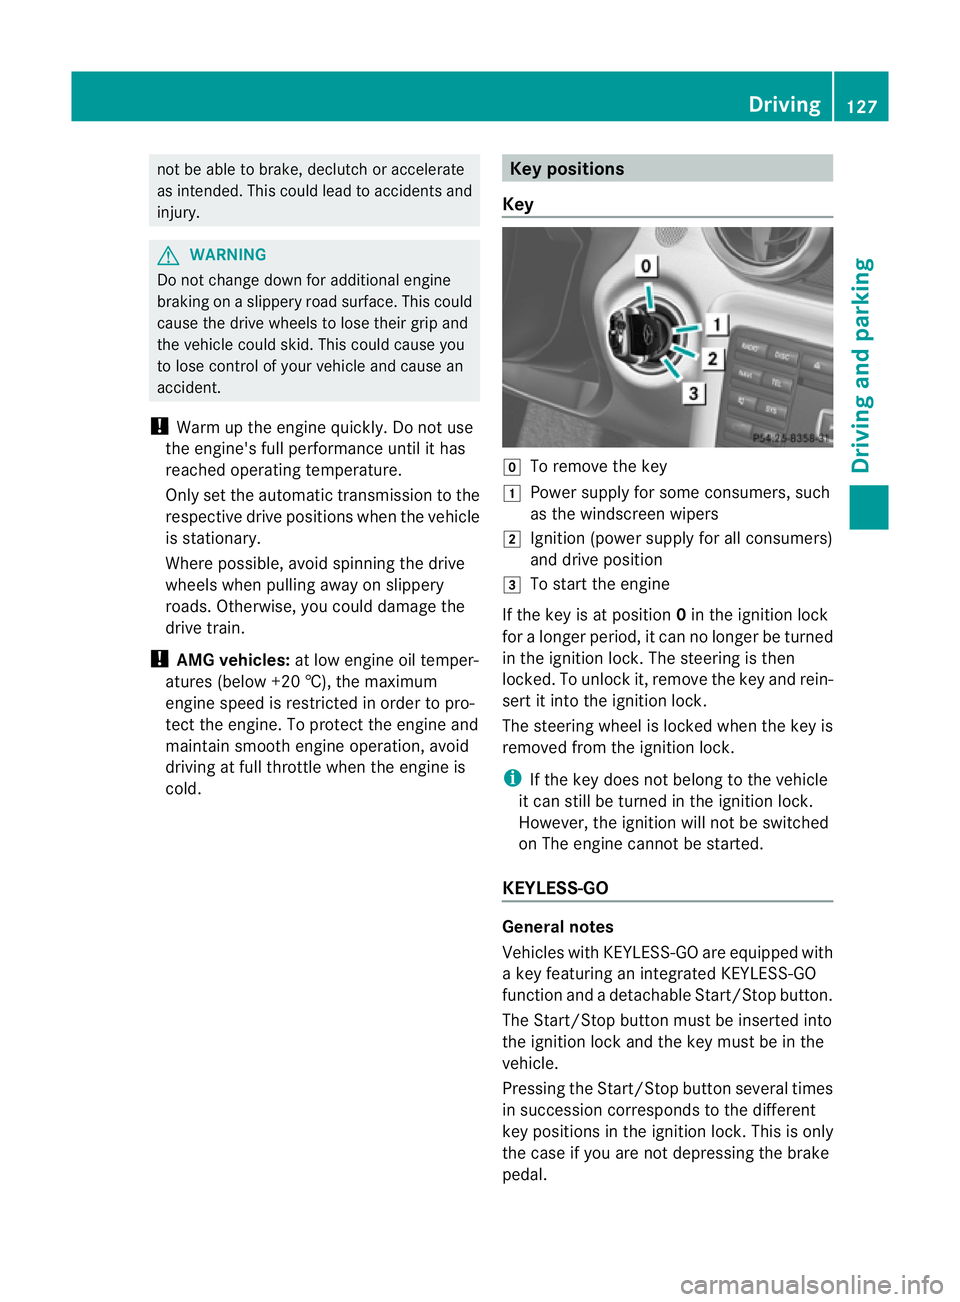
Key g
To remove the key
1 Power supply for some consumers, such
as the windscreen wipers
2 Ignition (power supply for all consumers)
and drive position
3 To start the engine
If the key is at position 0in the ignition lock
for a longer period, it can no longer be turned
in the ignition lock. The steering is then
locked. To unlock it, remove the key and rein-
sert it into the ignition lock.
The steering wheel is locked when the key is
removed from the ignition lock.
i If the key does not belong to the vehicle
it can still be turned in the ignition lock.
However, the ignition will not be switched
on The engine cannot be started.
KEYLESS-GO General notes
Vehicles with KEYLESS-GO are equipped with
a key featuring an integrated KEYLESS-GO
function and a detachable Start/Stop button.
The Start/Stop button must be inserted into
the ignition lock and the key must be in the
vehicle.
Pressing the Start/Stop button several times
in succession corresponds to the different
key positions in the ignition lock. This is only
the case if you are not depressing the brake
pedal. Driving
127Driving and parking Z
Page 131 of 321
If you depress the brake pedal and press the
Start/Stop button, the engine starts immedi-
ately.
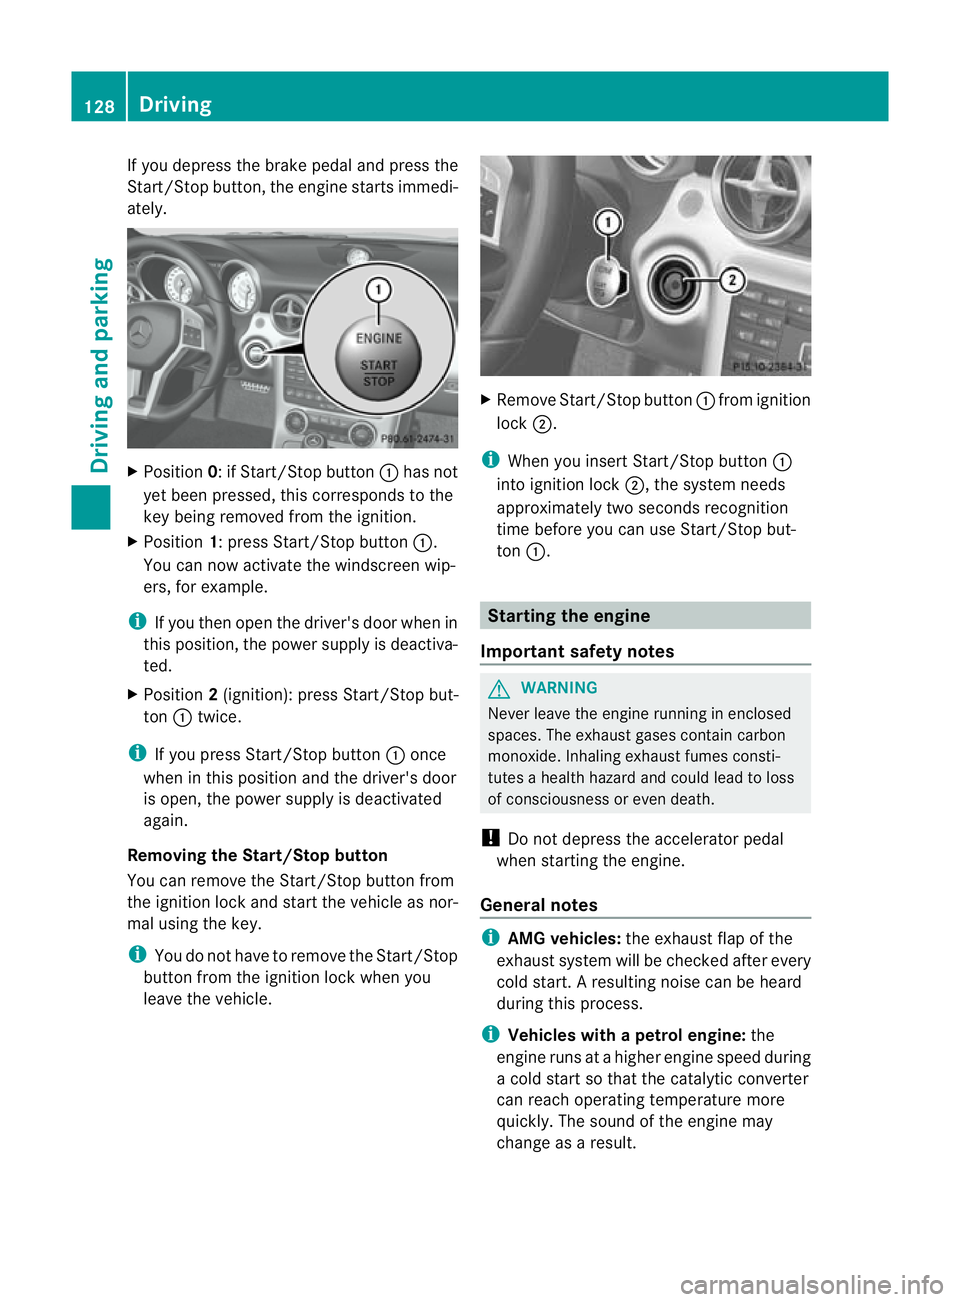
X
Position 0: if Start/Stop button :has not
yet been pressed, this corresponds to the
key being removed from the ignition.
X Position 1: press Start/Stop button :.
You can now activate the windscree nwip-
ers, for example.
i If you the nopen the driver's door when in
this position, the power supply is deactiva-
ted.
X Position 2(ignition): press Start/Stop but-
ton :twice.
i If you press Start/Stop button :once
when in this position and the driver's door
is open, the power supply is deactivated
again.
Removing the Start/Stop button
You can remove the Start/Stop button from
the ignition lock and start the vehicle as nor-
mal using the key.
i You do not have to remove the Start/Stop
button from the ignition lock when you
leave the vehicle. X
Remove Start/Stop button :from ignition
lock ;.
i When you insert Start/Stop button :
into ignition lock ;, the system needs
approximately two seconds recognition
time before you can use Start/Stop but-
ton :. Starting the engine
Important safety notes G
WARNING
Never leave the engine running in enclosed
spaces. The exhaust gases contain carbon
monoxide. Inhaling exhaust fumes consti-
tutes a health hazard and could lead to loss
of consciousness or even death.
! Do not depress the accelerator pedal
when starting the engine.
General notes i
AMG vehicles: the exhaust flap of the
exhaust system will be checked after every
cold start .Aresulting noise can be heard
during this process.
i Vehicles with apetrol engine: the
engine runs at a highe rengine speed during
a cold start so that the catalytic converter
can reach operating temperature more
quickly. The sound of the engine may
change as a result. 128
DrivingDriving an
d parking
Page 133 of 321
i
Follow the shift recommendations in the
multifunction display for an economical
driving style (Y page 136).
i The vehicle locks centrally once you have
pulled away .The locking knobs in the doors
drop down.
You can open the doors from the inside at
any time.
You can also deactivate the automatic lock-
ing feature (Y page 193).
Automatic transmission i
It is only possible to shift the transmission
from position Pto the desired position if
you depress the brake pedal. Only then is
the selector lever lock released.
X Depress the brake pedal and keep it
depressed.
X Shift the transmission to position Dor R.
X Release the brake pedal.
X Carefully depress the accelerator pedal.
The electric parking brake (Y page 147) is
automatically released.
i The vehicle locks centrally once you have
pulled away.T he locking knobs in the doors
drop down.
You can open the doors from the inside at
any time.
You can also deactivate the automatic lock-
ing feature (Y page 193).
i Upshifts take place at higher engine
speeds after a cold start. This helps the
catalytic converter to reach its operating
temperature more quickly.
Hill starta ssist Hill start assist helps you when pulling away
forwards or in reverse on an uphill gradient.
It holds the vehicle for a short time after you
have removed your foot from the brake pedal.
This gives you enough time to move your foot
from the brake pedal to the accelerator pedal and depress it before the vehicle begins to
roll. G
WARNING
Never leave the vehicle when it is held by hill
start assist. After approximately one second,
hill start assist will no longer brake your vehi-
cle and it could roll away.
X Take your foot off the brake pedal.
i Once you have taken your foot off the
brake pedal, the vehicle is held for around
one second.
X Pull away.
Hill start assist will not function if:
R you are pulling away on a level road or a
downhill gradient.
R on vehicles with automatic transmission,
the transmission is in position N.
R the electric parking brake is applied.
R ESP ®
is malfunctioning. ECO start/stop function
Important safety notes G
WARNING
If the ECO symbol appears in the multifunc-
tion display when the engine is switched off,
the engine was switched off automatically.
However, all vehicle systems remain active. If
you open the door, unfasten your seat belt or
remove your foot from the brake pedal, the
engine will automatically start .The vehicle
may begin moving. There is a risk of accident.
To prevent the vehicle from accidentally pull-
ing away, do not release the brake pedal until
you want to drive on.
Do not leave the vehicle until you have
switched off the ignition and secured the vehi-
cle to prevent it from rolling away.
! Always switch the ignition off and take the
key with you when leaving the vehicle. 130
DrivingDriving and parking
Page 137 of 321
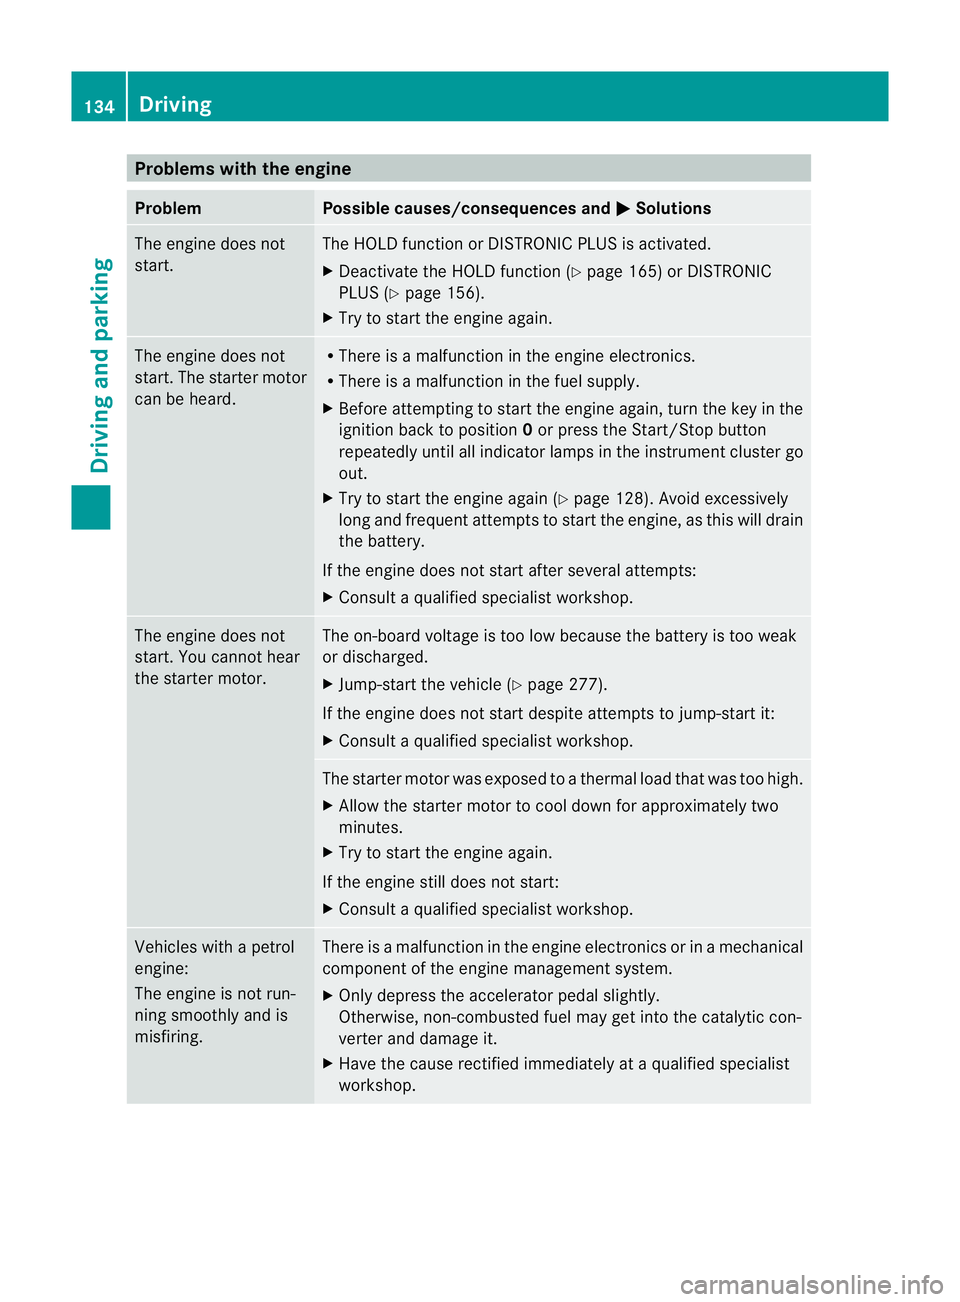
Problems with the engine
Problem Possible causes/consequences and
M Solutions
The engine does not
start. The HOLD function or DISTRONIC PLUS is activated.
X
Deactivate the HOLD function (Y page 165) or DISTRONIC
PLUS (Y page 156).
X Try to start the engine again. The engine does not
start. The starter motor
can be heard. R
There is a malfunction in the engine electronics.
R There is a malfunction in the fuel supply.
X Before attempting to start the engine again, turn the key in the
ignition back to position 0or press the Start/Stop button
repeatedly until all indicator lamps in the instrumen tcluster go
out.
X Try to start the engine again (Y page 128). Avoid excessively
long and frequent attempts to start the engine, as this will drain
the battery.
If the engine does not start after several attempts:
X Consult a qualified specialist workshop. The engine does not
start. You cannot hear
the starter motor. The on-board voltage is too low because the battery is too weak
or discharged.
X
Jump-star tthe vehicle (Y page 277).
If the engine does not start despite attempts to jump-start it:
X Consult a qualified specialist workshop. The starter motor was exposed to a thermal load that was too high.
X
Allow the starter motor to cool down for approximately two
minutes.
X Try to start the engine again.
If the engine still does not start:
X Consult a qualified specialist workshop. Vehicles with a petrol
engine:
The engine is not run-
ning smoothly and is
misfiring. There is a malfunction in the engine electronics or in a mechanical
component of the engine management system.
X
Only depress the accelerator pedal slightly.
Otherwise, non-combusted fuel may get into the catalytic con-
verter and damage it.
X Have the cause rectified immediately at a qualified specialist
workshop. 134
DrivingDriving and parking
Page 140 of 321
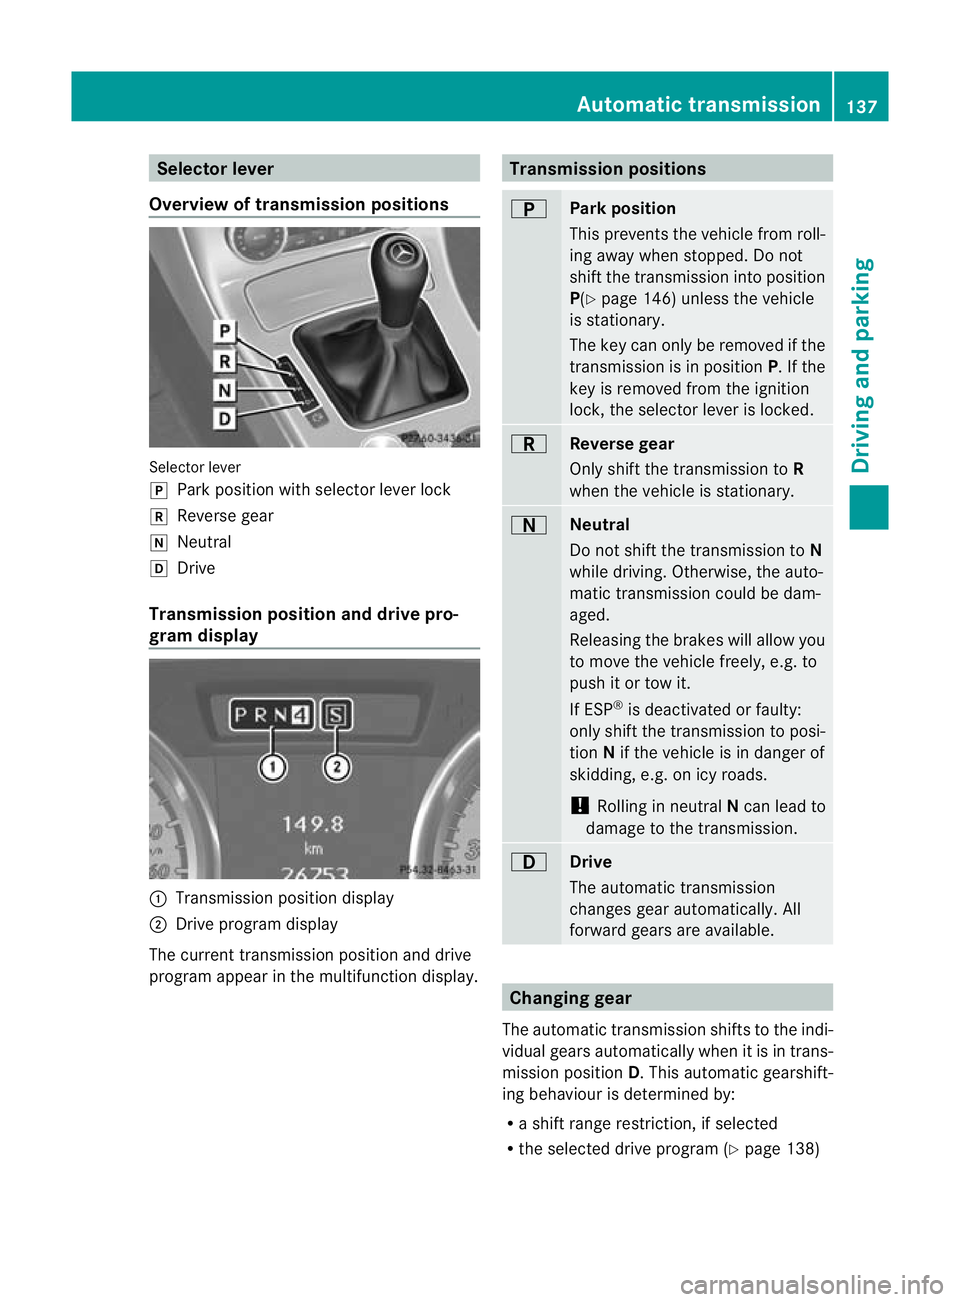
Selector lever
Overview of transmission positions Selector lever
j
Park position with selector lever lock
k Reverse gear
i Neutral
h Drive
Transmission position and drive pro-
gram display :
Transmission position display
; Drive program display
The current transmission position and drive
program appear in the multifunction display. Transmission positions
B
Park position
This prevents the vehicle from roll-
ing away when stopped. Do not
shift the transmission into position
P(Y
page 146) unless the vehicle
is stationary.
The key can only be removed if the
transmission is in position P. If the
key is removed from the ignition
lock, the selector lever is locked. C
Reverse gear
Only shift the transmission to
R
when the vehicle is stationary. A
Neutral
Do not shift the transmission to
N
while driving. Otherwise, the auto-
matic transmission could be dam-
aged.
Releasing the brakes will allow you
to move the vehicle freely, e.g. to
push it or tow it.
If ESP ®
is deactivated or faulty:
only shift the transmission to posi-
tion Nif the vehicle is in danger of
skidding, e.g. on icy roads.
! Rolling in neutral Ncan lead to
damage to the transmission. 7
Drive
The automatic transmission
changes gear automatically. All
forward gears are available. Changing gear
The automatic transmission shifts to the indi-
vidual gears automatically when it is in trans-
mission position D.This automatic gearshift-
ing behaviouri s determined by:
R a shift range restriction, if selected
R the selected drive program (Y page 138) Automatic transmission
137Driving and parking Z
Page 143 of 321
i
If the engine exceeds the maximum
engine speed when shifting down, the auto-
matic transmission protects against engine
damage by not shifting down.
i If the maximum engine speed for the shift
range is reached and you continue to accel-
erate, the automatic transmission shifts up
in order to prevent the engine from over-
revving, even if the shift range is restricted.
Derestricting the shift range X
Briefly press the selector lever to the right
towards D+.
or
X Pull the right-hand steering wheel gearshift
paddle.
The shift range is derestricted.
Clearing the shift range restriction X
Press and hold the selector lever towards
D+ until Dis shown once more in the mul-
tifunction display.
or
X Pull and hold the right-hand steering wheel
gearshift paddle until Dis shown again in
the multifunction display.
The automatic transmission shifts from the
current shift range directly to D.
Selecting the ideal shift range X
Press the selector lever to the left towards
D– and hold it in position.
or
X Pull the left-hand steering wheel gearshift
paddle and hold it in position.
The automatic transmission shifts to the
gear which allows optimum acceleration
and deceleration. To do this, the automatic
transmission shifts down one or more
gears. Manual drive program
Activating the manual drive program Manual drive program
Mdiffers from drive
program Swith regard to spontaneity,
responsiveness and the smoothness of the
gear changes.
Manual drive program Mcan be selected
using the program selector button. You can
change gear using the steering wheel gear-
shift paddles or the selector lever in manual
drive program Mif the transmission is in posi-
tion D.The gear selected is shown in the mul-
tifunction display.
X Press the program selector button
(Y page 138) repeatedly until Mappears in
the multifunction display.
Upshifting X
Briefly press the selector lever to the right
towards D+.
or
X Pull the right-hand steering wheel gearshift
paddle (Y page 139).
The automatic transmission shifts up to the
next gear.
Vehicles with AMG engines
! In manual gearshift program M, the auto-
matic transmission does not shift up auto-
matically even when the engine limiting
speed for the current gear is reached.
When the engine limiting speed is reached,
the fuel supply is cut to prevent the engine
from overrevving. You must make sure that
the engine speed does not reach the red
area of the rev counter. Otherwise, there is
a risk of engine damage.
Before the engine speed reaches the red area,
an upshift indicator will be shown in the AMG
menu of the multifunction display. 140
Automatic transmissionDriving and parking