2012 MERCEDES-BENZ SLK ROADSTER check engine
[x] Cancel search: check enginePage 70 of 321
When it is dark, the surround lighting also
comes on if it is activated in the on-board
computer (Y page 192).
You can also set an audible signal to confirm
that the vehicle has been locked. The audible
signal can be activated and deactivated using
the on-board computer (Y page 193).
X To unlock centrally: press the%but-
ton.
If you do not open the vehicle within approx-
imately 40 seconds of unlocking:
R the vehicle is locked again.
R the anti-theft system is primed again.
X To lock centrally: press the&button. KEYLESS-GO
Important notes on the use of KEYLESS-
GO R
Do not keep the KEYLESS-GO key together
with:
- electronic devices, e.g. a mobile phone
or another key
- metallic objects, e.g. coins or metal foil
This can affect the functionality of KEY-
LESS-GO.
R Bear in mind that the engine can be started
by any of the vehicle occupants if there is
a KEYLESS-GO key in the vehicle.
Locking and unlocking centrally You can start, lock or unlock the vehicle using
KEYLESS-GO. To do this, you only need carry
the key with you. You can combine the KEY-
LESS-GO functions with those of a conven-
tional key, e.g. using KEYLESS-GO to unlock
and pressing the &button to lock.
When locking or unlocking with KEYLESS-GO,
the distance between the key and the corre-
sponding door handle must not be greater
than 1 m. KEYLESS-GO checks whether a valid key is in
the vehicle by periodically establishing a radio
connection between the vehicle and the key.
This happens:
R when the external door handles are
touched
R when starting the engine
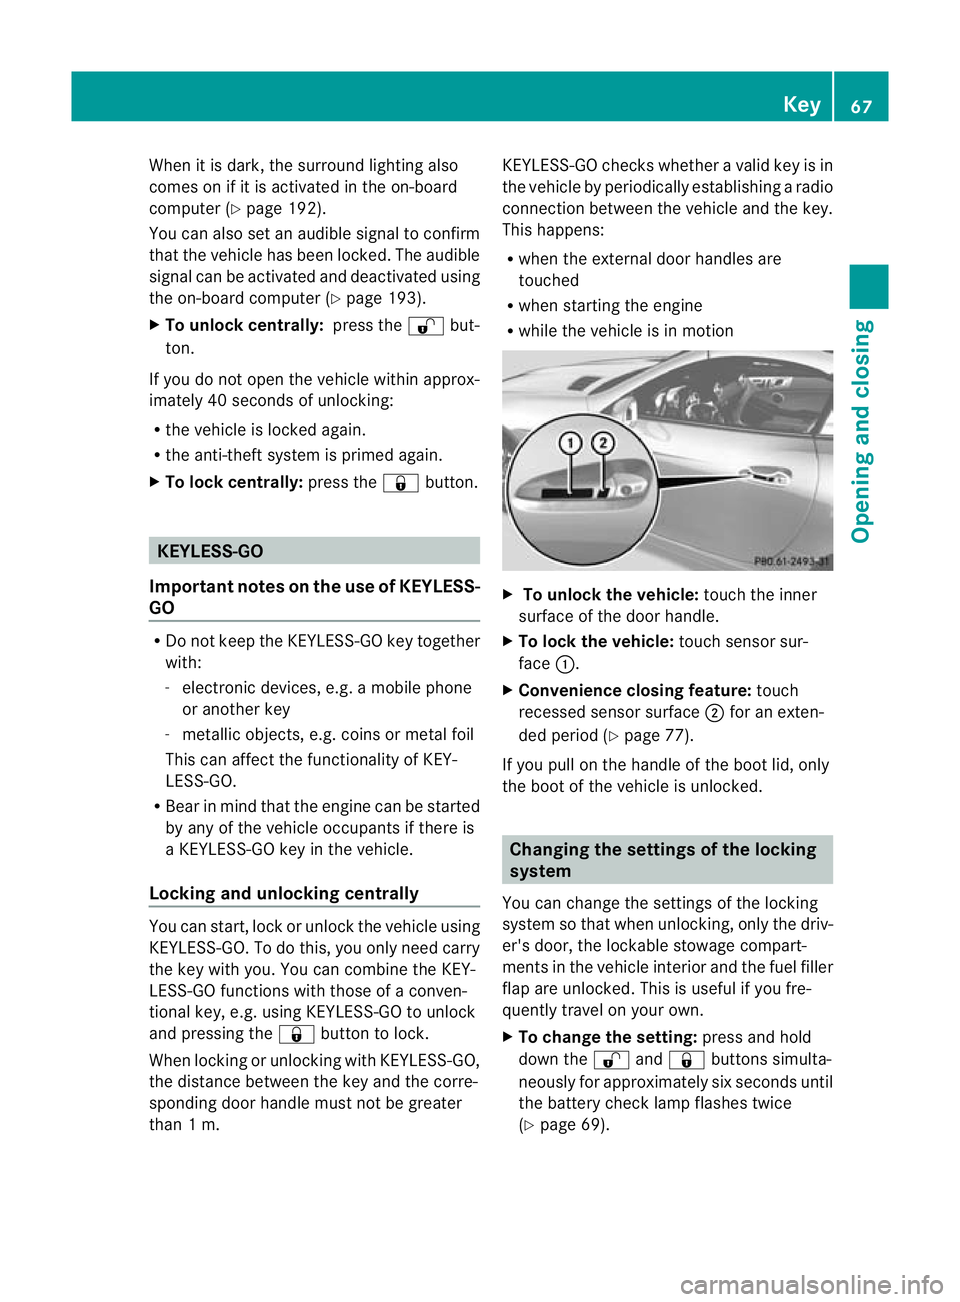
R while the vehicle is in motion X
To unlock the vehicle: touch the inner
surface of the door handle.
X To lock the vehicle: touch sensor sur-
face :.
X Convenience closing feature: touch
recessed sensor surface ;for an exten-
ded period (Y page 77).
If you pull on the handle of the boot lid, only
the boot of the vehicle is unlocked. Changing the settings of the locking
system
You can change the settings of the locking
system so that when unlocking, only the driv-
er's door, the lockable stowage compart-
ments in the vehicle interior and the fuel filler
flap are unlocked. This is useful if you fre-
quently travel on your own.
X To change the setting: press and hold
down the %and& buttons simulta-
neously for approximately six seconds until
the battery check lamp flashes twice
(Y page 69). Key
67Opening and closing Z
Page 74 of 321
Problem Possible causes/consequences and
M Solutions
The engine cannot be
started using the key. The on-board voltage is too low.
X
Switch off non-essential consumers, e.g. seat heating or interior
lighting, and try to start the engine again.
If this does not work:
X Check the starter battery and charge it if necessary
(Y page 273).
or
X Jump-start the vehicle (Y page 277).
or
X Consult a qualified specialist workshop. The engine cannot be
started using KEYLESS-
GO. The key is in the
vehicle. Ad
oor is open. Therefore, the key cannot be detected as easily.
X Close the door and try to start the vehicle again. There is interference from a powerful source of radio waves.
X
Start your vehicle with the key in the ignition lock. Doors
Important safety notes
G
WARNING
Only for the United Kingdom: if the vehicle
has been locked with the key, the double lock
function is activated as standard. It is then not
possible to open the doors from inside the
vehicle.
Therefore, do not leave any people behind in
the vehicle, particularly children, elderly peo-
ple or people in need of special assistance if
the vehicle has been locked with the key. As
a result, they may not be able to free them-
selves in the event of an emergency. As a
result, they could be seriously or even fatally
injured by prolonged exposure to extremely
high or low temperatures, for example. In this
case, rescuing people from outside the vehi-
cle is difficult.
Deactivate the interior motion sensor before
you lock the vehicle with the key. The doors
can then be opened from the inside after the
vehicle has been locked from the outside with
the key. G
WARNING
If children are left unsupervised in the vehicle,
they could:
R open a door from inside the vehicle at any
time, even if it has been locked
R start the vehicle using akey which has been
left in the vehicle
R release the electric parking brake
They could thereby endanger themselves and
others. Never leave children unsupervised in
the vehicle. Always take the key with you
when leaving the vehicle, even if you are only
leaving it for a short time. Unlocking and opening the doors
from the inside
For all countries except the United King-
dom: you can open a door from inside the
vehicle even if it has been locked.
Only for the United Kingdom: if the vehicle
has been locked with the key, the double lock
function is activated as standard. It is then
not possible to open the doors from inside the Doors
71Opening and closing Z
Page 85 of 321
Problems with the roof
Problem Possible causes/consequences and
M Solutions
The roof will not open or
close. The boot separator is not closed and not properly engaged.
X
Close the boot separator (Y page 81). The boot lid is open.
X
Close the boot lid (Y page 73). The on-board voltage is too low.
X
Leave the engine running. The roof has been opened and closed several times in
arow. The
roof drive has been automatically deactivated.
You can open and close the roof again after approximately ten
minutes.
X Switch off the ignition and turn it back on.
X Repeat the opening or closing procedure. The automatic roof mechanism is faulty.
X
Consult a qualified specialist workshop. Draught stop
General notes The draught stop offers protection from the
wind when driving with the roof down.
G
WARNING
You could lose control of the vehicle and
injure yourself or others if you operate the
draught stop while driving.
Fit or remove AIRGUIDE only when the vehicle
is stationary. G
WARNING
If you use the draught stop in darkness or in
other conditions offering poor visibility, your
view to the rear is further impaired. As a result
of the visibility impairment, you could cause
an accident and injure yourself or others.
For this reason, remove the draught stop as
soon as it is dark or if your vision is otherwise
restricted. G
WARNING
If the draught stop is not correctly engaged,
it may break free and obstruct traffic behind
you or lead to an accident.
Each time before driving with the roof down,
check that the draught stop is properly
engaged.
! Fit or remove the draught stop only when
the roof is open. You could otherwise dam-
age the draught stop or the vehicle interior.
The draught stop can be fitted or removed
from the driver's side or passenger side.
Perform operations involving the draught
stop preferably on the side facing away from
traffic, after you have stopped the vehicle,
paying attention to road and traffic condi-
tions. 82
RoofOpening and closing
Page 109 of 321
The interior lighting automatically switches
on if you:
R unlock the vehicle
R open a door
R remove the key from the ignition lock
The interior light is activated for a short while
when the key is removed from the ignition
lock. You can activat ethis delayed switch-off
using the on-board computer (Y page 193).
Manual interior lighting control X
To switch the interior lighting on/off:
press the cbutton.
X To switch the reading lamps on/off:
press the pbutton. Crash-responsive emergency lighting
The interior lighting is activated automatically
if the vehicle is involved in an accident.
X To switch off the crash-responsive
emergency lighting: press the hazard
warning lamp button.
or
X Lock and then unlock the vehicle using the
key. Replacing bulbs
Important safety notes
Xenon bulbs G
DANGER
Xenon bulbs are under high voltage. If you
touch the electrical contacts of a xenon bulb,
you could suffer an electric shock and be seri-
ously or even fatally injured. For this reason,
do not remove the cover of xenon bulbs.
Do not change the xenon bulbs yourself, but
have them replaced at a qualified workshop.
If your vehicle is equipped with xenon bulbs,
you can recognise this by the following: the cone of light from the xenon bulbs moves
from the top to the bottom and back again
when you start the engine. For this to be
observed, the lights must be switched on
before starting the engine.
Bulbs and lamps are an important aspect of
vehicle safety. You must therefore make sure
that these function correctly at all times.
Have the headlamp setting checked regularly.
Other bulbs
There are bulbs other than the xenon bulbs
that you cannot replace. Replace only the
bulbs listed (Y
page 107). Have the bulbs that
you cannot replace yourself changed at a
qualified specialist workshop.
If you require assistance changing bulbs, con-
sult a qualified specialist workshop.
Do not touch the glass tube of new bulbs with
your bare hands. Even minor contamination
can burn into the glass surface and reduce
the service life of the bulbs. Always use a lint-
free cloth or only touch the base of the bulb
when fitting.
Only use bulbs of the correct type.
If the new bulb still does not light up, consult
a qualified specialist workshop.
Bulbs and lamps are an important aspect of
vehicle safety. You must therefore make sure
that these function correctly at all times.
Have the headlamp setting checked regularly. G
WARNING
Bulbs and lamps can be very hot. You should
therefore allow them to cool down before you
change them. Otherwise, you could be burned
if you touch them.
Keep bulbs out of the reach of children. Oth-
erwise, they could damage the bulbs, for
example, and injure themselves.
Never use a bulb which has been dropped.
Such a bulb may break or even explode and
injure you.
Halogen bulbs are pressurised and can
explode when you change them, particularly
if they are very hot. You should therefore wear 106
Replacing bulbsLights and windscreen wipers
Page 131 of 321
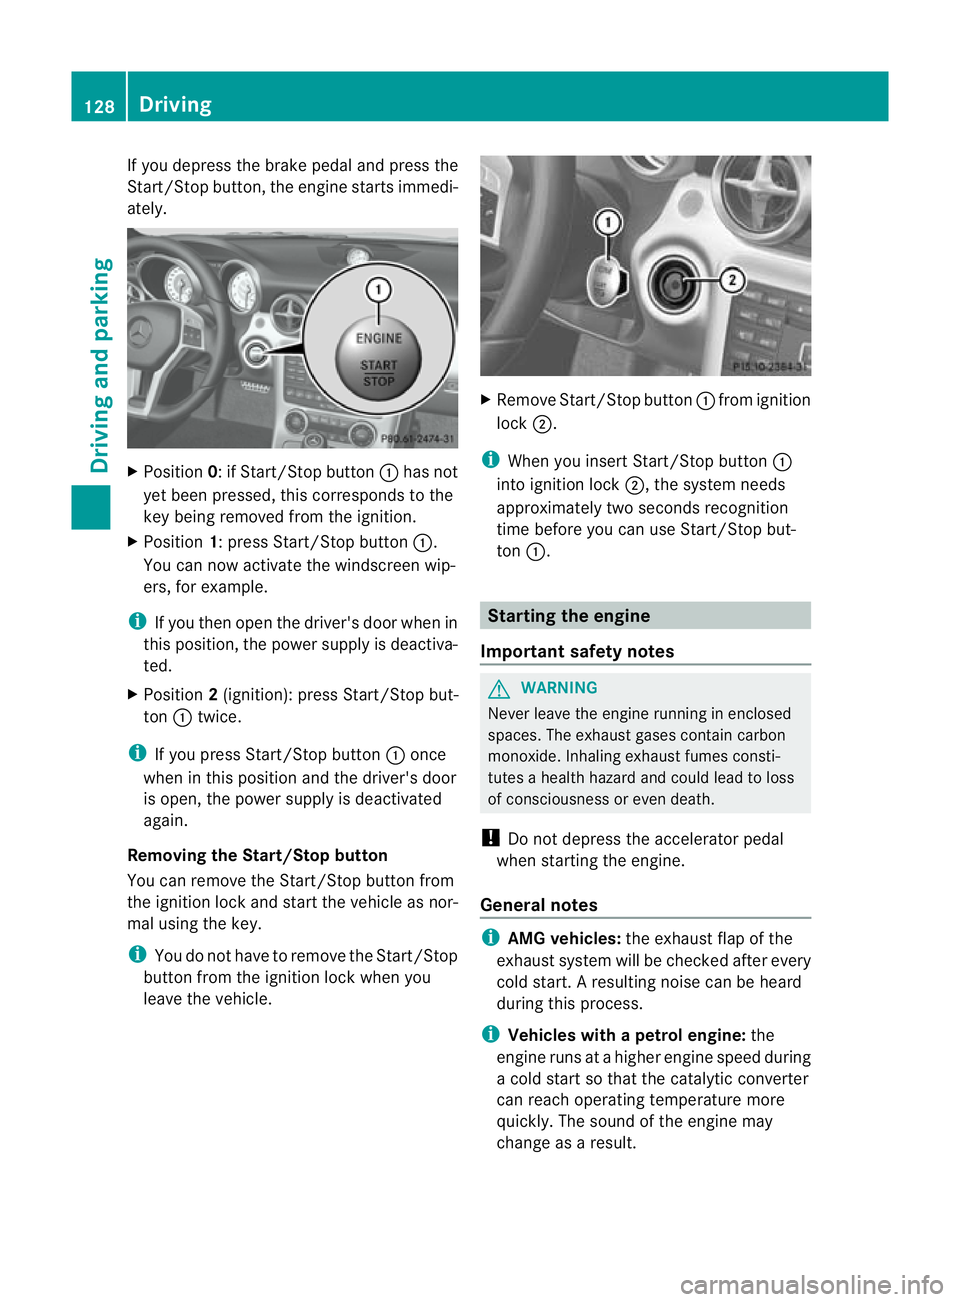
If you depress the brake pedal and press the
Start/Stop button, the engine starts immedi-
ately.
X
Position 0: if Start/Stop button :has not
yet been pressed, this corresponds to the
key being removed from the ignition.
X Position 1: press Start/Stop button :.
You can now activate the windscree nwip-
ers, for example.
i If you the nopen the driver's door when in
this position, the power supply is deactiva-
ted.
X Position 2(ignition): press Start/Stop but-
ton :twice.
i If you press Start/Stop button :once
when in this position and the driver's door
is open, the power supply is deactivated
again.
Removing the Start/Stop button
You can remove the Start/Stop button from
the ignition lock and start the vehicle as nor-
mal using the key.
i You do not have to remove the Start/Stop
button from the ignition lock when you
leave the vehicle. X
Remove Start/Stop button :from ignition
lock ;.
i When you insert Start/Stop button :
into ignition lock ;, the system needs
approximately two seconds recognition
time before you can use Start/Stop but-
ton :. Starting the engine
Important safety notes G
WARNING
Never leave the engine running in enclosed
spaces. The exhaust gases contain carbon
monoxide. Inhaling exhaust fumes consti-
tutes a health hazard and could lead to loss
of consciousness or even death.
! Do not depress the accelerator pedal
when starting the engine.
General notes i
AMG vehicles: the exhaust flap of the
exhaust system will be checked after every
cold start .Aresulting noise can be heard
during this process.
i Vehicles with apetrol engine: the
engine runs at a highe rengine speed during
a cold start so that the catalytic converter
can reach operating temperature more
quickly. The sound of the engine may
change as a result. 128
DrivingDriving an
d parking
Page 138 of 321
Problem Possible causes/consequences and
M Solutions
The coolant tempera-
ture display is showing
more than 120 †. The
coolant warning lamp
may also be lit and a
warning tone may
sound. The coolant level is too low. The coolant is too hot and the engine
is no longer being cooled sufficiently.
X Stop as soon as possible and allow the engine and the coolant
to cool down.
X Check the coolant level (Y page 251). Observe the warning
notes as you do so and top up the coolant if necessary. If the coolant level is correct, the engine radiator fan may be faulty.
The coolant is too hot and the engine is no longer being cooled
sufficiently.
X If the coolant temperature is less than 120 †, you can continue
driving to the nearest qualified specialist workshop.
X Avoid heavy loads on the engine as you do so, e.g. driving on
mountain roads and stop-start traffic. Manual transmission
Important safety notes
G
WARNING
The movement of the pedals must not be
impaired in any way. Do not keep any objects
in the driver's footwell. Make sure that floor-
mats or carpets are correctly secured and
that there is sufficient clearance for the ped-
als.
Do not place several floormats on top of one
another. G
WARNING
Do not change down for additional engine
braking on a slippery road surface. This could
cause the drive wheels to lose their grip and
the vehicle could skid. This could cause you
to lose control of your vehicle and cause an
accident. Gear lever
Gear lever
!
Only engage gear when the clutch pedal
is depressed.
! When shifting between 5thand 6thgear,
you should always push the gear lever all
the way to the right. Otherwise, you could
shift unintentionally into 3rdor4th gear
and damage the transmission.
If you shift down at too high a speed (trans-
mission braking), this can cause the engine
to overrev, leading to engine damage.
Do not use the clutch bite point to keep the
vehicle stationary on uphill gradients.
There is otherwise a risk of damaging the
clutch. Manual transmission
135Driving and parking Z
Page 145 of 321
Problems with the transmission
Problem Possible causes/consequences and
M Solutions
The transmission has
problems shifting gear. The transmission is losing oil.
X
Have the transmission checked at a qualified specialist work-
shop immediately. The acceleration ability
is deteriorating.
The transmission no
longer changes gear. The transmission is in emergency mode.
It is only possible to shift into
secondgear and reverse gear.
X Stop.
X Shift the transmission to position P.
X Switch off the engine.
X Wait at least 10seconds before restarting the engine.
X Shift the transmission to position Dor R.
If D is selected, the transmission shifts into secondgear; ifRis
selected, the transmission shifts into reverse gear.
X Have the transmission checked at a qualified specialist work-
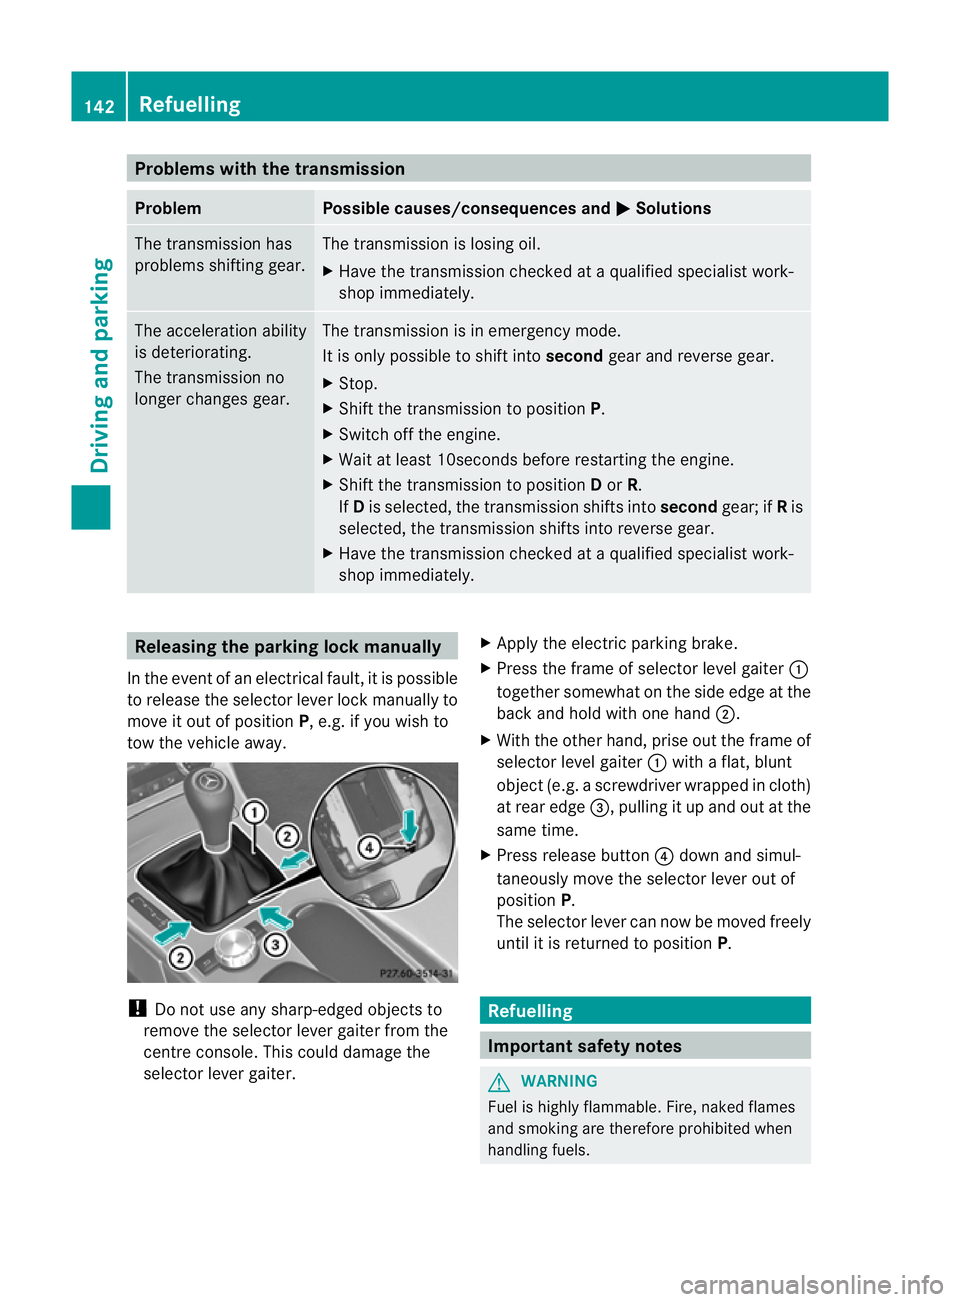
shop immediately. Releasing the parking lock manually
In the event of an electrical fault, it is possible
to release the selector lever lock manually to
move it out of position P, e.g. if you wish to
tow the vehicle away. !
Do not use any sharp-edged objects to
remove the selector lever gaiter from the
centre console. This could damage the
selector lever gaiter. X
Apply the electric parking brake.
X Press the frame of selector level gaiter :
together somewhat on the side edge at the
back and hold with one hand ;.
X With the other hand, prise out the frame of
selector level gaiter :with a flat, blunt
object (e.g. a screwdriver wrapped in cloth)
at rear edge =, pulling it up and out at the
same time.
X Press release button ?down and simul-
taneously move the selector lever out of
position P.
The selector lever can now be moved freely
until it is returned to position P. Refuelling
Important safety notes
G
WARNING
Fuel is highly flammable. Fire, naked flames
and smoking are therefore prohibited when
handling fuels. 142
RefuellingDriving and parking
Page 150 of 321
Electric parking brake
General notes i
The electric parking brake carries out a
function check at regular intervals when
the engine is switched off .Noises that
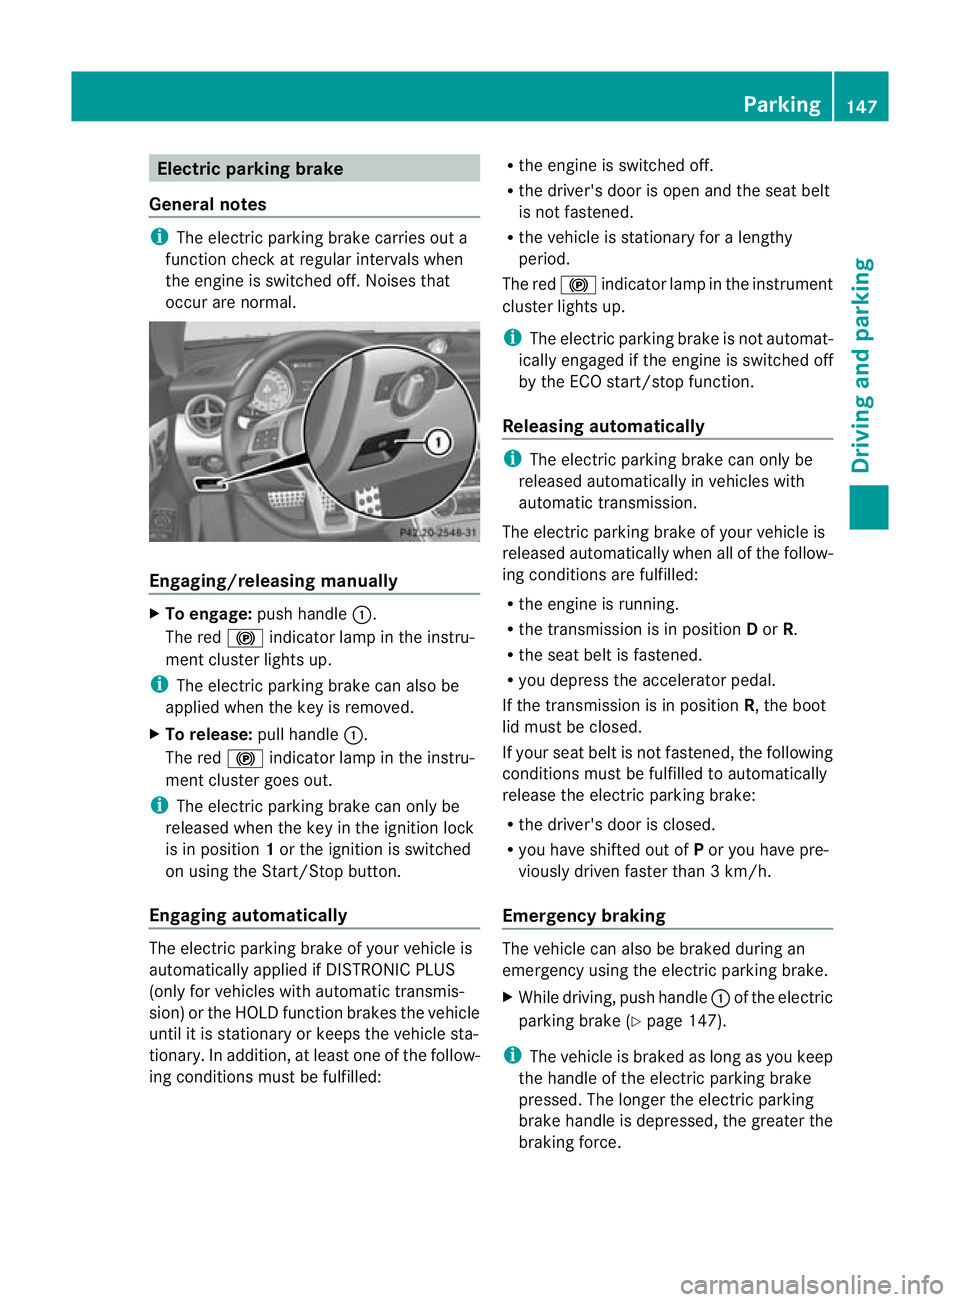
occur are normal. Engaging/releasing manually
X
To engage: push handle :.
The red !indicator lamp in the instru-
ment cluster lights up.
i The electric parking brake can also be
applied when the key is removed.
X To release: pull handle:.
The red !indicator lamp in the instru-
ment cluster goes out.
i The electric parking brake can only be
released when the key in the ignition lock
is in position 1or the ignition is switched
on using the Start/Stop button.
Engaging automatically The electric parking brake of your vehicle is
automatically applied if DISTRONIC PLUS
(only for vehicles with automatic transmis-
sion) or the HOLD function brakes the vehicle
until it is stationary or keeps the vehicle sta-
tionary. In addition, at least one of the follow-
ing conditions must be fulfilled: R
the engine is switched off.
R the driver's door is open and the seat belt
is not fastened.
R the vehicle is stationary for a lengthy
period.
The red !indicator lamp in the instrument
cluster lights up.
i The electric parking brake is not automat-
ically engaged if the engine is switched off
by the ECO start/stop function.
Releasing automatically i
The electric parking brake can only be
released automatically in vehicles with
automatic transmission.
The electric parking brake of your vehicle is
released automatically when all of the follow-
ing conditions are fulfilled:
R the engine is running.
R the transmission is in position Dor R.
R the seat belt is fastened.
R you depress the accelerator pedal.
If the transmission is in position R, the boot
lid must be closed.
If your seat belt is not fastened, the following
conditions must be fulfilled to automatically
release the electric parking brake:
R the driver's door is closed.
R you have shifted out of Por you have pre-
viously driven faster than 3 km/h.
Emergency braking The vehicle can also be braked during an
emergency using the electric parking brake.
X
While driving, push handle :of the electric
parking brake (Y page 147).
i The vehicle is braked as long as you keep
the handle of the electric parking brake
pressed. The longer the electric parking
brake handle is depressed, the greater the
braking force. Parking
147Driving and parking Z