2012 MERCEDES-BENZ SL ROADSTER automatic transmission
[x] Cancel search: automatic transmissionPage 255 of 637
Display messages
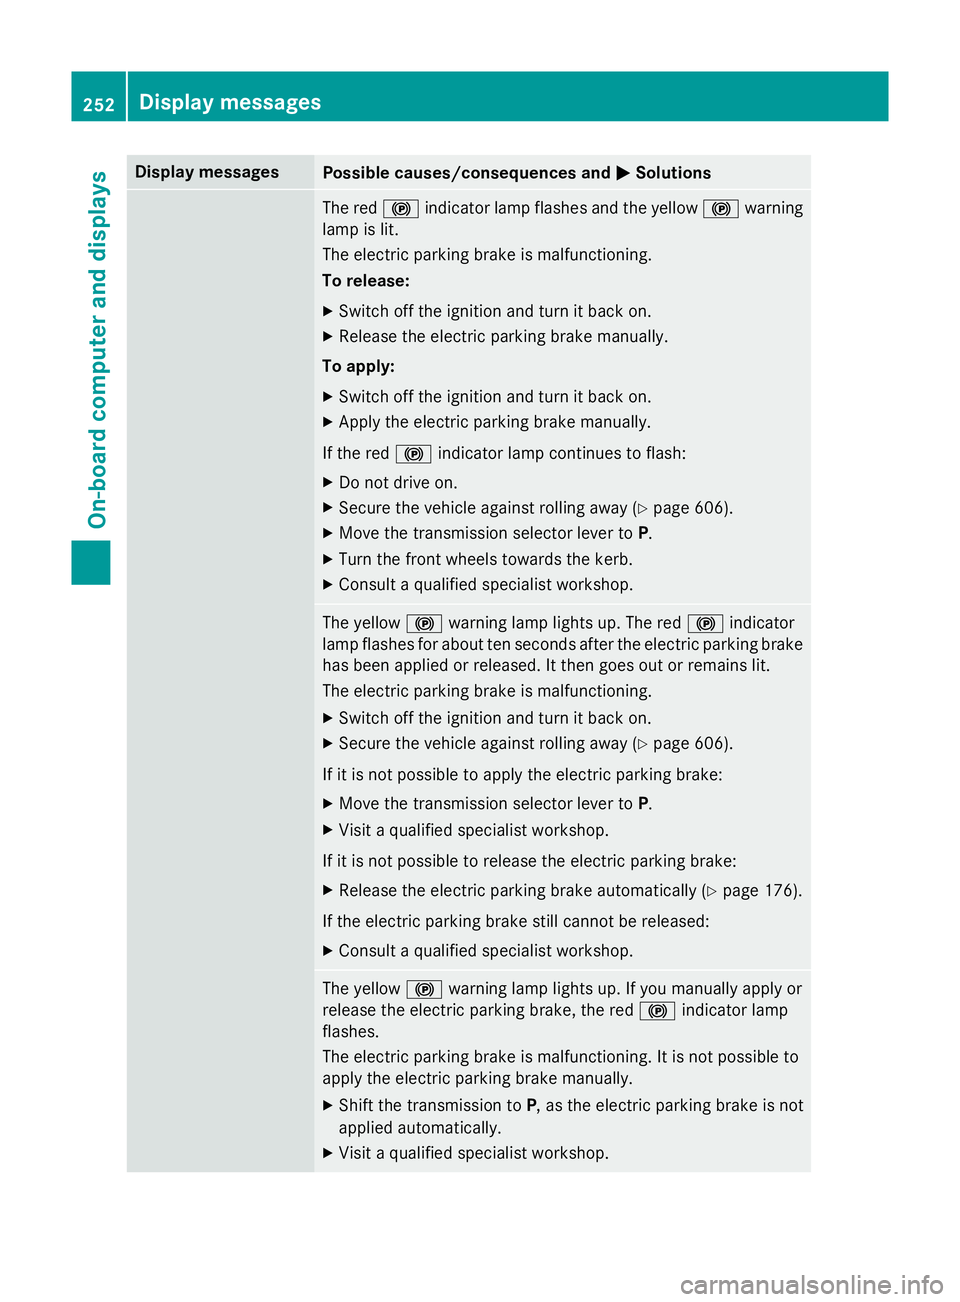
Possible causes/consequences and
M
MSolutions The red
!indicator lamp flashes and the yellow !warning
lamp is lit.
The electric parking brake is malfunctioning.
To release:
X Switch off the ignition and turn it back on.
X Release the electric parking brake manually.
To apply:
X Switch off the ignition and turn it back on.
X Apply the electric parking brake manually.
If the red !indicator lamp continues to flash:
X Do not drive on.
X Secure the vehicle against rolling away (Y page 606).
X Move the transmission selector lever to P.
X Turn the front wheels towards the kerb.
X Consult a qualified specialist workshop. The yellow
!warning lamp lights up. The red !indicator
lamp flashes for about ten seconds after the electric parking brake
has been applied or released. It then goes out or remains lit.
The electric parking brake is malfunctioning.
X Switch off the ignition and turn it back on.
X Secure the vehicle against rolling away (Y page 606).
If it is not possible to apply the electric parking brake:
X Move the transmission selector lever to P.
X Visit a qualified specialist workshop.
If it is not possible to release the electric parking brake: X Release the electric parking brake automatically (Y page 176).
If the electric parking brake still cannot be released: X Consult a qualified specialist workshop. The yellow
!warning lamp lights up. If you manually apply or
release the electric parking brake, the red !indicator lamp
flashes.
The electric parking brake is malfunctioning. It is not possible to
apply the electric parking brake manually.
X Shift the transmission to P, as the electric parking brake is not
applied automatically.
X Visit a qualified specialist workshop. 252
Display
messagesOn-board computer and displays
Page 272 of 637
Display messages
Possible causes/consequences and
M
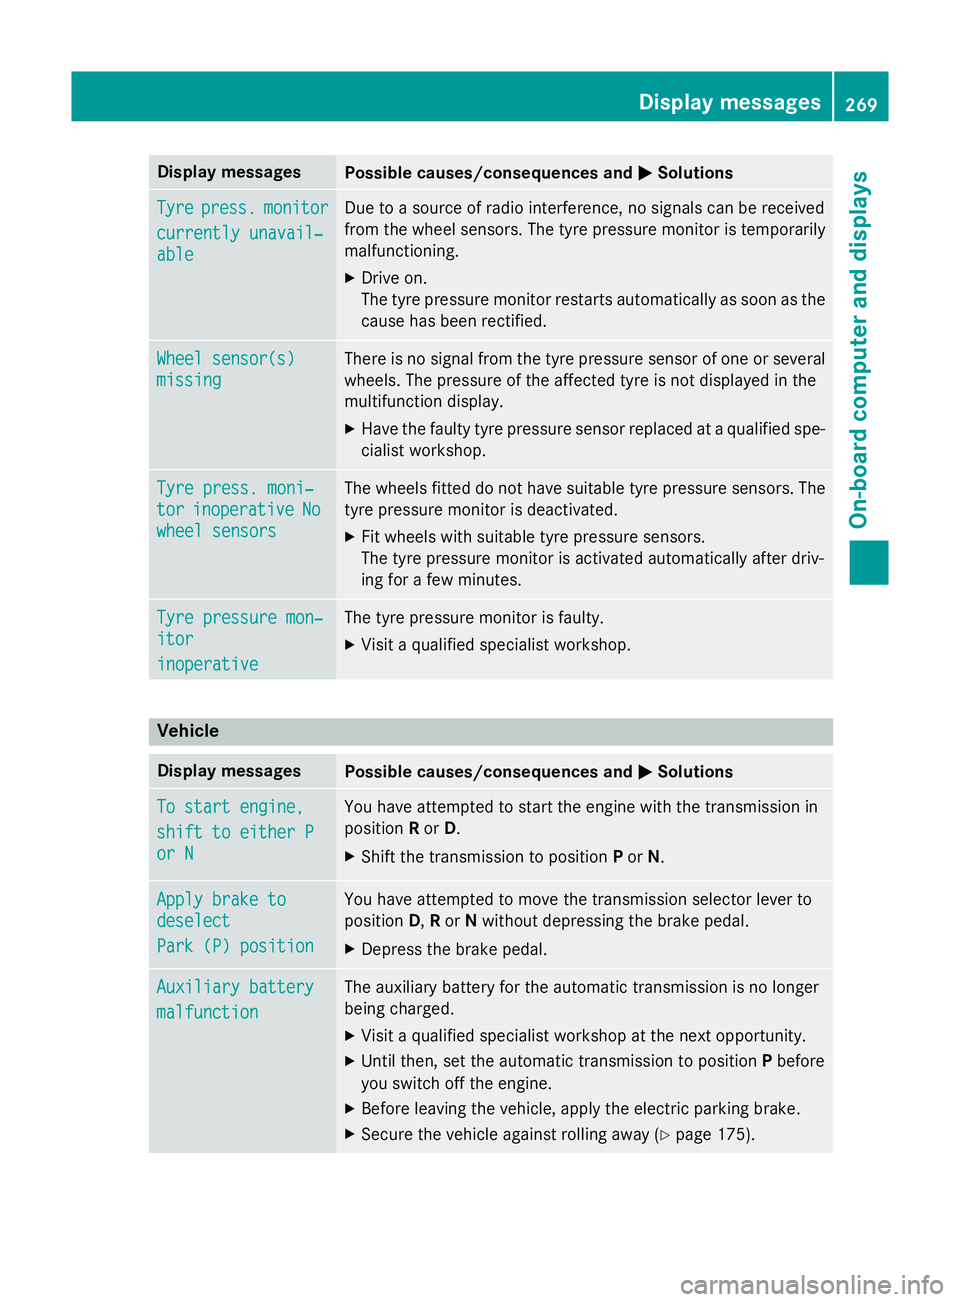
MSolutions Tyre
Tyre
press.
press. monitor
monitor
currently unavail‐
currently unavail‐
able able Due to a source of radio interference, no signals can be received
from the wheel sensors. The tyre pressure monitor is temporarily
malfunctioning.
X Drive on.
The tyre pressure monitor restarts automatically as soon as the
cause has been rectified. Wheel sensor(s) Wheel sensor(s)
missing missing There is no signal from the tyre pressure sensor of one or several
wheels. The pressure of the affected tyre is not displayed in the
multifunction display.
X Have the faulty tyre pressure sensor replaced at a qualified spe-
cialist workshop. Tyre press. moni‐ Tyre press. moni‐
tor tor
inoperative
inoperative No
No
wheel sensors
wheel sensors The wheels fitted do not have suitable tyre pressure sensors. The
tyre pressure monitor is deactivated.
X Fit wheels with suitable tyre pressure sensors.
The tyre pressure monitor is activated automatically after driv-
ing for a few minutes. Tyre pressure mon‐ Tyre pressure mon‐
itor itor
inoperative inoperative The tyre pressure monitor is faulty.
X Visit a qualified specialist workshop. Vehicle
Display messages
Possible causes/consequences and
M
MSolutions To start engine,
To start engine,
shift to either P shift to either P
or N or N You have attempted to start the engine with the transmission in
position
Ror D.
X Shift the transmission to position Por N. Apply brake to Apply brake to
deselect deselect
Park (P) position Park (P) position You have attempted to move the transmission selector lever to
position
D,Ror Nwithout depressing the brake pedal.
X Depress the brake pedal. Auxiliary battery Auxiliary battery
malfunction malfunction The auxiliary battery for the automatic transmission is no longer
being charged.
X Visit a qualified specialist workshop at the next opportunity.
X Until then, set the automatic transmission to position Pbefore
you switch off the engine.
X Before leaving the vehicle, apply the electric parking brake.
X Secure the vehicle against rolling away (Y page 175). Display
messages
269On-board computer and displays Z
Page 426 of 637
X
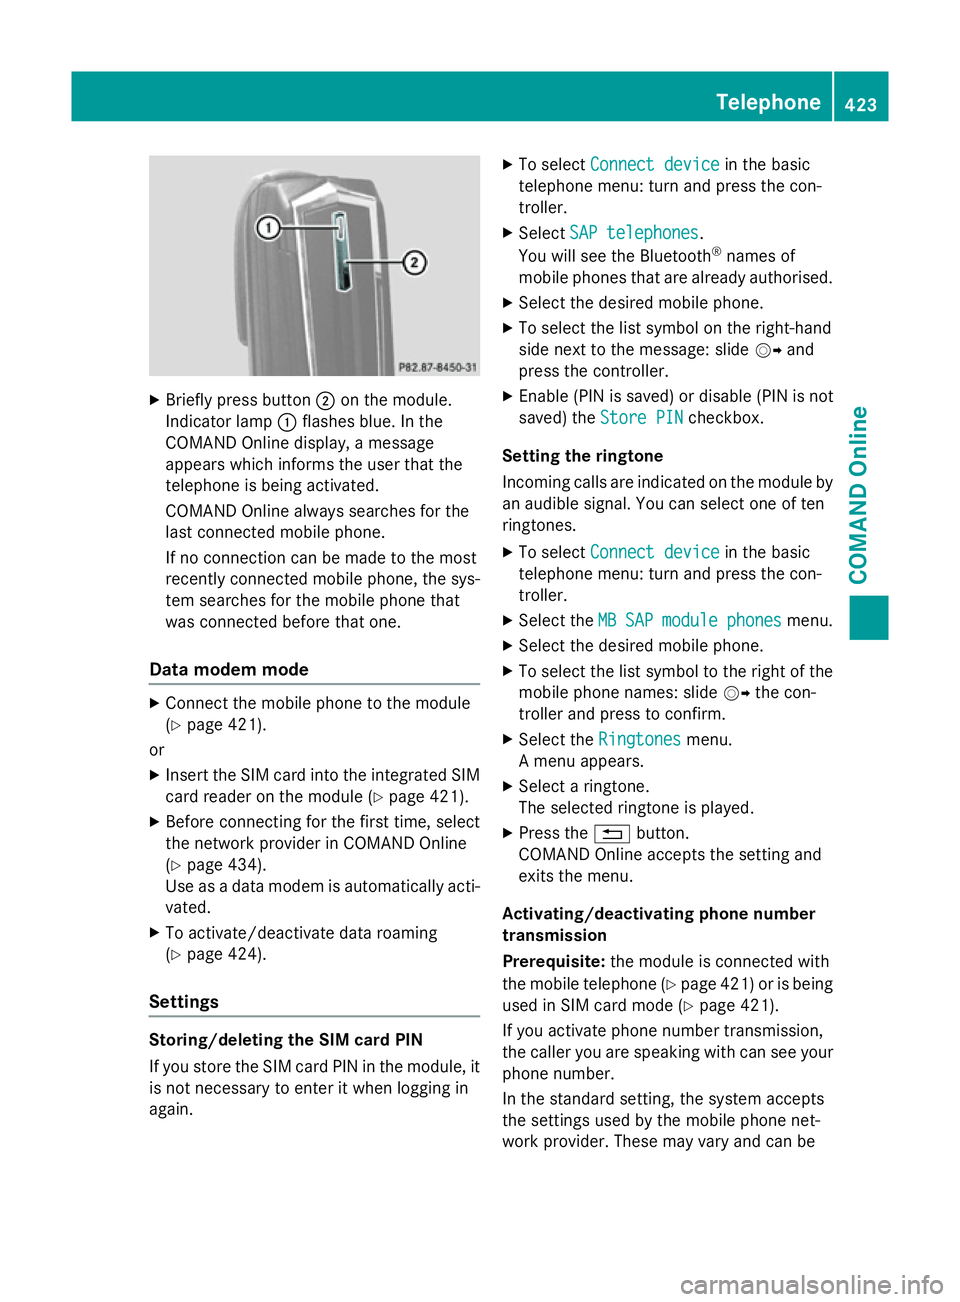
Briefly press button ;on the module.
Indicator lamp :flashes blue. In the
COMAND Online display, a message
appears which informs the user that the
telephone is being activated.
COMAND Online always searches for the
last connected mobile phone.
If no connection can be made to the most
recently connected mobile phone, the sys- tem searches for the mobile phone that
was connected before that one.
Data modem mode X
Connect the mobile phone to the module
(Y page 421).
or
X Insert the SIM card into the integrated SIM
card reader on the module (Y page 421).
X Before connecting for the first time, select
the network provider in COMAND Online
(Y page 434).
Use as a data modem is automatically acti- vated.
X To activate/deactivate data roaming
(Y page 424).
Settings Storing/deleting the SIM card PIN
If you store the SIM card PIN in the module, it
is not necessary to enter it when logging in
again. X
To select Connect device Connect device in the basic
telephone menu: turn and press the con-
troller.
X Select SAP telephones SAP telephones.
You will see the Bluetooth ®
names of
mobile phones that are already authorised.
X Select the desired mobile phone.
X To select the list symbol on the right-hand
side next to the message: slide VYand
press the controller.
X Enable (PIN is saved) or disable (PIN is not
saved) the Store PIN
Store PIN checkbox.
Setting the ringtone
Incoming calls are indicated on the module by
an audible signal. You can select one of ten
ringtones.
X To select Connect device
Connect device in the basic
telephone menu: turn and press the con-
troller.
X Select the MB MBSAP
SAP module
module phones
phonesmenu.
X Select the desired mobile phone.
X To select the list symbol to the right of the
mobile phone names: slide VYthe con-
troller and press to confirm.
X Select the Ringtones
Ringtones menu.
A menu appears.
X Select a ringtone.
The selected ringtone is played.
X Press the %button.
COMAND Online accepts the setting and
exits the menu.
Activating/deactivating phone number
transmission
Prerequisite: the module is connected with
the mobile telephone (Y page 421)or is being
used in SIM card mode (Y page 421).
If you activate phone number transmission,
the caller you are speaking with can see your phone number.
In the standard setting, the system accepts
the settings used by the mobile phone net-
work provider. These may vary and can be Telephone
423COMAND Online Z
Page 427 of 637
obtained from the mobile phone network pro-
vider.
Activating phone number transmission:
X Enter the number "00031" in the telephone
basic menu.
X Press the 6button.
The phone number will be transmitted in
future.
Deactivating phone number transmis-
sion: X Enter the number "00030" in the telephone
basic menu.
X Press the 6button.
The phone number will no longer be trans-
mitted in future.
Activating/deactivating data roaming
Prerequisite: the module is connected with
the mobile telephone (Y page 421) or is being
used in SIM card mode (Y page 421).
If you activate data roaming, you can receive
and send data abroad via the module.
Data roaming is deactivated in the standard
setting.
To activate data roaming:
X Enter the number "00061" in the telephone
basic menu.
X Press the 6button.
Data roaming is activated.
To deactivate data roaming: X Enter the number "00060" in the telephone
basic menu.
X Press the 6button.
Data roaming is deactivated.
Activating/deactivating network pro-
vider restriction
Prerequisite: the module is connected with
the mobile telephone (Y page 421) or is being
used in SIM card mode (Y page 421).
When you activate network provider restric-
tion, the module will not log into foreign net-
works. You will then be unable to conduct telephone calls or send and receive text mes-
sages when abroad.
Network provider restriction is deactivated in
the standard setting.
To deactivate network provider restric-
tion:
X Enter the number "00070" in the telephone
basic menu.
X Press the 6button.
Network provider restriction is deactiva-
ted.
To activate network provider restriction: X Enter the number "00071" in the telephone
basic menu.
X Press the 6button.
Network provider restriction is activated.
Adjusting the brightness of the indicator
lamp
Situation-related dimming:
X Enter the number "00082" in the telephone
basic menu.
X Press the 6button.
The LED is dimmed as long as the user does
not perform any actions (press a key etc.).
No change to brightness:
X Enter the number "00083" in the telephone
basic menu.
X Press the 6button.
The LED is always bright regardless of any
user actions.
Transferring the phone book In order to use the phone book of the mobile
phone via COMAND Online, the phone book
must be transferred using the module.
The data transfer may take up to ten minutes.
Transmission occurs automatically after a
Bluetooth ®
connection is automatically
established.
i If the mobile phone supports the PBAP
(Phone BookAccess Profile), the system 424
TelephoneCOMAND Online
Page 491 of 637
Operation with Bluetooth
®
audio
Preconditions for the Bluetooth ®
audio
device Bluetooth
®
audio mode requires a Blue-
tooth ®
-capable audio device. Observe the
information in the Bluetooth ®
audio device's
operating instructions.
Before using Bluetooth ®
audio mode, you
should check your Bluetooth ®
audio device
for the following:
R Bluetooth ®
audio profile
The Bluetooth ®
audio device must support
the A2DP and AVRCP Bluetooth ®
audio
profiles.
R Bluetooth ®
visibility
Certain Bluetooth ®
audio devices require
more than simply activating the Bluetooth ®
function. In addition, your device must be
made "visible" to other devices.
R Bluetooth ®
device name
This device name is predetermined but can
usually be changed. To make a clear selec-
tion of the Bluetooth ®
device possible,
Mercedes-Benz recommends that you cus-
tomise the device name.
i A2DP (
Advanced AudioDistribution
Profile): Bluetooth ®
audio profile for audio
data transmission
AVRCP (Audio VideoRemote Control
Profile): Bluetooth ®
audio profile for audio
data playback
i Not all Bluetooth ®
audio devices available
on the market are equally suitable.
Information on suitable Bluetooth ®
audio
devices and on connecting Bluetooth ®
audio devices to COMAND Online:
R is available from your Mercedes-Benz
Service Centre
R or visit the website http://
www.mercedes-benz.com/connect X
Activate Bluetooth ®
and Bluetooth ®
visibil-
ity on the Bluetooth ®
audio device.
Preconditions in COMAND Online X
Activate the Bluetooth ®
function in
COMAND Online (Y page 313).
Connecting Bluetooth ®
audio devices General notes
Before using your Bluetooth
®
audio device
with COMAND Online for the first time, you
will need to authorise it.
When you authorise a new Bluetooth ®
audio
device, it is connected automatically. Con-
nection involves first searching for a Blue-
tooth ®
audio device and then authorising it.
You can authorise up to fifteen Bluetooth ®
devices.
i If you authorise a mobile phone that sup-
ports Bluetooth ®
audio, the A2DP and
AVRCP Bluetooth ®
audio profiles are con-
nected automatically.
The mobile phone is then entered:
R in the Bluetooth ®
telephone list
(Y page 391)
R in the Bluetooth ®
device list
(Y page 489)
Mercedes-Benz recommends authorising a mobile phone in Bluetooth ®
telephony
(Y page 391). 488
AudioCOMAND Online
Page 572 of 637
vehicle in a tow-through car wash. Other
transmission positions may lead to damage to the vehicle.
! Make sure that:
R the side windows and the roof are com-
pletely closed
R the climate control blower is switched off
R the windscreen wiper switch is at posi-
tion 0
The vehicle could otherwise be damaged.
You can wash the vehicle in an automatic car
wash from the very start.
Wash off excess dirt before cleaning the vehi- cle in an automatic car wash.
After using an automatic car wash, wipe wax
off the windscreen and the wiper blades. This
will prevent smears and reduce wiping noises caused by residue on the windscreen.
Washing by hand In some countries, washing by hand is only
allowed at specially equipped washing bays.
Observe the legal requirements for each indi- vidual country.
X Do not use hot water and do not wash the
vehicle in direct sunlight.
X Use a soft sponge to clean.
X Use a mild cleaning agent, such as a car
shampoo approved by Mercedes-Benz.
X Thoroughly hose down the vehicle with a
gentle jet of water.
X Do not point the water jet directly towards
the air inlet.
X Use plenty of water and rinse out the
sponge frequently.
X Rinse the vehicle with clean water and dry
thoroughly with a chamois.
X Do not let the cleaning agent dry on the
paintwork.
When using the vehicle in winter, remove all
traces of road salt deposits carefully and as
soon as possible. High-pressure cleaning equipment G
WARNING
The water jet of circular-jet nozzles (dirt grind- ers) can cause damage not visible from the
outside to tyres or chassis components. Com-
ponents damaged in this way can unexpect-
edly fail. There is a risk of an accident.
Do not use high-pressure cleaners with circu-
lar-jet nozzles to clean the vehicle. Have dam- aged tyres or chassis components replaced
immediately.
! Always maintain a distance of at least
30 cm between the vehicle and the high-
pressure cleaner nozzle. Information about
the correct distance is available from the
equipment manufacturer.
Move the high-pressure cleaner nozzle
around when cleaning your vehicle.
Do not aim directly at any of the following:
R tyres
R door gaps, roof gaps, joints etc.
R electrical components
R battery
R connectors
R lights
R seals
R trim elements
R ventilation slots
Damaged seals or electrical components
can lead to leaks or failures.
! Vehicles with HANDS-FREE ACCESS: if a
key with KEYLESS-GO is within the detec-
tion range of the KEYLESS-GO antenna, the
following situations could lead to the unin-
tentional opening of the boot lid:
R using a car wash
R using a high-pressure cleaner
Make sure that the key is at least 2 m away
from the vehicle. Care
569Maintenance and care Z
Page 592 of 637
users aware that a vehicle is being
towed.
R only secure the tow rope to the towing
eye.
R observe the brake lamps of the towing
vehicle while driving. Always maintain a
distance so that the tow rope does not
sag.
R do not use steel cables or chains to tow
your vehicle. You could otherwise dam-
age the vehicle.
! Do not use the towing eye for recovery,
this could damage the vehicle. If in doubt,
recover the vehicle with a crane.
! When towing, pull away slowly and
smoothly. If the tractive power is too high,
the vehicles could be damaged.
! To tow vehicles with KEYLESS-GO, use
the key instead of the Start/Stop button.
The automatic transmission may otherwise switch to position Pwhen you open the
driver's or front-passenger door which
could damage the transmission.
! Make sure that the electric parking brake
is released. If the electric parking brake is
faulty, visit a qualified specialist workshop.
! You may tow the vehicle for a maximum of
50km. A towing speed of 50 km/h must not
be exceeded.
For towing distances over 50 km, the entire vehicle must be lifted up and transported.
! If you tow or tow-start another vehicle, its
weight must not exceed the maximum per- missible gross vehicle weight of your vehi-
cle.
i Information on your vehicle's gross vehi-
cle weight rating can be found on the vehi-
cle identification plate (Y page 622).
Observe the legal requirements for the rele-
vant countries when towing.
It is better to have the vehicle transported
than to have it towed. The automatic transmission must be in posi-
tion
Nwhen the vehicle is being towed.
The battery must be connected and charged. Otherwise, you:
R cannot turn the key in the ignition lock to
position 2
R cannot shift the automatic transmission to
position N
i Deactivate the automatic locking feature
before the vehicle is towed (Y page 242).
You could otherwise be locked out when
pushing or towing the vehicle.
Deactivate tow-away protection before the
vehicle is towed (Y page 80). Fitting/removing the towing eye
Fitting the towing eye G
WARNING
The exhaust tail pipe may be extremely hot.
There is a risk of burning when removing the
rear cover.
Do not touch the exhaust tail pipe. Use
extreme caution when removing the rear
cover. Towing and tow-starting
589Breakdown assistance Z
Page 594 of 637
X
Switch on the hazard warning lamps
(Y page 130).
X Turn the key in the ignition lock to position
0 and remove the key from the ignition
lock.
X When leaving the vehicle, take the key or
the KEYLESS-GO key with you.
When towing your vehicle with the rear axle
raised, it is important that you observe the
safety instructions (Y page 588).Towing the vehicle with both axles on
the ground G
WARNING
If the steering wheel lock is engaged, the vehi- cle can no longer be steered. There is a risk of
an accident.
Always switch on the ignition when towing
with a tow rope or a towing bar.
The automatic transmission automatically
shifts to position Pwhen you open the driver's
or front-passenger door or when you remove the key from the ignition lock.
In order to ensure that the automatic trans-
mission stays in position Nwhen towing the
vehicle, you must observe the following
points:
X Switch on the hazard warning lamps
(Y page 130).
i In order to signal a change of direction
when towing the vehicle with the hazard
warning lamps switched on, use the com-
bination switch as usual. In this case, only
the turn signals for the desired direction
flash. When the combination switch is
reset, the hazard warning lamps start flash- ing again.
X Make sure that the vehicle is stationary and
that the key is in position 0in the ignition
lock.
X Turn the key to position 2in the ignition
lock. On vehicles with KEYLESS-GO, use the key
instead of the Start/Stop button
(Y page 155).
X Depress and hold the brake pedal.
X Shift the automatic transmission to posi-
tion N.
X Release the brake pedal.
X Release the electric parking brake.
X Leave the key in position 2in the ignition
lock.
It is important that you observe the safety
instructions when towing away your vehicle
(Y page 588). Transporting the vehicle
! You may only secure the vehicle by the
wheels, not by parts of the vehicle such as
axle or steering components. Otherwise,
the vehicle could be damaged.
The towing eye can be used to pull the vehicle
onto a trailer or transporter for transport pur-
poses.
X Turn the key to position 2in the ignition
lock.
X Shift the automatic transmission to posi-
tion N.
As soon as the vehicle is loaded: X Prevent the vehicle from rolling away by
applying the electric parking brake.
X Shift the automatic transmission to posi-
tion P.
X Turn the key to position 0in the ignition
lock and remove it.
X Secure the vehicle. Tow-starting (emergency engine
starting)
! Do not tow-start vehicles with automatic
transmission. You could otherwise damage the automatic transmission. Towing and tow-starting
591Breakdown assistance Z