2012 MERCEDES-BENZ SL ROADSTER ad blue
[x] Cancel search: ad bluePage 303 of 637
X
Press the $button.
The radio display appears. You will hear the
last station played on the last waveband
selected.
X Select Sound
Sound by sliding VÆand turning
cVd the COMAND controller and press W
to confirm.
You can now set the treble, bass and bal-
ance for radio mode.
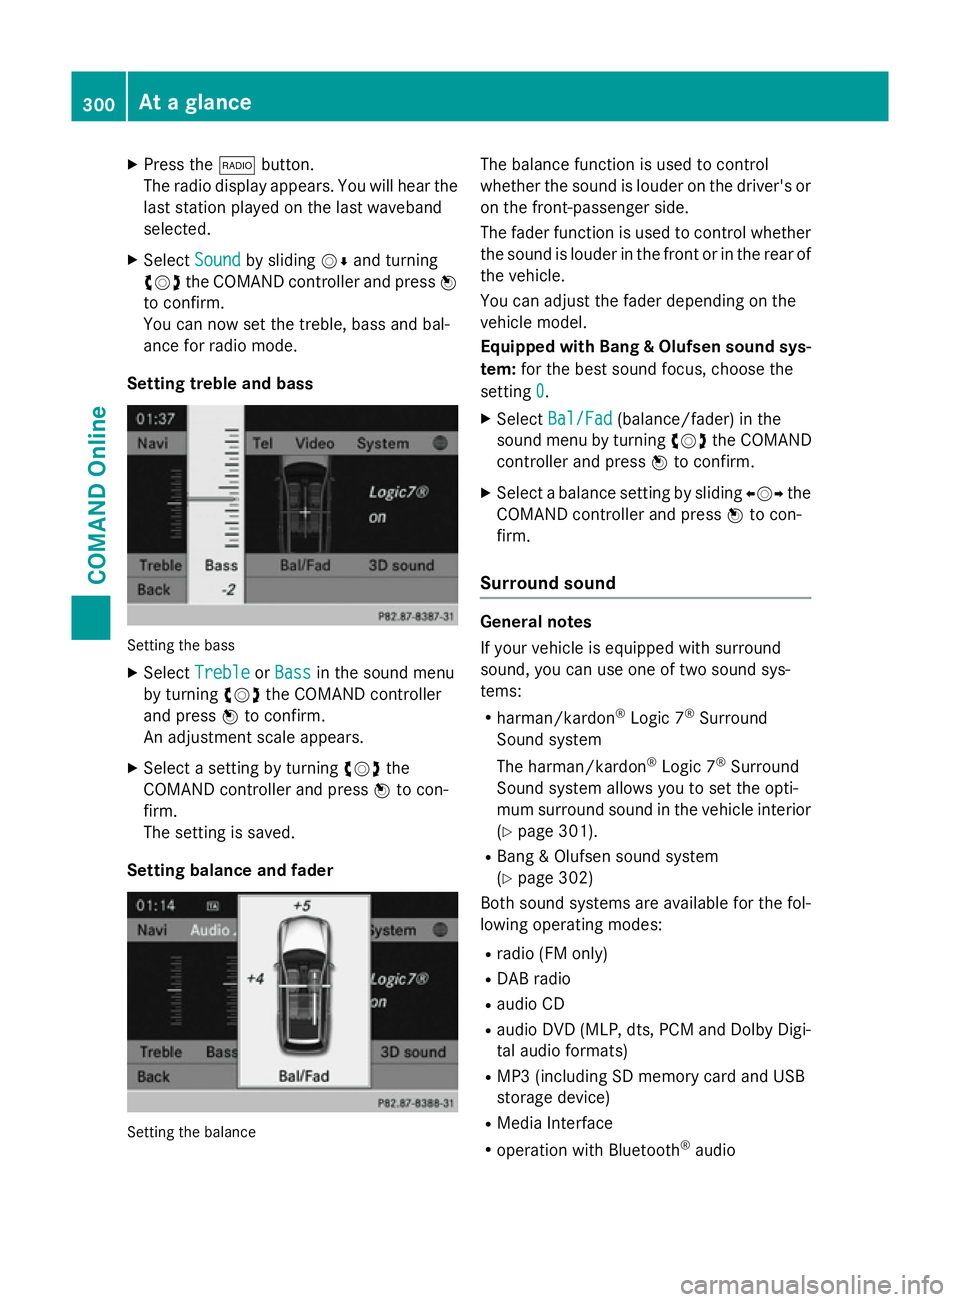
Setting treble and bass Setting the bass
X Select Treble Treble orBass
Bass in the sound menu
by turning cVdthe COMAND controller
and press Wto confirm.
An adjustment scale appears.
X Select a setting by turning cVdthe
COMAND controller and press Wto con-
firm.
The setting is saved.
Setting balance and fader Setting the balance The balance function is used to control
whether the sound is louder on the driver's or
on the front-passenger side.
The fader function is used to control whether
the sound is louder in the front or in the rear of the vehicle.
You can adjust the fader depending on the
vehicle model.
Equipped with Bang & Olufsen sound sys-
tem: for the best sound focus, choose the
setting 0 0.
X Select Bal/Fad
Bal/Fad (balance/fader) in the
sound menu by turning cVdthe COMAND
controller and press Wto confirm.
X Select a balance setting by sliding XVYthe
COMAND controller and press Wto con-
firm.
Surround sound General notes
If your vehicle is equipped with surround
sound, you can use one of two sound sys-
tems:
R harman/kardon ®
Logic 7 ®
Surround
Sound system
The harman/kardon ®
Logic 7 ®
Surround
Sound system allows you to set the opti-
mum surround sound in the vehicle interior
(Y page 301).
R Bang & Olufsen sound system
(Y page 302)
Both sound systems are available for the fol-
lowing operating modes:
R radio (FM only)
R DAB radio
R audio CD
R audio DVD (MLP, dts, PCM and Dolby Digi-
tal audio formats)
R MP3 (including SD memory card and USB
storage device)
R Media Interface
R operation with Bluetooth ®
audio 300
At a glanceCOMAND Online
Page 316 of 637
improve voice recognition. See the separate
operating instructions. Bluetooth
®
settings
General information about Bluetooth ®Bluetooth
®
technology is a standard for
short-range wireless data transmissions up to
approximately 10 metres. Bluetooth ®
allows,
for example, the exchange of vCards. Bluetooth
®
is a registered trademark of Blue-
tooth Special Interest Group (SIG) Inc.
Activating/deactivating Bluetooth ®X
Press the Wbutton.
The system menu appears.
X Select System
System by turning cVdthe
COMAND controller and press Wto con-
firm.
X Select Activate
Activate Bluetooth
Bluetooth and pressW
to confirm.
This switches Bluetooth ®
on O or off ª. Setting the system language
This function allows you to determine the lan-
guage for the menu displays and the naviga-
tion announcements. The selected language
affects the characters available for entry.
The navigation announcements are not avail-
able in all languages. If a language is not avail- able, the navigation announcements will be in English.
If you change the system language, the lan-
guage for LINGUATRONIC will also be
changed. If the selected language is not sup- ported by LINGUATRONIC, English will be
selected.
X Press the Wbutton.
X Select System System by turning cVdthe
COMAND controller and press Wto con-
firm.
X Select Language
Language and pressWto confirm.
The list of languages appears. The #dot
indicates the current setting.
X Select the language by turning cVdthe
COMAND controller and press Wto con-
firm.
COMAND loads the selected language and
sets it.
i If you are using Arabic map data, the text
information can also be shown in Arabic on
the navigation map. To do this, select Eng‐ Eng‐
lish
lish (Arabic
(Arabic map)
map)as the language from
the list of languages. Navigation announce-
ments are then made in Arabic. Assigning a favourites button
X To assign a favourites button: press the
W button.
X Select System
System by turning cVdthe
COMAND controller and press Wto con-
firm.
X Select Assign as favourite
Assign as favourite and press
W to confirm.
The list of predefined functions appears.
The dot #indicates the currently selected
function.
X Select the function by turning cVdthe
COMAND controller and press Wto con-
firm.
The favourites button is assigned the selec-
ted function.
X Example: to call up a favourite: press the
g favourites button.
This calls up the predefined function. System settings
313COMAND Online Z
Page 355 of 637
Those roads, for example, that are closed to
through-traffic.
R roads that have time restrictions (e.g.
closed on Sundays and public holidays) are
considered for route guidance on days
when they are open. For this purpose, the
relevant times must be correctly stored in
the database.
Displaying during route guidance Changing direction
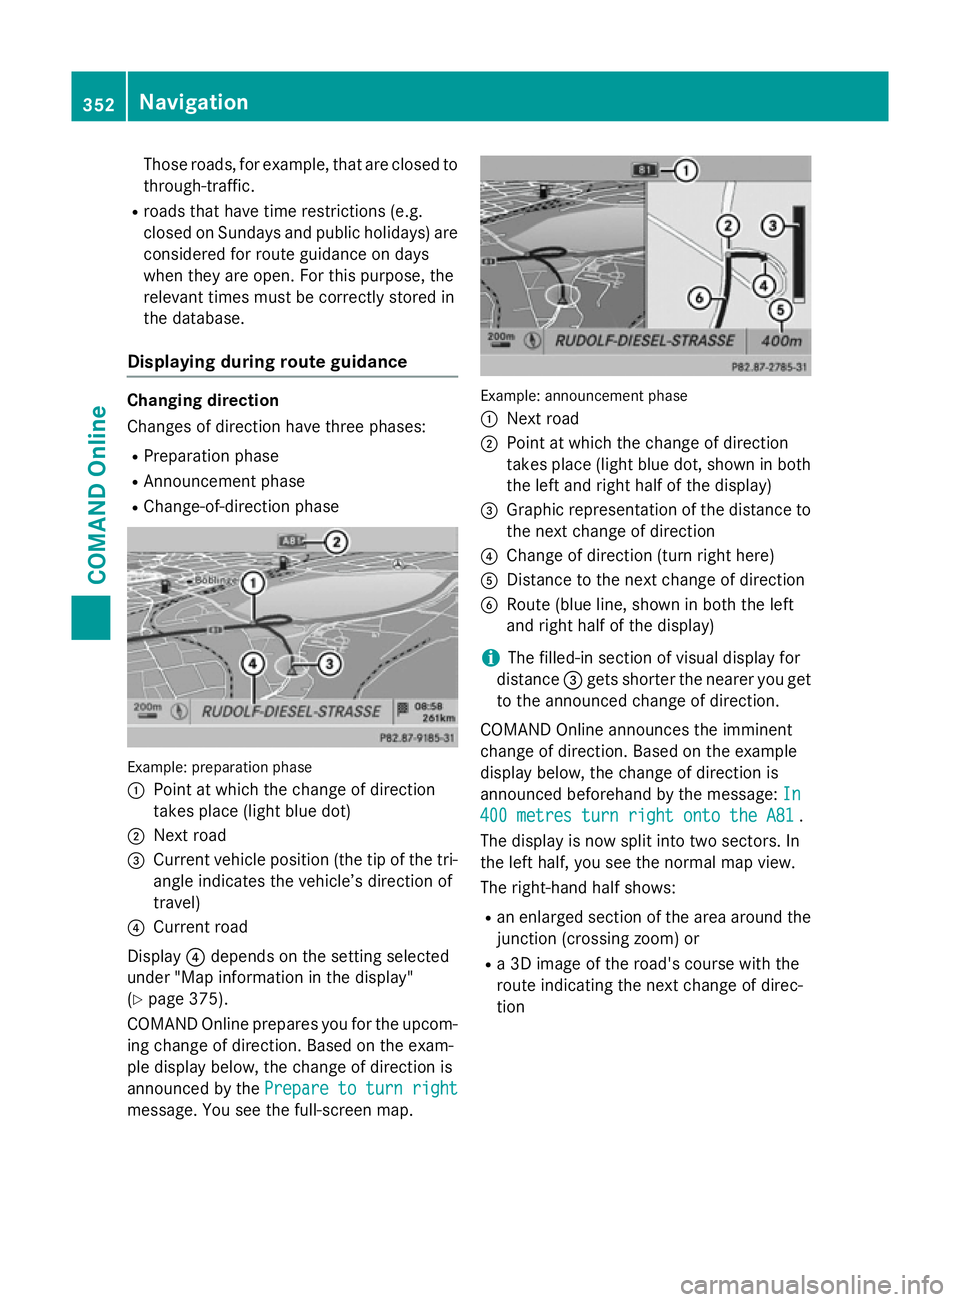
Changes of direction have three phases:
R Preparation phase
R Announcement phase
R Change-of-direction phase Example: preparation phase
:
Point at which the change of direction
takes place (light blue dot)
; Next road
= Current vehicle position (the tip of the tri-
angle indicates the vehicle’s direction of
travel)
? Current road
Display ?depends on the setting selected
under "Map information in the display"
(Y page 375).
COMAND Online prepares you for the upcom-
ing change of direction. Based on the exam-
ple display below, the change of direction is
announced by the Prepare to turn right
Prepare to turn right
message. You see the full-screen map. Example: announcement phase
:
Next road
; Point at which the change of direction
takes place (light blue dot, shown in both
the left and right half of the display)
= Graphic representation of the distance to
the next change of direction
? Change of direction (turn right here)
A Distance to the next change of direction
B Route (blue line, shown in both the left
and right half of the display)
i The filled-in section of visual display for
distance =gets shorter the nearer you get
to the announced change of direction.
COMAND Online announces the imminent
change of direction. Based on the example
display below, the change of direction is
announced beforehand by the message: In In
400 metres turn right onto the A81
400 metres turn right onto the A81 .
The display is now split into two sectors. In
the left half, you see the normal map view.
The right-hand half shows:
R an enlarged section of the area around the
junction (crossing zoom) or
R a 3D image of the road's course with the
route indicating the next change of direc-
tion 352
NavigationCOMAND Online
Page 356 of 637
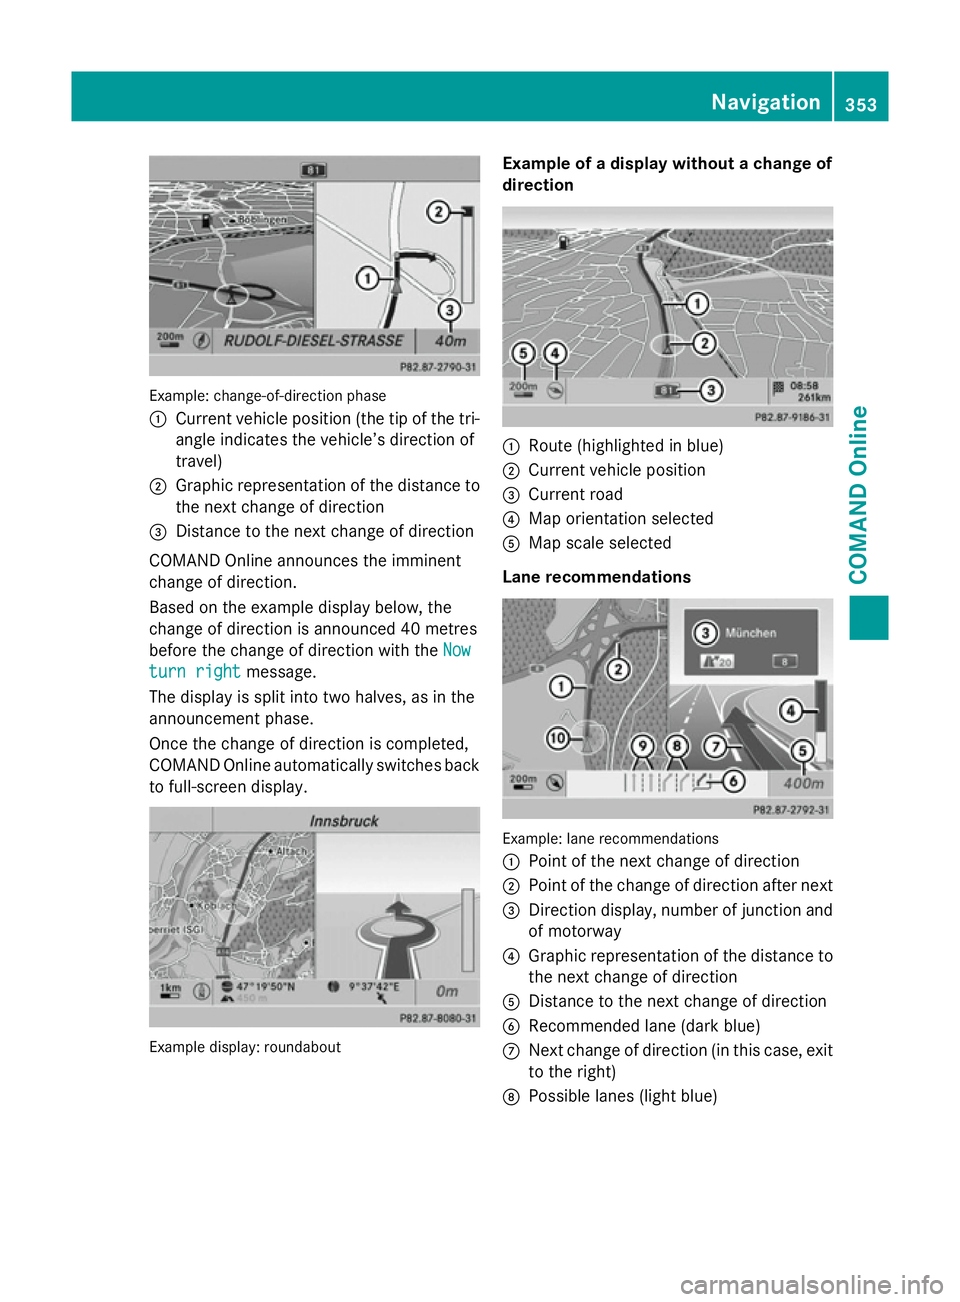
Example: change-of-direction phase
:
Current vehicle position (the tip of the tri-
angle indicates the vehicle’s direction of
travel)
; Graphic representation of the distance to
the next change of direction
= Distance to the next change of direction
COMAND Online announces the imminent
change of direction.
Based on the example display below, the
change of direction is announced 40 metres
before the change of direction with the Now
Now
turn right turn right message.
The display is split into two halves, as in the
announcement phase.
Once the change of direction is completed,
COMAND Online automatically switches back to full-screen display. Example display: roundabout Example of a display without a change of
direction
:
Route (highlighted in blue)
; Current vehicle position
= Current road
? Map orientation selected
A Map scale selected
Lane recommendations Example: lane recommendations
:
Point of the next change of direction
; Point of the change of direction after next
= Direction display, number of junction and
of motorway
? Graphic representation of the distance to
the next change of direction
A Distance to the next change of direction
B Recommended lane (dark blue)
C Next change of direction (in this case, exit
to the right)
D Possible lanes (light blue) Navigation
353COMAND Online Z
Page 357 of 637
E
Non-recommended lanes (light brown or
light grey)
F Current vehicle position (the tip of the tri-
angle indicates the vehicle’s direction of
travel)
On multi-lane roads, COMAND Online can dis- play lane recommendations for the next
change of direction. The corresponding data
must be available on the digital map.
COMAND Online displays lane recommenda-
tion Bbased on the next two changes of
direction. The number of lanes applies to the
point at which the next change of direction is
required.
i The multifunction display also shows lane
recommendations.
Only the recommended lanes are displayed
here; see separate vehicle Owner's Man-
ual. Display and description of lane recom-
mendations Lane Day
design Night
design
Recommended lane
In this lane, you will
be able to complete
the next two
changes of direction
without changing
lane. Dark
blue Light
blue
Possible lane
In this lane, you will
only be able to com-
plete the next
change of direction
without changing
lane. Light
blue Dark
blue
Non-recommended
lane
In this lane, you will
not be able to com-
plete the next
change of direction
without changing
lane. Light
brown or
light grey Grey
i
The colours used in the lane recommen-
dation display vary depending on whether
day or night design is switched on. :
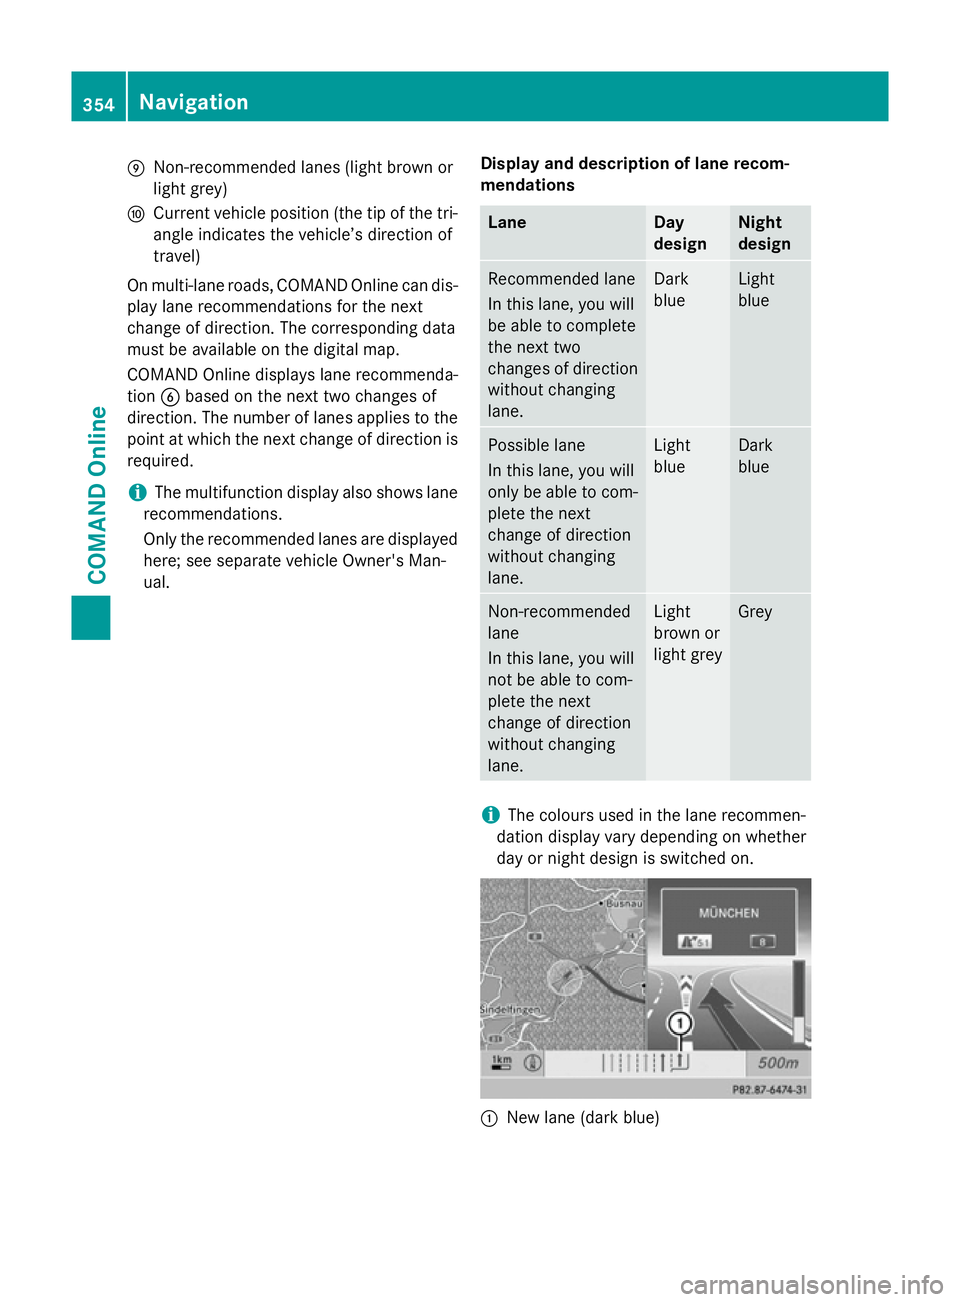
New lane (dark blue) 354
NavigationCOMAND Online
Page 358 of 637
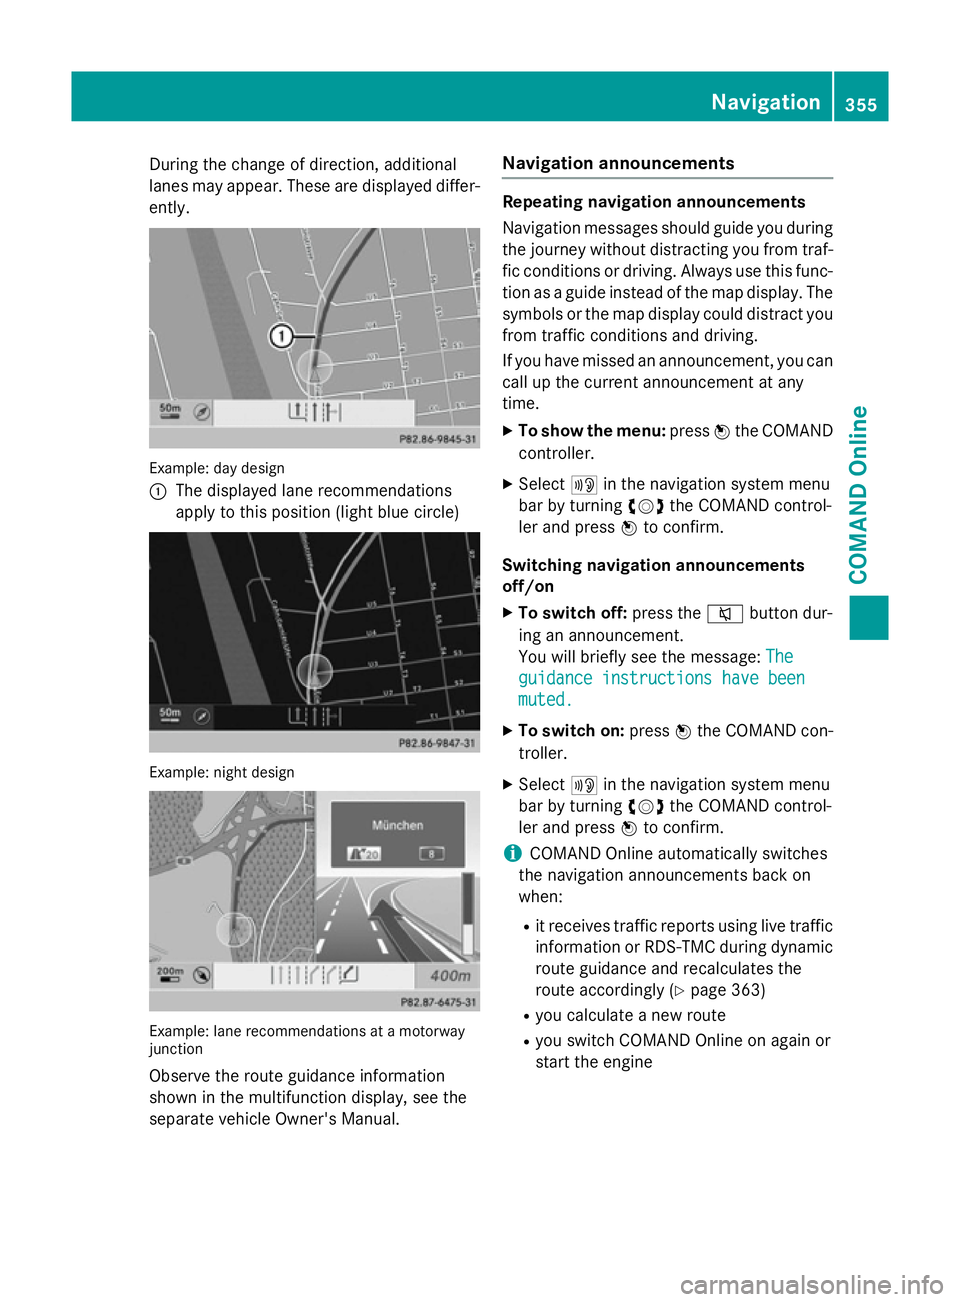
During the change of direction, additional
lanes may appear. These are displayed differ-
ently. Example: day design
:
The displayed lane recommendations
apply to this position (light blue circle) Example: night design
Example: lane recommendations at a motorway
junction
Observe the route guidance information
shown in the multifunction display, see the
separate vehicle Owner's Manual. Navigation announcements Repeating navigation announcements
Navigation messages should guide you during
the journey without distracting you from traf- fic conditions or driving. Always use this func-
tion as a guide instead of the map display. The
symbols or the map display could distract you from traffic conditions and driving.
If you have missed an announcement, you can call up the current announcement at any
time.
X To show the menu: pressWthe COMAND
controller.
X Select +in the navigation system menu
bar by turning cVdthe COMAND control-
ler and press Wto confirm.
Switching navigation announcements
off/on X To switch off: press the8button dur-
ing an announcement.
You will briefly see the message: The The
guidance instructions have been guidance instructions have been
muted. muted.
X To switch on: pressWthe COMAND con-
troller.
X Select +in the navigation system menu
bar by turning cVdthe COMAND control-
ler and press Wto confirm.
i COMAND Online automatically switches
the navigation announcements back on
when:
R it receives traffic reports using live traffic
information or RDS-TMC during dynamic
route guidance and recalculates the
route accordingly (Y page 363)
R you calculate a new route
R you switch COMAND Online on again or
start the engine Navigation
355COMAND Online Z
Page 360 of 637
Destination or area of destination
reached
When you reach your destination, COMAND
Online displays a chequered flag and route
guidance is automatically ended.
If the destination is not in close proximity to a
digitised street, the Area
Area of ofdestination
destination
reached
reached message appears when the desti-
nation is reached.
Influencing route guidance Avoiding a section of the route blocked by
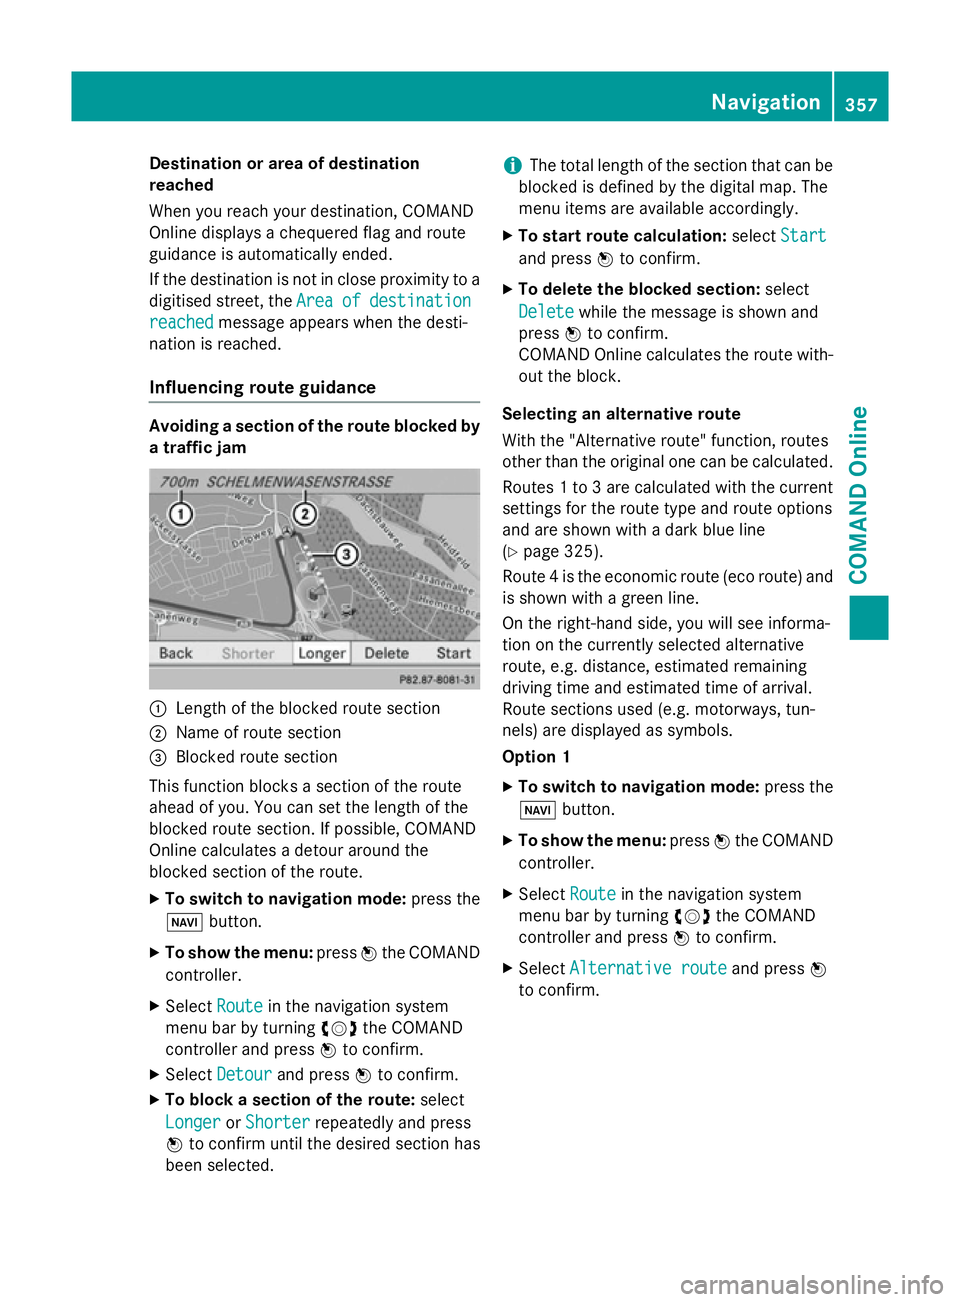
a traffic jam :
Length of the blocked route section
; Name of route section
= Blocked route section
This function blocks a section of the route
ahead of you. You can set the length of the
blocked route section. If possible, COMAND
Online calculates a detour around the
blocked section of the route.
X To switch to navigation mode: press the
Ø button.
X To show the menu: pressWthe COMAND
controller.
X Select Route
Route in the navigation system
menu bar by turning cVdthe COMAND
controller and press Wto confirm.
X Select Detour
Detour and press Wto confirm.
X To block a section of the route: select
Longer
Longer orShorter
Shorter repeatedly and press
W to confirm until the desired section has
been selected. i
The total length of the section that can be
blocked is defined by the digital map. The
menu items are available accordingly.
X To start route calculation: selectStart
Start
and press Wto confirm.
X To delete the blocked section: select
Delete Delete while the message is shown and
press Wto confirm.
COMAND Online calculates the route with-
out the block.
Selecting an alternative route
With the "Alternative route" function, routes
other than the original one can be calculated.
Routes 1 to 3 are calculated with the current settings for the route type and route options
and are shown with a dark blue line
(Y page 325).
Route 4 is the economic route (eco route) and is shown with a green line.
On the right-hand side, you will see informa-
tion on the currently selected alternative
route, e.g. distance, estimated remaining
driving time and estimated time of arrival.
Route sections used (e.g. motorways, tun-
nels) are displayed as symbols.
Option 1
X To switch to navigation mode: press the
Ø button.
X To show the menu: pressWthe COMAND
controller.
X Select Route
Route in the navigation system
menu bar by turning cVdthe COMAND
controller and press Wto confirm.
X Select Alternative route Alternative route and pressW
to confirm. Navigation
357COMAND Online Z
Page 364 of 637
X
Call up the Routes menu (Y page 360).
X To start recording : selectStart
Start
recording
recording in the Routes menu by turning
cVd the COMAND controller and press W
to confirm.
The route is recorded and entered in a list.
# REC REC is displayed in red :.
X To end recording: selectStop
Stoprecording
recording
in the Routes menu by turning cVdthe
COMAND controller and press Wto con-
firm.
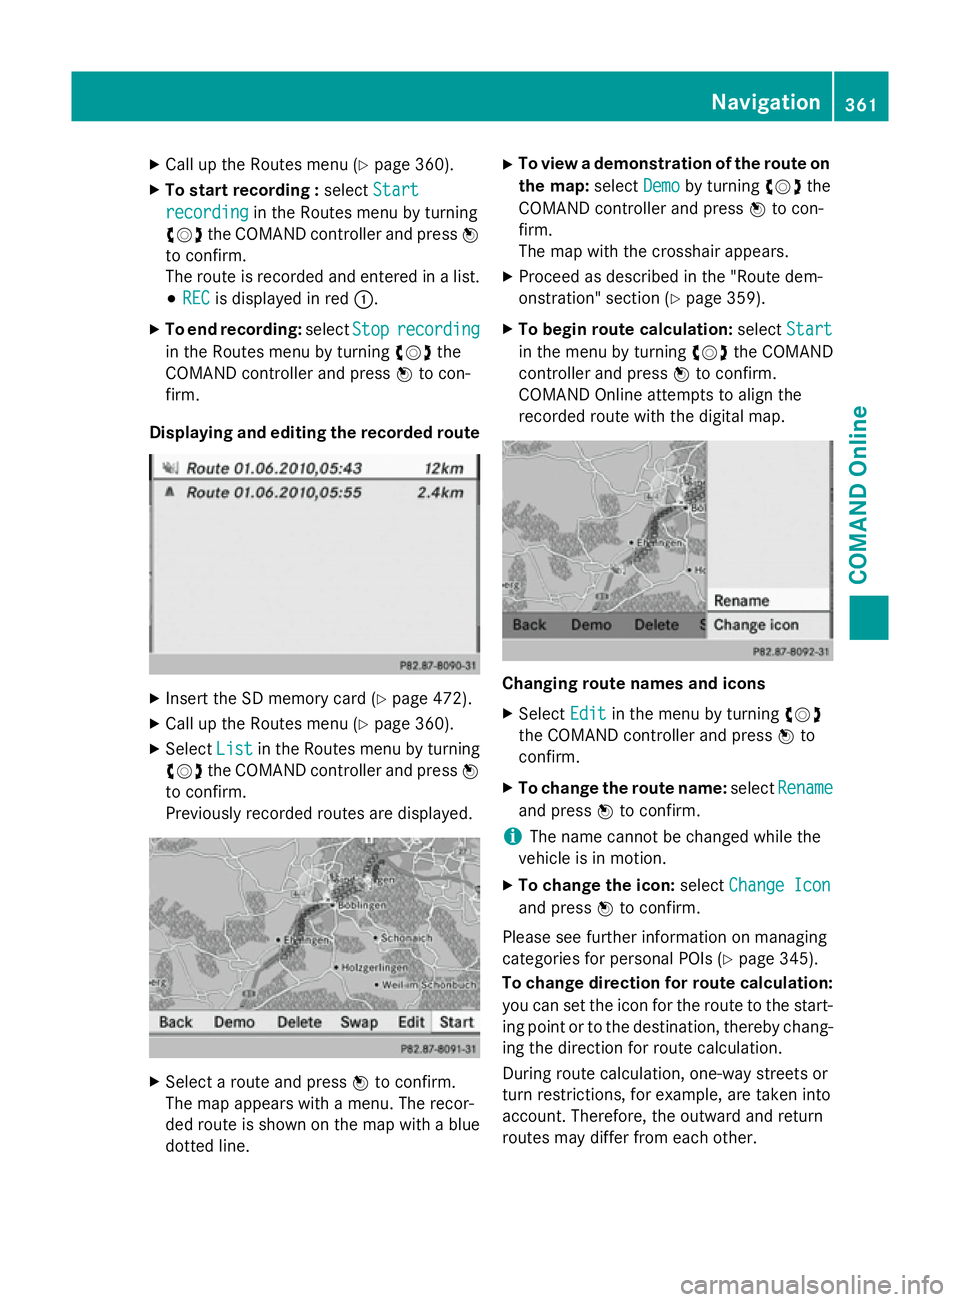
Displaying and editing the recorded route X
Insert the SD memory card (Y page 472).
X Call up the Routes menu (Y page 360).
X Select List
List in the Routes menu by turning
cVd the COMAND controller and press W
to confirm.
Previously recorded routes are displayed. X
Select a route and press Wto confirm.
The map appears with a menu. The recor-
ded route is shown on the map with a blue dotted line. X
To view a demonstration of the route on
the map: selectDemo
Demo by turning cVdthe
COMAND controller and press Wto con-
firm.
The map with the crosshair appears.
X Proceed as described in the "Route dem-
onstration" section (Y page 359).
X To begin route calculation: selectStart Start
in the menu by turning cVdthe COMAND
controller and press Wto confirm.
COMAND Online attempts to align the
recorded route with the digital map. Changing route names and icons
X
Select Edit Editin the menu by turning cVd
the COMAND controller and press Wto
confirm.
X To change the route name: selectRename
Rename
and press Wto confirm.
i The name cannot be changed while the
vehicle is in motion.
X To change the icon: selectChange Icon
Change Icon
and press Wto confirm.
Please see further information on managing
categories for personal POIs (Y page 345).
To change direction for route calculation:
you can set the icon for the route to the start- ing point or to the destination, thereby chang-
ing the direction for route calculation.
During route calculation, one-way streets or
turn restrictions, for example, are taken into
account. Therefore, the outward and return
routes may differ from each other. Navigation
361COMAND Online Z