2012 MERCEDES-BENZ SL ROADSTER key
[x] Cancel search: keyPage 305 of 637
i
Please note the following: for the opti-
mum audio experience for all passengers
when Logic7 ®
is switched on, the balance
should be set to the centre of the vehicle
interior.
You will achieve the best sound results by
playing high-quality audio and video DVDs.
MP3 tracks should have a bit rate of at least
128 kbit/ s.
Surround-sound playback does not func-
tion for mono signal sources, such as the
medium wave range (MW) in radio mode.
If radio reception is poor, e.g. in a tunnel,
you should switch off Logic 7 ®
, as it may
otherwise switch between stereo and
mono and cause temporary sound distor-
tions.
On some stereo recordings, the sound
characteristics may differ from conven-
tional stereo playback.
i The
Logic7
Logic7 ® ®
on
on function creates a sur-
round sound experience for every
passenger when playing stereo recordings, for example. It enables optimum playback
of music and films on CD, audio DVD or
video DVD with multichannel audio for-
mats, such as MLP, dts or Dolby Digital.
This results in sound characteristics as the
sound engineer intended when the original was recorded.
i If you select
Logic7 Logic7®
®
off
off , the sound sys-
tem plays the tracks as stored on the
medium. Due to the design of the
passenger compartment, an optimum
audio experience cannot be guaranteed for
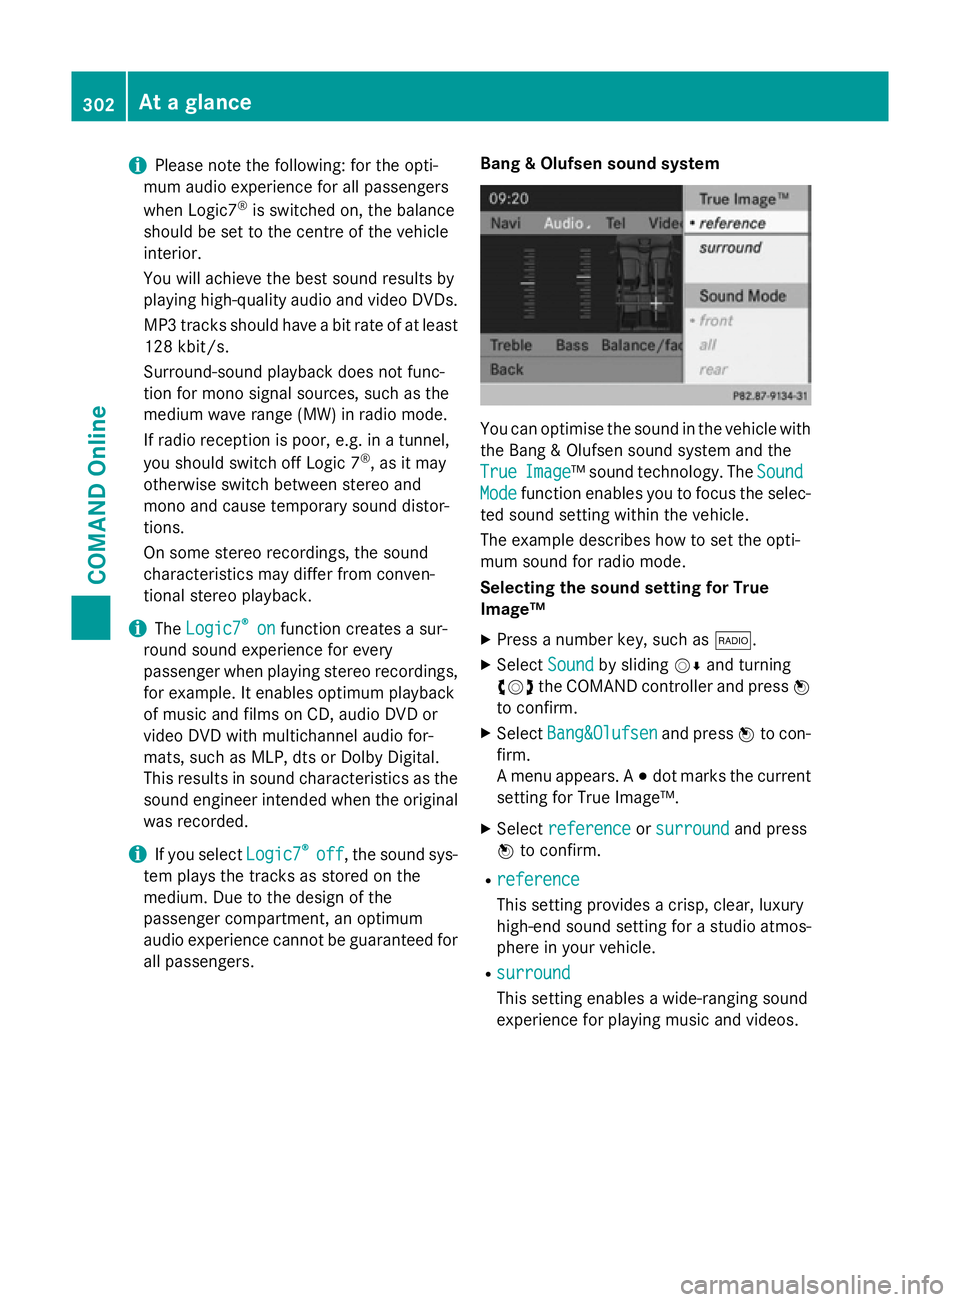
all passengers. Bang & Olufsen sound system You can optimise the sound in the vehicle with
the Bang & Olufsen sound system and the
True True Image
Image™ sound technology. The Sound
Sound
Mode
Mode function enables you to focus the selec-
ted sound setting within the vehicle.
The example describes how to set the opti-
mum sound for radio mode.
Selecting the sound setting for True
Image™
X Press a number key, such as $.
X Select Sound Soundby sliding VÆand turning
cVd the COMAND controller and press W
to confirm.
X Select Bang&Olufsen
Bang&Olufsen and pressWto con-
firm.
A menu appears. A #dot marks the current
setting for True Image™.
X Select reference reference orsurround
surround and press
W to confirm.
R reference
reference
This setting provides a crisp, clear, luxury
high-end sound setting for a studio atmos-
phere in your vehicle.
R surround surround
This setting enables a wide-ranging sound
experience for playing music and videos. 302
At a glanceCOMAND Online
Page 308 of 637
Changing the character set
While making an entry in the input menu
(Y page 404):
X Select the psymbol and press Wto
confirm.
R ABC
ABC (upper/lower case)
R 123 123 (digits)
R Other
Other (special characters such as @, €,
etc.)
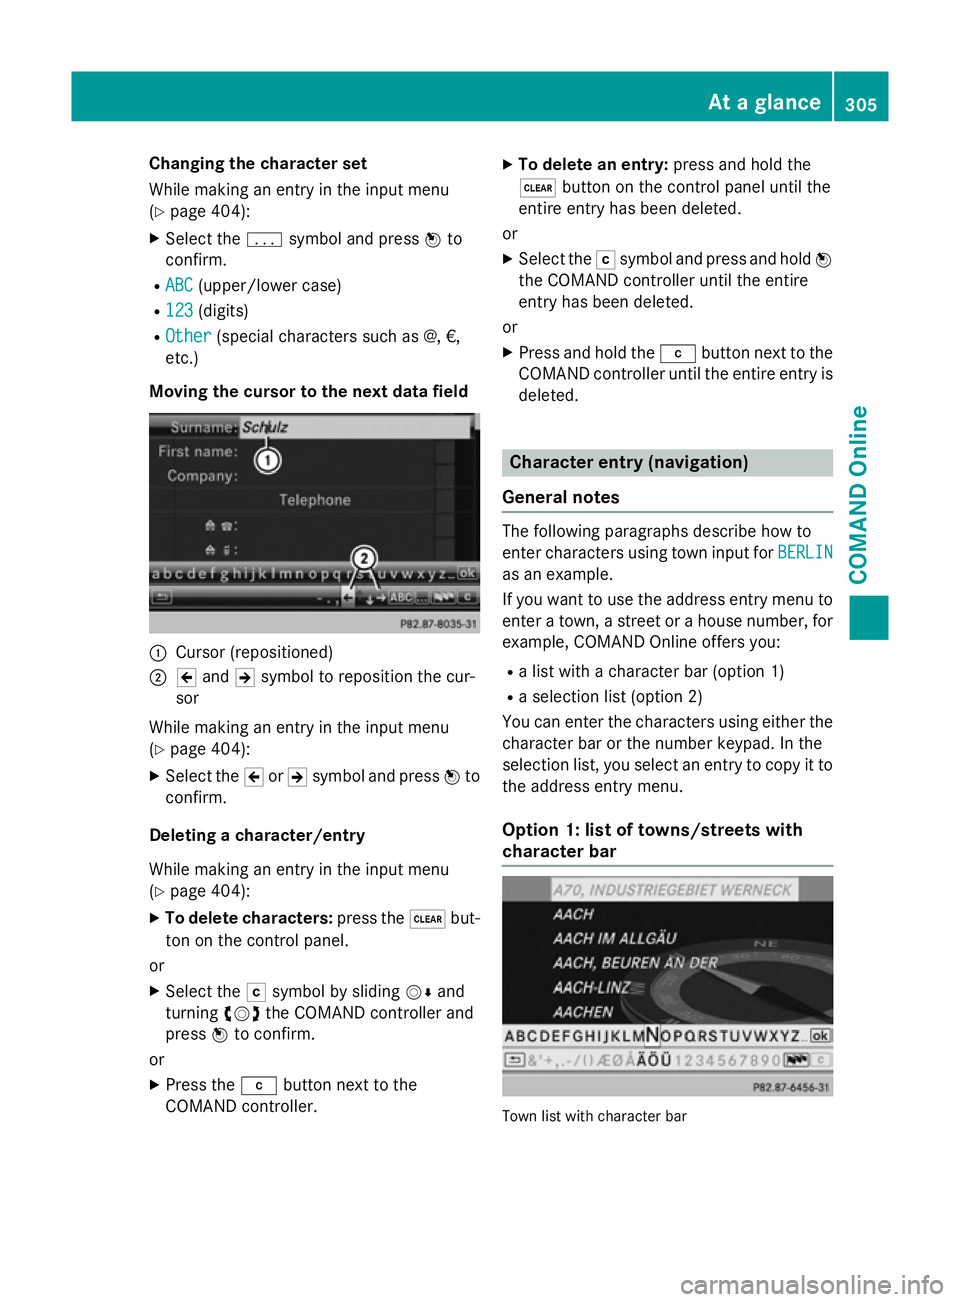
Moving the cursor to the next data field :
Cursor (repositioned)
; 2 and 3symbol to reposition the cur-
sor
While making an entry in the input menu
(Y page 404):
X Select the 2or3 symbol and press Wto
confirm.
Deleting a character/entry
While making an entry in the input menu
(Y page 404):
X To delete characters: press the$but-
ton on the control panel.
or
X Select the Fsymbol by sliding VÆand
turning cVdthe COMAND controller and
press Wto confirm.
or X Press the jbutton next to the
COMAND controller. X
To delete an entry: press and hold the
$ button on the control panel until the
entire entry has been deleted.
or X Select the Fsymbol and press and hold W
the COMAND controller until the entire
entry has been deleted.
or
X Press and hold the jbutton next to the
COMAND controller until the entire entry is deleted. Character entry (navigation)
General notes The following paragraphs describe how to
enter characters using town input for BERLIN BERLIN
as an example.
If you want to use the address entry menu to enter a town, a street or a house number, for
example, COMAND Online offers you:
R a list with a character bar (option 1)
R a selection list (option 2)
You can enter the characters using either the character bar or the number keypad. In the
selection list, you select an entry to copy it tothe address entry menu.
Option 1: list of towns/streets with
character bar Town list with character bar At a glance
305COMAND Online Z
Page 309 of 637
X
Call up the town list with the character bar
(Y page 327).
The alphabetically sorted town list shows
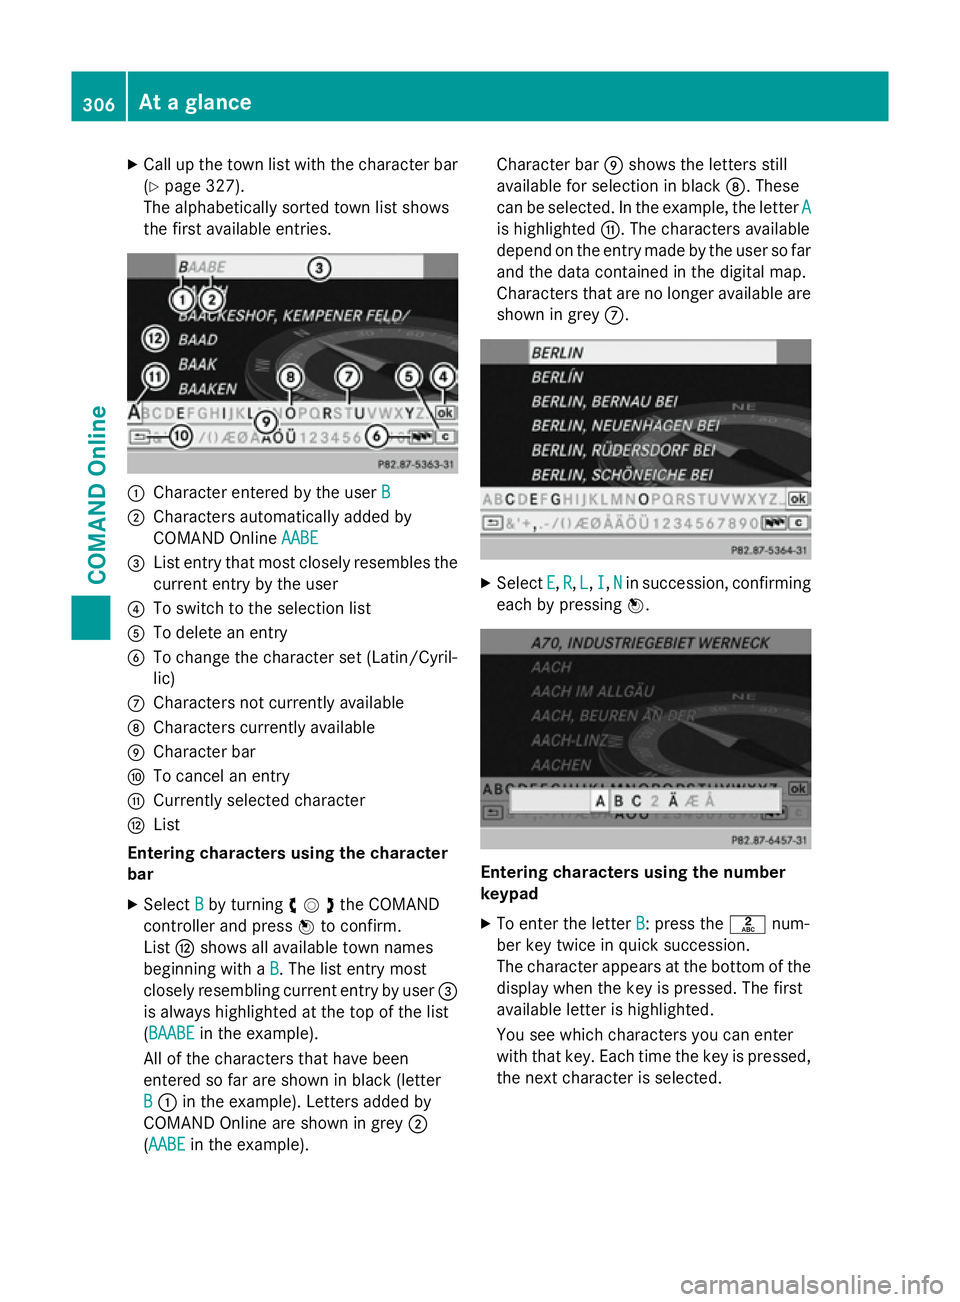
the first available entries. :
Character entered by the user B
B
; Characters automatically added by
COMAND Online AABE
AABE
= List entry that most closely resembles the
current entry by the user
? To switch to the selection list
A To delete an entry
B To change the character set (Latin/Cyril-
lic)
C Characters not currently available
D Characters currently available
E Character bar
F To cancel an entry
G Currently selected character
H List
Entering characters using the character
bar
X Select B
B by turning cVdthe COMAND
controller and press Wto confirm.
List Hshows all available town names
beginning with a B
B. The list entry most
closely resembling current entry by user =
is always highlighted at the top of the list
(BAABE BAABE in the example).
All of the characters that have been
entered so far are shown in black (letter
B
B : in the example). Letters added by
COMAND Online are shown in grey ;
(AABE AABE in the example). Character bar
Eshows the letters still
available for selection in black D. These
can be selected. In the example, the letter A A
is highlighted G. The characters available
depend on the entry made by the user so far and the data contained in the digital map.
Characters that are no longer available are
shown in grey C. X
Select E E,R
R, L
L, I
I,N
Nin succession, confirming
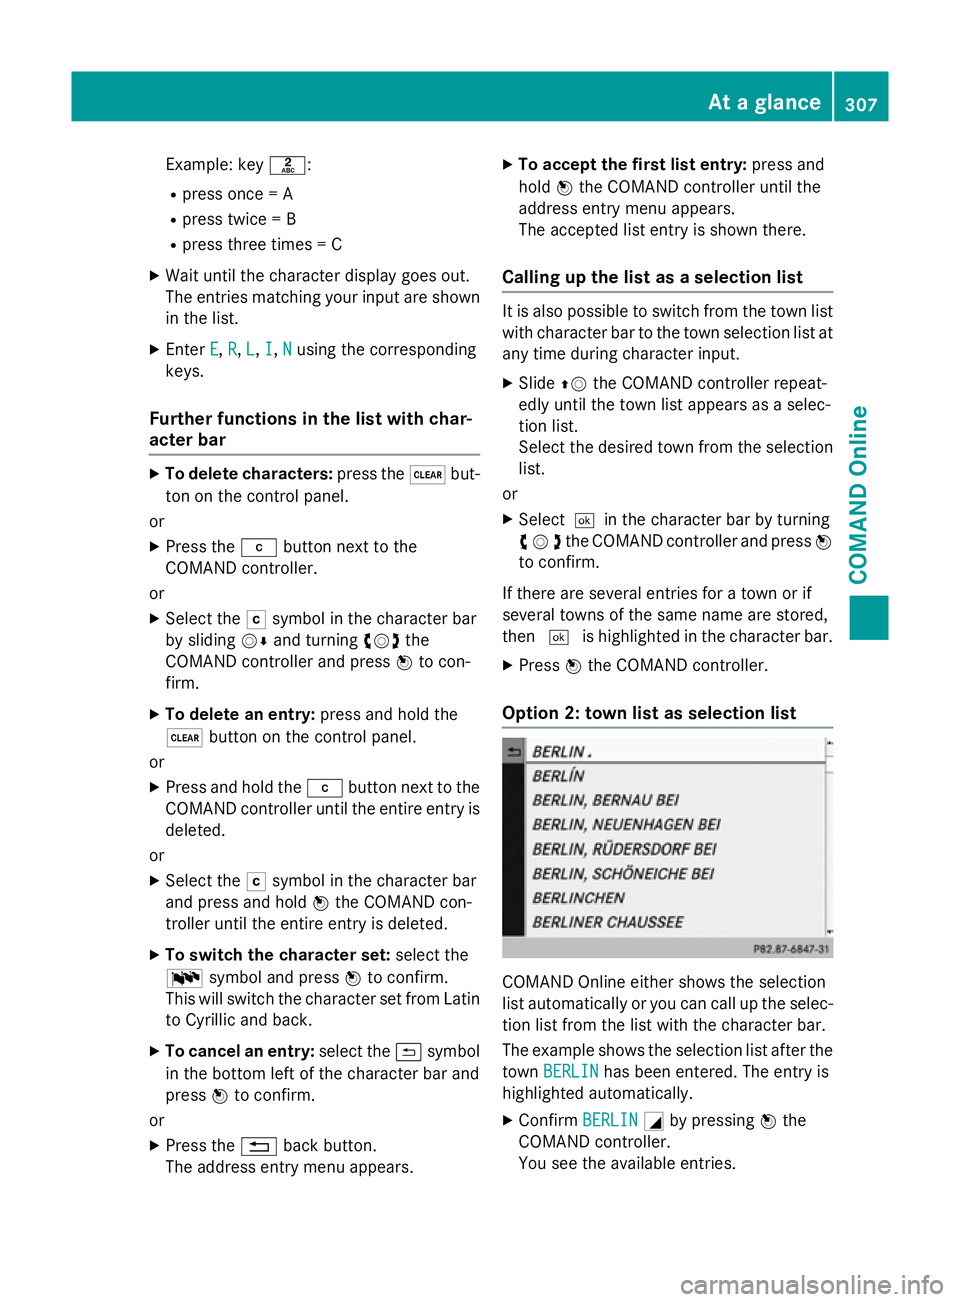
each by pressing W. Entering characters using the number
keypad
X To enter the letter B
B: press thelnum-
ber key twice in quick succession.
The character appears at the bottom of the
display when the key is pressed. The first
available letter is highlighted.
You see which characters you can enter
with that key. Each time the key is pressed,
the next character is selected. 306
At a glanceCOMAND Online
Page 310 of 637
Example: key
l:
R press once = A
R press twice = B
R press three times = C
X Wait until the character display goes out.
The entries matching your input are shown
in the list.
X Enter E
E, R
R,L
L,I
I,N
Nusing the corresponding
keys.
Further functions in the list with char-
acter bar X
To delete characters: press the$but-
ton on the control panel.
or
X Press the jbutton next to the
COMAND controller.
or
X Select the Fsymbol in the character bar
by sliding VÆand turning cVdthe
COMAND controller and press Wto con-
firm.
X To delete an entry: press and hold the
$ button on the control panel.
or
X Press and hold the jbutton next to the
COMAND controller until the entire entry is deleted.
or
X Select the Fsymbol in the character bar
and press and hold Wthe COMAND con-
troller until the entire entry is deleted.
X To switch the character set: select the
B symbol and press Wto confirm.
This will switch the character set from Latin to Cyrillic and back.
X To cancel an entry: select the&symbol
in the bottom left of the character bar and
press Wto confirm.
or
X Press the %back button.
The address entry menu appears. X
To accept the first list entry: press and
hold Wthe COMAND controller until the
address entry menu appears.
The accepted list entry is shown there.
Calling up the list as a selection list It is also possible to switch from the town list
with character bar to the town selection list atany time during character input.
X Slide ZVthe COMAND controller repeat-
edly until the town list appears as a selec-
tion list.
Select the desired town from the selection
list.
or
X Select¬ in the character bar by turning
cVdthe COMAND controller and press W
to confirm.
If there are several entries for a town or if
several towns of the same name are stored,
then ¬ is highlighted in the character bar.
X Press Wthe COMAND controller.
Option 2: town list as selection list COMAND Online either shows the selection
list automatically or you can call up the selec- tion list from the list with the character bar.
The example shows the selection list after the
town BERLIN BERLIN has been entered. The entry is
highlighted automatically.
X Confirm BERLIN
BERLINGby pressing Wthe
COMAND controller.
You see the available entries. At a glance
307COMAND Online Z
Page 312 of 637
The front passenger sees the display of the
function last activated. If the switch-on
time was longer than 30 minutes previ-
ously, the display from the driver's side is
shown.
The front passenger can now call up the
COMAND Online functions with the remote
control.
Switching off SPLITVIEW
X Select ;in the menu bar by turning cVd
the COMAND controller and press Wto
confirm.
SPLITVIEW symbol :disappears from the
display. Display ;switches to on
on.
i If COMAND Online has already been
switched on, you can also use the remote
control to switch SPLITVIEW on and off.
Make sure that the SPLITVIEW symbol is
set on the remote control thumbwheel
(Y page 520).
The SPLITVIEW display remains on for approx-
imately 30 minutes after the key has been
turned to position 0in the ignition lock. After
this time or after the key has been removed,
the settings on the front-passenger side are
saved for approximately 30 minutes longer.
After this period, reactivation on the front-
passenger side means that the settings from the driver's side will be used.
Transferring the driver's website X
To switch on SPLITVIEW: select Settings Settings
from the main function bar by turning cVd
the COMAND controller and press Wto
confirm.
X Select ;in the menu bar and confirm.
SPLITVIEW symbol :appears in the dis-
play, and display ;switches to off
off. X
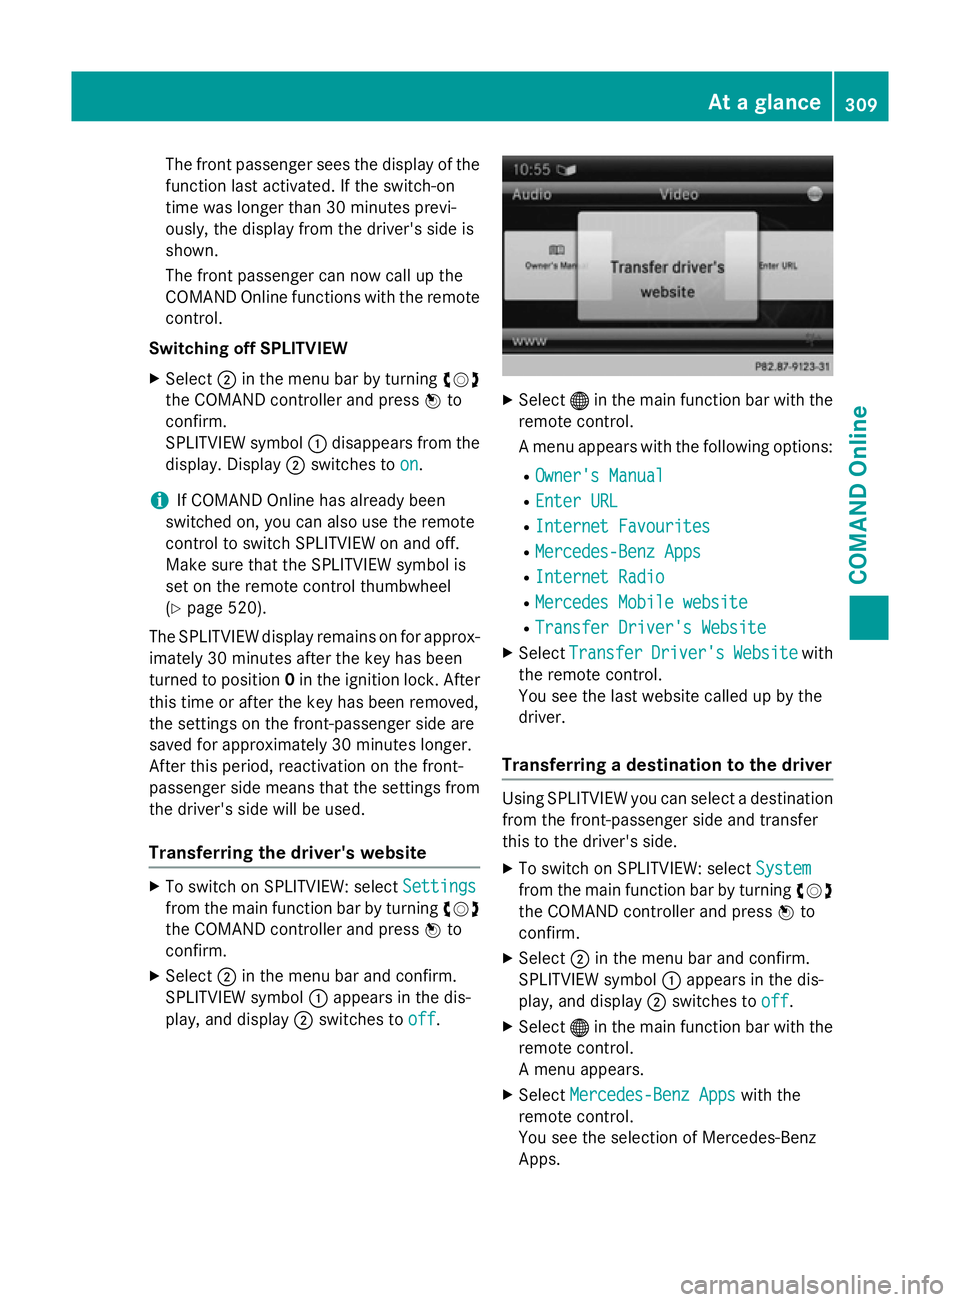
Select ®in the main function bar with the
remote control.
A menu appears with the following options:
R Owner's Manual Owner's Manual
R Enter URL
Enter URL
R Internet Favourites
Internet Favourites
R Mercedes-Benz Apps
Mercedes-Benz Apps
R Internet Radio
Internet Radio
R Mercedes Mobile website
Mercedes Mobile website
R Transfer Driver's Website
Transfer Driver's Website
X Select Transfer
Transfer Driver's
Driver'sWebsite
Websitewith
the remote control.
You see the last website called up by the
driver.
Transferring a destination to the driver Using SPLITVIEW you can select a destination
from the front-passenger side and transfer
this to the driver's side.
X To switch on SPLITVIEW: select System System
from the main function bar by turning cVd
the COMAND controller and press Wto
confirm.
X Select ;in the menu bar and confirm.
SPLITVIEW symbol :appears in the dis-
play, and display ;switches to off
off.
X Select ®in the main function bar with the
remote control.
A menu appears.
X Select Mercedes-Benz Apps Mercedes-Benz Apps with the
remote control.
You see the selection of Mercedes-Benz
Apps. At a glance
309COMAND Online Z
Page 327 of 637
deactivated as soon as the vehicle speed
drops below approximately 3 km/h.
When the restriction is active, certain entries cannot be made. This will be indicated by the fact that certain menu items are greyed out
and cannot be selected.
The following entries are not possible, for
example:
R entering the destination town and street
R entering a destination via the map
R entering POIs in the vicinity of a town or via
a name search
R editing entries
R direct entry using the number keypad
Other entries are possible, however, such as
entering POIs in the vicinity of the destination or current position.
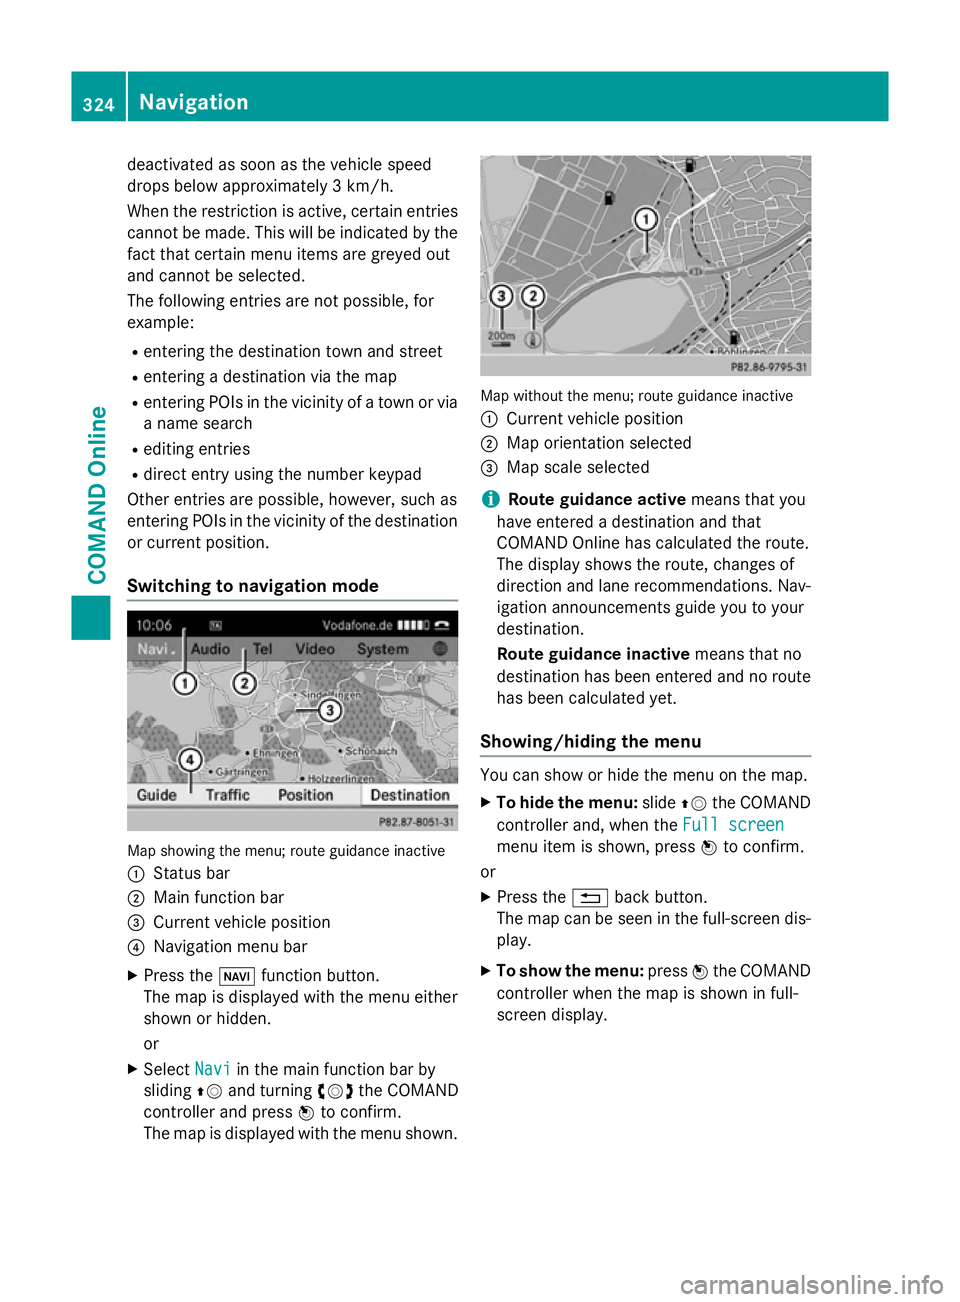
Switching to navigation mode Map showing the menu; route guidance inactive
: Status bar
; Main function bar
= Current vehicle position
? Navigation menu bar
X Press the Øfunction button.
The map is displayed with the menu either
shown or hidden.
or
X Select Navi
Navi in the main function bar by
sliding ZVand turning cVdthe COMAND
controller and press Wto confirm.
The map is displayed with the menu shown. Map without the menu; route guidance inactive
: Current vehicle position
; Map orientation selected
= Map scale selected
i Route guidance active
means that you
have entered a destination and that
COMAND Online has calculated the route.
The display shows the route, changes of
direction and lane recommendations. Nav-
igation announcements guide you to your
destination.
Route guidance inactive means that no
destination has been entered and no route has been calculated yet.
Showing/hiding the menu You can show or hide the menu on the map.
X To hide the menu: slideZVthe COMAND
controller and, when the Full screen Full screen
menu item is shown, press Wto confirm.
or
X Press the %back button.
The map can be seen in the full-screen dis- play.
X To show the menu: pressWthe COMAND
controller when the map is shown in full-
screen display. 324
NavigationCOMAND Online
Page 337 of 637
Moving the map and selecting the desti-
nation
X Call up the destination entry via the map
(Y page 333).
X To scroll the map: slideXVY, ZVÆor
aVb the COMAND controller.
X To set the map scale: as soon as you turn
cVd the COMAND controller, the scale bar
appears.
X Turn cVd until the desired scale is set.
Turning clockwise zooms out from the map; turning anti-clockwise zooms in.
X To select a destination: pressWthe
COMAND controller.
If the crosshair lies outside the digital map,
COMAND Online uses the nearest digitised
road for route calculation. The The
The cross‐ cross‐
hair is outside the digitalised
hair is outside the digitalised
area area of
ofthe
the map
mapmessage is shown. If the
crosshair is located over a body of water,
you will see the message: The destina‐ The destina‐
tion is located in a body of
tion is located in a body of
water. Please select another des‐ water. Please select another des‐
tination.
tination.
X Select OK
OKand press Wto confirm.
If the destination is within the limits of the
digital map, COMAND Online attempts to
assign the destination to the map.
If the destination can be assigned, you will see the address entry menu with the
address of the destination. If not, you will
see the Destination from map
Destination from map entry.
X To start route calculation: selectStart
Start
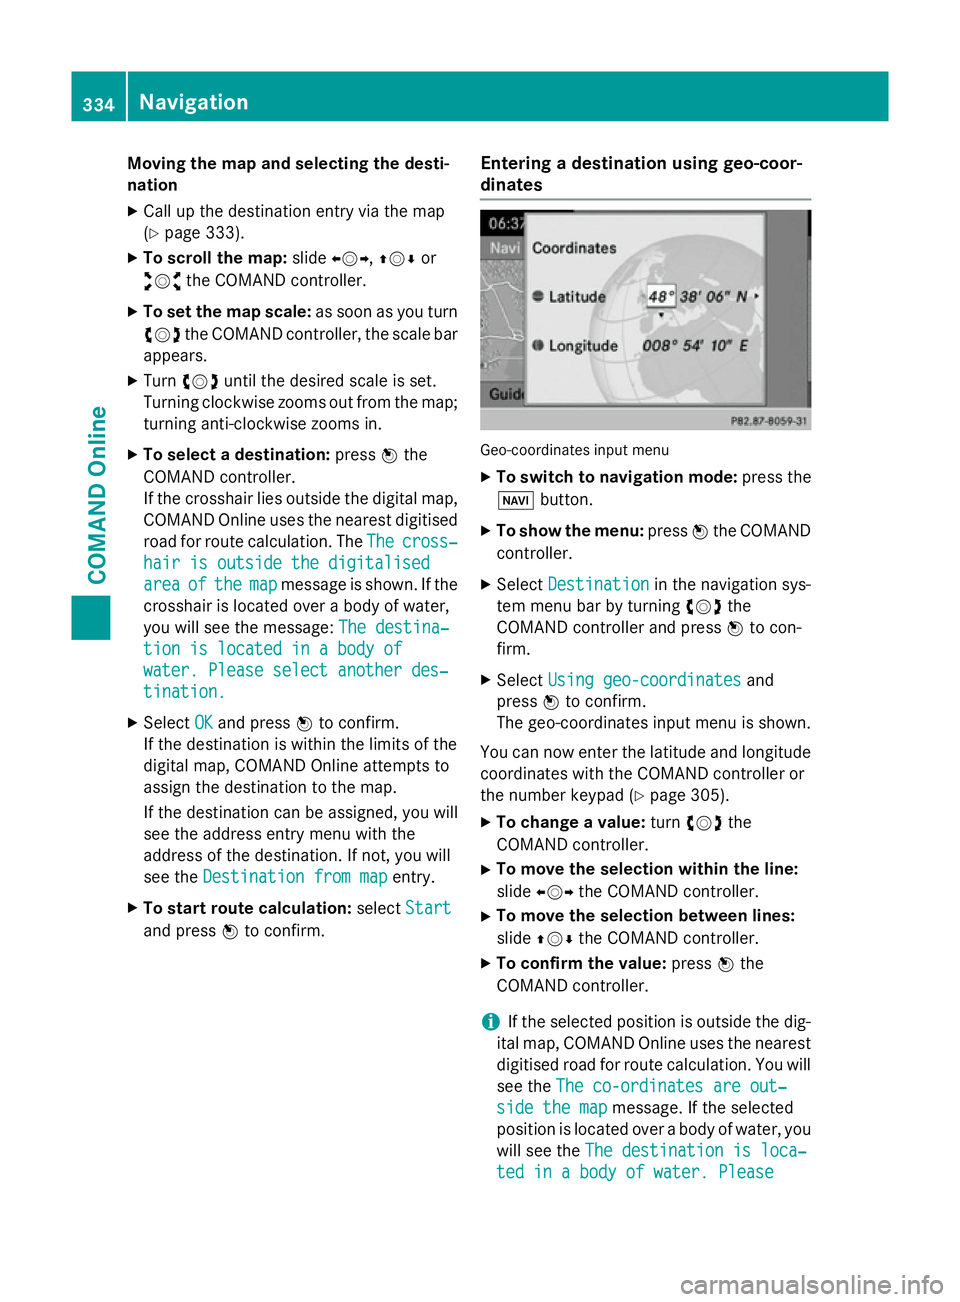
and press Wto confirm. Entering a destination using geo-coor-
dinates Geo-coordinates input menu
X To switch to navigation mode: press the
Ø button.
X To show the menu: pressWthe COMAND
controller.
X Select Destination Destination in the navigation sys-
tem menu bar by turning cVdthe
COMAND controller and press Wto con-
firm.
X Select Using geo-coordinates
Using geo-coordinates and
press Wto confirm.
The geo-coordinates input menu is shown.
You can now enter the latitude and longitude coordinates with the COMAND controller or
the number keypad (Y page 305).
X To change a value: turncVd the
COMAND controller.
X To move the selection within the line:
slide XVY the COMAND controller.
X To move the selection between lines:
slide ZVÆ the COMAND controller.
X To confirm the value: pressWthe
COMAND controller.
i If the selected position is outside the dig-
ital map, COMAND Online uses the nearest
digitised road for route calculation. You will
see the The co-ordinates are out‐ The co-ordinates are out‐
side the map
side the map message. If the selected
position is located over a body of water, you
will see the The destination is loca‐
The destination is loca‐
ted in a body of water. Please
ted in a body of water. Please 334
NavigationCOMAND Online
Page 380 of 637
X
Select Navi
Naviin the main function bar by
sliding ZVand turning cVdthe COMAND
controller and press Wto confirm.
X Select Map
Map settings
settings and pressWto con-
firm.
The map settings menu appears.
X Select Topographic map Topographic map and pressWto
confirm.
Depending on the previous status, switch
the option on Oor off ª.
The topographic map uses different colours
to depict elevation. The colour key generally
reflects the topography's dominant vegeta-
tion or the ground's perceived colour when
seen from the air, for example:
R green (grass) for lowland
R yellow, brown (woodland) for hills
R grey (stone) and white (snow) for moun-
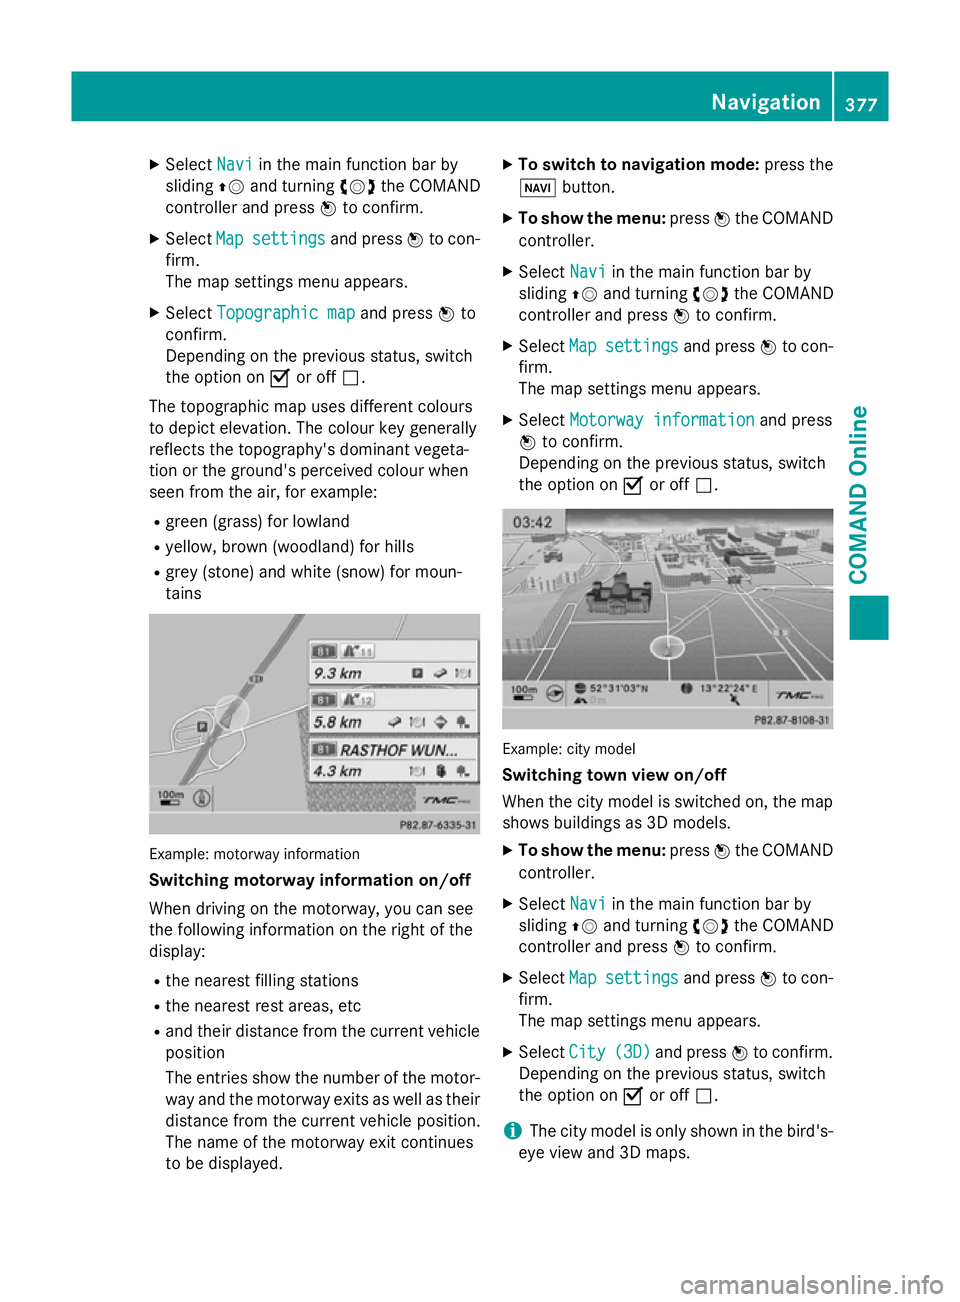
tains Example: motorway information
Switching motorway information on/off
When driving on the motorway, you can see
the following information on the right of the
display:
R the nearest filling stations
R the nearest rest areas, etc
R and their distance from the current vehicle
position
The entries show the number of the motor- way and the motorway exits as well as their
distance from the current vehicle position.
The name of the motorway exit continues
to be displayed. X
To switch to navigation mode: press the
Ø button.
X To show the menu: pressWthe COMAND
controller.
X Select Navi
Navi in the main function bar by
sliding ZVand turning cVdthe COMAND
controller and press Wto confirm.
X Select Map Mapsettings
settings and pressWto con-
firm.
The map settings menu appears.
X Select Motorway information Motorway information and press
W to confirm.
Depending on the previous status, switch
the option on Oor off ª. Example: city model
Switching town view on/off
When the city model is switched on, the map
shows buildings as 3D models.
X To show the menu: pressWthe COMAND
controller.
X Select Navi Naviin the main function bar by
sliding ZVand turning cVdthe COMAND
controller and press Wto confirm.
X Select Map
Mapsettings
settings and pressWto con-
firm.
The map settings menu appears.
X Select City City(3D)
(3D)and press Wto confirm.
Depending on the previous status, switch
the option on Oor off ª.
i The city model is only shown in the bird's-
eye view and 3D maps. Navigation
377COMAND Online Z