2012 MERCEDES-BENZ GLK SUV fuse box
[x] Cancel search: fuse boxPage 15 of 381

Exhaust tail pipe (cleaning instruc-
tions) .................................................. 321
Exterior lighting Settings options ............................ .110
see Lights
Exterior mirrors
Adjusting ....................................... 103
Anti-dazzle mode (automatic) ........105
Folding in/out (automatically). ......104
Folding in/out (electrically). ..........104
Folding in (12-button multifunc-
tion steering wheel) .......................244
Out of position (troubleshooting) ...104
Parking position ............................. 105
Resetting ....................................... 104
Storing settings (memory func-
tion) ............................................... 106F
Fault message see Display messages
Filler cap
see Fuel filler flap
Fire extinguisher ............................... 326
First-aid kit ......................................... 326
Flat tyre Changing a wheel/fitting the
spare wheel ................................... 332
Preparing the vehicle .....................329
Raising the vehicle .........................333
TIREFIT kit ...................................... 329
see Emergency spare wheel
Floormat ............................................ .310
Foglamps Extended range .............................. 115
Switching on/off ........................... 112
Folding the rear bench seat for-
wards/back ....................................... 298
Fording Off-road ......................................... 169
On flooded roads ........................... 168
Frequencies
Mobile phone ................................. 363
Two-way radio ................................ 363
Front foglamp
Display message (12-button mul-
tifunction steering wheel) ..............262Front foglamps
Display message (4-button multi-
function steering wheel) ................259
Fuel
Additives ........................................ 366
Consumption information ..............368
Displaying the range (12-button
multifunction steering wheel) ........231
Displaying the range (4-button
multifunction steering wheel) ........226
Grade (petrol) ................................ 366
Important safety notes ..................365
Problem (malfunction) ...................163
Quality (diesel )............................... 367
Refuelling ...................................... .161
Tank content/reserve fuel .............366
Tank content display (12-button
multifunction steering wheel) ..........33
Tank content display (4-button
multifunction steering wheel) ..........31
Fuel consumption
Current (12-button multifunction
steering wheel) .............................. 231
Fuel filler flap
Opening/closing ............................ 162
Fuel filter
Display message (12-button mul-
tifunction steering wheel) ..............269
Display message (4-button multi-
function steering wheel) ................266
Fuel reserve
Display message (12-button mul-
tifunction steering wheel) ..............268
Display message (4-button multi-
function steering wheel) ................265
see Fuel
Fuel tank
Capacity ........................................ 366
Problem (malfunction) ...................163
Fuse allocation chart (vehicle tool
kit) ...................................................... 327
Fuses Allocation chart ............................. 346
Before changing ............................. 346
Dashboard fuse box .......................347
Fuse box in the engine compart-
ment .............................................. 34712
Index
Page 16 of 381

Fuse box in the luggage compart-
ment
.............................................. 347
Important safety notes ..................346 G
Gear or selector lever (cleaning
instructions) ...................................... 322
Genuine Mercedes-Benz parts .........362
Glove compartment ..........................297 H
Handbrake see Parking brake
Hazard warning lamps ......................114
Headlamp Cleaning system (function) ............114
Cleaning system (notes) ................372
Headlamps
Misting up ...................................... 117
Topping up the cleaning system ....317
see Automatic headlamp mode
Head restraints
Adjusting ......................................... 98
Adjusting (electrically) .....................99
Adjusting (manually). .......................98
Adjusting (rear) ................................ 99
Fitting/removing (rear) ....................99
see NECK-PRO head restraints
see NECK-PRO head restraints/
NECK-PRO luxury head restraints
Heating
see Climate control
High-pressure cleaners ....................318
Hill start assist .................................. 150
HOLD function Display message (12-button mul-
tifunction steering wheel) ..............271
Display message (4-button multi-
function steering wheel) ................270
Function/notes ............................. 186 I
Ignition lock see Key positions
Immobiliser .......................................... 71Indicator and warning lamps
Coolant .......................................... 292
DISTRONIC PLUS ........................... 294
Engine diagnostics .........................291
Fuel tank ........................................ 292
Overview (12-button multifunc-
tion steering wheel) .........................34
Overview (4-button multifunction
steering wheel) ................................ 32
Indicator lamps
see Warning and indicator lamps
Insect protection on the radiator ....315
Inspection see ASSYST PLUS
Instrument cluster (12-button mul-
tifunction steering wheel)
Indicator and warning lamps ............34
Overview .......................................... 33
Settings ......................................... 238
Instrument cluster (4-button mul-
tifunction steering wheel)
Indicator and warning lamps ............32
Overview .......................................... 31
Instrument cluster lighting ..............239
Multifunction steering wheel with
4 buttons ....................................... 224
Intelligent Light System
Activating/deactivating (12-but-
ton multifunction steering wheel) ..240
Display message (12-button mul-
tifunction steering wheel) ..............263
Overview ........................................ 114
Interior lighting ................................. 117
Automatic control system ..............118
Delayed switch-off (12-button
multifunction steering wheel) ........241
Emergency lighting ........................118
Manual control ............................... 118
Overview ........................................ 117
Reading lamp ................................. 117
Setting brightness for display/
switches (on-board computer) .......239
Interior motion sensor ........................73
ISOFIX child seat securing system ....57 Index
13
Page 349 of 381

X
Switch on the hazard warning lamps
(Y page 114).
X Fit the towing eye (Y page 343).
X Secure the rigid towing bar or the towing
rope.
X Depress and hold the brake pedal.
X Turn the key to position 2in the ignition
lock.
X Depress the clutch pedal and keep it
depressed.
X Engage neutral.
X Release the brake pedal.
X Tow-start the vehicle.
X Engage second gear.
X Release the clutch pedal slowly; do not
depress the accelerator pedal while doing
so.
The engine is started.
X Depress the clutch pedal and shift to neu-
tral.
X Stop at a suitable place.
X Depress the parking brake.
X Remove the rigid towing bar or towing rope.
X Remove the towing eye (Y page 344).
X Switch off the hazard warning lamps. Electrical fuses
Important safety notes
G
WARNING
Only use fuses that have been approved for
Mercedes-Benz vehicles and which have the
correct fuse rating for the systems con-
cerned. Do not attempt to repair or bridge
faulty fuses. Using fuses which have not been
approved or attempting to repair or bridge
faulty fuses could cause the fuse to be over-
loaded and result in a fire. Have the cause
traced and rectified at a qualified specialist
workshop.
! Only use fuses that have been approved
for Mercedes-Benz vehicles and which have the correct fuse rating for the system
concerned. Otherwise, components or sys-
tems could be damaged.
The fuses in your vehicle serve to disconnect
faulty circuits. If a fuse blows, all the compo-
nents on the circuit and their functions will
fail.
Blown fuses must be replaced with fuses of
the same rating, which you can recognise by
the colour and fuse rating. The fuse ratings
are listed in the fuse allocation chart.
If the newly inserted fuse also blows, have the
cause traced and rectified at a qualified spe-
cialist workshop, e.g. a Mercedes-Benz
Service Centre. Before replacing a fuse
X Secure the vehicle against rolling away
(Y page 164).
X Switch off all electrical consumers.
X Turn the key to position 0in the ignition
lock and remove it (Y page 147).
or
X On vehicles with KEYLESS-GO, make sure
the ignition is switched off (Y page 147).
All indicator lamps in the instrument cluster
must be off.
The fuses are located in various fuse boxes:
R fuse box on the driver's side of the dash-
board
R fuse box in the engine compartment on the
left-hand side of the vehicle, when viewed
in the direction of travel
R fuse box in the stowage well under the lug-
gage compartment floor on the right-hand
side of the vehicle, when viewed in the
direction of travel
The fuse allocation chart is located in the
vehicle tool kit in the stowage compartment
under the luggage compartment floor
(Y page 327). 346
Electrical fusesBreakdown assistance
Page 350 of 381

Dashboard fuse box
! Do not use a pointed object such as a
screwdriver to open the cover in the dash-
board. You could damage the dashboard or
the cover.
! Make sure that no moisture can enter the
fuse box when the cover is open.
! When closing the cover, make sure that it
is lying correctly on the fuse box. Moisture
seeping in or dirt could otherwise impair
the operation of the fuses. X
To open: pull out cover :slightly at the
bottom in the direction of arrow =.
X Pull cover :outwards in the direction of
arrow ;and remove it.
X To close: clip in cover :on the front of
the dashboard.
X Fold cover :inwards until it engages. Fuse box in the engine compartment
G
WARNING
Make sure that the windscreen wipers are
turned off and the key is pulled out of the igni-
tion lock before you open the cover of the fuse
box. Otherwise, the windscreen wipers and
the wiper rods above the cover could be set
in motion. This could lead to you or others
being injured by the wiper rods.
! Make sure that no moisture can enter the
fuse box when the cover is open. !
When closing the cover, make sure that it
is lying correctly on the fuse box. Moisture
seeping in or dirt could otherwise impair
the operation of the fuses.
X Make sure that the windscreen wipers are
switched off.
X Open the bonnet. X
Remove any existing moisture from the
fuse box using a dry cloth.
X To open: take lines ;from the guides.
X Open clamps :.
X Remove the fuse box cover forwards.
X To close: check whether the rubber seal is
lying correctly in the cover.
X Insert the cover at the rear of the fuse box
into the retainer.
X Fold down cover and close clamps :.
X Secure lines ;in the guides.
X Close the bonnet. Fuse box in the luggage compartment
! Make sure that no moisture can enter the
fuse box when the cover is open.
! When closing the cover, make sure that it
is lying correctly on the fuse box. Moisture
seeping in or dirt could otherwise impair
the operation of the fuses.
X Open the tailgate. Elect
rical fuses
347Breakdown assis tance Z
Page 351 of 381

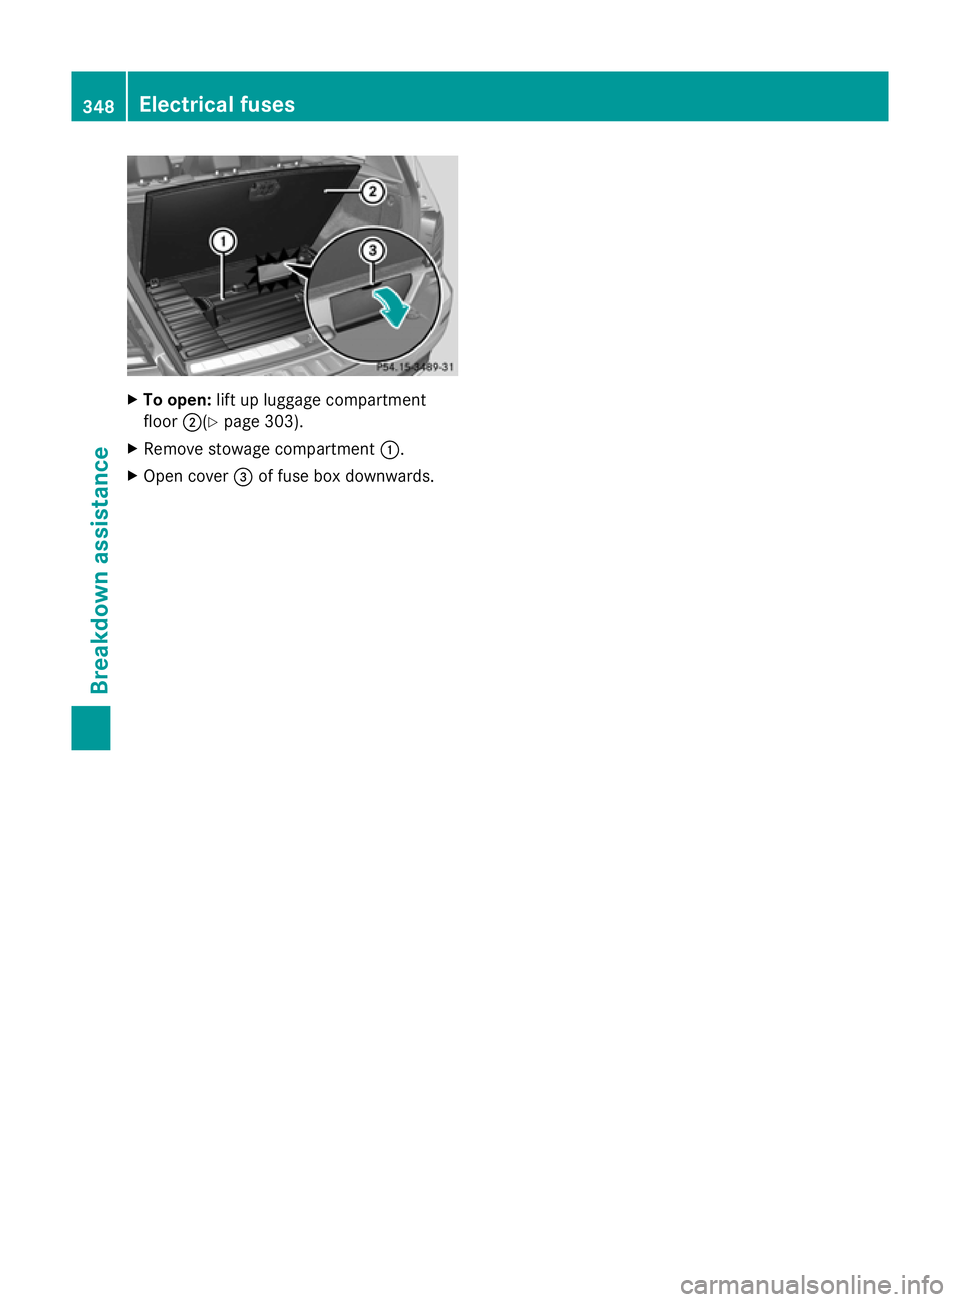
X
To open: lift up luggage compartment
floor ;(Y page 303).
X Remove stowage compartment :.
X Open cover =of fuse box downwards. 348
Electrical fusesBreakdo
wn assis tance