2012 MERCEDES-BENZ GLK SUV lights
[x] Cancel search: lightsPage 174 of 381
R
Always keep the engine running and in gear
when driving on a downhill gradient. Acti-
vate DSR (Y page 213).
R Drive slowly and evenly, if necessary at
walking pace.
R Ensure that the wheels are in contact with
the ground at all times.
R Drive with extreme care on unknown off-
road routes where visibility is poor. For
safety reasons, get out of the vehicle first
and survey the off-road route.
R Check the depth of water before fording
rivers and streams.
R Look out for obstacles such as rocks, holes,
tree stumps and furrows.
R Always keep the side windows and the pan-
orama sliding sunroof closed during the
journey.
R Do not stray from marked routes or paths.
i Information about retrofitting special all-
terrain tyres is available from any qualified
specialist workshop.
Checklist before driving off-road X
Engine oil level: check the engine oil and
top it up if necessary.
X Tyre-change tool kit: check that the jack
is working and make sure you have the
wheelbrace, a robust tow cable and a fold-
ing spade in the vehicle.
X Wheels and tyres: check the tyre tread
depth and tyre pressure.
X Check for damage and remove any foreign
objects, e.g. small stones, from the
wheels/tyres.
X Replace any missing valve caps.
X Replace dented or damaged wheels.
Checklist after driving off-road Driving over rough terrain places greater
demands on your vehicle than driving on nor-
mal roads. After driving off-road, check the
vehicle. This allows you to detect damage promptly and reduce the risk of an accident
to yourself and other road users.
X Deactivate DSR ( Ypage 213).
X Clean the headlamps and rear lights and
check for damage.
X Clean the front and rear licence plates.
X Clean the wheels/tyres with a water jet and
remove any foreign objects.
X Clean the wheels, wheel arches and the
vehicle underside with a water jet; check
for any foreign objects and damage.
X Check whether twigs or other parts of
plants have become trapped. These
increase the risk of fire and can damage
fuel pipes, brake hoses or the rubber bel-
lows of the axle joints and propeller shafts.
X After the trip, examine without fail the
entire undercarriage, wheels, tyres, brakes,
bodywork structure, steering, chassis and
exhaust system for damage.
X After driving for extended periods across
sand, mud, gravel, water or in similarly dirty
conditions, have the brake discs, wheels,
brake pads/linings and axle joints checked
and cleaned.
X If you detect strong vibrations after off-road
travel, check for foreign objects in the
wheels and drive train and remove them if
necessary. Foreign objects can disturb the
balance and cause vibrations. Driving tips
171Driving and parking Z
Page 178 of 381
i
Vehicles with manual transmission:
R always drive at adequate, but not exces-
sive, engine speeds.
R change gear in good time.
R if possible, do not change down several
gears at a time.
Storing the current speed and calling up
the last stored speed G
WARNING
Only call up a stored speed if you know what
that speed is and if it is suitable for the current
traffic and driving situation. You can other-
wise endanger yourself or others by uninten-
tionally triggering sudden acceleration or
braking.
X Briefly pull the cruise control lever towards
you =.
X Remove your foot from the accelerator
pedal.
The first time cruise control is activated, it
stores the current speed or regulates the
speed of the vehicle to the previously
stored speed.
Setting a speed X
Press the cruise control lever up :for a
higher speed or down ?for a lower speed.
X Keep the cruise control lever pressed until
the desired speed is reached.
X Release the cruise control lever.
The new speed is stored.
X To adjust the set speed in 1 km/h incre-
ments: briefly press the cruise control
lever up :or down ?to the pressure
point.
The last speed stored is increased or
reduced in 1 km/h increments.
X To adjust the set speed in 10 km/h
increments: press the cruise control lever briefly up
:or down ?beyond the pres-
sure point.
The last speed stored is increased or
reduced in 10 km/h increments.
i Cruise control is not deactivated if you
depress the accelerator pedal. For exam-
ple, if you accelerate briefly to overtake,
cruise control adjusts the vehicle's speed
to the last speed stored after you have fin-
ished overtaking.
Deactivating cruise control There are several ways to deactivate cruise
control:
X
Briefly press the cruise control lever for-
wards B.
or
X Brake
or
X Briefly press the cruise control lever in the
direction of arrow A.
Variable SPEEDTRONIC is selected. LIM
indicator lamp ;in the cruise control lever
lights up.
Cruise control is automatically deactivated if:
R you depress the parking brake.
R you are driving at less than 30 km/h.
R ESP ®
intervenes or you deactivate ESP ®
.
R you shift into neutral in a vehicle with man-
ual transmission while driving or depress
the clutch pedal for longer than six sec-
onds.
R on vehicles with manual transmission, you
shift to a gear that is too high, and as a
result the engine speed is too low.
R on vehicles with automatic transmission,
you shift into position Nwhile driving.
If cruise control is deactivated, you will hear
a warning tone. You will see the Cruise Cruise
control off
control off message in the multifunction
display for approximately five seconds.
i The last speed stored is cleared when you
switch off the engine. Driving systems
175Driving and parking Z
Page 180 of 381
If it is not, press the cruise control lever in
the direction of arrow
A.
LIM indicator lamp ;in the cruise control
lever lights up. Variable SPEEDTRONIC is
selected. G
WARNING
If there is a change of drivers, advise the new
driver of the limit speed stored.
Only use variable SPEEDTRONIC if you will not
have to accelerate suddenly to a speed above
that stored as the limit speed. You could oth-
erwise cause an accident.
You can only exceed the limit speed stored if
you deactivate variable SPEEDTRONIC:
R using the cruise control lever
R by depressing the accelerator pedal
beyond the pressure point (kickdown)
It is not possible to deactivate variable
SPEEDTRONIC by braking.
Storing the current speed
Storing the current speed and call up the
last stored speed G
WARNING
Only select a stored speed if you know what
that speed is and whether it is suitable for the
current driving and traffic situation. Other-
wise, sudden braking could endanger you or
others.
X Briefly pull the cruise control lever towards
you =.
Making adjustments in 1 km/h incre-
ments
X Briefly press the cruise control lever to the
pressure point, up :for a higher speed or
down ?for a lower speed.
or
X Keep the cruise control lever pressed to the
pressure point until the desired speed is
set. Press the cruise control lever up :for
a higher speed or down ?for a lower
speed. Making adjustments in 10 km/h incre-
ments
X
Briefly press the cruise control lever
beyond the pressure point, up :for a
higher speed or down ?for a lower speed.
or
X Keep the cruise control lever pressed
beyond the pressure point until the desired
speed is set. Press the cruise control lever
up : for a higher speed or down ?for a
lower speed.
Deactivating variable SPEEDTRONIC
There are several ways to deactivate variable
SPEEDTRONIC:
X Briefly press the cruise control lever for-
wards B.
or
X Briefly press the cruise control lever in the
direction of arrow A.
LIM indicator lamp ;in the cruise control
lever goes out. Variable SPEEDTRONIC is
deactivated.
Cruise control is selected.
Variable SPEEDTRONIC is automatically
deactivated if:
R you depress the accelerator pedal beyond
the pressure point (kickdown), but only if
your current speed does not differ by more
than 20 km/h from the stored speed. You
will hear a warning tone if this is the case.
R on vehicles with manual transmission, if
you shift to a higher gear and as a result,
the engine speed is too low. G
WARNING
It is not possible to deactivate variable Speed-
tronic by braking.
i The last speed stored is cleared when you
switch off the engine. Driving systems
177Driving and parking Z
Page 182 of 381
Always pay attention to traffic conditions
even when DISTRONIC PLUS is activated.
Otherwise, you may fail to recognise dangers
in time, cause an accident and injure yourself
and others.
The radar sensor system is switched off auto-
matically in the vicinity of radio telescope
facilities (Y page 375).
If you want DISTRONIC PLUS to assist you,
the radar sensor system must be activated
(Y page 242) and operational.
If there is no vehicle in front, DISTRONIC
PLUS operates in the same way as cruise
control in the speed range between
30 km/h and 200 km/h. If a vehicle is driving
in front of you, DISTRONIC operates in the
speed range between 0 km/h and
200 km/h.
Do not use DISTRONIC PLUS on roads with
steep gradients. G
WARNING
DISTRONIC PLUS brakes your vehicle up to a
maximum of 4 m/s 2
depending on its speed.
This corresponds to approximately 40% of
your vehicle's maximum braking power. You
must also apply the brakes yourself if this
braking power is not sufficient.
If DISTRONIC PLUS detects a risk of collision
with a vehicle in front, an intermittent warning
tone sounds. In addition, the ·distance
warning lamp in the instrument cluster lights
up. Brake to avoid a collision.
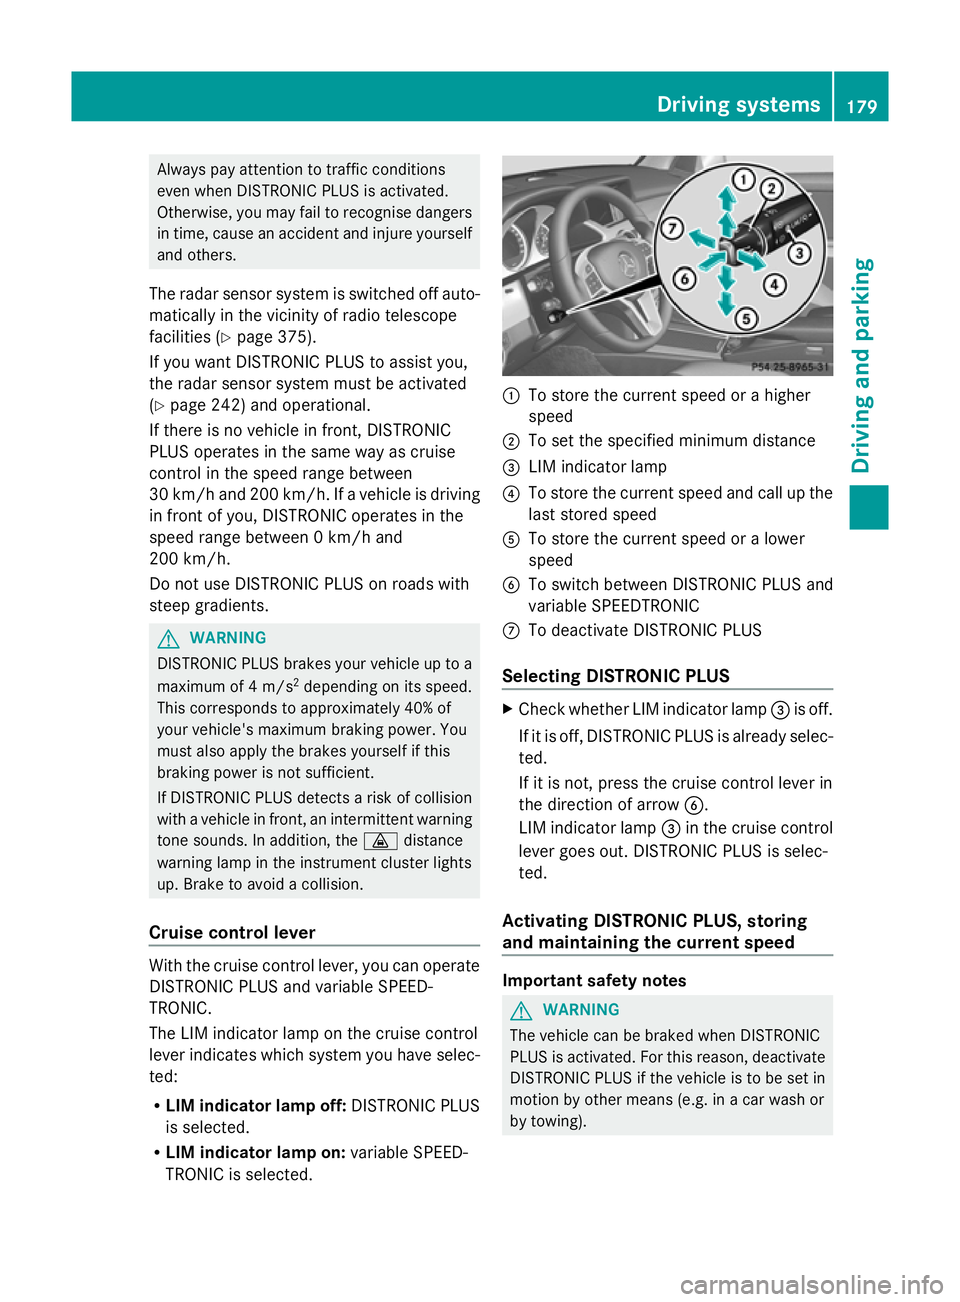
Cruise control lever With the cruise control lever, you can operate
DISTRONIC PLUS and variable SPEED-
TRONIC.
The LIM indicator lamp on the cruise control
lever indicates which system you have selec-
ted:
R
LIM indicator lamp off: DISTRONIC PLUS
is selected.
R LIM indicator lamp on: variable SPEED-
TRONIC is selected. :
To store the current speed or a higher
speed
; To set the specified minimum distance
= LIM indicator lamp
? To store the current speed and call up the
last stored speed
A To store the current speed or a lower
speed
B To switch between DISTRONIC PLUS and
variable SPEEDTRONIC
C To deactivate DISTRONIC PLUS
Selecting DISTRONIC PLUS X
Check whether LIM indicator lamp =is off.
If it is off, DISTRONIC PLUS is already selec-
ted.
If it is not, press the cruise control lever in
the direction of arrow B.
LIM indicator lamp =in the cruise control
lever goes out. DISTRONIC PLUS is selec-
ted.
Activating DISTRONIC PLUS, storing
and maintaining the current speed Important safety notes
G
WARNING
The vehicle can be braked when DISTRONIC
PLUS is activated. For this reason, deactivate
DISTRONIC PLUS if the vehicle is to be set in
motion by other means (e.g. in a car wash or
by towing). Driving systems
179Driving and parking Z
Page 188 of 381
or
X
Briefly press the cruise control lever in the
direction of arrow =.
Variable SPEEDTRONIC is selected. LIM
indicator lamp ;in the cruise control lever
lights up.
When you deactivate DISTRONIC PLUS, you
will see the DISTRONIC PLUS off DISTRONIC PLUS off message
in the multifunction display for approximately
five seconds.
i The last speed stored remains stored until
you switch off the engine.
DISTRONIC PLUS is automatically deactiva-
ted if:
R you engage the parking brake.
R you are driving slower than 25 km/h and
there is no vehicle in front, or if the vehicle
in front is no longer detected.
R ESP ®
intervenes or you deactivate ESP ®
.
R the transmission is in the P,Ror Nposition.
R the vehicle is near a radio telescope facility
(Y page 375).
R you switch off the radar sensor system
(Y page 242).
R you pull the cruise control lever towards
you in order to pull away, and the front-
passenger door or one of the rear doors is
open.
R the vehicle has skidded.
If DISTRONIC PLUS is deactivated, you will
hear a warning tone. You will see the DIS‐
DIS‐
TRONIC TRONIC PLUS
PLUSoff
offmessage in the multifunc-
tion display for approximately five seconds.
If the vehicle has been stopped by DISTRONIC
PLUS and a fault occurs in the system, the
Brake Brake immediately
immediately message appears in the
multifunction display. Depress the brake
pedal immediately so that the vehicle does
not roll away. DISTRONIC PLUS is then deac-
tivated, and the message disappears. Tips for driving with DISTRONIC PLUS General notes
The following contains descriptions of certain
road and traffic conditions in which you must
be particularly attentive. In such situations,
brake if necessary. DISTRONIC PLUS is then
deactivated.
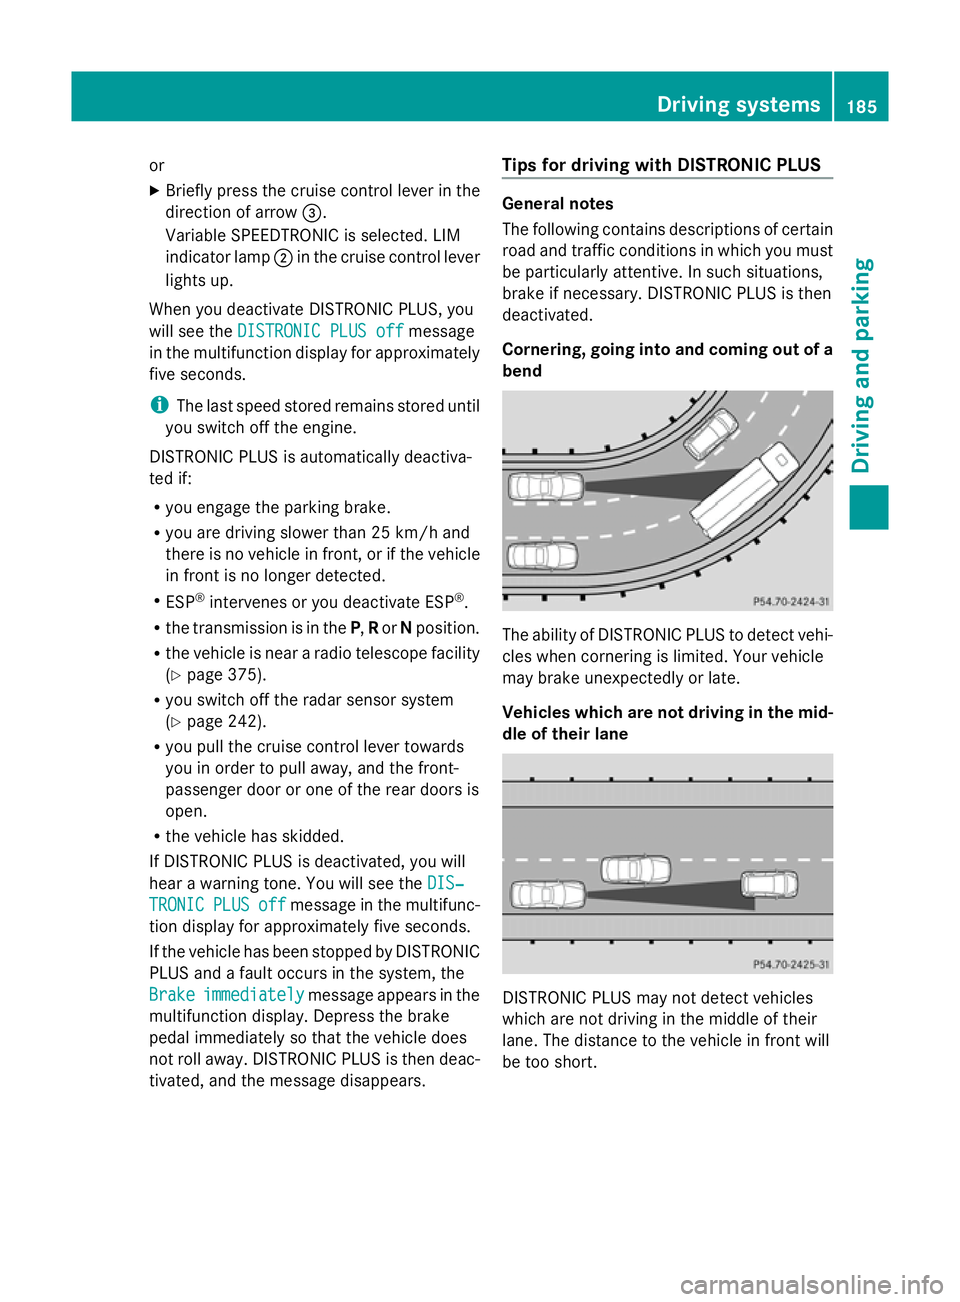
Cornering, going into and coming out of a
bend
The ability of DISTRONIC PLUS to detect vehi-
cles when cornering is limited. Your vehicle
may brake unexpectedly or late.
Vehicles which are not driving in the mid-
dle of their lane
DISTRONIC PLUS may not detect vehicles
which are not driving in the middle of their
lane. The distance to the vehicle in front will
be too short. Driving systems
185Driving and parking Z
Page 189 of 381
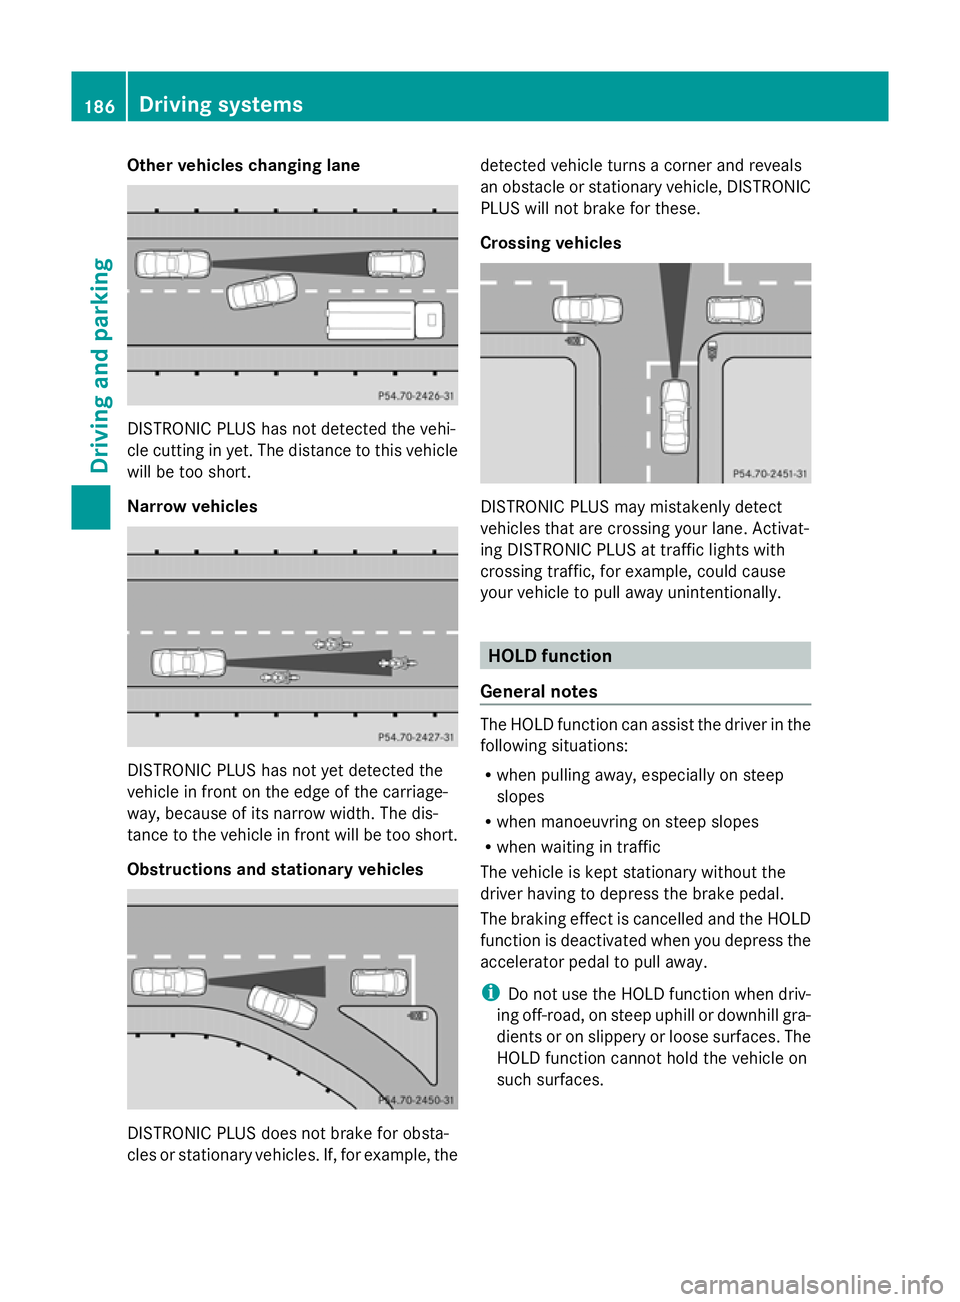
Other vehicles changing lane
DISTRONIC PLUS has not detected the vehi-
cle cutting in yet. The distance to this vehicle
will be too short.
Narrow vehicles DISTRONIC PLUS has not yet detected the
vehicle in front on the edge of the carriage-
way, because of its narrow width. The dis-
tance to the vehicle in front will be too short.
Obstructions and stationary vehicles DISTRONIC PLUS does not brake for obsta-
cles or stationary vehicles. If, for example, the detected vehicle turns a corner and reveals
an obstacle or stationary vehicle, DISTRONIC
PLUS will not brake for these.
Crossing vehicles
DISTRONIC PLUS may mistakenly detect
vehicles that are crossing your lane. Activat-
ing DISTRONIC PLUS at traffic lights with
crossing traffic, for example, could cause
your vehicle to pull away unintentionally.
HOLD function
General notes The HOLD function can assist the driver in the
following situations:
R
when pulling away, especially on steep
slopes
R when manoeuvring on steep slopes
R when waiting in traffic
The vehicle is kept stationary without the
driver having to depress the brake pedal.
The braking effect is cancelled and the HOLD
function is deactivated when you depress the
accelerator pedal to pull away.
i Do not use the HOLD function when driv-
ing off-road, on steep uphill or downhill gra-
dients or on slippery or loose surfaces. The
HOLD function cannot hold the vehicle on
such surfaces. 186
Driving systemsDriving and parking
Page 193 of 381
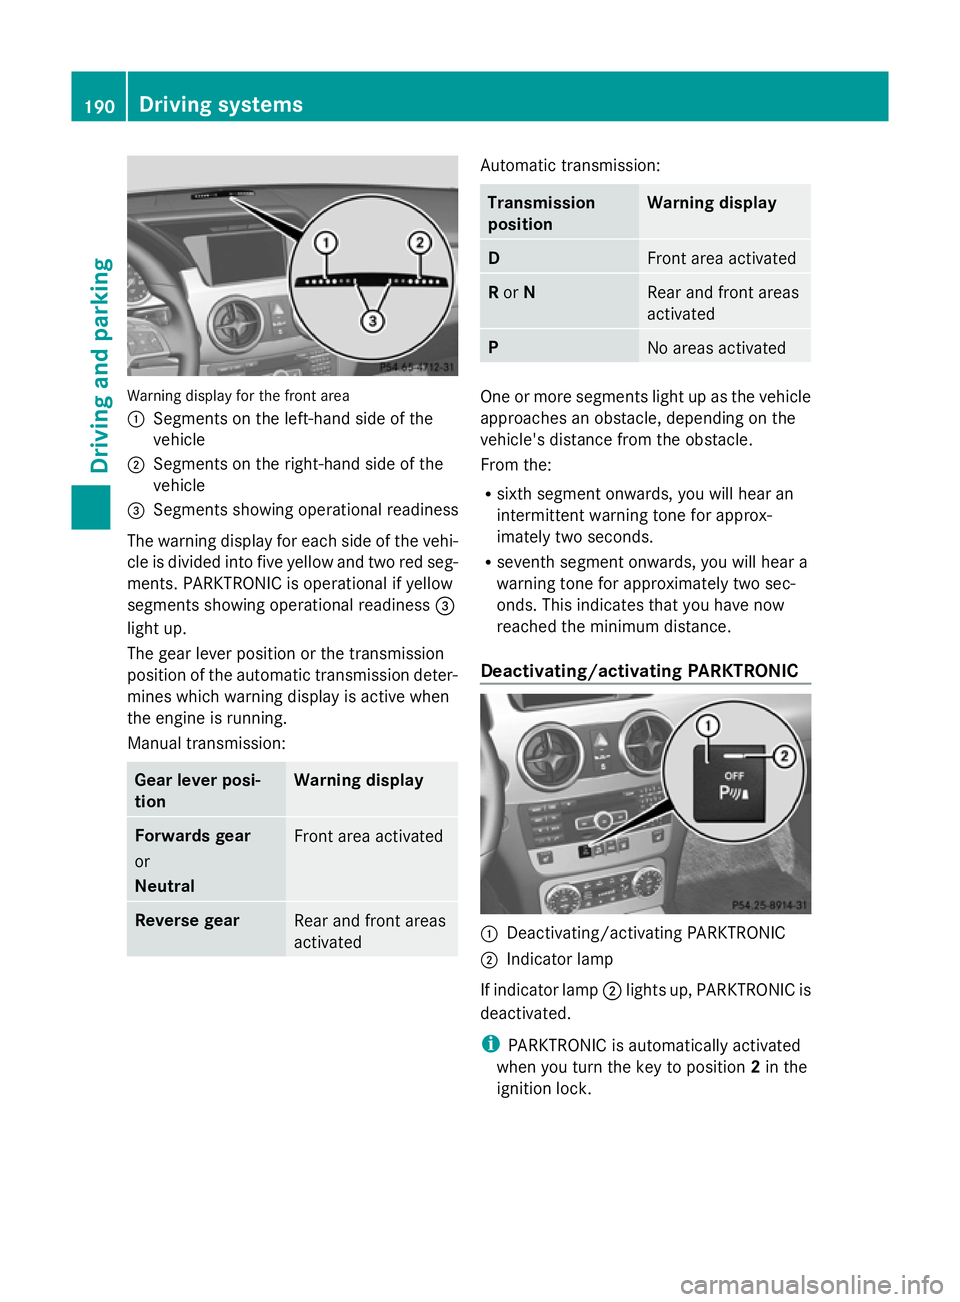
Warning display for the front area
:
Segments on the left-hand side of the
vehicle
; Segments on the right-hand side of the
vehicle
= Segments showing operational readiness
The warning display for each side of the vehi-
cle is divided into five yellow and two red seg-
ments. PARKTRONIC is operational if yellow
segments showing operational readiness =
light up.
The gear lever position or the transmission
position of the automatic transmission deter-
mines which warning display is active when
the engine is running.
Manual transmission: Gear lever posi-
tion Warning display
Forwards gear
or
Neutral
Front area activated
Reverse gear
Rear and front areas
activated Automatic transmission:
Transmission
position Warning display
D
Front area activated
R
or N Rear and front areas
activated
P
No areas activated
One or more segments light up as the vehicle
approaches an obstacle, depending on the
vehicle's distance from the obstacle.
From the:
R
sixth segment onwards, you will hear an
intermittent warning tone for approx-
imately two seconds.
R seventh segment onwards, you will hear a
warning tone for approximately two sec-
onds. This indicates that you have now
reached the minimum distance.
Deactivating/activating PARKTRONIC :
Deactivating/activating PARKTRONIC
; Indicator lamp
If indicator lamp ;lights up, PARKTRONIC is
deactivated.
i PARKTRONIC is automatically activated
when you turn the key to position 2in the
ignition lock. 190
Driving systemsDriving and parking
Page 195 of 381
Problems with PARKTRONIC
Problem Possible causes/consequences and
M
MSolutions Only the red segments
in the PARKTRONIC
warning displays are lit.
You also hear a warning
tone for approximately
two seconds.
PARKTRONIC is deacti-
vated after approx-
imately five seconds,
and the indicator lamp
in the PARKTRONIC
button lights up. PARKTRONIC has malfunctioned and has switched off.
X
If problems persist, have PARKTRONIC checked at a qualified
specialist workshop. Only the red segments
in the PARKTRONIC
warning displays are lit.
PARKTRONIC is deacti-
vated after approx-
imately five seconds. The PARKTRONIC sensors are dirty or there is interference.
X
Clean the PARKTRONIC sensors (Y page 321).
X Switch the ignition back on. The problem may be caused by an external source of radio or
ultrasound waves.
X
See if PARKTRONIC functions in a different location. Active Parking Assist
Important safety notes Active Parking Assist is an electronic parking
aid with ultrasound. Ultrasound is used to
measure the road on both sides of the vehicle.
A suitable parking space is indicated by the
parking symbol. Active steering intervention
can assist you during parking. You may also
use PARKTRONIC (Y page 188). When PARK-
TRONIC is switched off, Active Parking Assist
is also unavailable. G
WARNING
Active Parking Assist is merely an aid and may
sometimes recommend parking spaces that
are not suitable for parking. For example,
these might be spaces where parking is pro-
hibited, driveways, unsuitable surfaces, etc.
Active Parking Assist measures the parking
space as you drive past it. Any later changes to the parking space are not taken into
account. For instance, this may be the case
when the vehicle parked in front of or behind
the space changes its position or when an
obstacle is moved into the parking space.
Active Parking Assist does not relieve you of
the responsibility of paying attention. If you
rely solely on Active Parking Assist, you could
cause an accident and injure yourself and oth-
ers.
You are always responsible for safety and
must continue to pay attention to your imme-
diate surroundings when parking and
manoeuvring. G
WARNING
Objects located above the height range of
Active Parking Assist will not be detected
when the parking space is measured. These
are not taken into account when the parking 192
Driving systemsDriving and parking