2012 MERCEDES-BENZ GL SUV lights
[x] Cancel search: lightsPage 186 of 441

Engaging/releasing manually
X
To engage: push handle :.
When th eelectric parking brak eis
engaged ,the ! redi ndicator lamp lights
up in the instrumen tcluster.
i The electric parking brak ecan also be
applied when the key is removed.
X To release: pull handle:.
The red !indicator lamp in the inst ru-
ment cluster goe sout.
i The electric parking brake can only be
released:
R when the key is in position 1in the igni-
tion lock or
R the ignition was switched on using the
Start/Stop button.
To ensure that you do not roll backwards
when pulling away on an uphill slope, engage
the electric parking brake (Y page 162).
Engagin gautomatically Th
ee lectric parkin gbrake is engaged auto-
matically:
R if DISTRONIC PLUS brings th evehicle to a
standstill or
R if the HOL Dfunction is keeping the vehicle
stationary In addition, at least one of the following con-
ditions must be fulfilled:
R
the engine is switched off.
R the driver' sdoor is open and the seat belt
is not fastened.
R the vehicle is stationar yfor alengthy
period.
The red !indicator lam pint he inst rument
cluster lights up.
i Thee lectric parkin gbrake is not automat-
icall yapplied if the engine is switched off
by the ECO star t/stopfunction.
Releasing automatically The electric parking brake is released auto-
matically when all of the following conditions
are fulfilled:
R
the engine is running.
R the transmissio nisinp osition Dor R.
R the seat belt is fastened.
R you depress the accelerator pedal.
If the transmission is in position R,the boot
lid must be closed.
If your seat belt is not fastened, the following
conditions must be fulfilled to automatically
release the electric parkin gbrake:
R thed river's door is closed
R yo uh ave shifted out of transmission posi-
tion Por you have previously driven faster
than 3km/h
Emergenc ybraking Parking
183Drivingand pa rking Z
Page 193 of 441

Checklist after driving off-road
!
If you detect damag etothe vehicl eafter
dri ving off-road, have the vehicle checked
immediately at aqualified specialist work-
shop.
X Vehicles with th eON&O FFROAD pack-
age: activat ethe on-road program
(Y page 253).
X Vehicles without th eON&O FFROAD
package: deactivate the on- road program
(Y page 252).
X Deac tivate the LOW RANGE off-roa dgear
(Y page 254).
X Deactiva teDS R(Ypage 251).
X Lowe rthe vehicle level again to alevel suit-
able to the road conditions, e.g. to the high-
way/high-speed level.
X Clean the headlamps and rear lights and
check for damage.
X Clean the front and rear licence plates.
X Clean the wheels/tyres with awater jet and
remove any foreign objects.
X Clea nthe wheels, wheel arches and the
vehicle underside with awater jet; check
for any foreign objects and damage.
X Check whethe rtwigs or other parts of
plants have become trapped. These
increase the risk of fire and can damage
fuel pipes, brake hose sorthe rubber bel-
lows of the axl ejoint sand propeller shafts.
X After the trip, examine without fail the
entire undercarriage, wheels ,tyres, brakes,
bodywork structure, steering, chassis and
exhaus tsystem for damage.
X After driving for extended period sacross
sand ,mud, gravel, water or in similarly dirty
conditions, have the brake discs, wheels,
brake pads/lining sand axle joints checked
and cleaned.
X If you detect strong vibrations after off-road
travel, check for foreig nobject sinthe
wheels and drive train and remove them if
necessary. Foreign objec ts candisturb the
balance and cause vibrations. Driving over rough terrain places greater
demands on your vehicle than drivin
gonnor-
ma lroads. Af terd riving off- road, check the
vehicle. This allow syou to detec tdamage
promptly and reduce the risk of an accident
to yourself and other road users.
Driving on sand Observe the following rules when driving on
sand:
R
vehicle swith the ON&OFFROAD pack-
age: select off- road program 1
(Y page 253).
R vehicle swithou tthe ON&OFFROAD
package: select theoff-road program
(Y pag e252).
R select ahigher vehicle level.
R select ashift range appropriate to the ter-
rain.
R drive quickly to overcom ethe rolling resist-
ance. Otherwise, the vehicle' swheels
could becom estuck in loose ground.
R drive in the track sofother vehicle sifpos-
sible. Make sure that:
- the tyr eruts are not too deep.
- the sand is sufficiently firm.
- the ground clearance of the vehicle is
sufficient.
Tyr eruts and gravel roads !
Check that th eruts are not too deep and
that your vehicle has sufficient clearance.
Otherwise, your vehicle could be damaged
or bottom out and get stuck.
Observe the following rules when driving
along ruts in off-road terrain or on roads with
loos egravel:
R Activate th eoff-road program
(Y pag e252).
R Vehicle swith the AIRMATIC package:
select araised vehicle level.
R Avoid high engine speeds.
R Restrict the shift range to 1.190
Driving tipsDriving and parking
Page 198 of 441

Setting
aspeed X
Press the cruise control lever up :for a
high er spee dordown;for alower speed.
X Keep the cruise contr ol leverpresse duntil
the desired speed is reached.
X Release the cruise contro llever.
The new speed is stored.
X Setting in 1-k m/hincrements: press the
cruise control lever up :or down ;to
the pressur epoint.
The last speed stored is inc reased or
reduced in 1km/ hincrements.
X To adjust the set speed in 10-km/h
increments: pressthe cruise contr ol lever
briefl yup: or down ;beyon dthe pres-
sur epoint.
The last speed stored is inc reased or
reduced in 10 km/ hincrements.
i Cruise contro lisnot deactivated if you
depress the accelerator pedal. For exam-
ple, if you accelerate briefly to over take,
cruise control adjusts the vehicle's speed
to the last speed stored after you have fin-
ished overtaking. Deactivating cruise control There are several ways to deacti
vate cruise
control:
X Briefly press the cruise control lever for-
wards =.
or
X Brake
or
X Briefly press the cruise control lever in the
direction of arrow ;.
Variable SPEEDTRONIC is selected. LIM
indicator lamp :in the cruise control lever
lights up.
Cruise control is automatically deactivated if:
R you engag ethe electric parkin gbrake.
R yo ua re driving at less than 30 km/h.
R ESP ®
intervenes or yo udeactiva teESP ®
.
R you activate DSR.
R you activate off-road program 2onvehicles
with the ON&OFFROA Dpackage.
R you shift the transmissio ntoposition N
while driving.
If cruise control is deactivated, you will hear
aw arning tone. You will see the Cruise contro
loff message in th
emultifunction
display for approximately five seconds.
i The last spee dstored is cleared when you
switch off the engine. Drivin
gsystems
195Drivingand parking Z
Page 202 of 441
G
WARNING
DISTRONIC PLUS canno ttake account of road
and traffic conditions. If DISTRONI Cdoes not
recognise or no longer recognises the vehicle
in front, do not activate DISTRONIC or, if it is
alr eady active, deactivate it. This is especially
the case:
R befor ecorners
R on filter lanes
R when changing to alane with faster moving
traffic
R in comple xdriving situations or where lanes
are diverte d,e.g. at roadworks on amotor-
way
DISTRONIC PLU Sotherwise maintains the
current spe ed setbyyou or accelerates up to
the set speed.
DISTRONIC PLU Scannot take account of
weather conditions. Deactivate, or do not
activate, DISTRONI CPLUS:
R if th eroads are slippery, snow-covered or
icy .The wheels coul dlose their grip when
brakin goraccelerating .The vehicle could
star ttos kid.
R if the sensors are dirty or there is poo rvis-
ibility, e.g. due to snow, rain or fog. Dis-
tance control may be impaired.
Always pay attention to traffic conditions
even when DISTRONIC PLU Sisactivate d.
Otherwise, you ma yfail to recognise dangers
in time, caus eanaccident and injure yourself
and others. G
WARNING
DISTRONIC PLUS brake syourvehicle up to a
maximu mof4m /s2
depending on its speed.
This corresponds to approximately 40% of
your vehicle's maximum braking power. You
must als oapply the brakes yourself if this
braking power is not sufficient.
If DISTRONI CPLUS detect sarisk of collision
with avehicle in front, an intermit tent warning
tone sounds. In addition, the ·distance
warning lamp in the instrument cluste rlights
up. Brak etoavoidac ollision. G
WAR
NING
The vehicle can be braked when DISTRONIC
PLUS is activated. For this reason, deactivate
DISTRONIC PLUS if the vehicle is to be set in
motion by othe rmeans (e.g. in acar wash or
by towing).
The radar senso rsystem is switched off auto-
matically in the vicinity of radio teles cope
facilities (Y page 433).
If you want DISTRONIC PLUS to assist you,
the radar sensor syste mmust be activated
(Y page 283 )and operational.
General notes DISTRONIC PLUS regulates the speed and
automati
cally helps you maintain the dis-
tanc etot he vehicle detected in front. DI S-
TRONIC PLU Sbrake sautomatically so that
the set spee disnot exceeded.
On long and steep downhil lgradients, espe-
ciall yifthe vehicle is laden or towing atrailer,
yo um ust select shift range 1,2or 3in good
time. By doing so, you will make use of the
braking effec tofthe engine. This relieves the
load on the brake system and prevents the
brakes from overheating and wearing too
quickly.
If DI STRONIC PLUS detects aslower-moving
vehicle in front ,your vehicle is braked in order
to maintain the preset distance to the vehicle
in front.
If ther eisnov ehicle in front ,DISTRONIC
PLUS operate sinthe sam eway as cruise
control in the spee drange between
30 km/h and 200 km/h. If avehicle is driving
in fron tofyou, DI STRONIC operates in the
speed range betwee n0km/h and
200 km/h.
Do not us eDISTRONIC PLUS on roa dswith
steep gradients. Driving systems
199Drivinga nd parking Z
Page 207 of 441

X
To adjust the se tspee din1k m/h incre-
ments: briefly press the cruise control
lever up :or down ;to the pressure
point.
The last stored speed increase sordecrea-
ses in 1km/ hincrements.
X To adjust the set speed in 10 km/h
increments: briefly pressthe cruise con-
trol lever up :or down ;to beyon dthe
pressur epoint.
The last stored speed inc reases or decrea-
ses in 10 km/ hincrements.
i DISTRONIC PLUS is not deactivated if you
depress the accelerator pedal. If you accel-
erate to overtake, DISTRONIC PLUS
adjusts the vehicle's speed to the last
speed sto reda fter you have finished over-
taki ng.
Setting th especified minimum distance Yo
uc an set the specified minimum distance
for DISTRONIC PLUS by varyin gthe tim espan
betwee none and two seconds. With thi sfun c-
tion, yo ucan set the minimum di stancethat
DISTRONIC PLU Skeep stot he vehi clein
front ,dependent on vehicle speed. You can
see this distanc einthe multifunction display
(Y page 20 5). X
To incre ase: tur nc ontrol ;in direction
=.
DISTRONIC PLU Sthenm aintains agreater
distanc ebetween your vehicle and the
vehicle in front.
X To decrease: turnc ontrol ;in direc-
tion :.
DISTRONIC PL US then maintains ashorter
distanc ebetween your vehicle and the
vehicle in front.
i Make sure that you maintai nasufficient
and safe distance from the vehicle in front.
Adjust the distance to the vehicle in front if
necessary.
Deactivating DISTRONIC PLUS There are several way
stodeactivate DI S-
TRONIC PLUS:
X Briefl ypres sthe cruise con trollever for-
wards :.
or
X Brake, unless the vehicle is stationary.
or
X Briefly press the cruise control lever in the
direction of arrow =.
Variable SPEEDTRONIC is selected. LIM
indicator lamp ;in the cruise control lever
lights up.
When you deactivate DI STRONIC PLUS, you
will see the DISTRONIC PLU Soff message
in th emultifunction displa yfor approximately
fiv es econds. 204
Driving systemsDriving and parking
Page 210 of 441
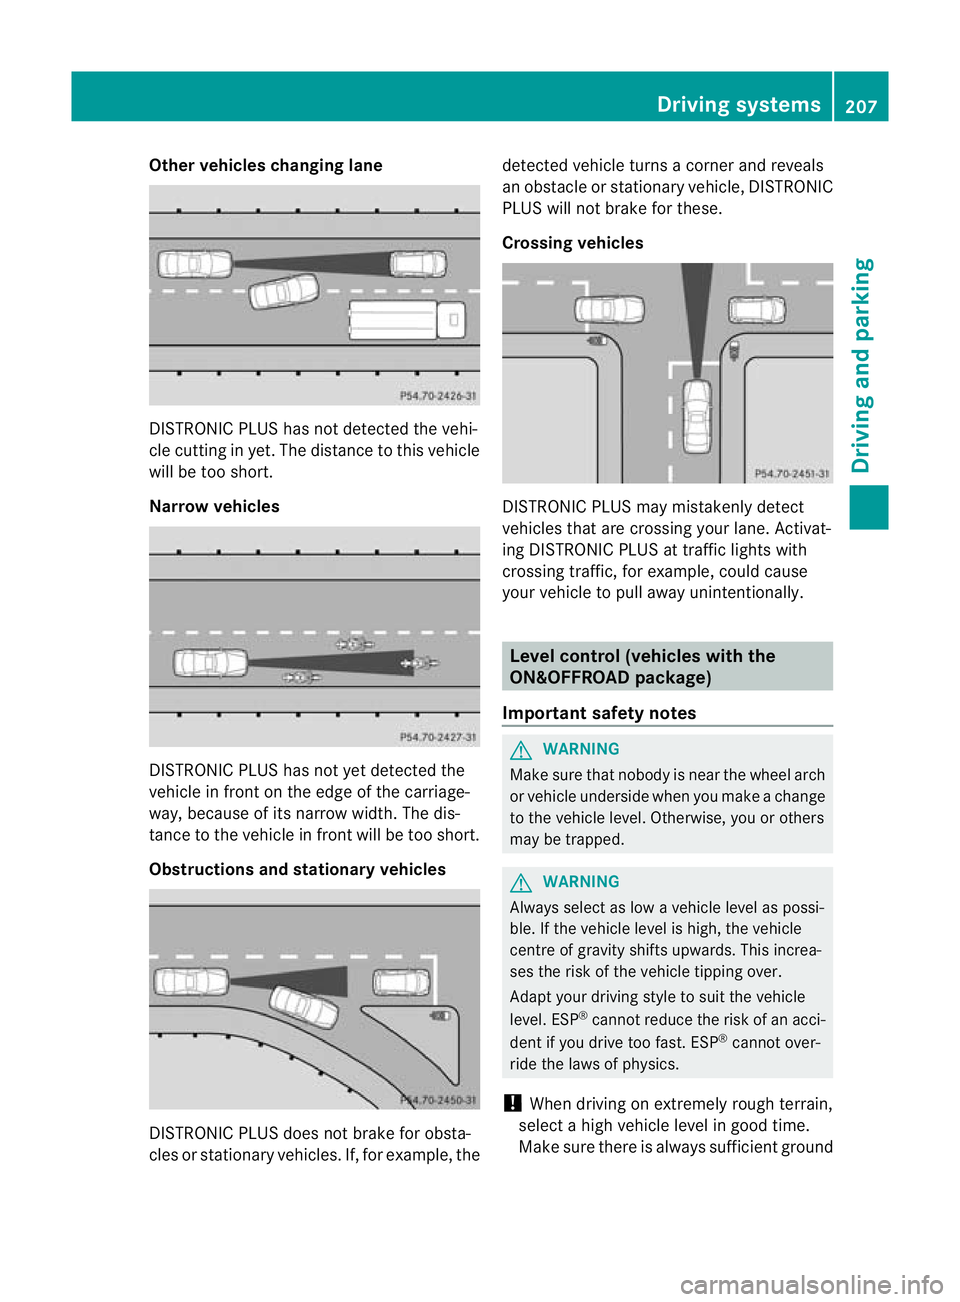
Other vehicles changing lane
DI
ST RONIC PLUS has not detected the vehi-
cle cutting in yet. The distance to this vehicle
will be too short.
Narrow vehicles DISTRONIC PLUS has not yet detected the
vehicle in fron tonthe edge of the carriage-
way, because of its narrow width. The dis-
tance to the vehicle in front will be too short.
Obstruction sand sta tionary vehicles DISTRONIC PLUS does not brake for obsta-
cles or stationary vehicles. If, for example, the detected vehicle turns
acorner and reveals
an obstacle or stationar yvehicle, DI STRONIC
PLUS will not brake for these.
Crossin gvehicles DISTRONIC PLUS may mistakenly detect
vehicles that are crossing your lane. Activat-
ing DISTRONIC PLUS at traffic lights with
crossing traffic, for example, could cause
your vehicle to pull away unintentionally.
Level control (vehicles with the
ON&OFFROAD package)
Important safety notes G
WARNING
Make sure that nobody is near the wheel arch
or vehicle underside when you make achange
to the vehicle level. Otherwise, you or others
ma ybet rapped. G
WARNING
Always select as lo wavehicle level as possi-
ble. If the vehicle level is high, the vehicle
centre of gravity shifts upwards. This increa-
ses the risk of the vehicle tippin gover.
Adapt you rdriving style to suit th evehicle
level. ESP ®
cannot reduc ethe risk of an acci-
dent if you drive too fast. ESP ®
cannot over-
rid ethe laws of physics.
! When driving on extremel yrough terrain,
select ahigh vehicle level in good time.
Make sure there is always sufficient ground Drivin
gsystems
207Drivingand pa rking Z
Page 212 of 441
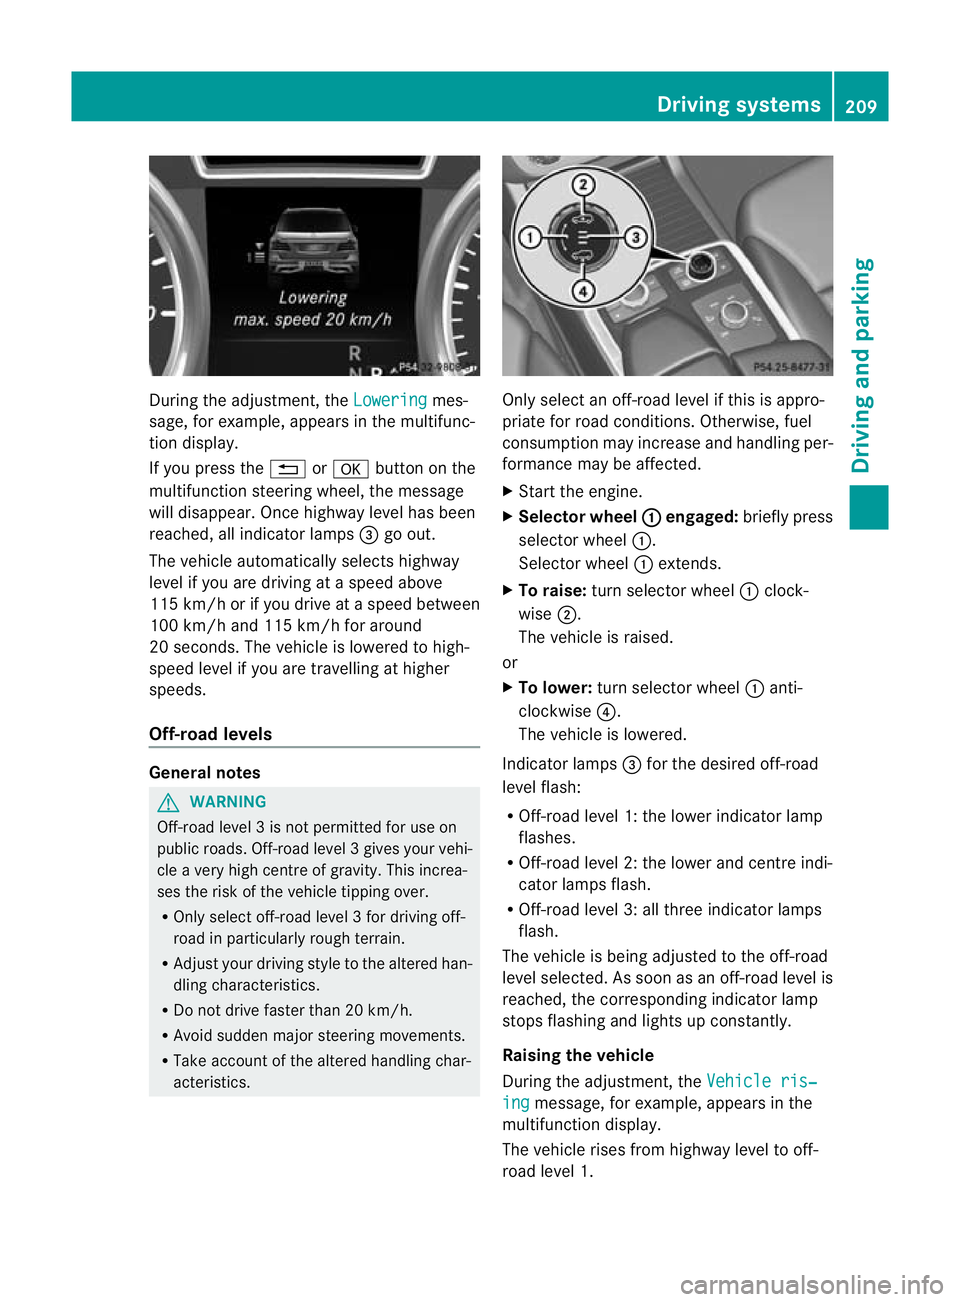
During the adjustment, the
Lowering mes-
sage ,for example, appears in the multifunc-
tion display.
If yo upressthe % ora button on the
multifunction steeri ngwheel, the message
will disappear. Onc ehighway level has been
reached, all indicator lamps =go out.
The vehicle automatically select shighway
level if you are drivin gataspeed above
11 5k m/ horify ou drive at aspeed between
10 0k m/ hand 115 km/h for around
20 seconds. The vehicle is lowered to high-
speed level if you are travelling at higher
speeds.
Off- road levels General notes
G
WARNING
Off-road level 3isn ot permitte dfor use on
public roads. Off -road level 3gives your vehi-
cle avery high centr eofgravity. This increa-
se st he risk of the vehi clet ippin gover.
R Onl yselec toff-road level 3for drivin goff-
road in particularl yrough terrain.
R Adjust your drivin gstyle to the altered han-
dling charac teristics.
R Do not drive faster than 20 km/h.
R Avoid sudden majo rsteering movements.
R Take account of th ealtered handling char-
acteristics. Only select an off-road level if this is appro-
priate for road conditions. Otherwise, fuel
consumption may increase and handling per-
formanc
emay be affected.
X Start the engine.
X Selector wheel : engaged:
briefly press
selector wheel :.
Selector wheel :extends.
X To raise: turn selector wheel :clock-
wise ;.
The vehicle is raised.
or
X To lower: turn selector wheel :anti-
clockwise ?.
The vehicle is lowered.
Indicator lamps =for the desired off-road
level flash:
R Off-road level 1: the lower indicator lamp
flashes.
R Off-road level 2: the lower and centre indi-
cator lamps flash.
R Off-road level 3: all three indicator lamps
flash.
The vehicle is being adjusted to the off-road
level selected .Assoon as an off-road leve lis
reached, th ecorresponding indicator lamp
stops flashing and lights up constantly.
Raising th evehicle
During the adjustment, the Vehicleris‐ ing message
,for example, appear sint he
multifunc tion display.
The vehicle rises from highway leve ltooff-
roa dlevel 1. Driving systems
209Driving and parking Z
Page 218 of 441

If yo
upressthe % ora button on the
multifunction steering wheel, the messa ge
wil ldisappear.
Once highway level has been reached, indi-
cator lamp ;goes out. The beinglow‐ ered messa
gedisappears from the multi-
function display.
The vehicle autom atically adjusts to highway
level when you:
R drive faster than 80 km/ hor
R driv eatas peed between 65 km/ hand
80 km/h for approximatel y20seconds.
Dependin gonthe ADS setting selected
(Y page 212), the vehicle is lowered to high-
speed level at high speeds. AM
GR IDE CONTROL sports suspen-
sion
Vehicl elevel The vehicle automatically sets the vehicle
level at the rear axle. Rea raxle level control
ensures the best poss iblesuspension and
that the ground clearanc eremains const ant
even when the vehicle is loaded .This
improves drivin gsafety and fuel consump-
tion.
Suspensio ntuning General notes
Th
ee lectronically controlled damping system
works continuously. This improves driving
safety and ride comfort.
The damping is tuned individually to each
wheel and depends on:
R your drivin gstyle, e.g. sporty
R the road surface conditio n,e.g .bum ps
R your individual selection of Sport, Sport +
or Comfort
If you select Sport or Sport +mode and
restar tthe engine, the suspension setting
revert stoComfort mode. Spor
tmode The firmer suspension tuning in Sport mode
ensures even better contact with the road.
Select this mode when employing
asporty
driving style, e.g. on windin gcountry roads.
X Press the :button once.
Indica torlamp ;lights up. You have selec-
ted Sport mode.
The AMGR ide Control SPORT message
appears in th emultifunction display.
Sport +mode
The very firm settin gofthe suspension tuning
in Spor t+mode ensures the best possible
con tact with the road .Select this mode only
when driving on rac ecircuits.
If indicator lamps =and ;are off:
X Press button :twice.
Indicator lamps =and ;light up. You
have selected Sport +mode.
The AMG Ride Control SPORT + message
appear sint he multifunc tion display.
If indicator lamp ;lights up:
X Press the :button once.
Secon dindicato rlamp =lights up. You
have selected Sport +mode.
The AMG Ride Control SPORT + message
appear sint he multifunc tion display.
Comfort mode
In comfor tmode, the drivin gcharacteristics
of your vehicle ar emore comfortable .There-
fore, selec tthis mode if you prefer amore Driving systems
215Driving and parking Z