2012 MERCEDES-BENZ GL SUV lights
[x] Cancel search: lightsPage 71 of 441

In this situation, ESP
®
assist syou and can
detec tifthe vehicle/trailer combination
begins to lurch. ESP ®
slows the vehicle down
by brakin gand limiting the engine outp ut until
the vehicle/trailer combinatio nhas stabi-
lised.
Trailer stabilisation is active above speeds of
about 60 km/h.
Trailer stabilisation does not work if ESP ®
is
deactivated or disabled because of amal-
function.
Crosswin dAssist Strong crosswinds can cause your vehicle to
deviate from astraight course. The crosswind
driving assistance function integrated into
ESP ®
significantly reduces thes eeffects.
ESP ®
intervene sautomatically according to
the direction and intensity of the crosswinds
affecting your vehicle.
When driving on straight roads or gentle
bends ,your vehicle is kept safel yonc ourse
by astabilising brake intervention.
Crosswind driving assistance is active above
av ehicle speed of 80 km /h.
Crosswind driving assistance does not work
if ESP ®
is deactivated or disabled because of
am alfunction. EBD (electronic brake force distribu-
tion)
i Observe the "Importan tsafety notes" sec-
tion (Y page 61). G
WARNING
If EBD has malfunctioned, the rear wheels can
still lock, e.g. under full braking. This increa-
ses the risk of skidding and an accident.
You should therefor eadapt your driving style
to the different handling characteristics. Have
the brak esystem checked at aqualified spe-
cialist workshop. Observe information regarding indicator and
warning lamps (Y
page 327) as well as dis-
play messages (Y page 293).
EBD monitors and controls the brake pres-
sure on the rear wheels to improve driving
stability while braking. ADAPTIVE BRAKE
ADAPTIVE BRAKE enhances braking safety
and offers increased braking comfort. In addi-
tion to the braking function, ADAPTIVE BRAKE
also has the HOLD function (Y page 211) and
hill start assist (Y page 162). PRE-SAFE
®
Brake
i Observe the "Important safety notes" sec-
tion (Y page 61).
PRE-SAFE ®
Brake is only available in vehicles
with DISTRONIC PLUS.
PRE-SAFE ®
Brake can help you to minimise
the risk of acollision with avehicle in front or
reduc ethe effect sofsuchacollision .IfPRE-
SAFE ®
Brake has detected arisk of collision,
you will be warned visually and acoustically
as well as by automatic braking. PRE-SAFE ®
Brake cannot prevent acollision withou tyour
interven tion.
This func tion will issue awarning if:
R at speeds of around 30 km/ horm ore over
several seconds, the distance maintained
to the vehicle travellin ginfront is insuffi-
cient.
The · distance warning lamp then lights
up in th einstrument cluster.
R at as peed of approximately 7km/h or
high er,y ou ver yquickly approach avehicle
in front.
An intermittent warning tone will then
sound and the ·distance warning lamp
will light up in the instrumen tcluster. 68
Driving safety systemsSafety
Page 75 of 441

R
the doors are closed.
R the tailgate is closed.
Onl ythen is the tow-away protection
primed.
X Lock the vehicle with the key or KEYLESS-
GO.
Tow-awa yprotectio nisprimedafter
approximately 60 seconds.
Switchin goff X
To switc hoff wit hkey: unlock the vehicle
with the key.
or
X Insert the key into the ignition lock.
Tow-awa yprotectio nisswitched off auto-
matically.
X To switch off with KEYLESS-GO: unlock
the vehicle with KEYLESS-GO.
or
X Press the Start/Stop button on the dash-
board. The key must be inside the vehicle.
Tow-awa yprotectio nisswitched off auto-
matically.
Deactivating X
Remove the key from the ignition lock.
X Press button :.
Indicator lamp ;lights up briefly.
X Lock the vehicle with the key or KEYLESS-
GO.
Tow-awa yprotectio nisdeactivated. Tow-away protec
tion remains deactivated
until:
R the vehicle is unlocked again and
R ad ooriso peneda nd closed agai nand
R the vehicl eislocked again.
To prevent afalse alarm, deactivate the tow-
away protection if yo uloc ky ourv ehicle and
it:
R is being transported
R is being loaded onto aferry or car trans-
porter, for example
R is parked on amovable surface, e.g. in a
split-level garage. Interio
rmotion sensor
Function When the interior motion sensor is primed, a
visual and audible alarm is triggered if move-
ment is detected in the vehicle interior
.This
can occur if someon ereaches into the vehicle
interior, for example.
Activating X
Make sure that:
R
the side windows are closed.
R the hinged side windows are closed.
R the sliding sunroof/panorama sliding
sunroof is closed.
R there are no objects, e.g. mascots, hang-
ing on the rear-view mirror or on the grab
handles on the roof trim.
This will prevent false alarms.
X Make sure that: 72
Anti-theft systemsSafety
Page 82 of 441

X
Push release cat ch: in the direction of
the arrow and at the same time, remove
emergenc ykey element ;from the key. Ba
ttery of the key
Important safety notes G
WARNING
Batteries are toxic and contain caustic sub-
stances. For this reason, keep batteries out of
the reach of children.
If ab attery has been swallowed, visit adoctor
immediately. H
Environment
alnote Bat
teri es contain pollutants.
It is illegal to dispose of them
with the household rubbish.
They must be collec teds ep-
arately and disposed of in an
environmen tally responsible
recycling system. Dispose of batteries in an
environmentally responsible
manner
.Take discharged
batteries to aqualified spe-
cialist workshop or to acol-
lection point for used batter-
ies.
Mercedes-Benz recommends that you have
the batteries replaced at aqualified specialist
workshop. Checking the battery X
Press the &or% button.
The battery is working properly if battery
check lamp :lights up briefly.
The battery is discharge difbattery check
lamp :does not light up briefly.
X Change the battery (Y page 79).
i If the key battery is checked within the
signal reception range of the vehicle, press-
ing the &or% button:
R locks or
R unlocks the vehicle
i You can get abattery at any qualified spe-
cialist workshop.
Replacing the battery You require
aCR20253Vc ell battery.
X Take the emergenc ykey elemen tout of the
key (Y page 78). :
Battery compartment cover
; Emergency key element Key
79Openin gand closing Z
Page 114 of 441

i
Further related subjects:
R EASY-ENT RY/EXIT feature
(Y page 111)
R storing setting s(Ypag e115) Ste
ering wheel heating
Switchin gon/off X
Make sure that the key is in position 2in
the ignition lock.
X To switch on/off: turn the lever in the
direction of arrow :or;.
Indicator lamp =lights up or goe sout.
Vehicles without KEYLESS-GO: when you
remove the key from the ignition lock, the
steering wheel heating is switched off.
Vehicles with KEYLESS-GO: when you switch
off the ignition and open the driver' sdoor, the
steerin gwheel heating is switched off.
Problems wit hthe steering whee lheat-
ing The steerin
gwheel heating has switched
itsel foff prematurely or cannot be switched
on. Th evehicle' selectrical system voltage is
too low because too many electrical consum-
ers are switched on.
X Switc hoff elect rical consumers that you do
not need, such as the rear window heating
or inte rior lighting. EASY-ENTRY/EXIT feature
Important safety notes G
WARNING
Make sur ethat nobody can becom etrapped
when you activate th eEASY-ENTRY/EXI Tfea-
ture.
If there is arisk of someon ebecomin gtrap-
ped, stop th eadjustment procedure. To halt
the procedure:
R press the steerin gcolum nadjustment but-
ton.
R briefly press one of the memory fun ction
position buttons.
The steerin gcolum nstops moving immedi-
ately.
Do not keep the memory function position
button pressed down, otherwise the memory
function will start and the steerin gwheel and
seat will begin to move.
Never leav echildren unsupervised in the vehi-
cle. They coul dopen the driver' sdoor and
thereby unin tentionally activate the EASY-
ENTRY feature and become trapped.
The EASY-ENTRY/EX ITfeature make sgetting
in and out of your vehicle easier.
You can activa teand deactivat ethe EASY-
ENTRY/ EXIT feature in th eon-board com-
puter (Y page285).
Positio nofthe steering whee lwhen the
EASY-ENTRY/EXIT feature is active Th
es teering whee ltilts upwards if you:
R remov ethe key from the ignition lock
R open the driver's door and KEYL ESS-GO is
in position 1
R ope nthe driver's door and the key is in
position 0or 1in the ignition lock
i The steerin gwheel only moves upwards if
it has not already reached the upper end
stop. Steering wheel
111Seats, steering whee land mirrors Z
Page 116 of 441
X
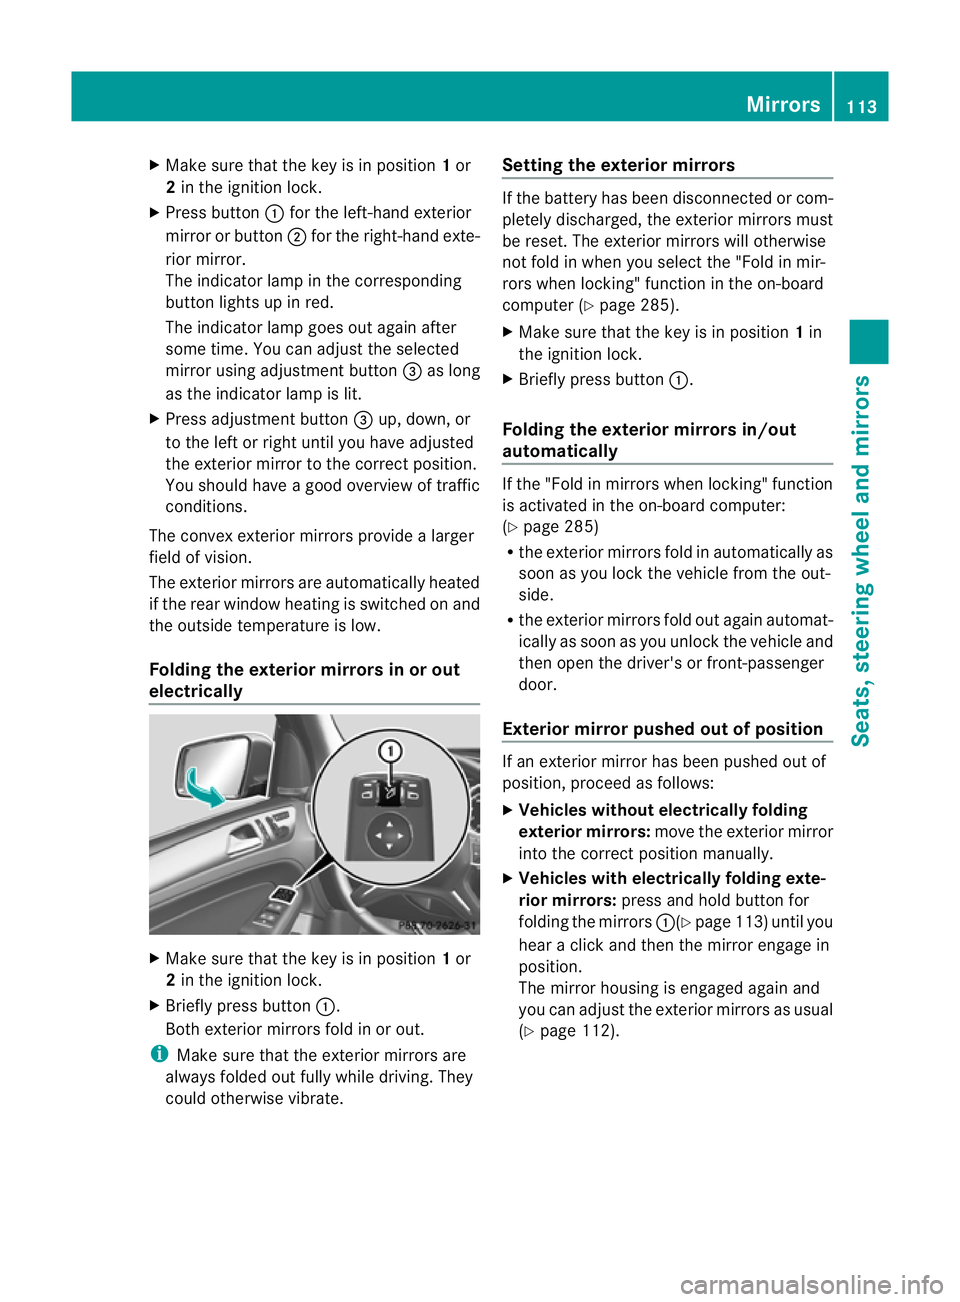
Make sur ethat the key is in position 1or
2 in the ignition lock.
X Press button :for the left-hand exterior
mirror or button ;for the right-hand exte-
rior mirror.
The indicator lam pint he corresponding
button lights up in red.
The indicator lam pgoes out again after
some time. You can adjust the selected
mirror using adjustment button =as long
as the indicator lam pislit.
X Press adjustment button =up, down, or
to the left or right until you have adjusted
the exterior mirror to the correct position.
You should have agood overview of traffic
conditions.
The convex exterior mirror sprovide alarger
field of vision.
The exterior mirrors are automatically heated
if the rear window heating is switched on and
the outside temperature is low.
Folding the exterior mirrors in or out
electrically X
Make sure that the key is in position 1or
2 in the ignition lock.
X Briefly press button :.
Both exterior mirrors fold in or out.
i Make sure that the exterior mirrors are
always folded out fully while driving. They
could otherwise vibrate. Setting the exterior mirrors If the battery has been disconnected or com-
pletely discharged
,the exterior mirrors must
be reset .The exterior mirrors will otherwise
not fol dinwhen you selec tthe "Fold in mir-
ror sw hen locking" func tion in the on-board
computer (Y page 285).
X Make sure that the key is in position 1in
the ignition lock.
X Briefl ypres sbutton :.
Folding the exterior mirrors in/out
automatically If the "Fold in mirrors when locking" function
is activated in the on-board computer:
(Y
page 285)
R the exterior mirrors fold in automatically as
soo nasyou lock the vehicle from the out-
side.
R the exterior mirror sfold out again automat-
ically as soon as you unloc kthe vehicle and
then open the driver's or front-passenger
door.
Exterior mir rorp ushe dout of position If an exterior mirro
rhas been pushe dout of
position, proceed as follows:
X Vehicles without electrically folding
exterior mirrors: move the exterior mirror
into the correct position manually.
X Vehicles with electrically folding exte-
rior mirrors: press and hold button for
folding the mirrors :(Ypage 113 )until you
hea rac lick and then the mirror engage in
position.
The mirror housing is engaged again and
you can adjust the exterior mirrors as usual
(Y page 112). Mirrors
113Seats, steerin gwhee land mirrors Z
Page 120 of 441

Usefu
linfor mation ............................ 118
Exterior lighting ................................ 118
Interior lighting ................................. 126
Replacing bulbs ................................. 128
Windscreen wipers ...........................131 117Lights and windscreen wipers
Page 121 of 441

Usefu
linfor mati on
i This Owner's Manual describes all mod-
els, series and optional equipment for your
vehicle that were available at the time of
going to press. National variation sare pos-
sible. Note that your vehicl emay not be
equippe dwith all of the function sdescri-
bed. This is also the case for system sand
functions relevant to safety.
i Read the information on qualified special-
ist workshops: (Y page25). Exterior lighting
Impo
rtantsafety notes
For reasons of safety, Mercedes-Benz reco m-
mend sthat you drive with the lights switched
on even during the daytime. In some coun-
tries ,operation of the headlamps varies due
to legal requirements and self-imposed obli-
gations. Driving abroad
Gener alnotes If your jour
neyt akes you to countries where
vehicles are driven on the opposite side of the
road to the country in which the vehicle is
registered, your headlamps must be switched
to symmetrical dipped beam as soon as pos-
sible after crossing the border. This prevents
oncoming traffic from being dazzled. Sym-
metrical lights do not illuminate as large an
area of the edge of the carriageway. Vehicles with halogen headlamps X
Turn protective cap :anti-clockwise and
remov eit.
X Push switchover lever ;down.
X Insert protective cap :and turn it clock-
wise.
Conver tthe headlamps bac ktoasymmetrical
dipped beam as soon as possible after return-
ing across the border.
Vehicle swith Intelligent Light System X
Befor ecrossing th eborder ,set the head-
lamps to symmetrical dipped beam and
when returnin gtoasymmetrica ldipped-
beam using the "Dipped-beam headlamps
for drivin gonthe right or left" func tion on
the on-boar dcomputer (Y page 281).
If the headlamps ar econverted to symmetri-
cal dipped beam ,the "motorway mode "and
"extended range foglamps" functions are not
available. Setting the exterior lighting
Setting options Exterior lighting can be set using the:
R
light switch
R combination switch (Y page121)
R on-board compute r(Ypage 280) 118
Exterior lightingLights and windscreen wipers
Page 122 of 441
Light switch
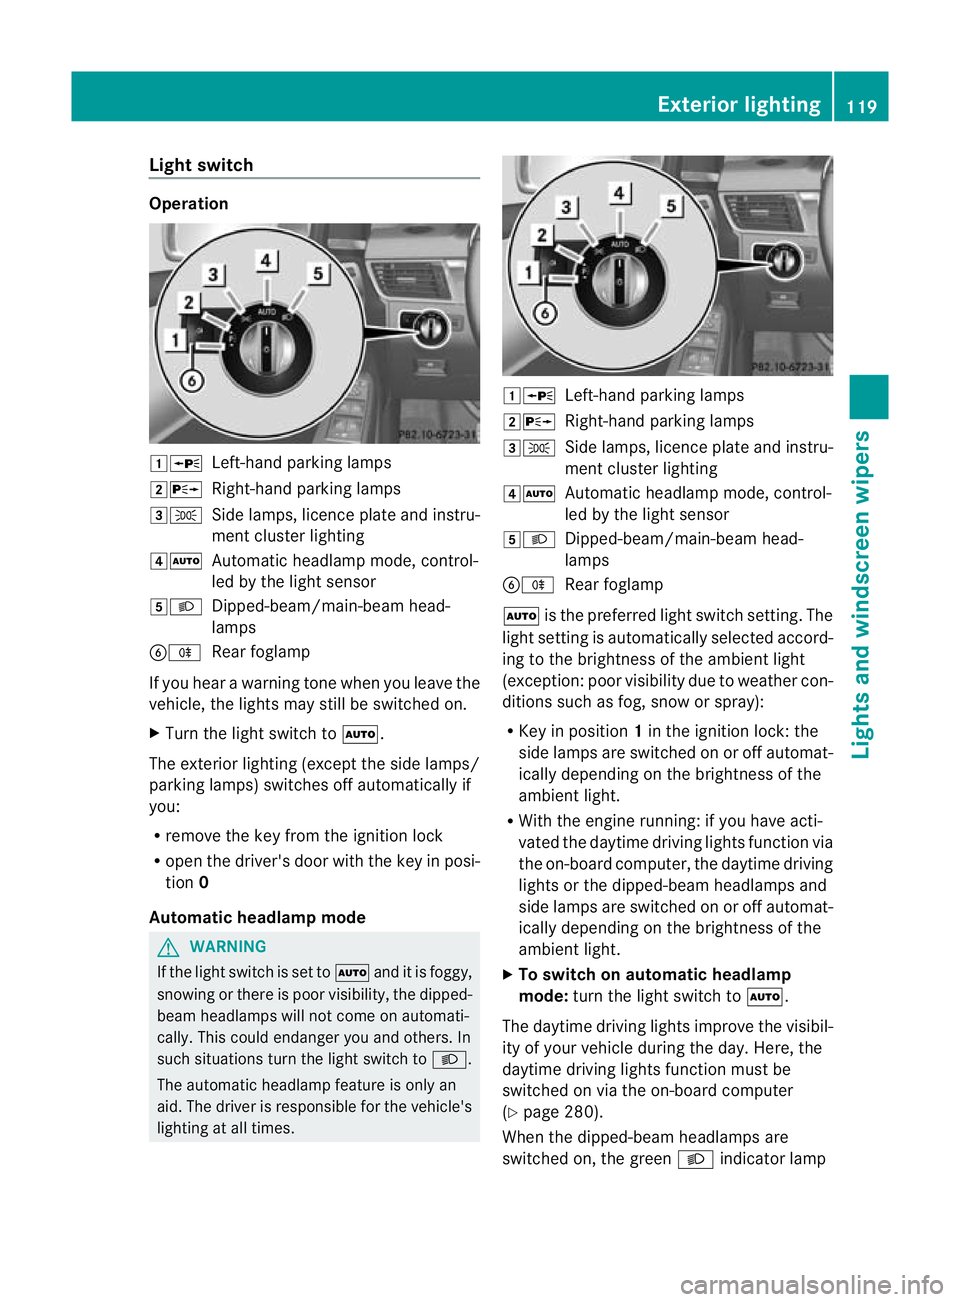
Operation
1W
Left-handparking lamps
2X Right-hand parking lamps
3T Side lamps, licenc eplatea nd instru-
men tcluster lighting
4Ã Automatic headlamp mode, control-
led by the light sensor
5L Dipped-beam/main-beam head-
lamps
BR Rear foglamp
If you hear awarnin gton ew hen you leav ethe
vehi cle, the light smay still be switched on.
X Turn the light switc htoÃ.
The exterior lighting (except the side lamps/
par king lamps )switches off automatically if
you:
R remove the key fro mthe igni tion lock
R open the driv er'sdoor with the key in posi-
tion 0
Automatic hea dlamp mode G
WARNING
If the light switch is se ttoÃand it is foggy,
snowing or ther eispoor visibility, the dipped-
beam headlamps will not com eonautomati-
cally. This could endanger you and others. In
such situations tur nthe light switc htoL .
The automatic headlamp feature is only an
aid. The driver is responsible for the vehicle's
lightin gatall times. 1W
Left-hand parking lamps
2X Right-hand parking lamps
3T Side lamps, licence plate and instru-
ment cluster lighting
4Ã Automatic headlamp mode, control-
led by the light sensor
5L Dipped-beam/main-beam head-
lamps
BR Rear foglamp
à is the preferred light switch setting. The
light setting is automatically selected accord-
ing to the brightness of the ambient light
(exception: poor visibility due to weather con-
ditions such as fog, snow or spray):
R Key in position 1in the ignition lock: the
side lamps are switched on or off automat-
ically depending on the brightness of the
ambient light.
R With the engine running: if you have acti-
vated the daytime driving lights function via
the on-board computer, the daytime driving
lights or the dipped-bea mheadlamps and
side lamps are switched on or off automat-
icall ydepending on the brightness of the
ambient light.
X To switc honautomatic headl amp
mode: turn the ligh tswitch to Ã.
The daytime driving lights improve the visibil-
ity of your vehicle during the day. Here, the
daytime driving lights function must be
switched on via the on-board computer
(Y page 280).
When the dipped-beam headlamps are
switched on, the green Lindicator lamp Exterio
rlighting
119Lights and windscreen wipers Z