2012 MERCEDES-BENZ GL SUV wipers
[x] Cancel search: wipersPage 6 of 441

Index
........................ ............................... 4 Introduction
......................................... 23 At
ag lance ........................................... 27 Safety
................................................... 39 Opening and closing
...........................75 Seats, steering wheel and mirrors
....99 Light
sand windscreen wipers .........117 Clima
tecontrol ................................. 135 Driving and pa
rking .......................... 157 On-boa
rdcomputer and displays ....265 Stowing and fea
tures....................... 337 Maintenance and care
......................359 Breakdown assistance
.....................375 Wheels and ty
res.............................. 395 Technical da
ta................................... 419 Contents
3
Page 25 of 441

LIM (cruis
econtrol) ........................ 193
LI M( DISTRONIC PLUS) ..................200
LIM (variabl eSPEEDTRONI C)......... 196
Overview .................................. 32, 324
PASSENGER AIRBAG OFF ................52
Reserve fuel ................................... 333
Sea tbelt. ....................................... 325
SRS ................................................ 332
Tyr ep ressure monito r................... 336
Warning triangle ................................ 376
Washer fluid Display message ............................ 322
Whee lboltt ightening torque ...........409
Whee lchock ...................................... 405
Wheels Changing/replacing ....................... 404
Ch anging awheel .......................... 404
Ch ecking ........................................ 397
Cleaning ......................................... 369
Cleaning (warning) .........................405
Emergency sp arew heel ................. 414
Fitting anew wheel ........................ 408
Fitting awheel ............................... 405
Important safety notes ..................396
Overview ........................................ 396
Removing awheel .......................... 407
Storin g........................................... 405
Ti gh tening torqu e........................... 409
Whee lsize/tyre size ...................... 409
Windowbag
Display message ............................ 300
Operatio n......................................... 45
Windows
Cleaning ......................................... 369
seeS ide windows
Windscreen
Demisting ...................................... 145
Infrared refl ective .......................... 358
Windscree nwashe rfluid
see Windscreen washer system
Windscreen washer system
Notes ............................................ .430
Topping up ..................................... 364
Windscree nwipers
Problem (malfunction) ...................133
Rea rwindow wiper ........................ 132
Replacing the wipe rblades ............ 132
Switch ingo n/off ........................... 131Winte
rdriving
Genera lnotes ................................ 398
Winte roperation
Overview ........................................ 398
Radi ator cover ............................... 362
Sli pp ery road surf aces ................... 188
Sno wchains .................................. 399
Sno wdrive program ....................... 249
Winte rtyres
Limiting th espee d(on-board com-
puter) ............................................ .283
M+S tyre s...................................... 398
Wipe rblades
Cleaning ...... ................................... 369
Important safety note s.................. 132
Replacing ....................................... 132
Replacing (o nthe rea rwindo w)..... 133
Replacing (windscreen) ..................132
Wooden trim (cleanin ginstruc-
tions) .................................................. 372
Workshop seeQ ualified specialist workshop 22
Index
Page 120 of 441

Usefu
linfor mation ............................ 118
Exterior lighting ................................ 118
Interior lighting ................................. 126
Replacing bulbs ................................. 128
Windscreen wipers ...........................131 117Lights and windscreen wipers
Page 121 of 441

Usefu
linfor mati on
i This Owner's Manual describes all mod-
els, series and optional equipment for your
vehicle that were available at the time of
going to press. National variation sare pos-
sible. Note that your vehicl emay not be
equippe dwith all of the function sdescri-
bed. This is also the case for system sand
functions relevant to safety.
i Read the information on qualified special-
ist workshops: (Y page25). Exterior lighting
Impo
rtantsafety notes
For reasons of safety, Mercedes-Benz reco m-
mend sthat you drive with the lights switched
on even during the daytime. In some coun-
tries ,operation of the headlamps varies due
to legal requirements and self-imposed obli-
gations. Driving abroad
Gener alnotes If your jour
neyt akes you to countries where
vehicles are driven on the opposite side of the
road to the country in which the vehicle is
registered, your headlamps must be switched
to symmetrical dipped beam as soon as pos-
sible after crossing the border. This prevents
oncoming traffic from being dazzled. Sym-
metrical lights do not illuminate as large an
area of the edge of the carriageway. Vehicles with halogen headlamps X
Turn protective cap :anti-clockwise and
remov eit.
X Push switchover lever ;down.
X Insert protective cap :and turn it clock-
wise.
Conver tthe headlamps bac ktoasymmetrical
dipped beam as soon as possible after return-
ing across the border.
Vehicle swith Intelligent Light System X
Befor ecrossing th eborder ,set the head-
lamps to symmetrical dipped beam and
when returnin gtoasymmetrica ldipped-
beam using the "Dipped-beam headlamps
for drivin gonthe right or left" func tion on
the on-boar dcomputer (Y page 281).
If the headlamps ar econverted to symmetri-
cal dipped beam ,the "motorway mode "and
"extended range foglamps" functions are not
available. Setting the exterior lighting
Setting options Exterior lighting can be set using the:
R
light switch
R combination switch (Y page121)
R on-board compute r(Ypage 280) 118
Exterior lightingLights and windscreen wipers
Page 122 of 441

Light switch
Operation
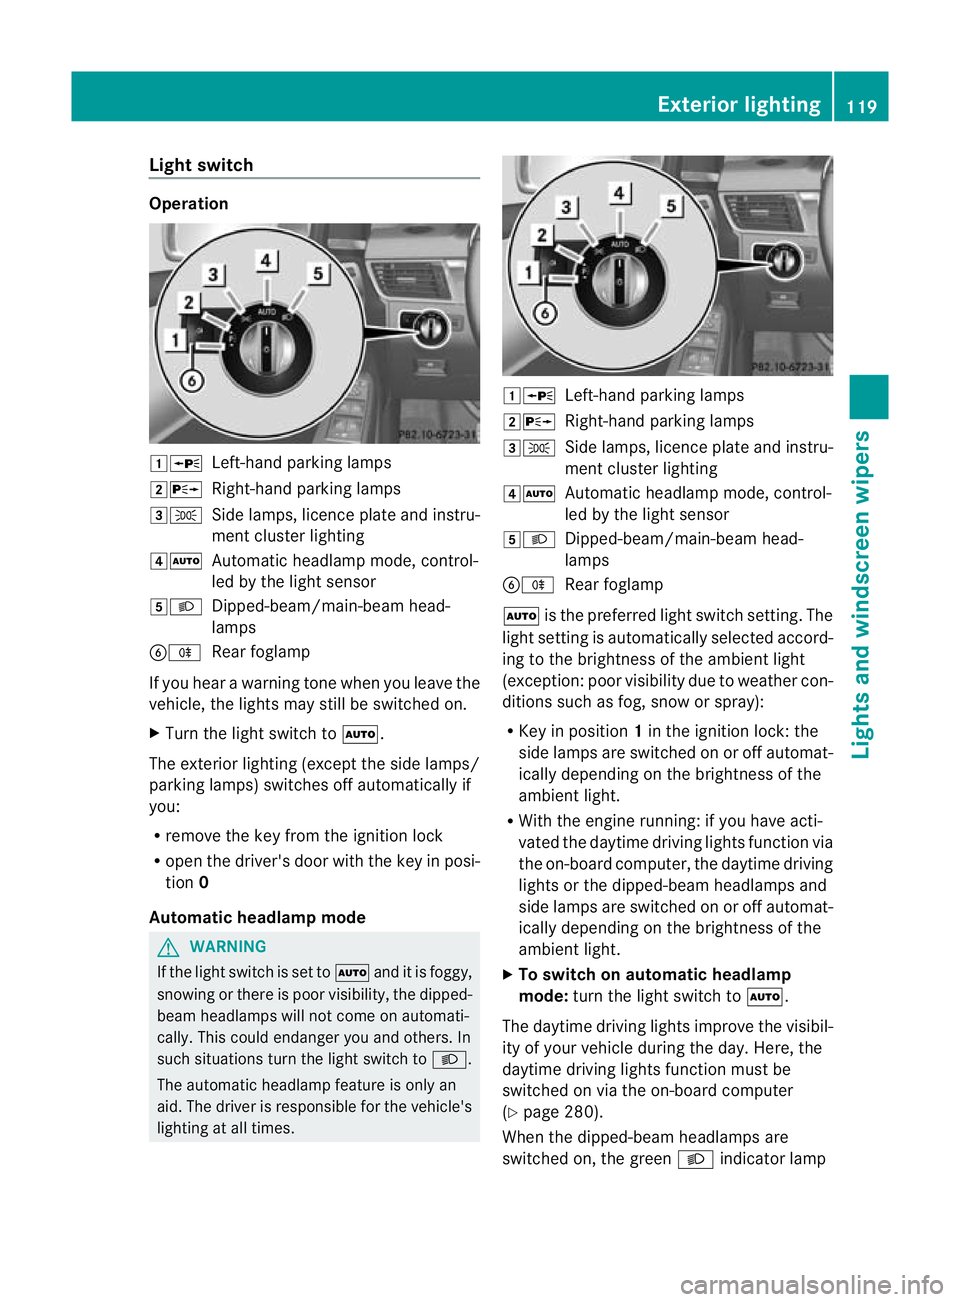
1W
Left-handparking lamps
2X Right-hand parking lamps
3T Side lamps, licenc eplatea nd instru-
men tcluster lighting
4Ã Automatic headlamp mode, control-
led by the light sensor
5L Dipped-beam/main-beam head-
lamps
BR Rear foglamp
If you hear awarnin gton ew hen you leav ethe
vehi cle, the light smay still be switched on.
X Turn the light switc htoÃ.
The exterior lighting (except the side lamps/
par king lamps )switches off automatically if
you:
R remove the key fro mthe igni tion lock
R open the driv er'sdoor with the key in posi-
tion 0
Automatic hea dlamp mode G
WARNING
If the light switch is se ttoÃand it is foggy,
snowing or ther eispoor visibility, the dipped-
beam headlamps will not com eonautomati-
cally. This could endanger you and others. In
such situations tur nthe light switc htoL .
The automatic headlamp feature is only an
aid. The driver is responsible for the vehicle's
lightin gatall times. 1W
Left-hand parking lamps
2X Right-hand parking lamps
3T Side lamps, licence plate and instru-
ment cluster lighting
4Ã Automatic headlamp mode, control-
led by the light sensor
5L Dipped-beam/main-beam head-
lamps
BR Rear foglamp
à is the preferred light switch setting. The
light setting is automatically selected accord-
ing to the brightness of the ambient light
(exception: poor visibility due to weather con-
ditions such as fog, snow or spray):
R Key in position 1in the ignition lock: the
side lamps are switched on or off automat-
ically depending on the brightness of the
ambient light.
R With the engine running: if you have acti-
vated the daytime driving lights function via
the on-board computer, the daytime driving
lights or the dipped-bea mheadlamps and
side lamps are switched on or off automat-
icall ydepending on the brightness of the
ambient light.
X To switc honautomatic headl amp
mode: turn the ligh tswitch to Ã.
The daytime driving lights improve the visibil-
ity of your vehicle during the day. Here, the
daytime driving lights function must be
switched on via the on-board computer
(Y page 280).
When the dipped-beam headlamps are
switched on, the green Lindicator lamp Exterio
rlighting
119Lights and windscreen wipers Z
Page 123 of 441

in the instrumen
tcluster lights up and the
daytime drivin glights go out or are dimmed.
Dipped-beam hea dlamps G
WARNING
If the light switch is se ttoÃand it is foggy,
snowing or ther eispoor visibility, the dipped-
beam headlamps will not com eonautomati-
cally. This could endanger you and others. In
such situations tur nthe light switc htoL .
The automatic headlamp feature is only an
aid. The driver is responsible for the vehicle's
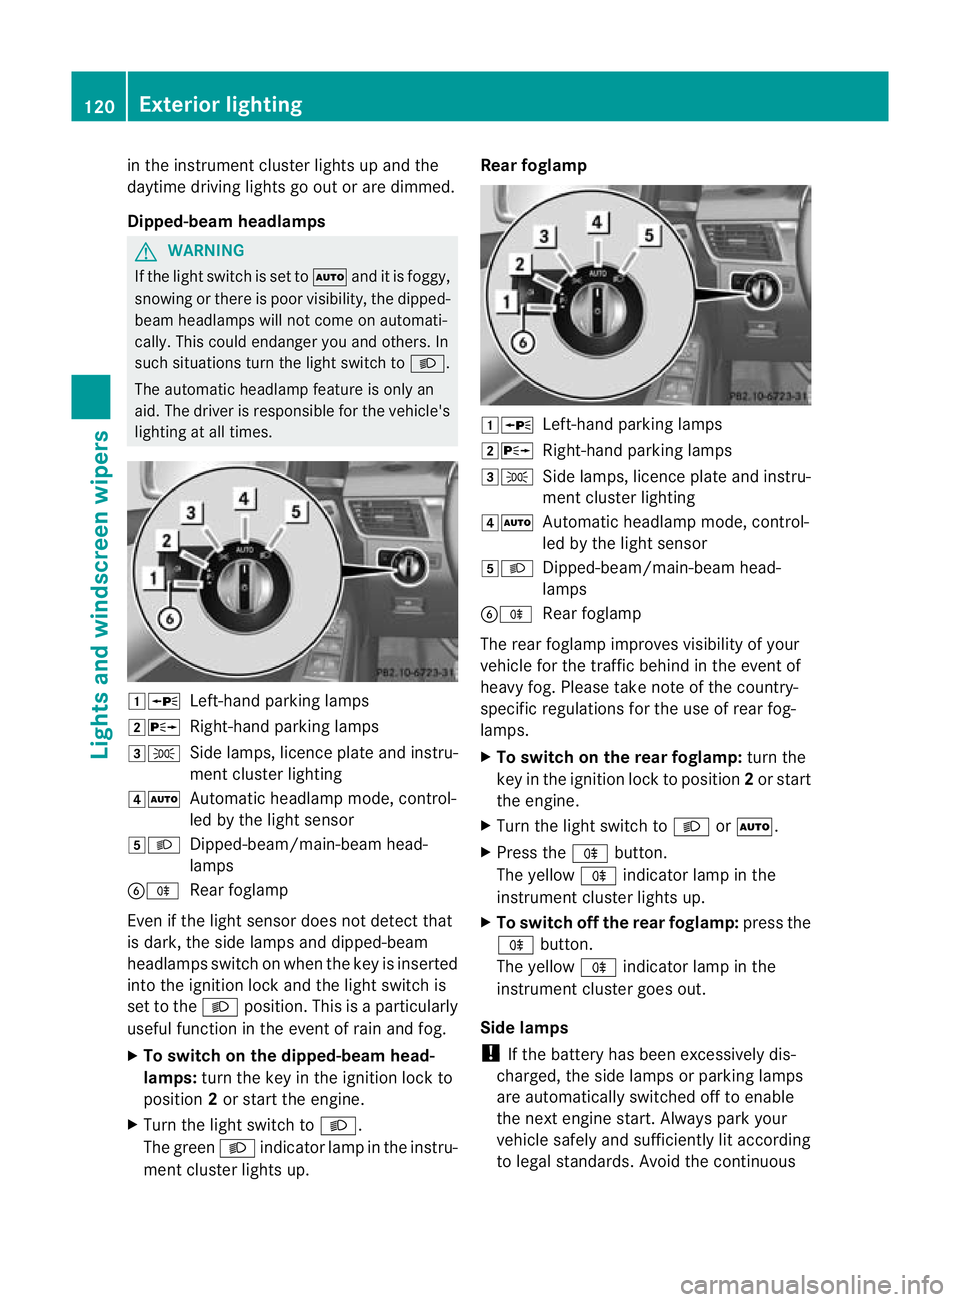
lightin gatall times. 1W
Left-hand parking lamps
2X Right-hand parking lamps
3T Side lamps, licence plate and instru-
ment cluster lighting
4Ã Automatic headlamp mode, control-
led by the light sensor
5L Dipped-beam/main-beam head-
lamps
BR Rear foglamp
Even if the light senso rdoes not detec tthat
is dark, the side lamps and dipped-beam
headlamps switc honwhen the key is inserted
int ot he ignition lock and the light switc his
set to the Lposition. This is aparticularly
useful function in the event of rain and fog.
X To switch on the dipped-beam head-
lamps: turn the key in the ignition lock to
position 2or start the engine.
X Turn the light switch to L.
The green Lindicator lamp in the instru-
ment cluster lights up. Rear foglamp
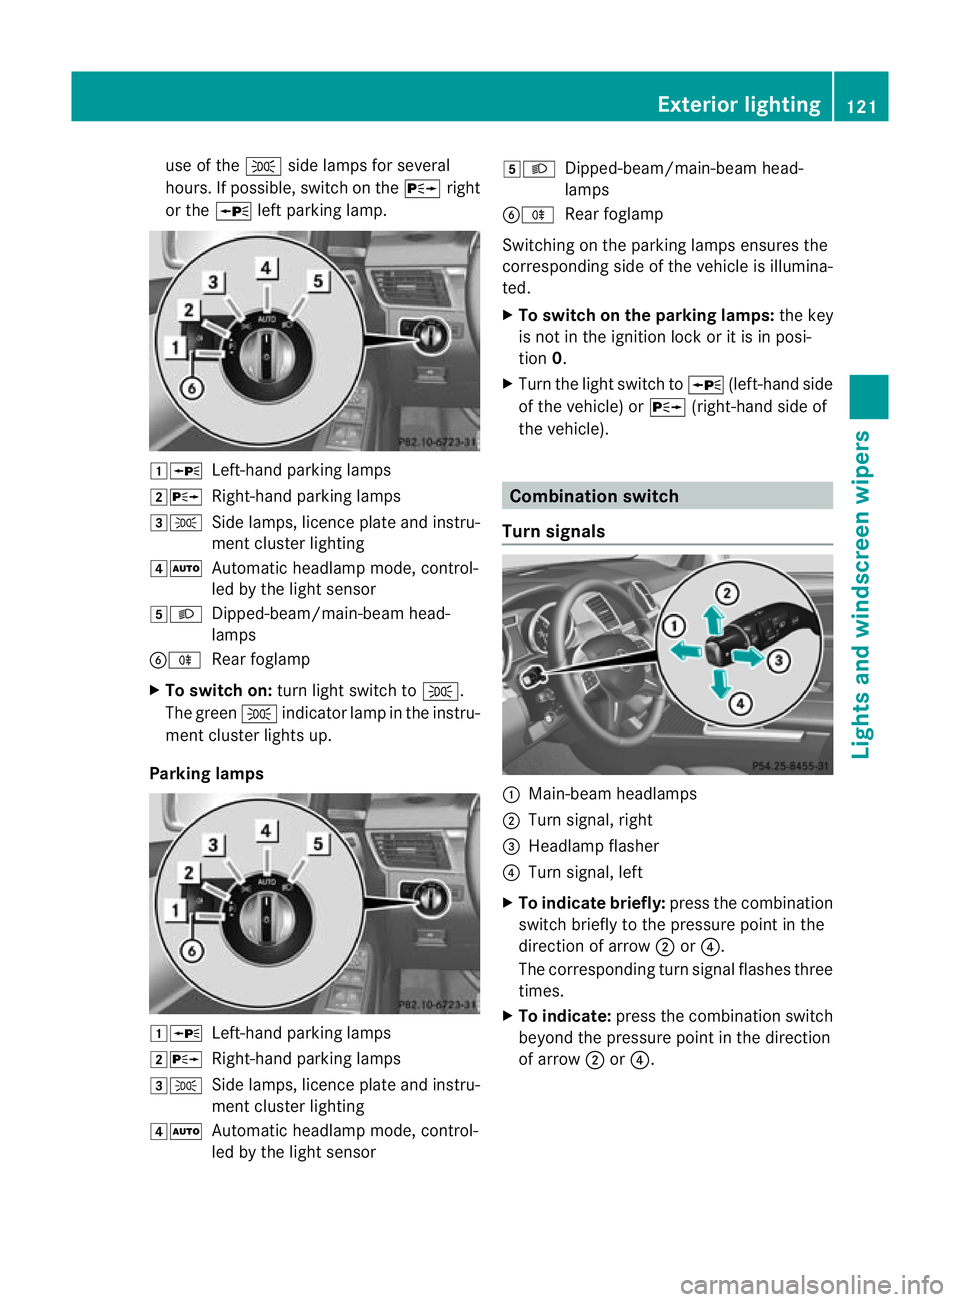
1W
Left-hand parking lamps
2X Right-hand parking lamps
3T Side lamps, licence plate and instru-
ment cluster lighting
4Ã Automatic headlamp mode, control-
led by the light sensor
5L Dipped-beam/main-beam head-
lamps
BR Rear foglamp
The rear foglamp improves visibility of your
vehicle for the traffic behind in the event of
heavy fog. Pleas etake note of the country-
specific regulations for the use of rear fog-
lamps.
X To switch on the rear foglamp: turn the
key in the ignition lock to position 2or start
the engine.
X Turn the light switch to LorÃ.
X Press the Rbutton.
The yellow Rindicator lamp in the
instrumen tcluster lights up.
X To switch off th erear foglamp: press the
R button.
The yellow Rindicator lamp in the
inst rument cluster goes out.
Side lamps
! If the bat tery ha sbeen excessively dis-
charged, the side lamps or parking lamps
are automatically switched off to enable
the nex tengine start. Alway sparky our
vehicl esafely and sufficiently li taccording
to lega lstandards. Avoi dthe contin uous 120
Exterio
rlightingLight sand windscreen wipers
Page 124 of 441

use of the
Tside lamps for several
hours. If possible, switc hontheX right
or the Wleft par king lamp. 1W
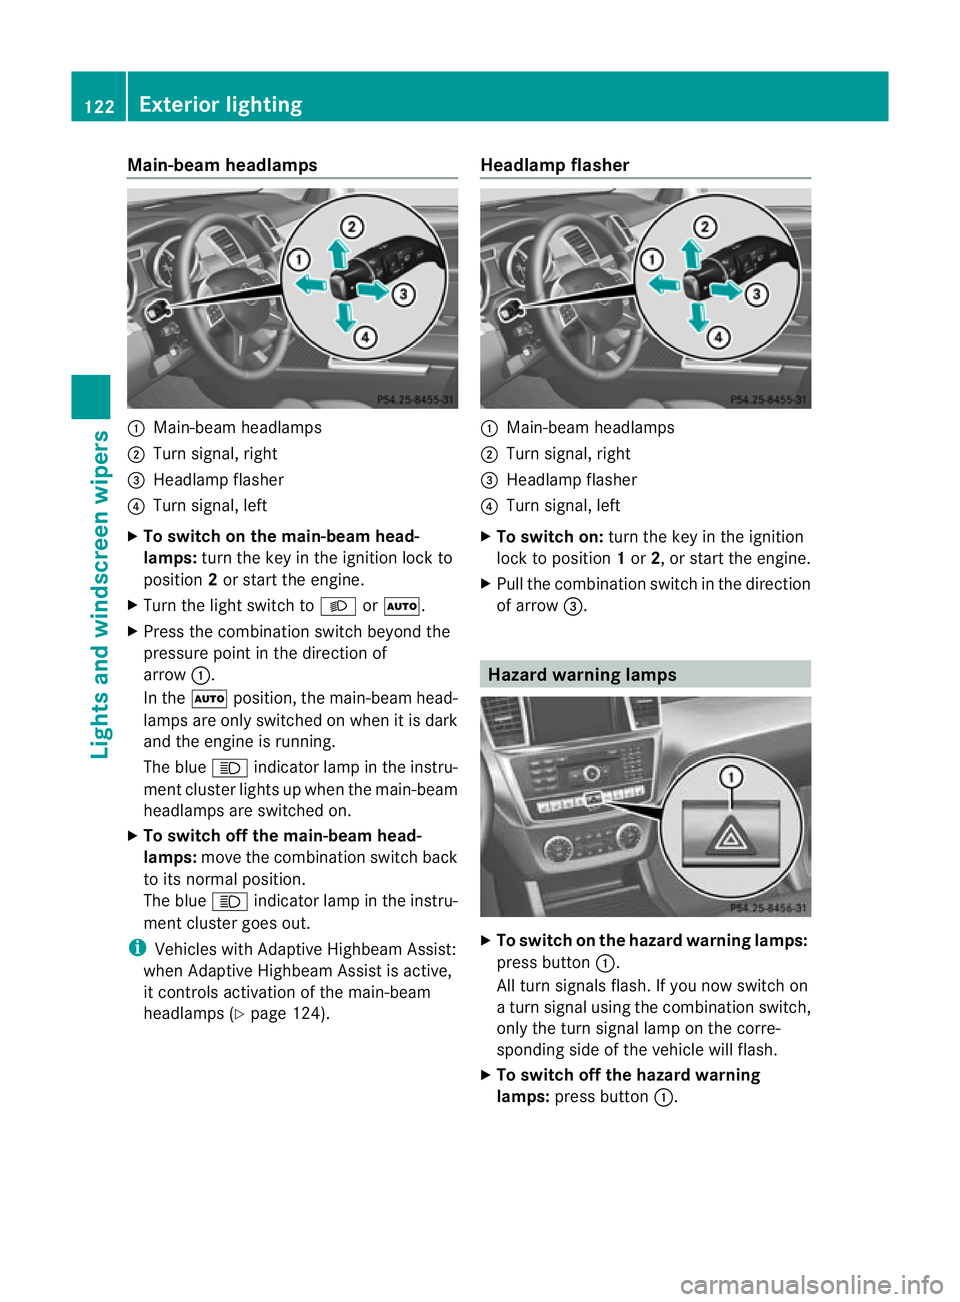
Left-hand parking lamps
2X Right-hand parking lamps
3T Side lamps, licence plate and instru-
mentcluster lighting
4Ã Automatic headlamp mode, control-
led by the light sensor
5L Dipped-beam/main-beam head-
lamps
BR Rear foglamp
X To switch on: turnlight switc htoT .
The green Tindicator lam pinthe instru-
men tcluster lights up.
Parking lamps 1W
Left-handparking lamps
2X Right-hand parking lamps
3T Side lamps, licence plate and instru-
mentcluster lighting
4Ã Automatic headlamp mode, control-
led by the light sensor 5L
Dipped-beam/main-beam head-
lamps
BR Rear foglamp
Switchin gonthe par king lamps ensures the
correspondin gside of the vehicle is illumina-
ted.
X To switch on th eparki ng lamps: the key
is not in the ignition lock or it is in posi-
tion 0.
X Turn the light switc htoW(left-han dside
of the vehicle) or X(right-han dside of
the vehicle). Combination switch
Turn signals :
Main-beam headlamps
; Turn signal, right
= Headlamp flasher
? Turn signal, left
X To indicate briefly: press the combination
switc hbrieflytot he pressur epoint in the
direction of arrow ;or?.
The correspondin gturns ignal flashes three
times.
X To indicate: press the combination switch
beyond the pressure point in the direction
of arrow ;or?. Exterior lighting
121Lights and windsc reen wipers Z
Page 125 of 441

Main-beam headlamps
:
Main-beam headlamps
; Turn signal, right
= Headlam pflasher
? Turn signal, left
X To switch on the main-beam head-
lamps: turn the key in the ignitio nlock to
position 2or star tthe engine.
X Tur nthe light switch to LorÃ.
X Press the combination switch beyond the
pressure point in the direction of
arrow :.
In the Ãposition, the main-beam head-
lamps ar eonly switched on whe nitisdark
and the engine is running.
The blue Kindicator lamp in the instru-
ment cluster lights up when the main-beam
headlamps are switched on.
X To switch off the main-beam head-
lamps: move the combinatio nswitch back
to its normal position.
The blue Kindicator lamp in the instru-
ment cluster goes out.
i Vehicles with Adaptive Highbeam Assist:
when Adaptive Highbeam Assist is active,
it controls activation of the main-beam
headlamps (Y page124). Headlamp flasher :
Main-beam headlamps
; Turn signal, right
= Headlam pflasher
? Turn signal, left
X To switch on: turn the key in the ignition
lock to position 1or 2,ors tart the engine.
X Pul lthe combination switch in the direction
of arrow =. Hazard warning lamps
X
To switch on th ehazard warnin glamps:
press button :.
All turn signals flash .Ifyou now switch on
at urn signa lusing the combination switch,
only the tur nsigna llam pont he corre-
sponding side of the vehicle will flash.
X To switch of fthe hazard warn ing
lamps: press button :.122
Exterior lightingLights and windscreen wipers