2012 MERCEDES-BENZ GL SUV open bonnet
[x] Cancel search: open bonnetPage 31 of 441

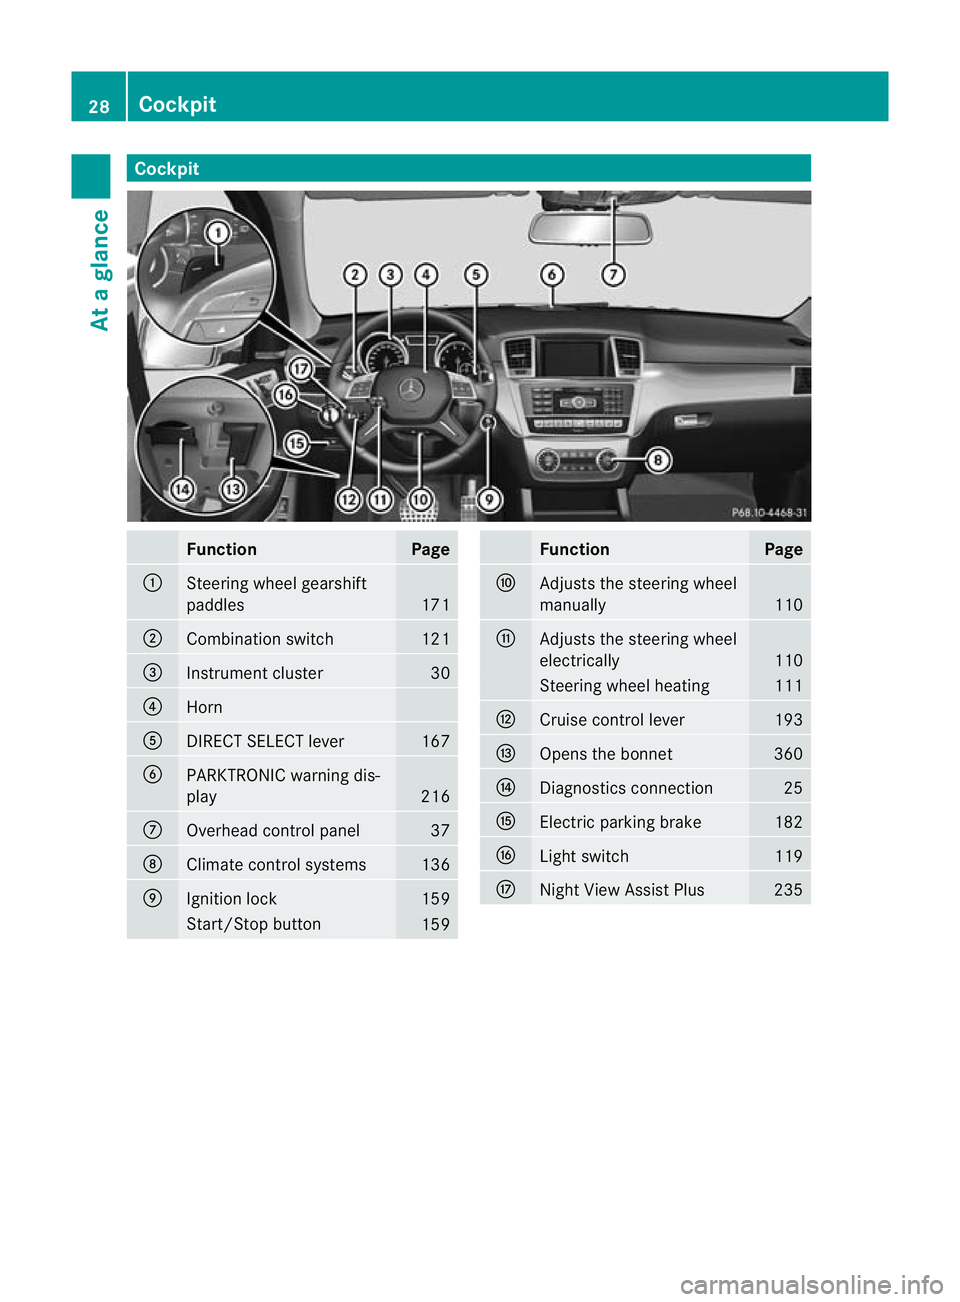
Cockpit
Function Page
:
Steering wheel gearshift
paddles
171
;
Combination switch 121
=
Instrumen
tcluster 30
?
Horn
A
DIRECT SELECT lever 167
B
PARKTRONI
Cwarning dis-
play 216
C
Overhead con
trol panel 37
D
Climat
econtrol systems 136
E
Ignition lock 159
Star
t/Stop button 159 Func
tion Page
F
Adjusts th
esteering wheel
manually 110
G
Adjusts th
esteering wheel
electrically 110
Steering wheel heating 111
H
Cruise control lever 193
I
Open
sthe bonnet 360
J
Diagnostics connection 25
K
Electric parking brake 182
L
Ligh
tswitch 119
M
Night View Assist Plus 23528
CockpitAt
ag lance
Page 32 of 441

Function Page
:
Overhead con
trol panel 37
;
PARKTRONI
Cwarning dis-
play 216
=
Combination switch 121
?
Instrument cluster 30
A
Horn
B
DIRECT SELECT lever 167
C
Steerin
gwheel gearshift
paddles 171
D
Nigh
tView Assist Plus 235
E
Light switch 119
F
Diagnostic
sconnection 25 Function Page
G
Open
sthe bonnet 360
H
Electric par
king brake 182
I
Ignitio
nlock 159
Star
t/St op button 159
J
Adjusts the steerin
gwheel
manually 110
K
Adjusts the steeri
ngwheel
electrically 110
Steerin
gwheel heati ng 111
L
Cruise control lever 193
M
Climate control systems 136Cockpit
29Atag lance
Page 74 of 441

Anti-
thefts ystems Im
mo biliser
X To activate wit hthe ke y:remove the key
from the ignition lock.
X To activat ewith KEYLESS-GO: switch the
ignitio noff and open th edriver's door.
X To deactivate: switch on the ignition.
Th eimmobil iser prev ents you rvehicle from
being star tedw ithout the correct key.
When leaving the vehicle, always take the key
with you and lock the vehicle. Anyone can
start the engin eifavalid key has been left
inside the vehicle.
i The immobiliser is alway sdeactiva ted
when you start the engine. ATA (Anti-Theft Alarm system)
X
To prime: lock the vehicle with the key or
KEYL ESS-GO.
Indicator lamp :flashes .The alar msys-
tem is primed after approximately
15 seco nds.
X To switch of fwith the key: unlock the
vehicle using the key.
or
X Inser tthe key int othe ignition lock.
X To switch of fwith KEYLESS-GO: unlock
the vehicle using KEYL ESS-GO.
or
X Pres sthe Start/Stop button on the dash-
board. The key must be insid ethe vehicle. Av
isual and audible alarm is triggered if the
alarm system is prime dand you ope n:
R ad oor
R the vehicle with the emergency key ele-
ment
R the tailgate
R the bonnet
X To turn th ealarmo ff wit hthe ke y:press
the % or& button on the key.
Th ea larm is switche doff.
or
X Insert the key into the ignition lock.
Th ea larm is switche doff.
X To sto pthe alarm using KEYLESS-GO:
gras pthe outside door handle. The key
must be outside th evehicle.
The alar misswitched off.
or
X Press the Start/Stop button on the dash-
board. The key must be inside the vehicle.
The alarm is switched off.
The alarm is not switched off ,even if you
close the open door that ha striggered it, for
example. Tow
-away protection
Function An audible and visual alarm is trigge
redify our
vehicle' sangle of inclination is altered while
tow-away protection is primed. Thi scan occur
if the vehicle is jacked up on one side, for
example.
Activating X
Make sure that: Anti-theft systems
71Safety Z
Page 133 of 441

X
Align housing cover :and turn it clock-
wise unti litengages.
X Replace the cove rinthe front wheel arch
(Y page 129).
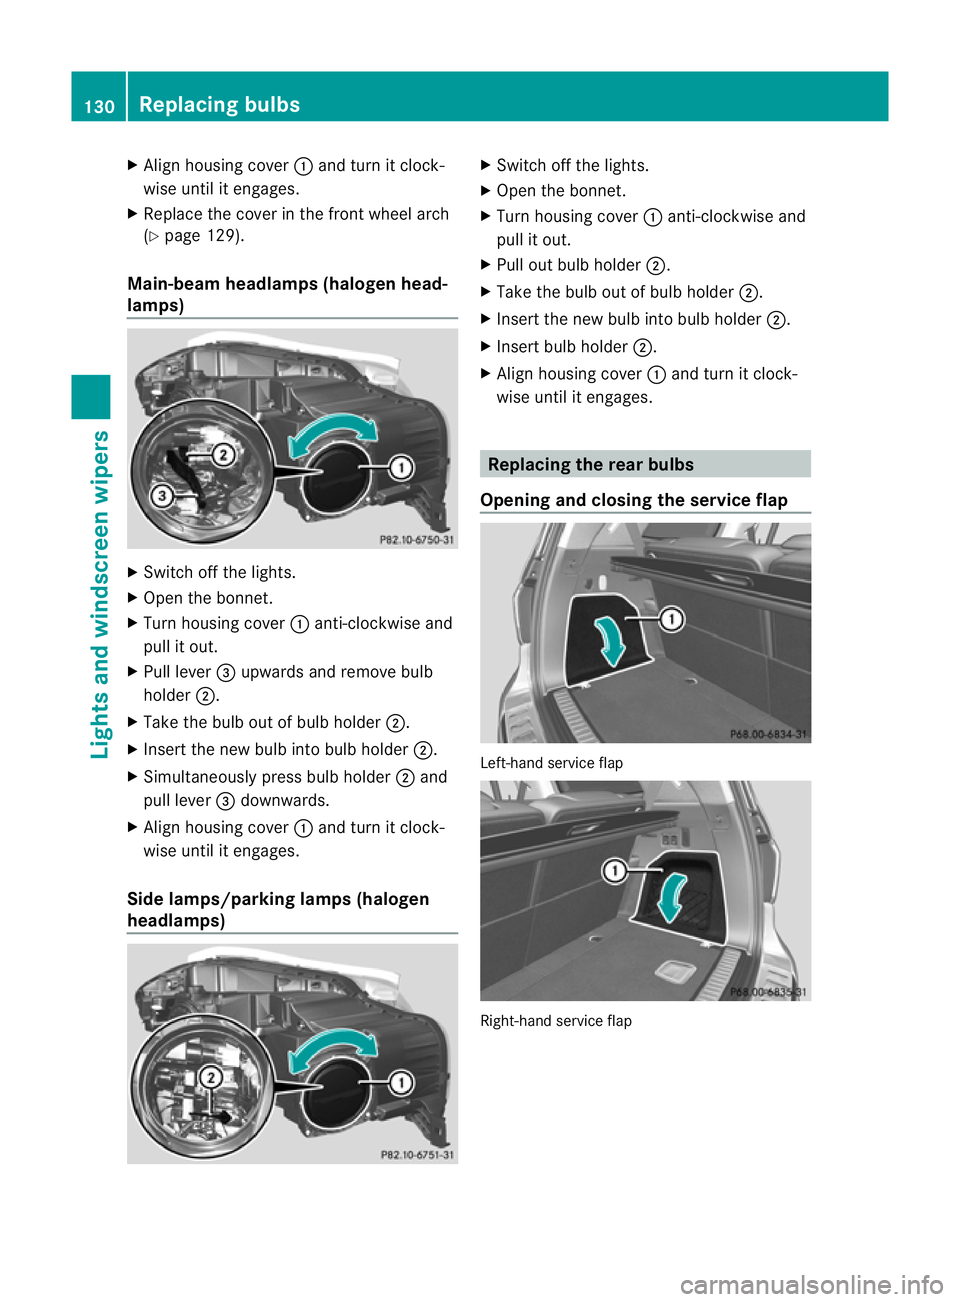
Main-beam headla mps(halogen head-
lamps) X
Switch off the lights.
X Open the bonnet.
X Turn housing cover :anti-clockwise and
pull it out.
X Pull lever =upwards and remov ebulb
holder ;.
X Take the bulb out of bulb holder ;.
X Insert the new bulb into bulb holder ;.
X Simultaneously press bulb holder ;and
pull lever =downwards.
X Align housing cover :and turn it clock-
wise until it engages.
Side lamps/parking lamps (halogen
headlamps) X
Switch off the lights.
X Open the bonnet.
X Turn housing cover :anti-clockwise and
pull it out.
X Pull out bulb holder ;.
X Take the bulb out of bulb holder ;.
X Insert the new bulb into bulb holder ;.
X Insert bulb holder ;.
X Align housing cover :and turn it clock-
wise until it engages. Replacing the rear bulbs
Openin gand closing th eservice flap Left
-hand service flap Right-hand service flap130
Replacin
gbulbsLight sand windscreen wipers
Page 135 of 441

5
¯ Continuous wipe, fast
B í Single wipe
C î To wipe with washer fluid
X Turn the key to position 1or 2in the ignition
lock (Y page 159).
X Turn the combination switc htothe corre-
sponding position.
In the ÄorÅ position, the appropriate
wipin gfrequency is se tautomatically accord-
ing to the intensity of the rain. In the Å
posi tion, the rain sensor is mor esensitive
than in the Äposition, causin gthe wind-
screen wiper stowipe mor efrequently. Switc
hing th erearw indow wiper on/
off Combi
nation switch
: è Rear windo wwiper switch
2 b To wipe with washer fluid
3 ITo switc honintermitten twiping
4 0To switc hoff intermittent wiping
5 ô To wip ewith washer fluid
X Turn the key to position 1or 2in the ignition
lock (Y page 159).
X Turn switch :on the combination switch
to the correspondin gposition.
When the rea rwindow wiper is switched on,
the icon appears in the instrumen tcluster. Replacing th
ewiper blades
Important safety notes G
WAR
NING
The wipe rarms could start moving and cause
an injury if you leave the windscreen wipers
switche don.
Remove the key from the ignition lock before
replacing the wipe rblades.
! Never open the bonnet if awindscreen
wiper arm has been folded away from the
windscreen.
Never fold awindscreen wiper arm without
aw iper blade back ont othe windscreen/
rea rwindow.
Hold the windscreen wiper arm firmly when
you change the wiper blade. If you release
the windscreen wiper arm without awiper
blade and it falls ont othe windscreen, the
windscreen ma ybedamaged by the force
of the impact.
Mercedes-Benz recommends that you have
the wiper blades changed at aqualified
specialist workshop.
! To avoid damaging the windscreen wiper
blades, mak esure that you touc honly the
wipe rarm of th ewindsc reen wiper.
Replacing th ewindscreen wiper blades Removing th
ewiper blades
X Remov ethe key fr om theignition lock.
X Fold the wiper ar maway fro mthe wind-
screen. 132
Windscreen wipersLights and windscreen wipers
Page 157 of 441

Displa
ymessages Possible causes/consequences and
M Solutions
If th
eauxiliar yheating is faulty:
X Hav ethe auxil iaryh eatin gchecked at aqualified specialist
workshop. Adjusting th
eair vents Important safet
ynotes G
WARNING
Ver yhot or ver ycold ai rcan flo wfromt he air
vents. This coul dcause burns or frostbite to
bare skin in the immediate vicinity of the
vents. Keep bare skin away from these air
outlets. If necessary, direct the airflow away
to ad ifferent area of the vehicle interior.
In order to ensure the direct flow of fresh air
through the air vent sinto the vehicl einterior,
please observe the following notes:
R keep the air inlet grill eonthe bonnet and
in the engin ecompartmen tonthe front-
passenger side free of blockages, such as
ice, snow or leaves.
R never cover the ven tsor ven tilation grilles
in the vehicle interior.
i For virtually draught-free ventilation,
adjust the sliders of the air vent stothe
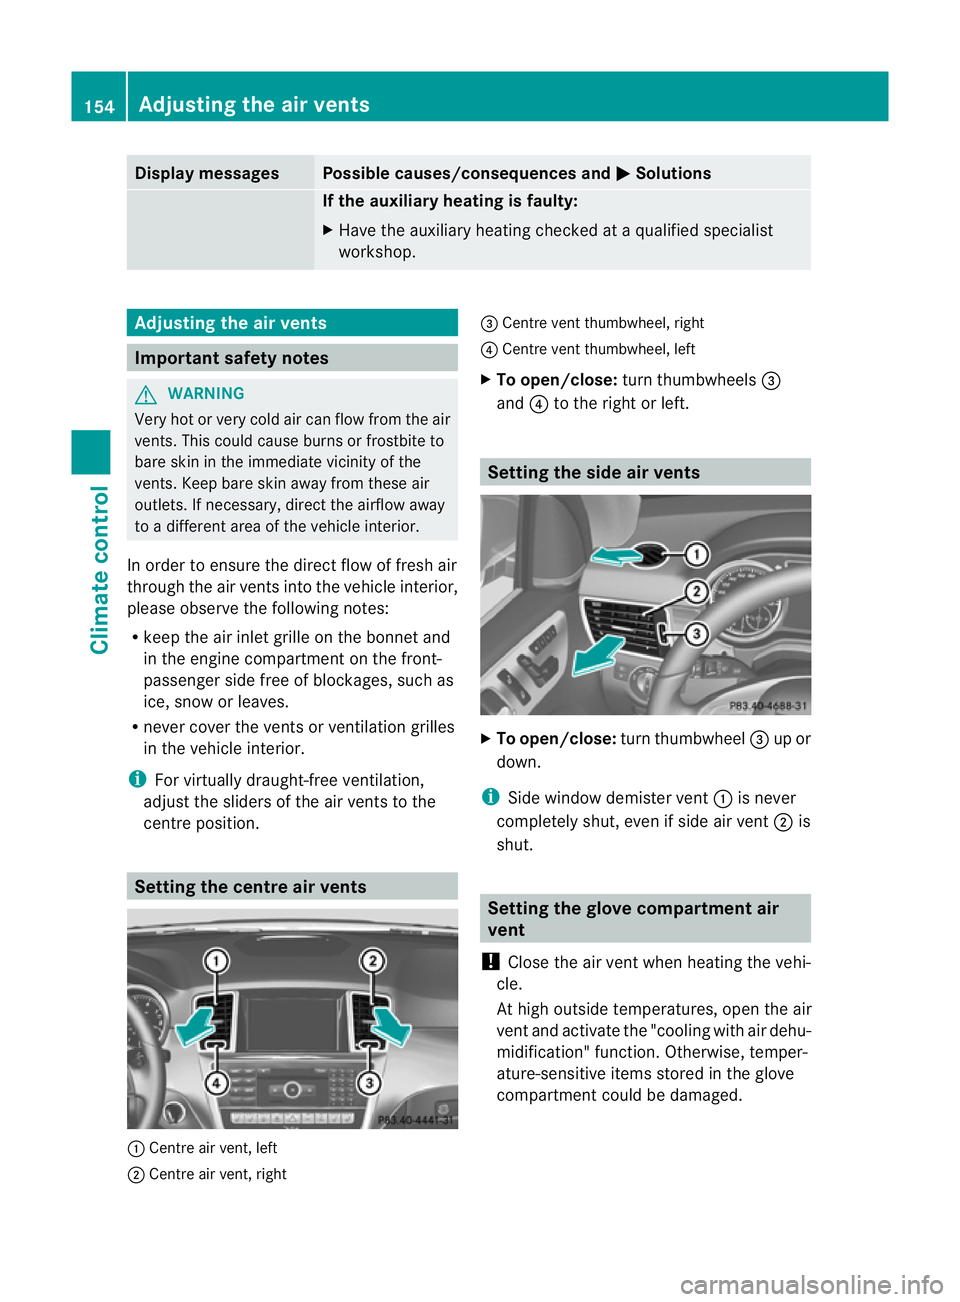
cen treposition. Setting the centre air vents
:
Centre air vent, left
; Centre air vent, right =
Centre ven tthumbwheel, right
? Centre ven tthumbwheel, left
X To open/close: turnthumbwheels =
and ?to the right or left. Setting th
eside air vents X
To open/close: turnthumbwheel =up or
down.
i Side window demister vent :is never
completely shut, even if side air vent ;is
shut. Setting th
eglove compartment air
vent
! Close the air vent when heating the vehi-
cle.
At high outside temperatures, open the air
vent and activate the "cooling with air dehu-
midification" function. Otherwise, temper-
ature-sensitiv eitems stored in the glove
compartmen tcould be damaged. 154
Adjusting th
eair ventsClimat econtrol
Page 308 of 441

Displa
ymessages Possible causes/consequences and
M Solutions
# The battery is no
tbeing charged.
Aw arning ton ealso sounds.
Possible causes:
R fault yalternator
R torn poly-V-belt
R am alfunction in the elect ronics
X Stop the vehicle immediately, paying attention to road and traf-
fic conditions, and switch off the engine.
X Open the bonnet.
X Check whether the poly-V-belt is torn.
If the poly-V-belt is torn:
! Do not continue driving. The engine could otherwise overheat.
X Consult aqualified specialist workshop.
If the poly-V-belt is OK:
X Visit aqualified specialist workshop. 4
Chec
keng. oil lev. when next
refuelling Th
ee ngine oil level has dropped to the minimum level.
Aw arning ton ealso sounds.
X Chec kthe oil level when nex trefuelling, at the latest
(Y page 362).
X If necessary, top up the engine oil (Y page 362).
X Hav ethe engin echecked at aqualified specialist worksho pif
the engine oil needs topping up more often than usual. 4
Top up wit
h1 litre of engine
oil when next refu‐
elling AM
Gvehicles: the engine oil level is too low.
X Check the oil level when next refuelling, at the latest
(Y page 362).
X If necessary, top up the engine oil (Y page 362).
X Hav ethe engin echecked at aqualified specialist worksho pif
the engine oil needs topping up more often than usual. 8
Reserv
efuel level Th
ef uel level has dropped into the reserve range.
Operation of the auxiliary heating is deactivated if the fuel level
drops into the reserve range.
X Refuel at the nearest filling station. C There is only
avery small amount of fuel in the fuel tank.
The auxiliary heatin gcannot be operated.
X Refuel at the nearest filling station without fail. Display messages
305On-board computer and displays Z
Page 323 of 441

Displa
ymessages Possible causes/consequences and
M Solutions
A The tailgat
eisopen.
G WARNING
When the engine is running ,exhaus tgases can enter the vehicle
interior if the tailgate is open.
There is arisk of poisoning.
X Close the tailgate. ? The bonnet is open.
Aw
arning ton ealso sounds.
G WARNING
The open bonne tmay then block your view when the vehicle is in
motion.
There is arisk of an accident.
X Pull over and stop the vehicle safely as soon as possible ,paying
attention to road and traffic conditions.
X Secure the vehicle against rolling away (Y page 181).
X Close the bonnet. Active bonnet mal‐
function Se
eOwn‐ er's Manual Th
ea ctive bonnet (pedestrian prote ction) is not activ edue to a
malfunction or because it has already been triggered.
X Visit aqualified specialist workshop. C At least one door is open.
Aw
arning ton ealso sounds.
X Close all doors. _
2nd
se
at row, left
Not locked or
2nd sea
tr ow,r ight Not locked Th
es econ drow of seat sisnot engage donthe left-hand and/or
ri gh t-hand side in the rear.
X Fol db ackt he second row of seats unt ilit engages. _
3rd
seat row, left
No
tl ocked or
3rd sea
trow,r ight Not locked Th
et hird row of seats is not engaged on the left-hand or ri ght-hand
side.
X Fol db ackt he third row of seats unt ilit engages. 320
Display messagesOn-board computer and displays