2012 MERCEDES-BENZ GL SUV lights
[x] Cancel search: lightsPage 335 of 441
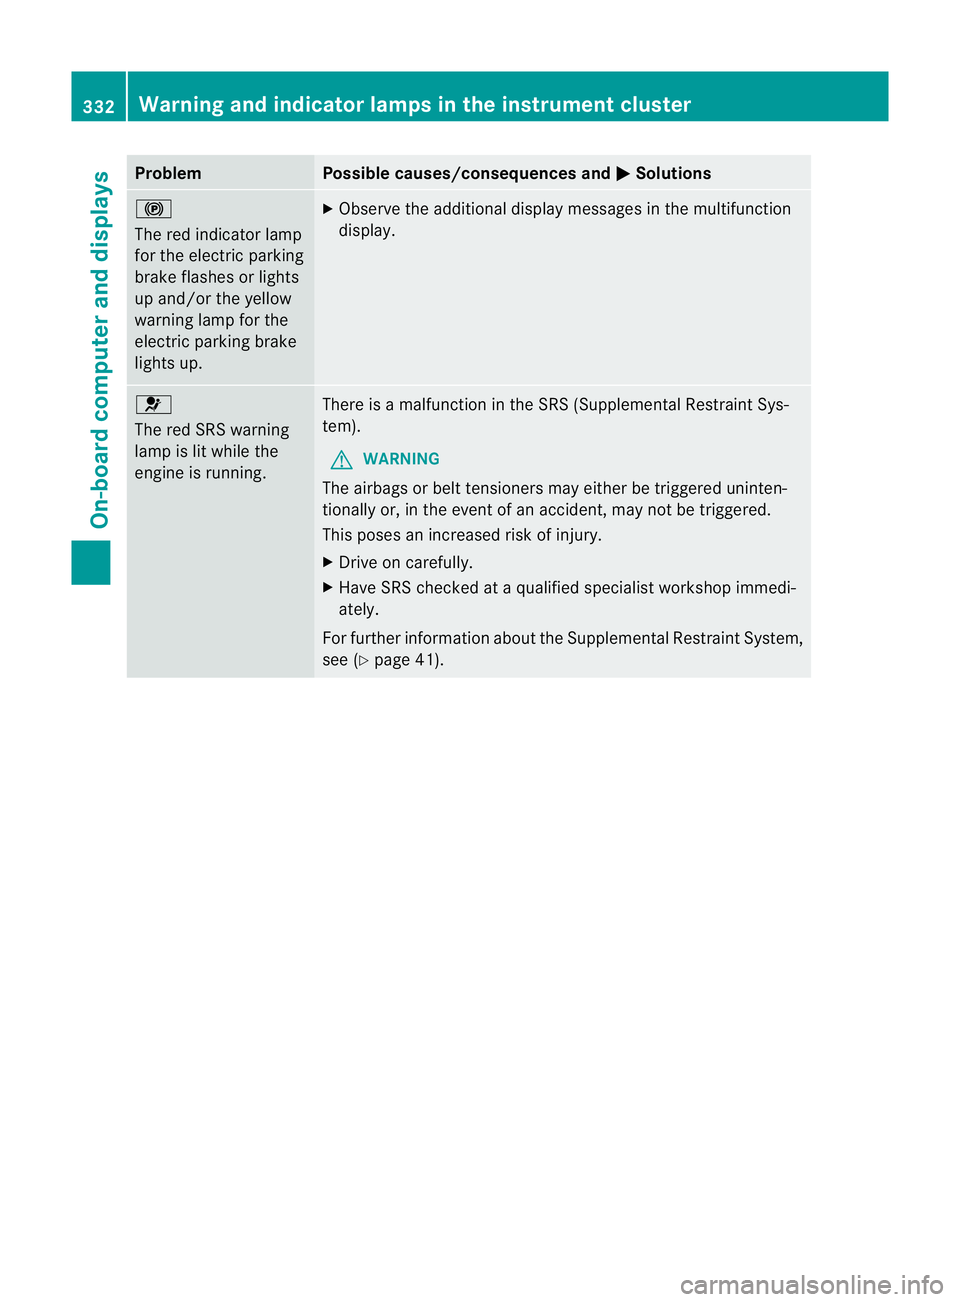
Problem Possible causes/consequences and
M Solutions
!
The red indicator lamp
for the electric parking
brake flashes or lights
up and/or the yellow
warnin glamp for the
electric parking brake
lights up. X
Observe the additional display message sint he multifunc tion
display. 6
The red SRS warning
lam
pisl it while the
engine is running. There is
amalfunction in the SRS (Supplemental Restraint Sys-
tem).
G WARNING
The airbags or belt tensioners may either be triggered uninten-
tionally or, in the event of an accident, may not be triggered.
This pose sanincrease drisk of injury.
X Driv eonc arefully.
X Have SRS checked at aqualified specialist worksho pimmedi-
ately.
For further information abou tthe Supplemental Restrain tSystem,
see (Y page 41). 332
Warnin
gand indicator lam psin th einstru ment clusterOn-board computer and displays
Page 350 of 441

You can remove the rubber mat of the cup
holder to clean it. Clean it with clean
,luke-
warm water only.
Temperature-controlled cup holder in
th ef ront-compartment centr econsole G
WARNING
When you use the warmin gfunction ,the metal
insert of thecup holder is heated. Therefore,
do not touch the cup holder inser t.Otherwise,
you migh tburny oursel f. :
Cuph olders
; Residual heat indicator lamp
= Button
Th et emperature-c ontrolle dcup holde rcan
be used to keep cold drinks cold and hot
drinks hot.
X Turn the key to position 2in the ignition
lock.
X To switch on th ecooling function: press
and hold button =until th eblue indicator
lamp on th ebutton lights up.
X To switch on th eheating function: press
and hold button =until the red indicator
lamp on the button lights up.
X To switch off th efunc tion: press and hold
button =until the indicator lamp on the
button goes out.
When the heatin gfunction is used, residual
heat indicator lamp ;lights up fro macer-
tain temperature. This mean sthat the metal
insert of the cup holder is hot. Cu
ph older in th erears eat armrest !
Do not sit on or support your body weight
on the rear seat arm rest when it is folded
down ,asy ou coul dotherwise damage it. X
Fold down the rear seat armrest.
Cup holder :is located in the rear seat
armrest.
Cup holder in th ethird row of seats :
Cup holders
The cup holders are located on the right-hand
and left-han dside panels. Sun visors
Overview G
WAR
NING
Keep the vanity mirrors in the sun visors cov-
ered whil edriving.Y ou coul dotherwise be
dazzled, which may impair your view of traffic
conditions and as aresult could cause an
accident. Features
347Stowing and features Z
Page 356 of 441

Garage door remote con
trol A is no tpart of
the integrated garage door opener.
X Before programmin gfor th efirst time, clear
th em emory of th eintegrated garage door
ope ner(Ypage 354).
X Turn th ekey to position 2in th eignition
lock.
X Press and hold on eofbuttons ;to? on
the integrate dgarag edoor opener.
Afte ras hort time, indicator lamp :lights
up yellow.
i Indicator lamp :lights up yellow as soon
as button ;,=or? is programmed for
the first time. If the selected button has
already been programmed ,indicator
lamp :will only light up yellow after ten
seconds have elapsed.
X Rele asebutton ;,=or?.I ndicator
lamp :flashes yellow.
X Point garage doo rremote control A
towards buttons ;to? on the rear-view
mirror at adistance of 5to 20 cm.
i The required distance between remote
control Aand the integrated garage door
opener depends on the garage door drive
system. Several attempt smay be required.
You should test every position for at least
25 seconds before trying another position.
X Press and hold button Bon remote control
A until indicator lamp :lights up green.
If indicator lamp :lights up green or
flashes ,then programming has been suc-
cessful.
X Release button Bof garage door drive
remote con trolA.
X Ifindicator lamp :lights up red: repeat
the programming procedur efor the corre-
spondin gbutton on the rear-view mirror.
When doing so, vary the distance between
remote control Aand the rear-view mirror.
i If the indicator lamp flashes green after
successful programming, the garage door
system is using arollin gcode. Af terp ro- gramming
,you must synchronise the
garage door opener integrated in the rear-
view mirror with the receive rofthe garage
door system.
Synchronising th erolling code
Your vehicle must be within range of the
garage door or exterior gate drive. Make sure
that neither your vehicle nor any persons/
objects are present within the sweep of the
door or gate.
Observe the safety notes when performing
the rolling code synchronisation.
X Turn the key to position 2in the ignition
lock.
X Press the programming button of the door
or gate drive (see the door or gate drive
operating instructions, e.g. under "Pro-
gramming of additional remote controls").
i Usually, you now have 30seconds to ini-
tiate the next step.
X Press previousl yprogramme dbutton ;,
= or? of the integrated garage door
opener until the door closes.
The rolling code synchronisatio nist hen
complete.
Problems when progra mming
If you have problems when programming the
integrated garage door opener, please note
the following:
R Check the transmitter frequency of garage
door driv eremote control A.This can usu-
ally be found on the bac kofthe remote
con trol.
R Replace the batteries in garage door
remote control A.This increases the like-
lihood that garage door remote con trolA
will transmit astron gand precis esignal to
the integrated garage door opener in the
rear-view mirror.
R When programming, hold remote control
A at varying distances and angles from the
button which you are programming. Try var-
ious angles at adistance between 5and Features
353Stowingand features Z
Page 357 of 441

30 cm or at the same ang
lebut at var ying
distances.
R If there is another remote control for the
same garage doo rdrive ,perf ormt he pro-
grammin gsteps again using this remote
control. Before performing thes esteps,
make sure that new batteries have been
fitted in garage doo rdrive remote control
A.
R Note that some remote controls transmit
onl yfor alimited perio d(the indicator lamp
on the remote control goe sout).Pres sbut-
ton Bon remote control Aagain before
transmission ends.
R Align the aerial cabl eofthe garage door
opener unit. This can improv esignal recep-
tion/transmission.
Opening or closing the garage door Once programmed, the integrated garage
door opener wil
lassume the function of the
garage door system's remote control. Please
also rea dthe oper ating instructions for the
garage door system.
X Turn the key to position 2in the ignition
lock.
X Press button ;,=or? which you have
programmed to operate the garage door.
Garage door system with afixed code: indi-
cator lamp :lights up green.
Garage door system with arolling code:
indicator lamp :flashes green.
i The transmitter will transmit asignal for
as long as the button is pressed. The trans-
mission is halted after amaximum of ten
seconds and indicator lamp :lights up
yellow. Pres sbutton ;,=or? again if
necessary. Clearing the memory X
Turn the key to position 2in the ignition
lock.
X Press buttons ;and ?.
The indicator lamp lights up yellow.
X Press and hold buttons ;and ?until the
indicator lamp turn sgreen.
i Make sure that yo uclear the memor yof
the integrated garage doo ropener before
selling the vehicle.
Frequencies Europe
Count
ry Radio
typeapproval num-
ber
Frequency range (MHz) AD (Andorra) 20 July
MHz: 27, 30, 40, 433
,868 AT (Aust
ria) Article
6ofDirective
1999/5/E CR&TT E18M ay
05
MHz :27, 40, 433 ,868 BE (Belgium) Articl
e6ofD irective
1999/5/E CR&TT E18M ay
05
MHz :27, 40, 433 ,868 BG (Bulga-
ria) Articl
e6ofD irective
1999/5/E CR&TT E12A pril
07
MHz: 27 ,40, 433, 868 CH (Switzer-
land) Article
6ofDirective
1999/5/EC R&TTE14357
27 May 05
MHz: 27, 40, 433 ,868 CY (Cyprus) Article
6ofDirective
1999/5/EC R&TTE 5May
05
MHz: 27, 40, 433 ,868 354
FeaturesSto
wing and featur es
Page 371 of 441

High-pressure cl
eaning equipment G
WARNING
Do not use high-pressure cleaner swith circu-
lar-jet nozzles (dirt grinders) to clean your
vehicle ,inparticular the tyres. You could oth-
erwise damage the tyres and cause an acci-
dent.
! Always maintain adistance of at least
30 cm between the vehicle and the high-
pressure cleaner nozzle. Information about
the correc tdistanc eisavailable from the
equipment manufacturer.
Move the high-pressure cleane rnozzle
around when cleanin gyour vehicle.
Do not aim directly at any of the following:
R tyres
R door gaps, roof gaps, join tsetc.
R electrical components
R battery
R connectors
R lights
R seals
R trim elements
R ven tilation slots
Damaged seals or electrical components
can lead to leaks or failures.
Cleanin gthe paintwork !
Do not affix:
R stickers
R films
R magnetic plate sorsimilar items
to painted surfaces. You could otherwise
damage the paintwork.
Scratches, corrosive deposits, areas affected
by corrosion and damage caused by inade-
quate care cannot always be completely
repaired. In such cases, visit aqualified spe-
cialist workshop. X
Remove impurities immediately, where
possible, whils tavoiding rubbing to ohard.
X Soak insect remains with insect remover
and rinse off the treated areas afterwards.
X Soak bird droppings with water and rinse
off the treated areas afterwards.
X Remove coolant, brake fluid, tree resin,
oils, fuels and greases by rubbing gently
with acloth soaked in petroleum ether or
lighter fluid.
X Use tar remover to remov etar stains.
X Use silicone remover to remove wax.
Care and treatment of mat tpaintwork !
Never polis hthe vehicle or the light alloy
wheels. Polishin gmakes the paintwork
shiny.
! The following may cause the paint to
become shiny and thus reduce the matt
effect:
R Vigorous rubbing with unsuitable mate-
rials.
R Frequent use of car washes.
R Washing the vehicle in direct sunlight.
! Never use paint cleaner, buffing or pol-
ishing products, or glos spreserver, e.g.
wax .These product sare onl ysuitable for
high-glos ssurfaces. Thei ruse on vehicles
wit hm att finish leads to considerable sur-
face damage (shiny, spotted areas).
Always have paintwork repairs performed
at aq ualified specialist workshop, e.g. a
Mercedes-Ben zService Centre.
! Do not use wash programs with ahot wax
treatmen tunder any circumstances.
Observe thes enotes if your vehicle has a
clea rmatt finish. This will help you to avoid
damage to the paintwork due to incorrect
treatment.
Thes enotes also apply to light-alloy wheels
with aclear matt finish. 368
CareMaintenance and care