2012 MERCEDES-BENZ GL SUV turn signal
[x] Cancel search: turn signalPage 17 of 441

Activating/deactivating the inte-
rio
rlightin gdelayed switch-off .......282
Active light function .......................123
Automatic he adlampmode ............ 119
Cornering light function .................123
Dipped-bea mheadlamps ............... 120
Driving abroa d............................... 118
Foglamps (extende drange )........... 124
Hazard warning lamps ...................122
Hea dlam pflasher ........................... 122
Light switc h................................... 119
Ma in-beam headlamps ................... 122
Motorway mode ............................. 124
Off-road lights ................................ 124
Parking lamps ................................ 121
Rea rfoglam p................................. 120
Setting the ambient lighting
bri ghtness (on-bo ardc omputer ).... 281
Setting the ambient lighting col-
ou r(on-board computer) ...... .......... 282
Side lamps ..................................... 120
Switch ingA daptive Highbeam
Assist on/of f................................. 281
Switch ingt he daytime driving
lights on/off (on-board computer) .280
Switch ingt he exteri or lighting
delayed switch-off on/off (on-
board computer) ............................ 282
Switch ingt he surround lighting
on/off (on-board computer) ..........282
Turn signals ................................... 121
se eC hangin gbulbs
see Interior lighting
Light sensor (display message) .......303
LI Mi ndicator lamp
Cruise control ................................ 193
DISTRONI CPLUS ........................... 200
Variabl eSPEEDTRONIC .................196
Lim iting the speed
see SPEEDTRONIC
Loading guidelines ............................338
Locking seeC entral locking
Locking (doors)
Automatic ........................................ 84
Emergency lockin g........................... 85
From insi de(central lockin gbut-
ton) .................................................. 83Locking centrally
seeC entral locking
Locking verification signal (on-
board computer) ............................... 283
LO WR ANGE
Display message ............................ 309
Off-road ge ar................................. 254
LO WR ANGE off-road gear ................254
Luggage compartmen tcover
Notes/function .............................. 344
Luggage compartmen tenlarge-
ment Important safety notes ..................341
Luggage compartmen tfloor
opening/closing ............................ 344
stow agew ell, under ....................... 344
Lumbar support
Adjusting (o nthe seat) .................. 108
Luxury head restraint .......................103 M
M+S tyres ........................................... 398
Main-beam headlamps Changing bulbs .............................. 130
Display message ............................ 302
Switch ingA daptive Highbeam
Assist on/of f................................. 125
Switch ingo n/off ........................... 122
Matt fin ish( cle anin ginstructions) ..368
Memory card (audi o)......................... 274
Memory function ............................... 115
Mercedes-Benz Service Centre seeQ ualified specialist workshop
Message memory (on-board com-
puter) ................................................. .290
Mes sages
see Display messages
Mirror
see Vanity mirror (in sun visor)
Mirrors
see Exterior mirrors
see Rear-view mirror
Mobile phone
Frequencies ................................... 421
Installati on .................................... .421
Menu (on-bo ardc omputer )............ 275 14
Index
Page 23 of 441

Menu (on-boar
dcomputer )............ 275
Number from the phone book ........ 276
Redialling ....................................... 276
Rej ecting/end ingac all................. 276
Te lephon ecompartmen t................ 339
Temperature
Coolan t.......................................... 268
Co olan t(on-board computer) ...... ...2 86
Engine oi l(on-board computer) ...... 286
Outside temperatur e..................... .268
Setting (cl imate control) ................143
TEMPOMAT
Function/notes ............................. 193
Theft-deterren tsyst em
ATA (Anti-Theft Alarm system) .........71
Immob iliser ...................................... 71
Through-loading ................................ 341
Time seeS eparate Owner's manual
Timing (RACETIMER) .........................287
TIRE FITk it.......................................... 379
Top Tether ............................................ 55
Total distanc erecorder .................... 271
Tow-away protection ..........................71
Towing Important safety notes ..................388
Towing atrailer
Active Blind Sp ot Assist................. 245
Active Lane Kee ping Assist ............248
Active Parking Assis t..................... 223
Axle lo ad,p erm issible .................... 433
Bulb failure ind icator for LED
lamps ............................................. 263
ESP ®
(Electroni cStability Pro-
gram) ............................................... 67
Pullin gawayw ithat railer .............. 162
Traile rdrive program ..................... 250
Towing away
Fitting the tow inge ye.................... 390
Removing the tow inge ye............... 390
With both axl eson the ground .......390
Tow-starting
Emergency engine starting ............391
Important safety notes ..................388
Trailer
Display message ............................ 321Trailer coupli
ng
se eT owing atrailer
Traile rtowing
7-pin connector ............................. 263
Blind Spo tAssist ...... ...................... 240
Cleaning the trailer tow hitch ......... 371
Coupling up atrailer ...................... 260
Decouplin gatrailer ....................... 261
Driving tip s.................................... 257
Fol ding in the bal lcoupling ............ 261
Fol ding out the bal lcoupling .......... 259
Important safety notes ..................257
Mo unting dimensions ....................432
Parktroni c...................................... 218
Po wer suppl y................................. 262
Pro blem (fault) ............................... 264
Shift rang e..................................... 170
Traile rloads ................................... 433
Transmission
seeA utomati ctransmission
Transmissio nposition display .........168
Transmission pos ition display
(DIRECT SELECT lever) ......................168
Transportin gthe vehicle .................. 391
Travellin guphill
Brow of hil l..................................... 192
Driving downhil l............................. 192
Maximum gradient-cl imbing capa-
bility .............................................. .192
Trim pie ces( cle anin ginstructions) .372
Trip computer (on-b oard com-
puter) ................................................. .271
Trip meter Calling up ....................................... 271
Resetting (on-bo ardc omputer )...... 272
Turn si gnal
se eT urn signals
Turn signals
Switching on/off ........................... 121
TV
Operating (on-bo ardc omputer )..... 275
se eS eparate operating instructions
Two- wayradio
Freq uencies ................................... 421
Installati on .................................... .421
Transmission output (maximum ).... 421 20
Index
Page 35 of 441
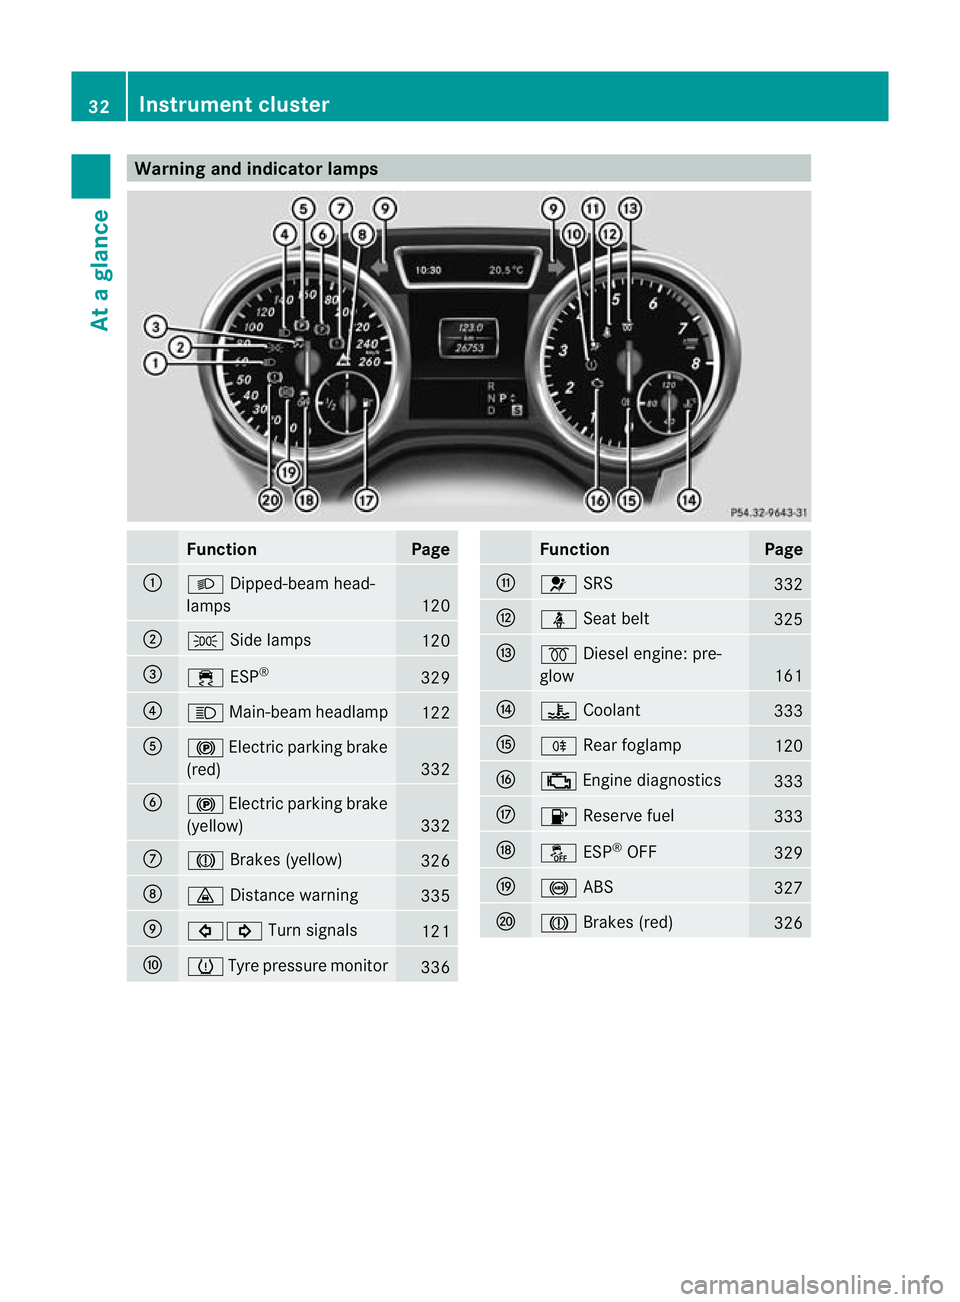
Warnin
gand indicator lamps Fun
ction Page
:
L
Dipped-bea mhead-
lamps 120
;
T
Side lamps 120
=
÷
ESP® 329
?
K
Main-beam headlamp 122
A
!
Electric parkin gbrake
(red) 332
B
!
Electri cparking brake
(yellow) 332
C
J
Brakes (yellow) 326
D
·
Distance warning 335
E
#!
Turn signals 121
F
h
Tyre pressure monitor 336 Function Page
G
6
SRS 332
H
ü
Seat belt 325
I
%
Diesel engine: pre-
glow 161
J
?
Coolant 333
K
R
Rearfoglamp 120
L
;
Engine diagnostics 333
M
8
Reserve fuel 333
N
å
ESP®
OFF 329
O
!
ABS 327
P
J
Brakes (red) 32632
Instru
ment clusterAtag lance
Page 81 of 441

Changing th
esettings of th elocking
system
You can chang ethe settings of th elocking
system. This mea nsthat only the driver' sdoor
and th efuel filler flap are unlocked when the
vehicle is unlocked. This is useful if you fre-
quently travel on your own.
X To change th esetting: press and hold
down the %and& buttons simulta-
neously for approximately six seconds until
the battery chec klamp flashes twice
(Y page 79).
i If the settin gofthe locki ngsystem is
changed within th esignal range of th evehi-
cle ,pressi ngthe & or% button:
R locks or
R unlock sthe vehicle
The ke ynow functions as follows:
X To unloc kthe drive r'sdoor: press the
% button once.
X To unlock cen trally:pressthe % but-
to nt wice.
X To lock centrally: pressthe & button.
The KEYLESS-GO function is changed as fol-
lows:
X To unlock th edriver's doo r:touch the
inner surface of the doo rhandle on the
driver' sdoor.
X To unlock centrally: touch theinner sur-
fac eo fthe door handle on th efront-
passenger door or th erear door.
X To lock centrally: touch theouter sensor
surface on one of the door handles
(Y page 77).
X To restor ethe facto rysettings: press
and hold down the %and& buttons
simulta neousl yfor appr oximate ly six sec-
onds until th ebatter ychec klamp flashes
twic e(Ypage 79). Emergency key element
General notes If th
evehicle can no longer be locke dor
unloc kedw itht he key ,use th eemergency
key element.
If yo uuse th eemergenc ykey elemen tto
unlock and open the driver' sdoor, the anti-
thef talarm system will be triggered
(Y page 71).
There are several ways to tur noff th ealarm:
X To turn the alarm off with the key: press
the % or& buttonont he key.
or
X Insert the key int othe ignition lock.
or
X To deactivat ethe alarm with KEYLESS-
GO: press th eStart/Stop button in the igni-
tion lock. The key must be in the vehicle.
or
X Lock or unlock the vehicle using KEYLESS-
GO. The key must be outside the vehicle.
If you unlock the vehicle using the emergency
key element, the fuel filler fla pwilln ot be
unlocked automatically.
X To unlock th efuel fil lerf lap: insert the
key into the ignition lock.
Removing the emergency key element :
Releas ecatch
; Emergency key element 78
KeyOpening and closing
Page 124 of 441
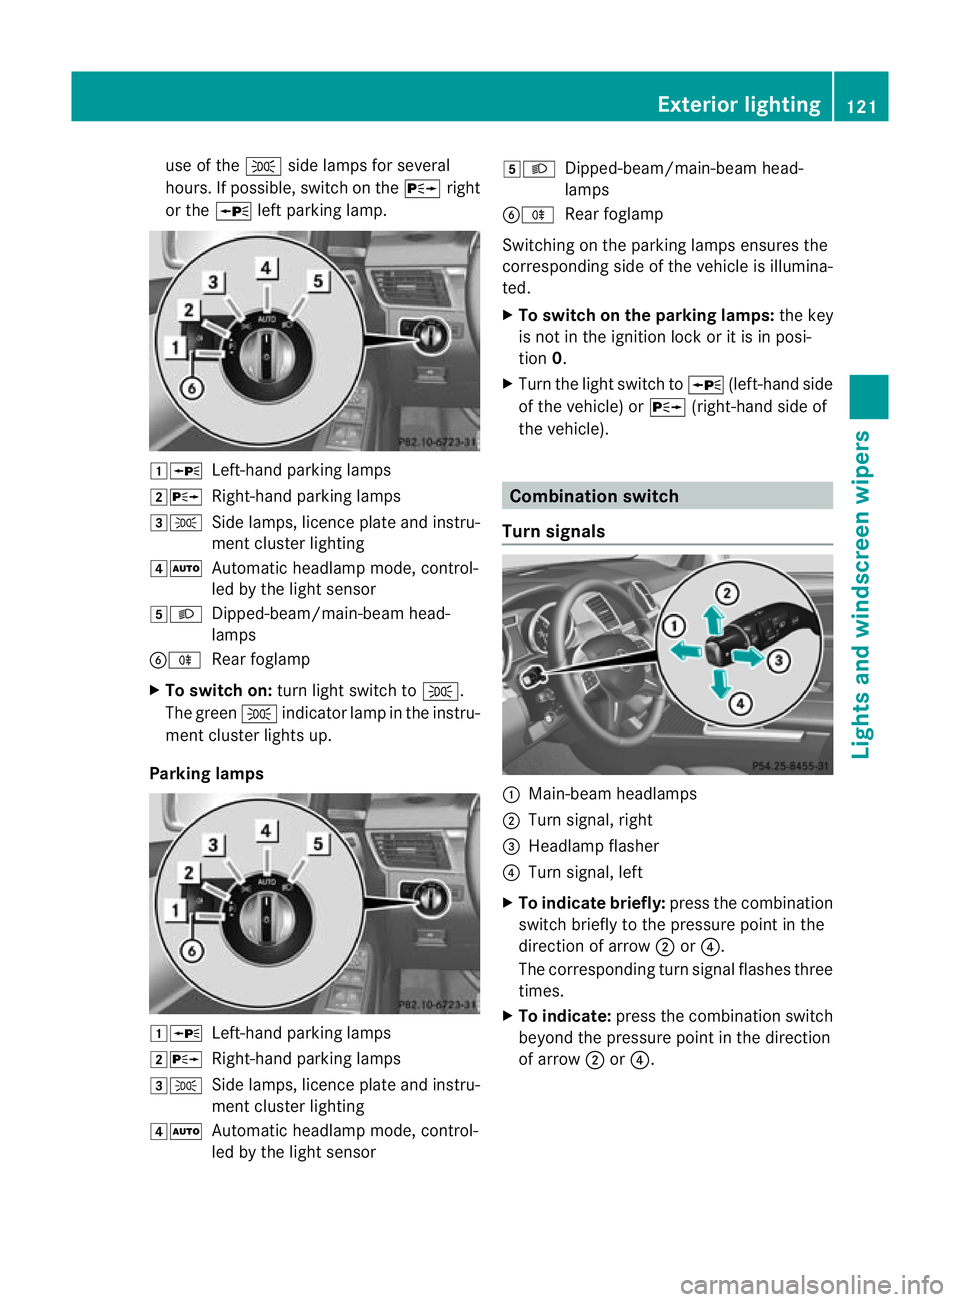
use of the
Tside lamps for several
hours. If possible, switc hontheX right
or the Wleft par king lamp. 1W
Left-hand parking lamps
2X Right-hand parking lamps
3T Side lamps, licence plate and instru-
mentcluster lighting
4Ã Automatic headlamp mode, control-
led by the light sensor
5L Dipped-beam/main-beam head-
lamps
BR Rear foglamp
X To switch on: turnlight switc htoT .
The green Tindicator lam pinthe instru-
men tcluster lights up.
Parking lamps 1W
Left-handparking lamps
2X Right-hand parking lamps
3T Side lamps, licence plate and instru-
mentcluster lighting
4Ã Automatic headlamp mode, control-
led by the light sensor 5L
Dipped-beam/main-beam head-
lamps
BR Rear foglamp
Switchin gonthe par king lamps ensures the
correspondin gside of the vehicle is illumina-
ted.
X To switch on th eparki ng lamps: the key
is not in the ignition lock or it is in posi-
tion 0.
X Turn the light switc htoW(left-han dside
of the vehicle) or X(right-han dside of
the vehicle). Combination switch
Turn signals :
Main-beam headlamps
; Turn signal, right
= Headlamp flasher
? Turn signal, left
X To indicate briefly: press the combination
switc hbrieflytot he pressur epoint in the
direction of arrow ;or?.
The correspondin gturns ignal flashes three
times.
X To indicate: press the combination switch
beyond the pressure point in the direction
of arrow ;or?. Exterior lighting
121Lights and windsc reen wipers Z
Page 125 of 441
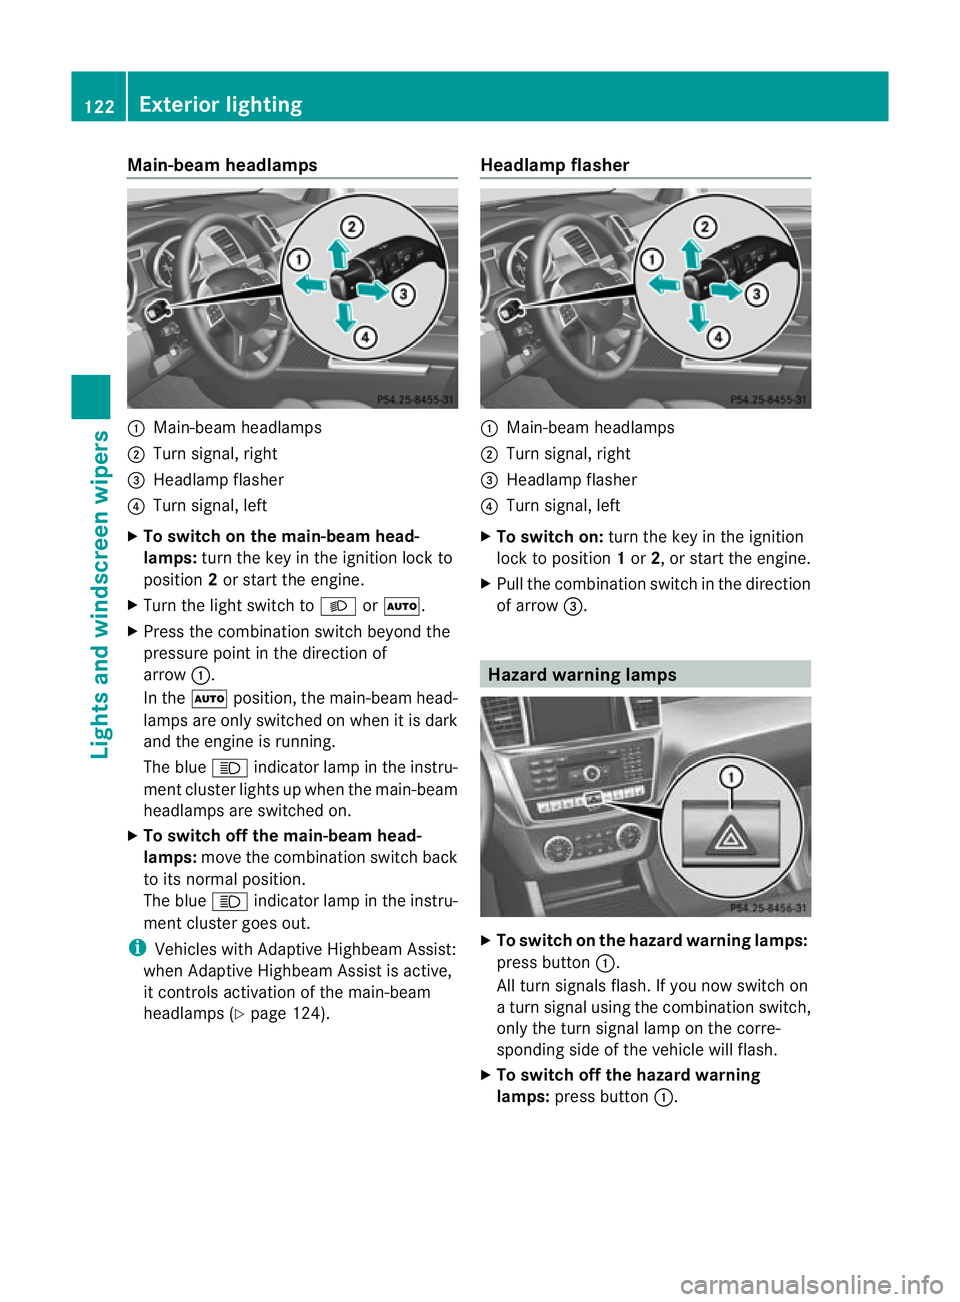
Main-beam headlamps
:
Main-beam headlamps
; Turn signal, right
= Headlam pflasher
? Turn signal, left
X To switch on the main-beam head-
lamps: turn the key in the ignitio nlock to
position 2or star tthe engine.
X Tur nthe light switch to LorÃ.
X Press the combination switch beyond the
pressure point in the direction of
arrow :.
In the Ãposition, the main-beam head-
lamps ar eonly switched on whe nitisdark
and the engine is running.
The blue Kindicator lamp in the instru-
ment cluster lights up when the main-beam
headlamps are switched on.
X To switch off the main-beam head-
lamps: move the combinatio nswitch back
to its normal position.
The blue Kindicator lamp in the instru-
ment cluster goes out.
i Vehicles with Adaptive Highbeam Assist:
when Adaptive Highbeam Assist is active,
it controls activation of the main-beam
headlamps (Y page124). Headlamp flasher :
Main-beam headlamps
; Turn signal, right
= Headlam pflasher
? Turn signal, left
X To switch on: turn the key in the ignition
lock to position 1or 2,ors tart the engine.
X Pul lthe combination switch in the direction
of arrow =. Hazard warning lamps
X
To switch on th ehazard warnin glamps:
press button :.
All turn signals flash .Ifyou now switch on
at urn signa lusing the combination switch,
only the tur nsigna llam pont he corre-
sponding side of the vehicle will flash.
X To switch of fthe hazard warn ing
lamps: press button :.122
Exterior lightingLights and windscreen wipers
Page 128 of 441
The system may not recognise the following
road users:
R road users that have no lighting, e.g. pedes-
trians
R road users that have poor lighting, e.g.
cyclists
R road users whose lightin gisnot clearly visi-
ble, e.g. road users behind acras hb arrier
R on rare occasions: road users that have
lights that may be recognised too late or not
at all
The automatic main-beam headlamps will not
be deactivated, or they may be activated
despite road users travelling in front of or
approaching the vehicle.
Thus, you could cause an accident and injure
yourself and others. Always observe traffic
conditions and, if necessary, dip the lights
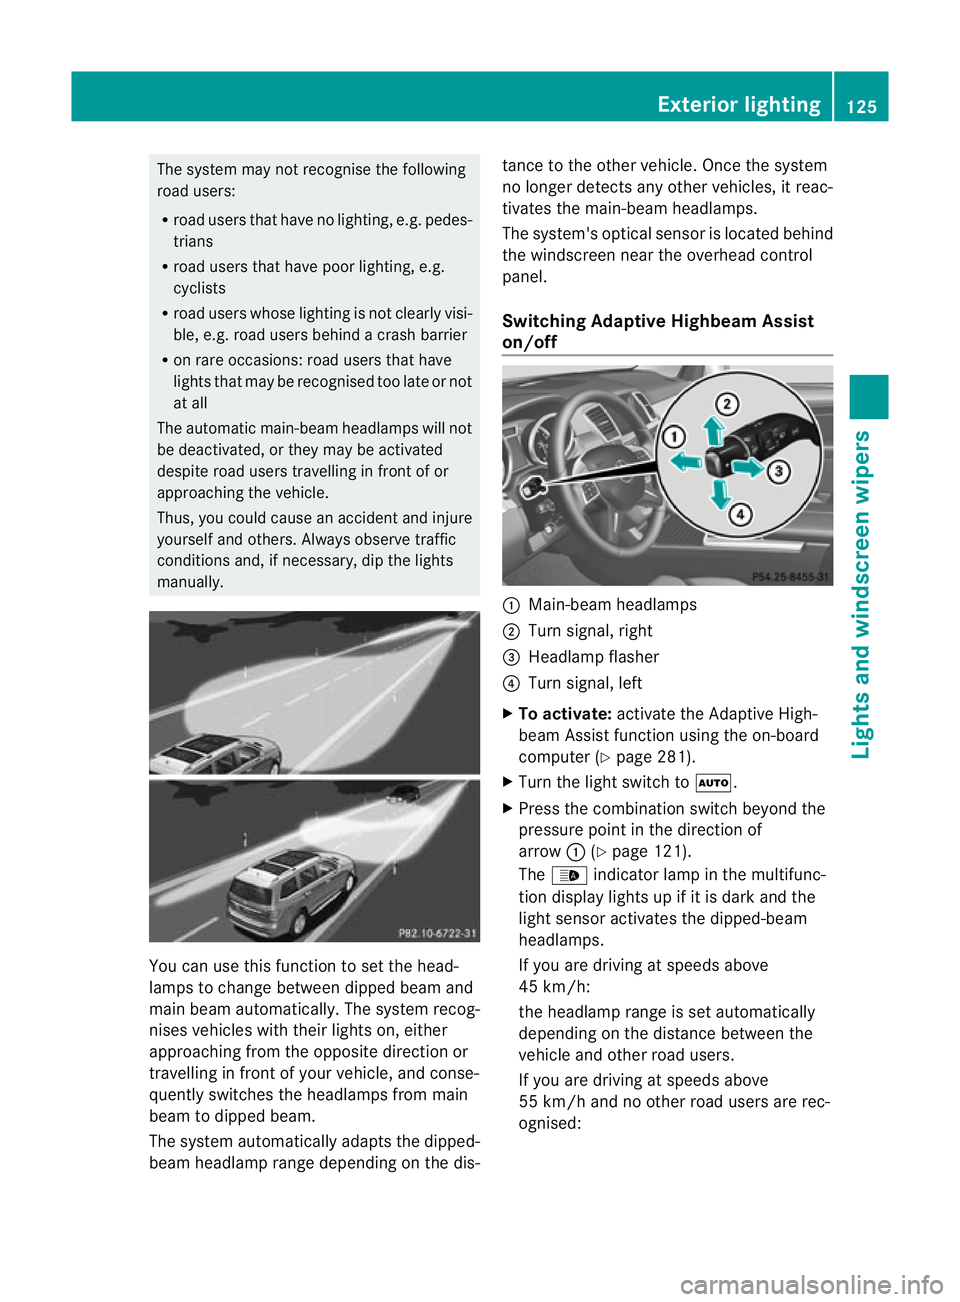
manually. You can use this function to set the head-
lamps to change between dippe dbeam and
mai nbeam automatically. The system recog-
nises vehicles with their lights on, either
approaching from the opposite direction or
travelling in front of your vehicle, and conse-
quently switches the headlamps from main
beam to dipped beam.
The system automatically adapts the dipped-
beam headlam prange depending on the dis- tanc
etot he other vehicle. Onc ethe system
no longer detec tsany other vehicles, it reac-
tivates the main-beam headlamps.
The system's optical senso risl ocated behind
the windscreen near the overhead con trol
panel.
Switching Adaptive Highbeam Assist
on/off :
Main-beam headlamps
; Turnsignal, right
= Headlamp flasher
? Turn signal, left
X To activa te:activate the Adaptive High-
beam Assis tfunction using the on-board
computer (Y page 281).
X Turn the light switch to Ã.
X Press the combination switch beyond the
pressure point in the direction of
arrow :(Ypage 121).
The _ indicator lamp in the multifunc-
tion display lights up if it is dark and the
light senso ractivate sthe dipped-beam
headlamps.
If you ar edriving at speeds above
45 km/h:
th eh eadlam prange is set automatically
depending on the distance between the
vehicle and other road users.
If you are driving at speeds above
55 km/ hand no other road users are rec-
ognised: Exterior lighting
125Lights and windscree nwipers Z
Page 205 of 441

cle's distance from oth
ervehicle s, the speed
bein gdrive nand for braking in goo dtime. X
If the vehicle in front pulls away: remove
your foot from the brake pedal.
X Briefly pull the cruise control lever towards
you ;or press it up :or down =.
or
X Accelerate briefly.
Your vehicle pulls away and adapts its
speed to that of the vehicle in front.
If there is no vehicle in front, DISTRONIC
PLUS operates in the same way as cruise
control.
If DISTRONIC PLUS detects that the vehicle
in fron thas slowed down, it brakes your vehi-
cle. In this way, the distanc eyou have selec-
ted is maintained.
If DI STRONIC PLUS detects afaster-moving
vehicle in front, it increases the driving speed.
However, the vehicle is only accelerated up
to the spee dyou have stored.
Changing lanes G
WARNING
DI ST RONIC PLUS and Active Blind Spot Assist
are only an aid designed to assist driving.
The ydon ot relieve you of the responsibility
of payin gattention. The driver remains fully
responsible for the vehicle's distance from
other vehicles, the vehicle's speed and for
braking in good time. Always pay attention to
traffic conditions and your surroundings. Oth-
erwise, you may fail to recognise dangers in time, cause an accident and injure yourself
and others.
If you change to the overtakin glane, DIS-
TRONIC PLUS supports you if:
R you are driving faster than 60 km/h.
R DISTRONIC PLUS is maintaining the dis-
tance to avehicle in front.
R you switc honthe respective tur nsignals.
R DISTRONIC PLU Sdoes not detec tadanger
of collision.
If these condition sare met, your vehicl eis
accelerated. Acceleration will be interrupted
if changing lanes takes too long or if the dis-
tance between your vehicle and the vehicle in
front becomes too small.
i When changing lanes, DISTRONIC PLUS
monitors the left lane for left-hand-drive
vehicles and the right lane for right-hand-
drive vehicles.
Vehicles with COMAND Online Example: roundabout
i
The following function is not operational
in all countries.
DISTRONIC PLUS uses additional information
from your navigation system so that it can
adapt to certain traffic situations. This is the
case if, while following avehicle, DI STRONIC
PLUS is active and you:
R approach or drive around aroundabout
R approach aT-junction
R turn off at amotorway exit 202
Driving systemsDriving and pa
rking