Page 409 of 441

Securing the vehicle on level ground
X
On level ground: place chocks or oth er
su itabl eitem sunder the front and rea rof
the whee lthat is diagonally opposite the
whee lyou wish to change. Securing the vehicle on slight downhill gradients
X On ligh tdownhill gradients: place
chocks or other suitabl eitems in front of
the wheels of the front and rear axle.
Raisin gthe vehicle G
WARNING
If you do not positio nthe jac kcorrectly at the
appropriate jackin gpoint of the vehicle, the
jac kc ould tip over with the vehicle raised.
There is arisk of injury.
Only position the jack at the appropriate jack-
ing point of the vehicle. The base of the jack
must be positioned vertically, directly under
the jackin gpoint of the vehicle.
! AMG vehicles equipped with the
"Minispare" emergency spare wheel:
Use the "Minispare" emergency spare wheel
only on th erear axle.Ift he
"Minispare" emergenc yspare wheel is
mounted on the front axle, it could damage
the brak esystem.
If at yre on the front axle is faulty, an intact
whee lfrom th erear axle must first be
replaced by the "Minispare" emergency
spare wheel. The faulty tyr eonthe front
axl es hould then be replaced by the intact
tyr efrom th erear axle.
Be sure to observ ethe instruction label on
the "Minispare" emergenc yspare wheel.
The following must be observed when raising
the vehicle:
R to raise the vehicle, only use the vehicle-
specifi cjack that has been tested and
approved by Mercedes-Benz .Ifthe jac kis
used incorrectly, it could tip over while the
vehicle is raised.
R the jack is designed only to raise and hold
the vehicle for ashort tim ewhile awheel
is being changed. It is not suited for per-
forming maintenance wor kunder the vehi-
cle.
R avoid changing the wheel on uphil land
downhil lslopes.
R before raising the vehicle, secure it from
rolling away by applying the parkin gbrake
and inserting whee lchocks. Never disen-
gage the parkin gbrake whil ethe vehicle is
raised.
R the jac kmust be placed on afirm ,flat and
non-slip surface. On aloose surface, a
large, load-bearing underlay must be used.
On aslippery surface, anon-slip underlay
must be used, e.g. rubber mats.
R do not use wooden block sorsimilar
objects as ajack underlay .Otherwi se,the
jack wil lnot be able to achiev eits load-
bearing capacity due to the restricted
height.
R mak esure that the distanc ebetween the
underside of the tyr es andthe grou nddoes
not exceed 3cm. 406
Changing
awheelWheels and tyres
Page 410 of 441

R
neve rplace your hands or feet under the
raised vehicle.
R never lie under the raised vehicle.
R never start the engin ewhen the vehi cleis
raised.
R never open or close adoor or the tailgate
when the vehicle is raised.
R ma kesur ethat no persons ar epresent in
th ev ehicle when the vehicle is raised. X
Usin gwheel wrench :,loosen the bolt son
the whee lyou wish to change by about one
full turn. Do not unscrew the bolt scom-
pletely. The jackin
gpoint sare located jus tbehin dthe
fr ont wh eel archesa nd just in front of the rear
wheel arches (arrows).
X Take the ratchet rin gspanner out of the
vehicle too lkit and place it on the hexagon
nut of the jac ksothat the letters AUFare
visible. ;
Jacking points
= Jack
? Crank
X Position jack =at jackin gpoint ;.
The centring pin on the jac kmust be inser-
ted int othe intended opening on th ejack-
ing point. Example
X
Mak esure that the base of the jac kisposi-
tioned vertically under the jackin gpoint.
X Tur nratchet ring spanner ?until jack =
sits completely on jacking point ;and the
base of the jack lies evenly on the ground.
X Turn ratchet ring spanner ?until the tyre
is raised amaximum of three centimetres
from the ground.
Removing awheel !
Do not pl acew heel bolts in sand or dirt.
The threads of the wheel bolts and wheel
hubs could otherwise be dam aged when
the bolts are tightened. Changing
awheel
407Wheels and tyres Z
Page 411 of 441

X
Unscre wthe uppermost wheel bolt com-
pletely.
X Screw cen tringpin:into the thread
instead of the wheel bolt.
X Unscrew the remainin gwheel bolts fully.
X Remove the wheel.
Fitting anew wheel G
WARNING
Oiled or greased wheel bolt sordamaged
wheel bolts/hub threads can cause the wheel
bolts to com eloose .Asa result,you could
lose awheel while driving. There is arisk of
accident.
Never oil or grease wheel bolts. In the event
of damage to the threads, contact aqualified
specialist workshop immediately .Have the
damaged wheel bolts or hub threads
replaced/renewed. Do not continue driving. G
WARNING
If you tighten the wheel bolts or wheel nuts
when the vehicle is raised, the jac kcould tip
over .There is arisk of injury.
Only tighten the wheel bolts or wheel nuts
when the vehicle is on the ground.
Always pay attention to the instructions and
safety notices in "Changing awheel"
(Y page 404).
Only use wheel bolts that hav ebeen designed
for the wheel and the vehicle. For safet yrea-
sons, Mercedes-Benz recommends that you
only use wheel bolts which have been approved for Mercedes-Benz vehicles and the
respec
tivewheel.
! Always use wheel bolts ;to fit the col-
lapsibl eemergency spare wheel. Using
othe rwheel bolts to fit the collapsible
emergenc yspare wheel could damage the
brak esystem. :
Wheel bolts for all wheels supplied by the
factory
; Wheel bolts for the "Minispare" emer-
gency spare wheel X
Clean the whee land wheel hub contact
surfaces.
X Slide the wheel to be mounted onto the
centring pin and pus hito n.
X Tighten the wheel bolts until they are fin-
ger-tight.
X Unscrew the centring pin.
X Tighten the last wheel bol tuntil it is finger-
tight. 408
Changin
gawheelWheels and tyres
Page 412 of 441

Lowering th
evehicle G
WARNING
The wheels could work loose if th ewheel nuts
and bolt sare not tightened to the specified
tightening torque. There is arisk of accident.
Have the tightening torque immediately
checked at aqualified specialist workshop
after awheel is changed. X
Plac ethe ratchet ring spanner ont othe
hexagon nut of the jac ksothat the letters
AB arev isible.
X Turn the ratchet ring spanner until the vehi-
cle is once again standing firmly on the
ground.
X Place the jack to one side.
X Tighten the wheel bolts evenly in across-
wis epattern in the sequence indicated
(: toA). The tightening torque must be
150 Nm.
X Turn the jack back to its initial position.
X Stow the jack and the rest of the tyre-
changing tools in the stowage well under
the luggag ecompart ment floor.
X Check the tyre pressure of the newly fitted
wheel and adjus titifnecessary.
Observ ethe recommended tyr epressure
(Y page 399).
i Vehicles wit htire pressure control sys-
tem: all fitted wheels must be equipped
with func tionin gsensors. Wheel and ty
recombinations General notes
! For safety reasons, Mercedes-Benz rec-
ommends that you only use tyres and
wheels which have been approved by
Mercedes-Benz specifically for your vehi-
cle.
Thes eare speciall yadapted to the control
systems, such as ABS or ESP ®
and are
marked as follows:
R MO =Mercedes-Ben zOriginal
R MOE =Mercedes-Ben zOriginal Extended
(tyres featuring run-flat characteristics)
R MO1 =Mercedes-Ben zOriginal (only cer-
tain AMG tyres)
Mercedes-Benz Original Extended tyres
may only be use donwheels that hav ebeen
specifically approved by Mercedes-Benz.
Only use tyres, wheels or accessories tes-
ted and approved by Mercedes-Benz. Cer-
tain characteristics, e.g. handling, vehic le
nois eemis sions or fuel consumption, may
otherwise be adv ersely affected. In addi-
tion, when driving with aload, tyr edimen-
sion variations could cause the tyres to
come into contact with the bodywork and
axle components .This could result in dam-
age to the tyres or the vehicle.
Mercedes-Ben zaccept snoliability for
damag eresulting from the use of tyr es,
wheel soraccess orieso the rthan those tes-
ted and approved.
Further information about wheels, tyres
and approved combination scan be
obtained from any qualified specialist
workshop.
! Retreaded tyres are neither tested nor
recommended by Mercedes-Benz, since
previous damage cannot always be detec-
ted on retreaded tyres. As aresult,
Mercedes-Ben zcannot guarantee vehicle
safet yifretreade dtyres are fitted. Do not
fit used tyres if you have no information
about their previous usage. Wheel and tyre combinations
409Wheelsand tyres Z
Page 413 of 441

!
Larg ewheels: the lower the section width
for acertain wheel size, the lower the ride
comfor tiso np oor roa dsurfaces. Roll com-
fort and suspensio ncomfort ar ereduced
and the risk of damage to the wheels and
tyres as aresult of driving over obstacles
increases.
Overview of abbreviations used in the follow-
ing tyr etables:
R BA: both axles
R FA: front axle
R RA: rear axle
You will find atable with recommended tyre
pressures for various operating conditions on
the inside of your vehicle's fuel filler flap. For
further information on tyre pressure, see
(Y page 399). Check tyre pressures regularly
and only when the tyres are cold.
Notes on the vehicle equipment –always fit
the vehicle:
R with tyre softhe sam esize on agiven axle
(left/right)
R with the same type of tyre satagiven time
(summer tyres, winter tyres, MOEx tended
tyres)
Vehicles with MO Extended tyres are not
equippe dwithaTIREFIT kit at th efactory. It
is therefore recommended that you addition-
ally equip your vehicle with aTIREFIT kit if you
fit tyres that do no tfeature run -flat charac-
teristics, e.g. winter tyres. ATIREFIT kit can
be obtaine dfrom aqualified specialist work-
shop.
i Not all wheel/tyre combinations can be
mounted at the factory in all countries. 410
Wheel and tyr
ecombinationsWheels and tyres
Page 414 of 441
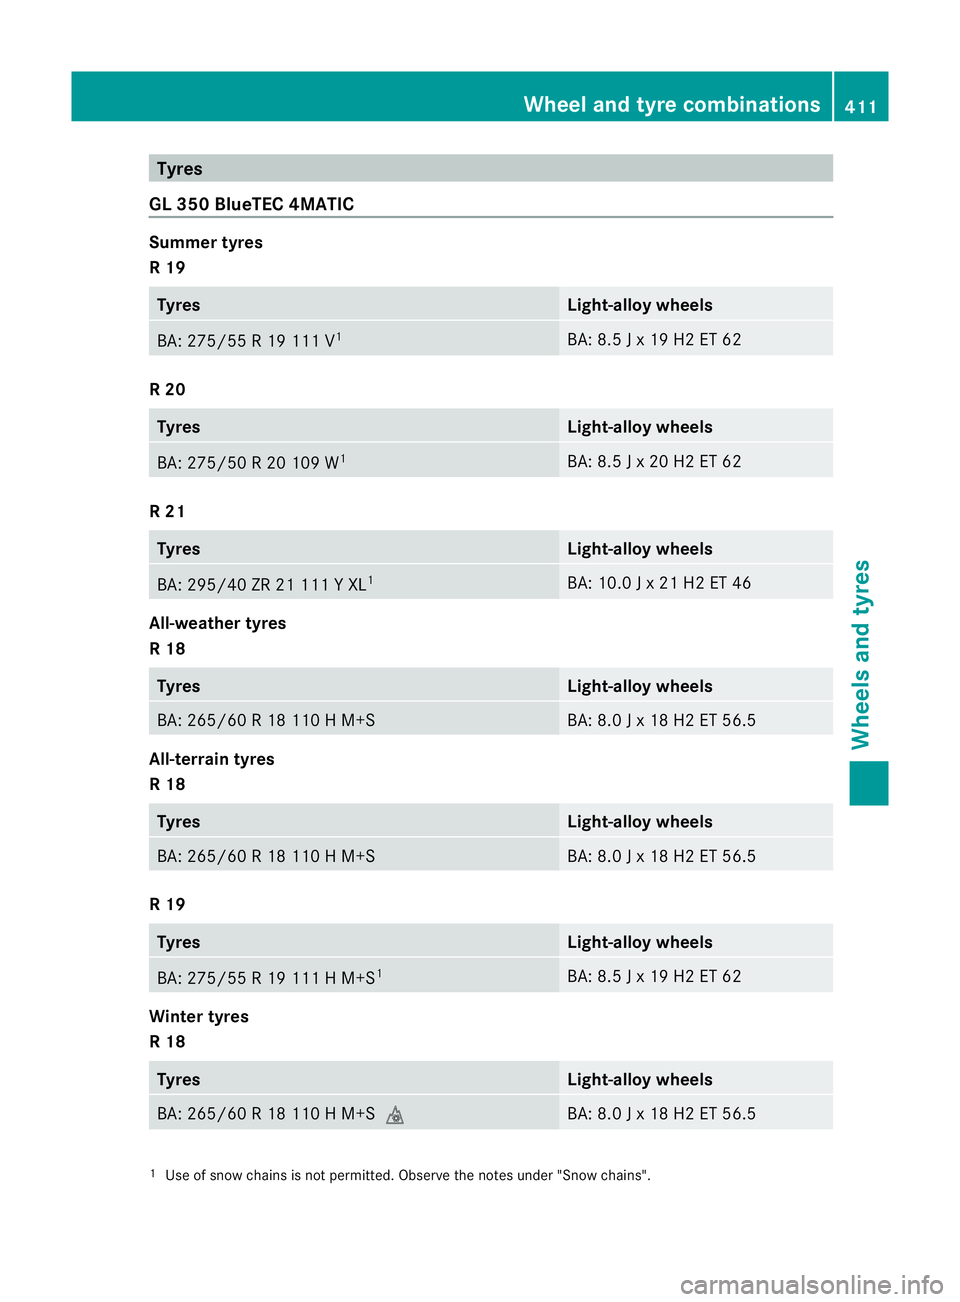
Tyres
GL 35 0BlueTEC 4MATIC Summ
ertyres
R19 Tyres Light-alloy whe
els BA: 275/55
R19111 V 1 BA
:8.5 Jx19H2ET62 R20
Tyres Light-allo
ywheels BA: 275/50
R20109 W1 BA: 8.5
Jx20H2ET62 R21
Tyres Light-alloy wheels
BA: 295/40 ZR 21 111
YXL1 BA: 10.0
Jx21H2ET46 All-weather tyres
R18
Tyres Light-alloy wheels
BA: 265/60
R18110HM +S BA: 8.0
Jx18H2ET56.5 All-terrain tyres
R18
Tyres Light-alloy wheels
BA: 265/60
R18110HM +S BA: 8.0
Jx18H2ET56.5 R19
Tyres Light-alloy wheels
BA: 275/55
R19111HM +S1 BA: 8.5
Jx19H2ET62 Winter tyres
R18
Tyres Light-alloy wheels
BA: 265/60
R18110HM +Si BA: 8.0
Jx18H2ET56.5 1
Use of sno wchains is not permitted. Observe the notes under "Snow chain s". Whee
land tyre combinations
411Wheels and tyres Z
Page 415 of 441
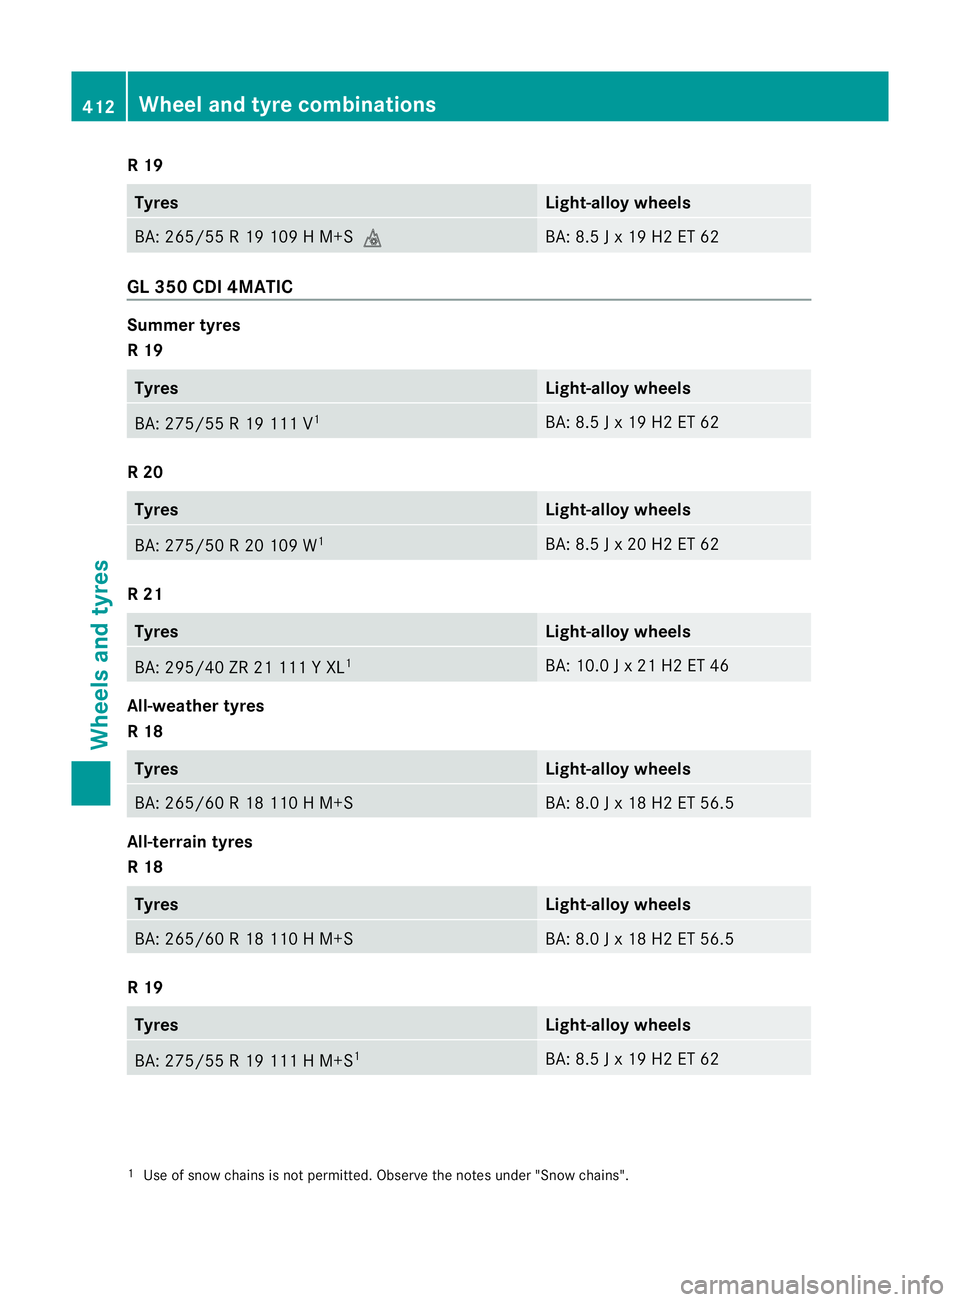
R19
Tyres Light-allo
ywheels BA: 265/55
R19109HM +Si BA: 8.5
Jx19H2ET62 GL 35
0CDI 4M ATIC Summer tyres
R19
Tyres Light-alloy wheels
BA: 275/55
R19111 V1 BA: 8.5
Jx19H2ET62 R20
Tyres Light-alloy wheels
BA: 275/50
R20109 W1 BA: 8.5
Jx20H2ET62 R21
Tyres Light-alloy wheels
BA: 295/40 ZR 21 111
YXL1 BA: 10.0
Jx21H2ET46 All-weather tyres
R18
Tyres Light-alloy wheels
BA: 265/60
R18110HM +S BA: 8.0
Jx18H2ET56.5 All-terrain tyres
R18
Tyres Light-alloy wheels
BA: 265/60
R18110HM +S BA: 8.0
Jx18H2ET56.5 R19
Tyres Light-alloy wheels
BA: 275/55
R19111HM +S1 BA: 8.5
Jx19H2ET62 1
Use of snow chains is no tpermitted. Observe the notes under "Snow chains". 412
Wheel and tyre combinationsWheels and tyres
Page 416 of 441
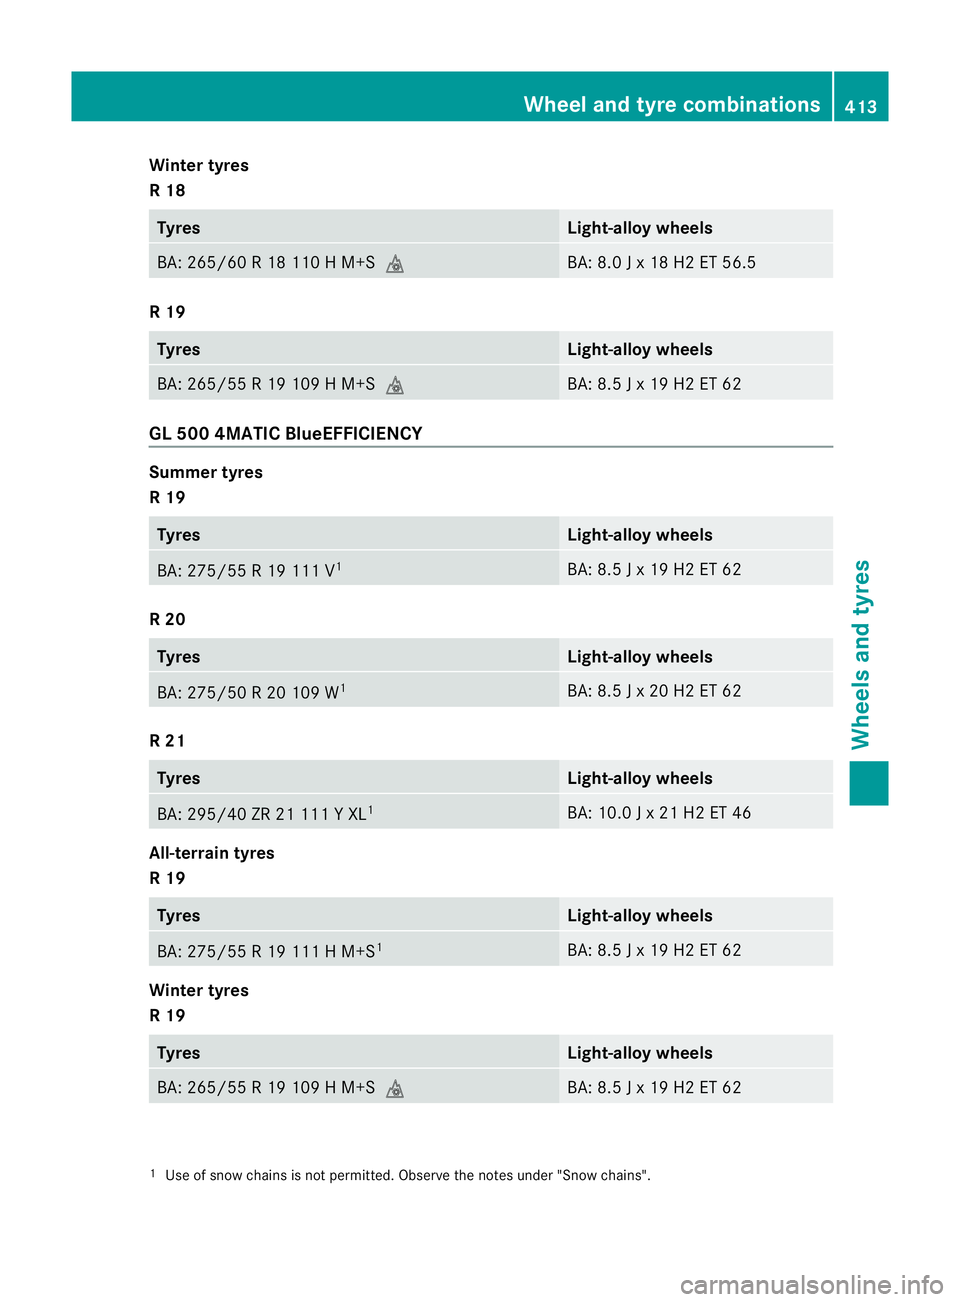
Winter tyres
R18
Tyres Light-alloy wheels
BA: 265/60
R18110HM +Si BA: 8.0
Jx18H2ET56.5 R19
Tyres Light-alloy wheels
BA: 265/55
R19109HM +Si BA: 8.5
Jx19H2ET62 GL 50
04MATI CBlueEFFICIENCY Summer tyres
R19
Tyres Light-alloy wheels
BA: 275/55
R19111 V1 BA: 8.5
Jx19H2ET62 R20
Tyres Light-alloy wheels
BA: 275/50
R20109 W1 BA: 8.5
Jx20H2ET62 R21
Tyres Light-alloy wheels
BA: 295/40 ZR 21 111
YXL1 BA: 10.0
Jx21H2ET46 All-terrain tyres
R19
Tyres Light-alloy wheels
BA: 275/55
R19111HM +S1 BA: 8.5
Jx19H2ET62 Winter tyres
R19
Tyres Light-alloy wheels
BA: 265/55
R19109HM +Si BA: 8.5
Jx19H2ET62 1
Use of snow chains is no tpermitted. Observe the notes under "Snow chains". Wheel and tyre combinations
413Wheels and tyres Z