Page 225 of 441

X
Shift the transmissio ntoposition Dwhile
the vehicle is stationary.
Active Parkin gAssist immediately steer sin
the othe rdirection.
The Park Assist active Accelerate and brake Observe surroundings mes-
sage appears in the multifunction display.
i You will achieve the best results by wait-
ing for the steerin gprocedure to complete
before pulling awa y.
X Drive forwards and be ready to brake at all
times.
X Stop as soo nasPARKTRONIC sounds the
continuous warning tone, if not before.
The ParkAssist active Select R Observe surroundings message appears in
th em ultifunction display.
Further transmissio nshift sm ay be neces-
sary.
As soon as the parking procedure is com-
plete, the Park Assist switched off mes-
sage appears in the multifunc tion display.
PARKTRONIC is still available.
X Manoeuvr eifnecessary.
X Alway sobserv ethe warnin gmessages dis-
played by PARKTRONI C(Ypage 217).
Parking tips:
R on narrow roads, driv easclosely as possi-
ble past the parkin gspace.
R parking spaces that are littered, overgrown
or partially occupied by trailer drawbars
might be identified incor rectly or not at all.
R snowfall or heavy rain may lea dtoap arking
space being measured inaccurately.
R the way your vehicle is positioned in the
parking space after parking is dependent
on various factors. Thes einclude the posi-
tion and shape of the vehicles parked in
front and behind it and the condi tions of the
location .Insome cases, Active Parking
Assist ma yguide you too far into aparking
space, or not far enough into it. In some
cases, it may also lead you across or onto
the kerb. If necessary, you should cancel the parking procedure with Active Parking
Assis
t.
R you can also engag eforward gear prema-
turely. The vehicle redirects and does not
drive as far int othe parkin gspace. Should
ag ear be changed too early, the parking
procedure will be cancelled. Asensible
parkin gposition can no longer be achieved
from this position.
Exiting aparkin gspace G
WARNING
Active Parking Assist doe snot monitor street
traffic .Insome cases, the vehicle will also
tak eyou onto section softhe oncoming lane
when exitin gaparking space.
You are responsible for safety at all times and
must pay attention to any road users
approaching or passing. Stop the vehicle if
necessary or cancel Active Parking Assis t.
Activ eParking Assis tcan only assis tyou with
exitin gaparking space if you have parked the
vehicle using Active Parking Assis t.
X Start the engine.
X Switch on the turn signal on the side facing
the street.
X Shift the transmission to position Dor R.
The Star tPark Assist? Yes: OK No: %
message appears in th emultifunction
display.
X To cancel the procedure: press the
% button on the multifunction steering
wheel or pull away.
or
X To exit aparkin gspace usin gActive
Parking Assist: press theabutton on
the multifunction steering wheel.
The Park Assis tactive Accelerate and brake Observe surroundings mes-
sage appear sinthe multifuncti on display.
X Releas ethe multifunction steeri ngwheel.
X Revers ethe vehi cleo rdrive forwards, being
ready to brake at all times .Donot exceed
am aximum spee dofapproximately 222
Driving systemsDriving and parking
Page 226 of 441

10 km/h wh
enexiting aparking space.
Otherwise ,Active Parking Assist will be
cancel led.
X Stop as soon as PARK TRONIC sounds the
continuous warning tone, if not before.
X Shif tthe transmission to position Dor Ras
req uired wh ilet he vehicle is stationary.
Activ eParking Assis timmediatel ysteers in
the othe rdirection.
i You will achieve the best results by wait-
ing for the steering procedure to complete
before pulling away.
If you rever seafter activation, the steering
wheel is moved to the straight-ahead posi-
tion.
X Drive forwards or reverse the vehicle, being
read ytob rake at al ltimes.
X Stop as soon as PARKTRONIC sounds the
continuou swarning tone, if not before.
X Drive forwards and revers easinstructed by
the PARKTRONI Cwarning displays.
Once you have exite dthe parkin gspace com-
pletely, the steering wheel is moved to the
straight-ahead position. You hea ratonea nd
the message Park Assist switched off appear
sinthe multifuncti on display. You will
then have to steer and merg eintot raffic on
you rown. PARKTRONI Cisstill available.
Cancelling Active Parking Assist X
Stop the movemen tofthe multifunction
steeri ngwheel or steer yourself.
Activ eParking Assist will be cancelled at
once. The Park Assist cancelled mes-
sage appears in the multifunction display.
or
X Press the PARKTRONI Cbutton on the
centr econsole (Y page 218).
PARKTRONI Cisswitched off and Active
Parking Assist is immediately cancelled.
The Park Assist cancelled message
appears in the multifunction display. Activ
eParking Assist is cancelled automati-
cally if:
R parking using Activ eParking Assist is no
longer possible.
R you are drivin gfaster than 10 km/h.
R aw heel spin sand ESP ®
intervenes or fails.
The ÷ warnin glamp lights up in the
instrumen tcluster.
Aw arning ton esounds. The par king symbol
disappears and the multifunction display
shows the ParkA ssist cancelled mes-
sage.
When Activ eParking Assist is cancelled, you
must steer again yourself.
Towing atrailer For vehicles with
atrailer to whitch, the min-
imum length for parking spaces is slightly
increased.
If yo uhavea ttache datrailer to your vehicle,
yo us houl dnot us eActiv eParking Assist.
Once the electrica lconnection is established
between your vehicl eand the trailer, Active
Parking Assist is no longer available .PARK-
TRONIC is deactivated for the rear area. Reversin
gcamera
Important safety notes G
WARNING
Mak esure that no persons or animals are in
the manoeuvring range. Otherwise, they
could be injured. G
WARNING
The reversing camera is only an aid and may
sho wad istorted view of obstacles, show
them incorrectly or not at all. The reversing
camer aisnotas ubstitute for paying atten-
tion. The camera cannot sho wobject sinthe
following areas: Driving systems
223Driving and parking
Z
Page 227 of 441

R
very close to th erear bumper
R under the rear bumper
R in close range above the handle on the boot
lid
You are alway sresponsible for safety, and
must alway spay attention to you rsurround-
ings when parking and manoeuvring. This
applies to the areas behind, in front of and
beside th evehicle. Yo ucould otherwise
endanger yoursel fand others. G
WARNING
Unde rthe followin gcircumstances, the
reversing camer awill not func tion, or will
function in alimited manner:
R if the boot lid is open
R in heavy rain, snow or fog
R at night or in very dark places
R if the camer aisexposed to very brigh tlight
R if the area is lit by fluorescen tlight or LED
lighting (the display may flicker)
R if there is asudden change in temperature,
e.g. when driving into aheated garage in
winter
R if the camera lens is dirt yorobstructed
R if the rear of your vehicl eisdamaged. In this
event, have the camera positio nand setting
checked at aqualified specialist workshop.
Do not use the reversing camera in these
types of situation. You could otherwis einjure
others or damage object sand your vehicle
whil eyou are parking.
General notes Reversin
gcamera :is in the handle on the
tailgate.
Reversing camera :is an optical parking
and manoeuvring aid. It shows the area
behind your vehicle with guide lines in the
COMAND displ ay.
Th ea rea behind th evehicle is displayed as a
mirror image, as in the rear-view mirror.
i The text of messages shown in the
COMAN Ddispla ydepends on the language
setting. The following are examples of
reversin gcamera message sint he
COMAN Ddisplay.
Activating/deactivating the reversing
camera X
To activate: make sure that the key is in
position 2in the ignition lock.
X Make sure that the func tion show reversing
camera display is selected in COMAND
Online.
X Engage reverse gear.
The area behind the vehicle is shown with
guide lines in the COMAN Ddisplay.
X To change the function mode for vehi-
cles with trailer tow hitch: using the
COMAND controller, select symbol :for
the "Reverse parking" func tion or sym-
bol ;for "Coupling up atrailer" (see the
separate COMAND Online operating
instructions).
Th es ymbol of the selected function is high-
lighted. 224
Driving systemsDrivin
gand pa rking
Page 228 of 441

To deactivate:
the reversing camera is deac-
tivated if you:
R sh iftt he transmission to position P
R drive for wards 10 m
R shift th etransmission from Rto another
positio n(after 15 seconds)
R driv eforwards at aspee dofover
10 km/h
Display sintheCOMAN Ddisplay G
WARNING
Usin gthe reversing camera ca nbedangerous
if you are colour-blind or if your abilit ytodis-
tinguish colours is impaired.
Only use th ereversing camera if you can see
and distinguish between all th ecoloured
guide lines that are displayed by the reversing
camera in the COMAN Ddisplay. G
WARNING
Please note that object snot at groun dlevel
may appear to be further away than they
actually are. These include:
R the bumper of avehicle that is parked
behind your vehicle
R at railer drawbar
R theb all coupling of atrailer tow hitch
R thet ail-end of alorry
R slanted posts
The lines are only guides, not accurate meas-
urements of the distance to an obstacle.
Therefore, you should never pass the red line
when approachin ganobstacle. You could oth-
erwise cause an accident and injur eyourself
and others. :
White guide line without turnin gthe steer-
ing wheel, vehicle widt hincluding the
exterior mirrors (static)
; Yellow guid eline at adistance of approx-
imately 4.0 mfrom th erear of the vehic le
= Red guide line for the vehicl ewidth includ-
ing the exterior mirrors, for current steer-
ing whee langle (dynamic)
? Yellow lane marking the course the tyres
willtake at the current steering wheel
angle (dynamic) A
Yellow guide line at adistance of approx-
imately 1.0 mfrom th erear of the vehic le
B Veh icle centr eaxle (marker ass istance)
C Bumper
D Red guide line at adistance of approx-
imately 0.2 5mfrom th erear of the vehic le
Th eg uide lines are sho wn whenthe trans-
mission is in position R.
The distance specifications only apply to
object sthat ar eatground level. Dri
ving systems
225Driving and pa rking Z
Page 229 of 441

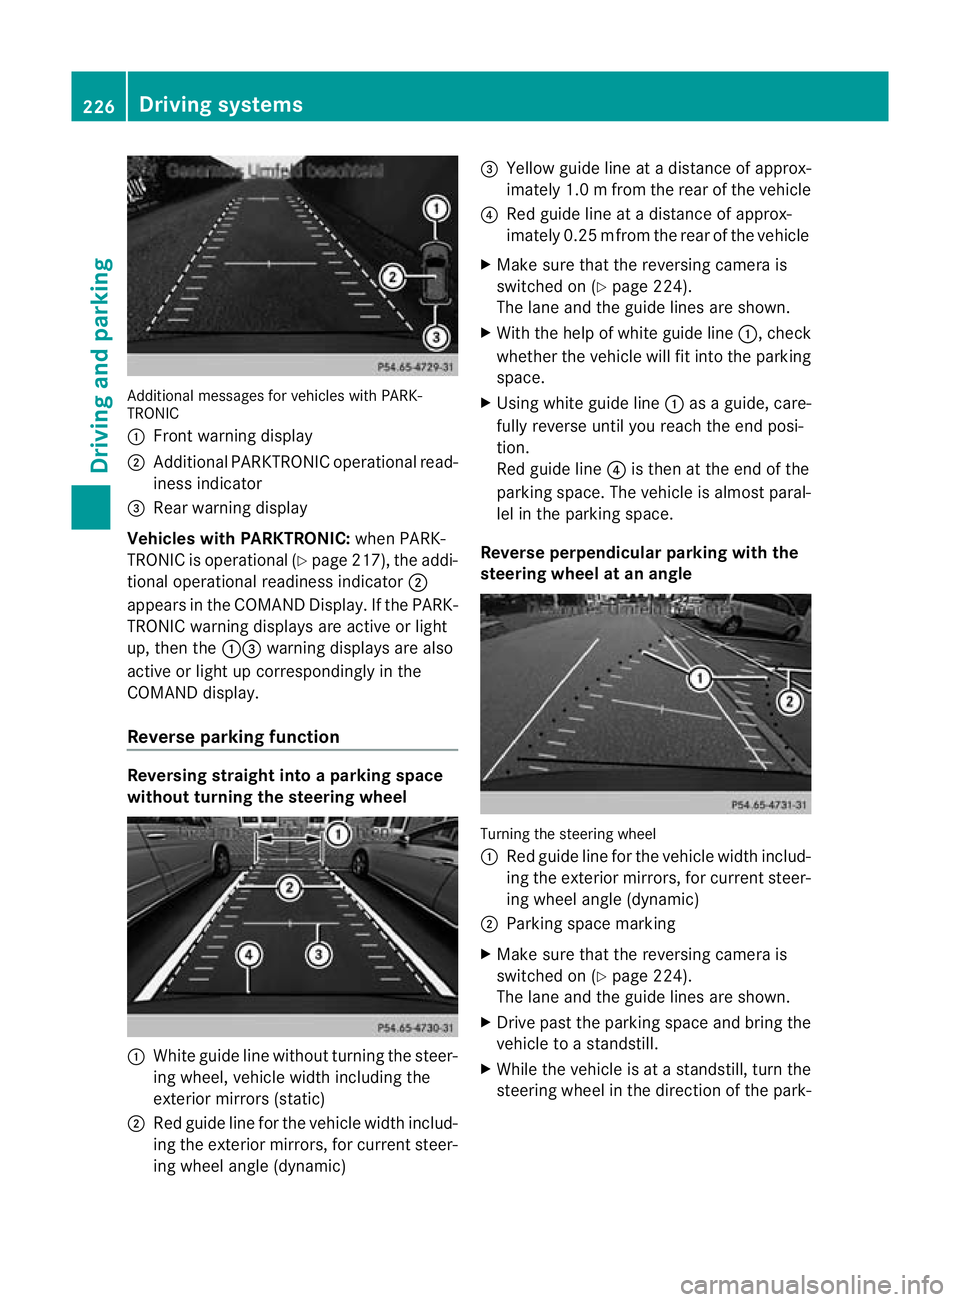
Additiona
lmessages for vehicles with PARK-
TRONIC
: Fron twarning display
; Additiona lPARKTRONIC operationa lread-
iness indicator
= Rear warning display
Veh icleswithP ARKTRONIC: when PARK-
TRONIC is operationa l(Y page 217), the addi-
tional operat iona lreadiness indicator ;
appears in the COMAN DDisplay. If the PARK-
TRONIC warnin gdisplays are active or light
up ,then the :=warnin gdisplays are also
active or light up correspondingl yinthe
COMAND display.
Reverse parkin gfunction Reversin
gstraight into aparkin gspace
withou tturning the ste eringwheel :
White gu idel ine without turning the steer-
ing wheel, vehicle width including the
exterior mirrors (static)
; Red guide line for the vehicle width includ-
ing the exterior mirrors, for current steer-
ing wheel angle (dynamic) =
Yellow guide line at adistance of approx-
imately 1.0 mfrom th erear of the vehic le
? Red guide line at adistance of approx-
imately 0.2 5mfrom th erear of the vehic le
X Ma ke sure that the reversing camera is
switched on (Y page224).
Th elane and the guide lines are sho wn.
X Wi th the hel pofwhite guide line :,check
whether the vehicle will fit into the parking
space.
X Using white guide line :asag uide, care-
fully reverse until you reach the end posi-
tion.
Red guide line ?is then at the end of the
parking space. The vehicle is almost paral-
lel in the parking space.
Reverse perpendicular parking with the
steering wheel at an angle Turning the steering wheel
:
Red guide line for the vehicle width includ-
ing the exterior mirrors, for current steer-
ing wheel angle (dynamic)
; Parking space marking
X Make sure that the reversing camera is
switched on (Y page 224).
The lane and the guide lines are shown.
X Drive past the parking space and bring the
vehicle to astandstill.
X While the vehicle is at astandstill, turn the
steering whee lint he direction of the park- 226
Driving systemsDriving and pa
rking
Page 230 of 441

ing space until red guide line
:reaches
parking space mar king ;.
X Keep the steering wheel in that position
and reverse carefully. Reversing with the steerin
gwheel turned
: Red guide line for the vehicle width includ-
ing the exterior mir rors, for current steer-
ing whee langle (dynamic)
X Stop the vehicle whe nitisalmost exactly
in fron tofthe par king space.
The whit elane should be as close to parallel
with the parking space marking as possi-
ble. Drivin
gtothe final position
: Whit eguide line at current steerin gwheel
angle
; Parking space marking
X Turn the steering wheel to the centr eposi-
tion while the vehicle is stationary. :
Red guide line at adistanc eofapprox-
imately 0.2 5mfrom th erear of the vehicle
; White guide line without turning the steer-
ing wheel
= End of park ings pace
X Reverse carefully unti lyou have reached
the end position.
Red guide line :is then at the end of park-
ing space =.The vehicle is almost parallel
in the parkin gspace.
"Coupling up atrailer" function :
Vehicle centre point on the yellow guide
line at adistance of approximately 1.0 m
from the rear of the vehicle
; Trailer drawbar
= Ball coupling
This func tion is only available on vehicles with
at railer to whitch.
X Set the height of trailer drawbar ;so that
it is slightly higher than ball coupling =.
X Position the vehicle centrally in front of
trailer drawbar ;. Drivin
gsystems
227Drivingand pa rking Z
Page 231 of 441

:
Ballcoupling
; Red guid elineatad istance of approx-
imately 0.25 mfromt he ball coupling
= Trailer drawbar marker assistant
? Trailer drawbar
A Symbol for the "Coupling up atrailer"
functi on
X Use th eCOM AND controlle rtoselect sym-
bol A,s ee the separate operating instruc-
tions for COMAN DOnline.
The "Coupling up atrailer" functio nisselec-
ted. The distance specification snow only
apply to objec tsthat are at the same level
as the ball coupling.
X Reverse carefully, making sure that trailer
drawbar marker assistant =points
approximately in the directio noftrailer
drawbar ?.
X Revers ecarefully until the trailer draw-
bar ?reaches red guide line ;.
X Couple up the trailer (Y page 257).360° camera (surround view)
Important safety notes G
WARNING
Make sure that no persons or animals are in
the manoeuvring range. Otherwise, they
could be injured.
The 360°camera is only an aid and may show
ad istorted view of obstacles, show them
incorrectly or not at all. The 360°camer aisnot
asubstitute for attentiv edriving. It cannot
sho wobjects in the following areas:
R under the fr ontb um per
R very clos etothe frontb um per
R very clos etothe rear bumper
R unde rthe rear bumper
R in close range abov ethe handle on th eboot
lid
R ver yclose to th eexter ior mirrors
You are always responsible for safety, and
must always pay attention to your surround-
ing sw hen par king and manoeuvring. This
applies to the areas behind ,inf ront of and
beside th evehicle. Yo ucould otherwise
endanger yoursel fand oth ers.
The rever sing camera will not functi on or will
function in alimited manner:
R if the doors are open
R if the exterior mir rors are folde din
R if the boot lid is open
R in heavy rain, snow or fog
R at night or in very dark places
R if the cameras are exposed to very bright
light
R if the area is lit by fluorescen tlight or LED
lightin g(the display may flicker)
R if you exit aheate dgarage in winter, result-
ing in arapid change in temperature
R if the camera lenses are dirt yorcovered
R if the vehicle component sinwhich the
cam erasare fitted are damaged .Inthis
event, hav ethe cam eraposition and setting
checked at aqualified specialist workshop.
Do not use the 360 °camer aint his case .You
can otherwise injur eothersorc ause damage
to object sorthe vehicle.
Ge neral notes The 360° camera is
asystem consisting of
four cameras. 228
Drivin
gsystemsDriving and parking
Page 232 of 441

The system evaluates images from the fol-
lowin gcameras:
R reversin gcamera
R fron tcamera
R two cameras in the exterior rear view mir-
rors
The cameras capture the immediate sur-
roundings of the vehicle. The system sup-
ports you, e.g. when parking or if vision is
restricted at an exit.
The 360 °camera images can be shown in full
screen mode or in seven different split-screen
views on the COMAND display. Asplit-screen
view also includes atop view of the vehicle.
This view is calculated from the data supplied
by the installed camera s(virtual camera).
Th e7s plit-screen views are:
R top view and picture from the reversing
camera (13 0°viewing angle)
R top view and picture from the fron tcamera
(without displaying the maximum steering
wheel angle)
R top view and enlarged rear view
R top view and enlarged front view
R top view and trailer view (vehicles with
trailer tow hitch)
R top view and pictures from the rearward
facin gmirror cameras (rear wheel view)
R top view and pictures from the forward
facin gmirror cameras (fron twheel view)
i The top vie wand trailer view are available
for vehicles equipped with atrailer tow
hitch.
When th efunction is active and you shift the
transmission from position Dor Rto N,y ou
see the previous view in the COMAN Ddis-
play. The dynamic guidelines are hidden.
When you change between transmission
positions Dand R,you see the previously
selected front or rea rview. Activation conditions The 360
°camera image can be displ ayed if:
R your vehicle is equip pedw ith the 360°
camera.
R COMAND Online is switched on, see the
separate COMAND Online operating
instruc tions.
R the 360° camera func
tion is activated
Activating th e360° camera using the
SYS but ton X
Press and hold the Wbutton for longer
than 2seconds, see the separate COMAND
Online operatin ginstructions.
Depe nding on whether position Dor Ris
engaged, the following is shown:
R full screen display with the image from
the fron tcamera
R full screen display with the image from
the rear camera.
Activating the 360° camer awith
COMAN DOnline X
Press the Wbutton, see the separate
COMAN DOnline operating instructi ons.
X Select System by turning
cVdthe
COMAND contr ollerand press Wto con-
firm.
X Select 360°camera and press
Wto con-
firm.
Depending on whethe rposition Dor Ris
engaged, the following is shown:
R as plit screen with top view and the
image from the front camera or
R as plit screen with top view and the
image from the reversing camera.
For further information about the COMAND
Controller, see the separat eCOMAN DOnline
operating instructions. Drivin
gsystems
229Drivingand pa rking Z