2012 MERCEDES-BENZ G-CLASS SUV steering
[x] Cancel search: steeringPage 171 of 357
R
Clean any mud from the tyre tread after
fording.
R Apply the brakes to dry them after fording.
R Water offers a high degree of resistance,
the ground is slippery and ,insome cases,
unstable. Therefore, it is difficult and dan-
gerous to pull away in the water.
R Ensure that a bow wave does not form as
you drive.
R Clean any mud from the tyre tread after
fording.
R Apply the brakes to dry them after fording. Parking the vehicle after heavy loads
on the engine
! Vehicles with adiesel engine: your
vehicle's exhaust gas turbocharger may get
very hot under heavy engine load, e.g. dur-
ing:
R trailer towing
R longe rmotorway journeys at high speed
R longer journeys through mountainous
terrain
X Let the engine run for approximately
another two minutes while the vehicle is
stationary before switching off the engine.
This way, the exhaust gas turbocharger can
cool down more effectively. Winter driving
General notes G
DANGER
If the exhaust pipe is blocked or adequate
ventilation is not possible, poisonous gases
such as carbon monoxide (CO) may enter the
vehicle. This is the case, e.g. if the vehicle
becomes trapped in snow. There is a risk of
fatal injury.
If you leave the engine or the auxiliary heating
running, make sure the exhaust pipe and area
around the vehicle are clear of snow. To ensure an adequate supply of fresh air, open
a window on the side of the vehicle that is not
facing into the wind. G
WARNING
If you have fitted snow chains to the front
wheels, they may scrape against the vehicle
body or chassis components. This could
cause damage to the vehicle or the tyres.
There is a risk of an accident.
To avoid hazardous situations:
R never fit snow chains on the front wheels
R fit snow chains to the rear wheels in pairs.
At the onset of winter, have your vehicle win-
terproofed at a qualified specialist workshop.
Observe the notes in the "Winter operation"
section (Y page 323).
Driving with summer tyres Observe the notes in the "Winter operation"
section (Y
page 323).
Slippery road surfaces G
WARNING
If you shift down on a slippery road surface in
an attempt to increase the engine's braking
effect, the drive wheels could lose their grip.
This increases the risk of skidding and having
an accident.
Do not shift down for additional engine brak-
ing on a slippery road surface.
You should drive particularly carefully on slip-
pery road surfaces. Avoid sudden accelera-
tion, steering and braking manoeuvres.
If the vehicle threatens to skid or cannot be
stopped when moving at low speed:
X Move the transmission to position N.
X Try to bring the vehicle under control by
using corrective steering.
i For more information on driving with
snow chains, see (Y page 324).168
Driving tipsDriving and parking
Page 174 of 357
Checklist after driving off-road
Driving ove
rrough terrain places greater
demands on your vehicle than driving on nor-
mal roads. After driving off-road, check the
vehicle. This allows you to detect damage
promptly and reduce the risk of an accident
to yourself and other road users.
X Shift the transfer case to HIGH
RANGE(Y page 202).
X Disengage the differential locks
(Y page 204).
X Clean the headlamps and rear lights and
check for damage.
X Clean the front and rear licence plates.
X Clean the wheels and tyres with a water jet
and remove any foreign objects.
X Clean the wheels, tyres, wheel arches and
the vehicle underside with a water jet;
check for any foreign objects and damage.
X Check whether twigs or other parts of
plants have become trapped. These
increase the risk of fire and can damage
fuel pipes, brake hoses or the rubber bel-
lows of the axle joints and propeller shafts.
X After the trip, examine without fail the
entire undercarriage, wheels, tyres, brakes,
bodywork structure, steering, chassis and
exhaust system for damage.
X After driving for extended periods across
sand, mud, gravel, water or in similarly dirty
conditions, have the brake discs, wheels,
brake pads/linings and axle joints checked
and cleaned.
X If you notice strong vibrations after off-road
driving, check for foreign objects in the
wheels and drive train and, if necessary,
remove them. Foreign objects can disturb
the balance and cause vibrations. Driving on sand Observe the following rules when driving on
sand:
R
Shift the transfer case to LOW
RANGE(Y page 202).
R Avoid high engine speeds.
R Limit the shift range of the automatic trans-
mission according to the off-road condi-
tions.
R Drive quickly to overcome the rolling resist-
ance. Otherwise, the vehicle could dig itself
into the sand.
R Drive in the tracks of other vehicles if pos-
sible. Make sure that the ruts are not too
deep, that the sand is firm enough and that
your vehicle has sufficient ground clear-
ance.
Tyre ruts and gravel roads !
Check that the ruts are not too deep and
that your vehicle has sufficient clearance.
Otherwise, your vehicle could be damaged
or bottom out and get stuck.
Observe the following rules when driving
along ruts in off-road terrain or on roads with
loose gravel:
R Shift the transfer case to LOW
RANGE(Y page 202).
R Avoid high engine speeds.
R Observe the safety notes (Y page 169) and
the general notes (Y page 169) on off-road
driving.
R Restrict the shift range of the automatic
transmission to 1(Ypage 153).
R Drive slowly.
R Where ruts are too deep, drive with the
wheels on one side on the middle section
of turf if possible.
Driving over obstacles !
Obstacles could damage the floor of the
vehicle or components of the chassis. Ask
passengers for guidance when driving over Driving tips
171Driving and parking Z
Page 177 of 357
Do not use cruise control:
R
in traffi cconditions that do not allow you
to drive at a constant speed, e.g. heavy
traffic, on winding roads or off-road
R on slippery road surfaces. Braking or accel-
erating could cause the drive wheels to lose
traction and the vehicle could then skid.
R when there is poor visibility, e.g. due to fog,
heavy rain or snow
General notes Cruise control maintains a constant road
speed for you. On long and steep downhill
gradients, especially if the vehicle is laden or
towing a trailer, you must select shift range
1,
2or 3in good time. By doing so, you will
make use of the braking effect of the engine.
This relieves the load on the brake system and
prevents the brakes from overheating and
wearing too quickly.
Use cruise control only if road and traffic con-
ditions make it appropriate to maintain a
steady speed for a prolonged period. You can
store any road speed above 30 km/h.
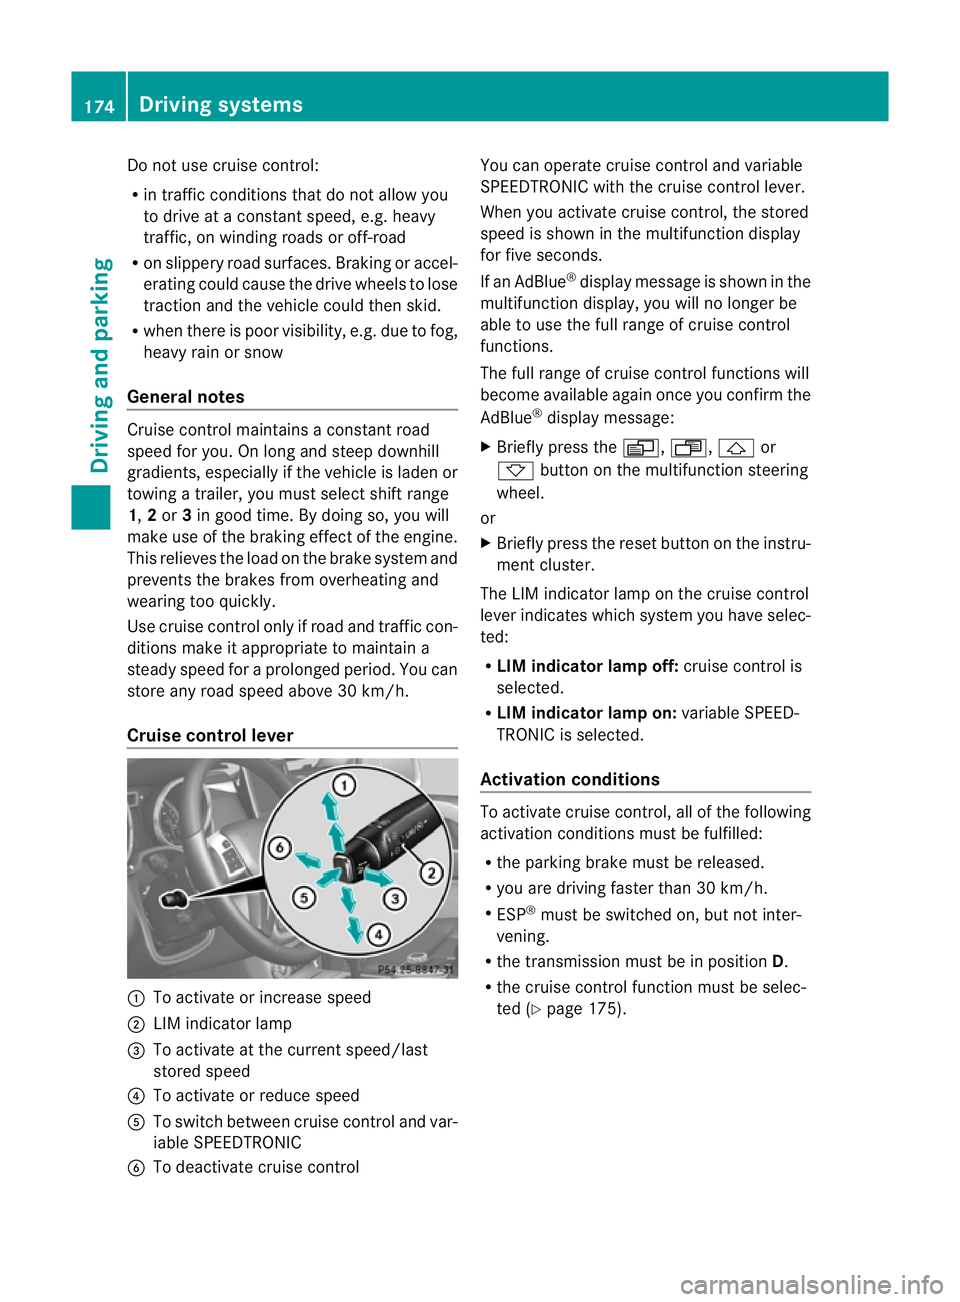
Cruise control lever :
To activate or increase speed
; LIM indicator lamp
= To activate at the current speed/last
stored speed
? To activate or reduce speed
A To switch between cruise control and var-
iable SPEEDTRONIC
B To deactivate cruise control You can operate cruise control and variable
SPEEDTRONIC with the cruise control lever.
When you activate cruise control, the stored
speed is shown in the multifunction display
for five seconds.
If an AdBlue ®
display message is shown in the
multifunction display, you will no longer be
able to use the full range of cruise control
functions.
The full range of cruise control functions will
become available again once you confirm the
AdBlue ®
display message:
X Briefly press the V,U,&or
* button on the multifunction steering
wheel.
or
X Briefly press the reset button on the instru-
ment cluster.
The LIM indicator lamp on the cruise control
lever indicates which system you have selec-
ted:
R LIM indicator lamp off: cruise control is
selected.
R LIM indicator lamp on: variable SPEED-
TRONIC is selected.
Activation conditions To activate cruise control, all of the following
activation conditions must be fulfilled:
R
the parking brake must be released.
R you are driving faster than 30 km/h.
R ESP ®
must be switched on, but not inter-
vening.
R the transmission must be in position D.
R the cruise control function must be selec-
ted (Y page 175). 174
Driving systemsDriving and parking
Page 198 of 357
Course-correcting brake application
G
WARNING
Active Blind Spot Assist is only an aid
designed to assis tdriving. It is not a substitute
for attentive driving. Automatic braking by the
system may not always be sufficient to avoid
a collision. In such cases, you need to steer,
brake or accelerate yourself.
In very rare cases, the system may detect a
risk of collision where there is none and brake
in error near crash barriers or similar road
boundaries. Active Blind Spot Assist cannot
detect all traffic situations and road users.
Ensure at all times that there is sufficient lat-
eral distance between you and other road
users or obstacles. You can, for example,
countersteer gently or depress the accelera-
tor pedal at any time to cancel inappropriate
braking action.
You are responsible for the vehicle's speed,
correct steering and for braking in good time.
Always adapt yourd riving style to suitthe
prevailing road and weather conditions.
Always pay attention to traffic conditions and
your surroundings. Otherwise, you may fail to
recognise dangers in time, cause an accident
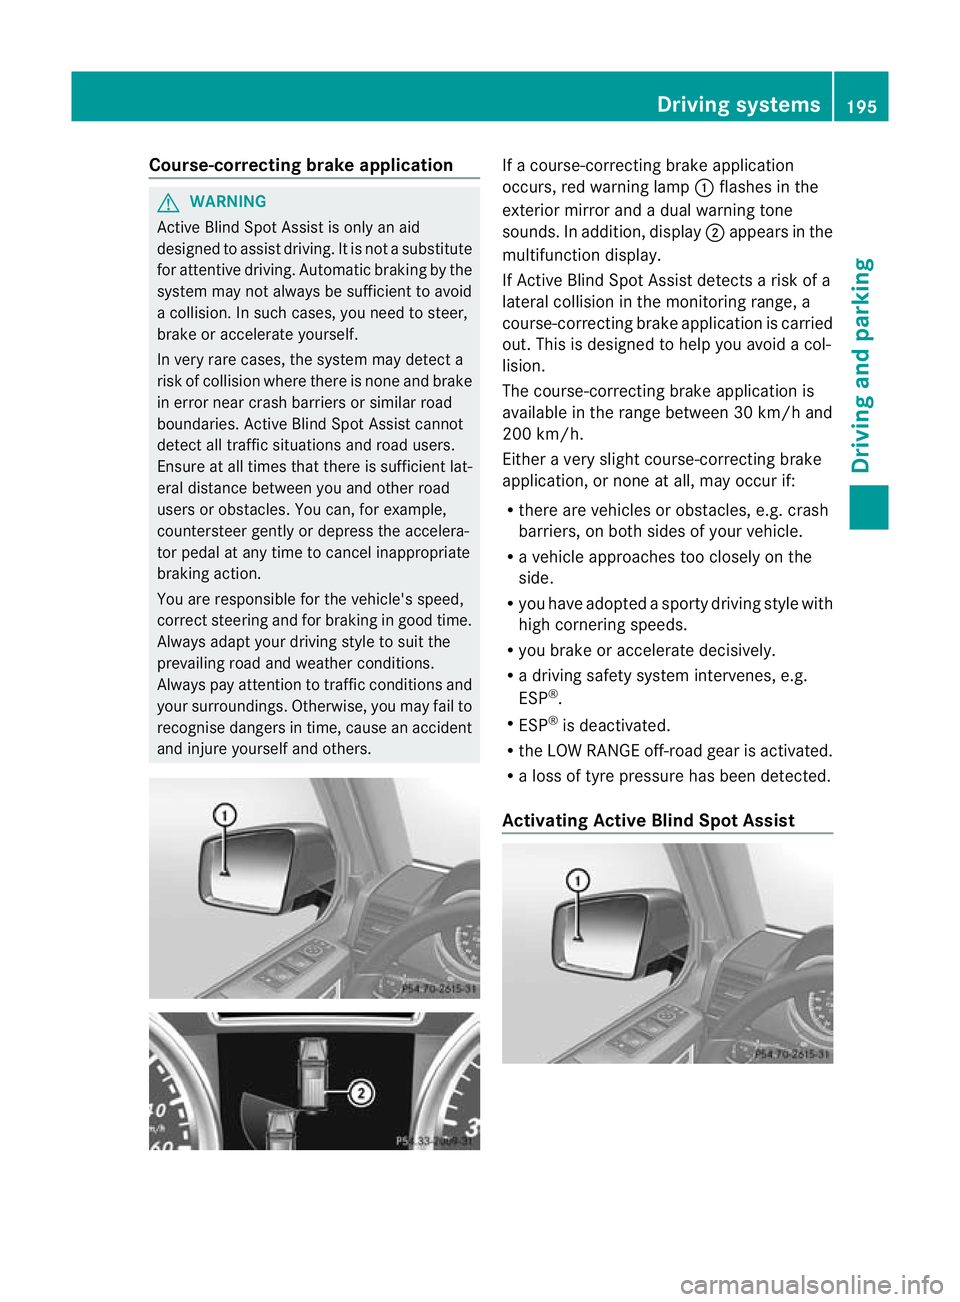
and injure yourself and others. If a course-correcting brake application
occurs, red warning lamp
:flashes in the
exterior mirror and a dual warning tone
sounds. In addition, display ;appears in the
multifunction display.
If Active Blind Spot Assist detects a risk of a
lateral collision in the monitoring range, a
course-correcting brake application is carried
out. This is designed to help you avoid a col-
lision.
The course-correcting brake application is
available in the range between 30 km/h and
200 km/h.
Either a very slight course-correcting brake
application, or none at all, may occur if:
R there are vehicles or obstacles, e.g. crash
barriers, on both sides of your vehicle.
R a vehicle approaches too closely on the
side.
R you have adopted a sporty driving style with
high cornering speeds.
R you brake or accelerate decisively.
R a driving safety system intervenes, e.g.
ESP ®
.
R ESP ®
is deactivated.
R the LOW RANGE off-road gear is activated.
R a loss of tyre pressure has been detected.
Activating Active Blind Spot Assist Driving systems
195Driving and parking Z
Page 208 of 357
For further information on driving off-road,
see (Y page 169).
i You can only engage the differential locks
if the transfer case is in the LOW RANGE
off-road driving positio n(Ypage 201).
i You can activate the differential locks in
the following order =,?,;.
Differential lock for the transfer case X
To engage: switch the transfer case to the
LOW RANGE off-road driving position
(Y page 202).
X Press switch =.
When the transfer case is in the LOW
RANGE off-road driving position, the yellow
activation indicator lamp below switch =
lights up.
The å warning lamp in the instrument
panel lights up.
When the differential is locked, the red
function indicator lamp above switch =
lights up.
The following message appears in the mul-
tifunction display:
ABS not available differential locked
The
å!÷ warning lamps in the
instrument cluster light up.
The differential lock for the transfer case is
engaged.
4ETS, ESP ®
, BASa nd ABS ar edeactivated.
The vehicle's ability to steer is severely
restricted. Drive carefully and accelerate gen-
tly for optimum traction.
i You can now engage the differential lock
for rear axle ?and the differential lock for
front axle ;as required. Differential lock for the rear axle X
To engage: press switch ?.
Yellow activation indicator lamp Alights
up first, followed by red function indicator
lamp :of switch ?.
The differential lock for the rear axle is
engaged.
Differential lock for the front axle X
To engage: press switch ;.
The yellow activation indicator lamp lights
up first, followed by the red function indi-
cator lamp.
The differential lock for the front axle is
engaged.
Deactivating the differential lock You can deactivate the differential locks in
this order:
;,?,=.
X To simultaneously deactivate all differ-
ential locks: press switch=.
Yellow activation indicator lamps Aand
red function indicator lamps :go out.
After approximately three seconds of nor-
mal driving, ABS, 4ETS, ESP ®
and BAS are
activated.
The ABS not available differential
locked message disappears from the mul-
tifunction display and the å,!and
÷ warning lamps in the instrument clus-
ter go out.
X Shift the transfer case to the HIGH
RANGE on-road position (Y page 202).
If red function indicator lamps :do not go
out when deactivating the differential locks:
X Observe the traffic situation.
X While driving, make some gentle steering
movements.
Red function indicator lamps :go out as
soon as the differential locks have been
disengaged. Off-road driving systems
205Driving and parking Z
Page 209 of 357

Towing
atrailer Notes on towing
atrailer
Important safety notes G
WARNING
The braking syste mcan overheat if you leave
your foo tonthe brake pedal while driving.
This increases the braking distance and could
even cause the braking system to fail. There
is a risk of an accident.
Never use the brake pedal as a footrest.Do
not simultaneously depress both the brake
pedal and the accelerato rpedal while driving. G
WARNING
You could lose control of the vehicle/trailer
combination if it begins to swerve. The vehi-
cle/trailer combination could even overturn.
There is a risk of an accident.
On no account should you attempt to
straighten out the vehicle/trailer combina-
tion by increasing speed. Decrease your
speed and do not countersteer. Brake if nec-
essary. G
WARNING
If the ball coupling has not been correctly fit-
ted and has not been secured with the bolt
supplied and the correspondin gspring cotter,
the trailer can detach. There is a risk of an
accident.
Always fit and secure the ball coupling as
described. Before beginning each journey,
make sure that the fitted ball coupling is
secured with the bolt supplied and the corre-
sponding spring cotter.
You will find the applicable permissible val-
ues, which must not be exceeded, in the vehi-
cle documents. You will find the values
approved by the manufacturer on the vehicle
identification plates and those for the towing
vehicle in the "Technical data" section
(Y page 340). Couple and uncouple the trailer carefully. If
you do not couple the trailer to the towing
vehicle correctly, the trailer could become
detached.
Make sure that the following values are not
exceeded:
R the permissible trailer drawbar noseweight
R the permissible trailer load
R the permissible rear axle load of the towing
vehicle
R the maximum permissible gross vehicle
weight of both the towing vehicle and the
trailer
When towing a trailer, your vehicle's handling
characteristics will be differen tincomparison
to when driving without a trailer.
The vehicle/trailer combination:
R is heavier
R is restricted in its acceleration and gradi-
ent-climbing capability
R has an increased braking distance
R is affected more by strong crosswinds
R demands more sensitive steering
R has a larger turning circle
This can impair the vehicle's handling char-
acteristics.
When towing a trailer, always adjust your
speed to the current road and weather con-
ditions. Do not exceed the maximum permis-
sible speed for your vehicle/trailer combina-
tion.
General notes !
Use a drawbar noseweight as close to the
maximum permissible noseweight as pos-
sible. Do not use a noseweight of less than
80 kg; otherwise, the trailer may come
loose.
Note that the payload and the rear axle load
are reduced by the actual payload.
i When towing a trailer, set the tyre pres-
sure on the rear axle of the towing vehicle 206
Towing
atrailerDriving an d parking
Page 216 of 357
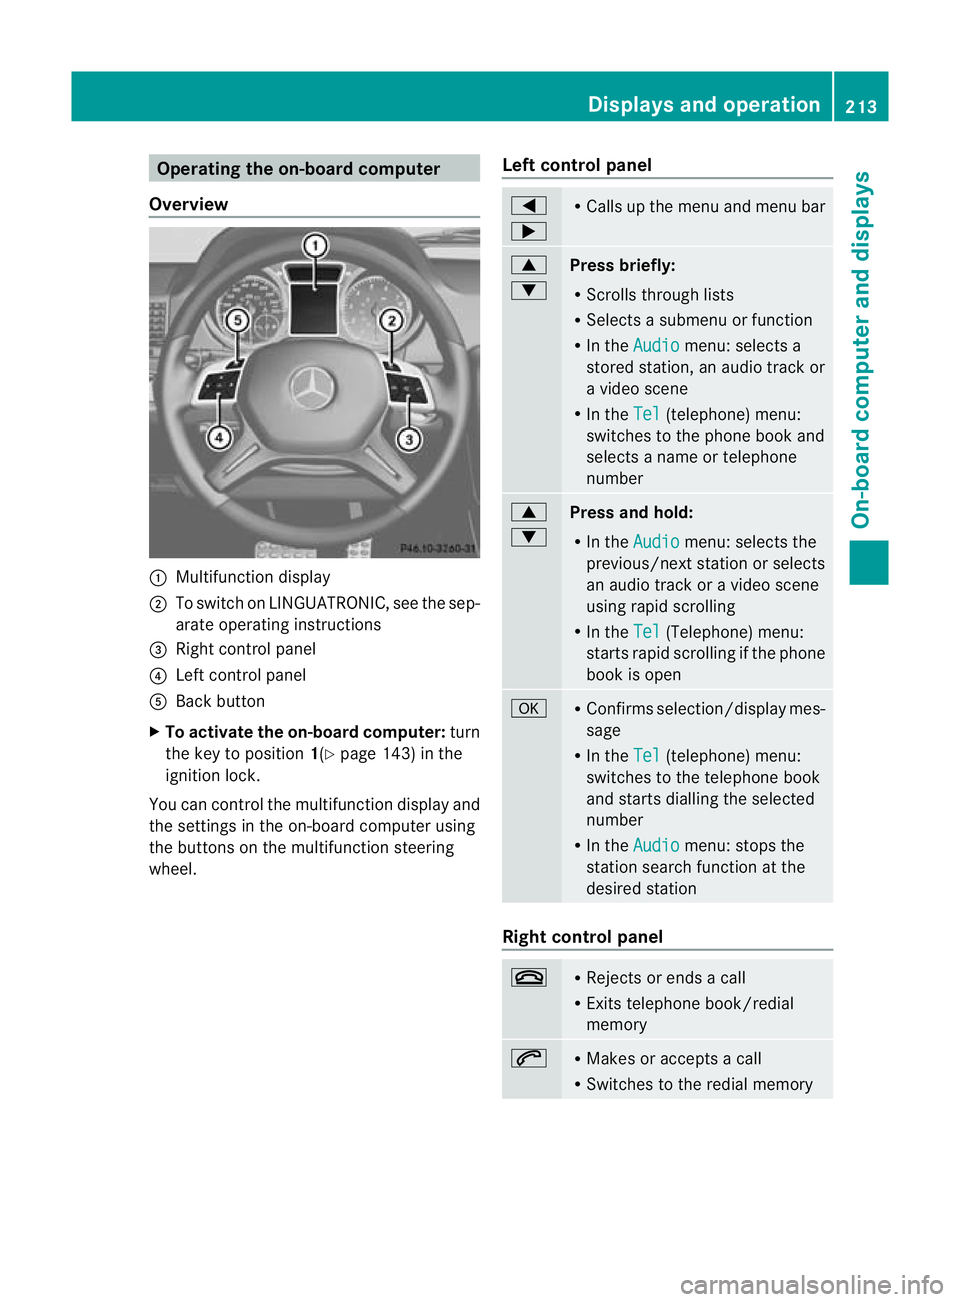
Operating the on-board computer
Overview :
Multifunction display
; To switch on LINGUATRONIC, see the sep-
arate operating instructions
= Right control panel
? Left control panel
A Back button
X To activate the on-board computer: turn
the key to position 1(Ypage 143) in the
ignition lock.
You can control the multifunction display and
the settings in the on-board computer using
the buttons on the multifunction steering
wheel. Left control panel =
; R
Calls up the menu and menu bar 9
:
Press briefly:
R
Scrolls through lists
R Selects a submenu or function
R In the Audio menu: selects a
stored station, an audio trac kor
a video scene
R In the Tel (telephone) menu:
switches to the phone book and
selects a name or telephone
number 9
:
Press and hold:
R
In the Audio menu: selects the
previous/next statio norselects
an audio trac koravideo scene
using rapid scrolling
R In the Tel (Telephone) menu:
starts rapid scrolling if the phone
book is open a R
Confirms selection/display mes-
sage
R In the Tel (telephone) menu:
switches to the telephone book
and starts dialling the selected
number
R In the Audio menu: stops the
station search function at the
desired station Right control panel
~ R
Rejects or ends a call
R Exits telephone book/redial
memory 6 R
Makes or accepts a call
R Switches to the redial memory Displays and operation
213On-board computer and displays Z
Page 217 of 357
W
X R
Adjusts the volume 8 R
Mute Back button
%
Press briefly:
R
Back
R Switches off LINGUATRONIC,
see the separate operating
instructions
R Hides display messages/calls
up the last Trip menu function
used
R Exits the telephone book/redial
memory %
Press and hold:
R
Calls up the standard display in
the Trip menu
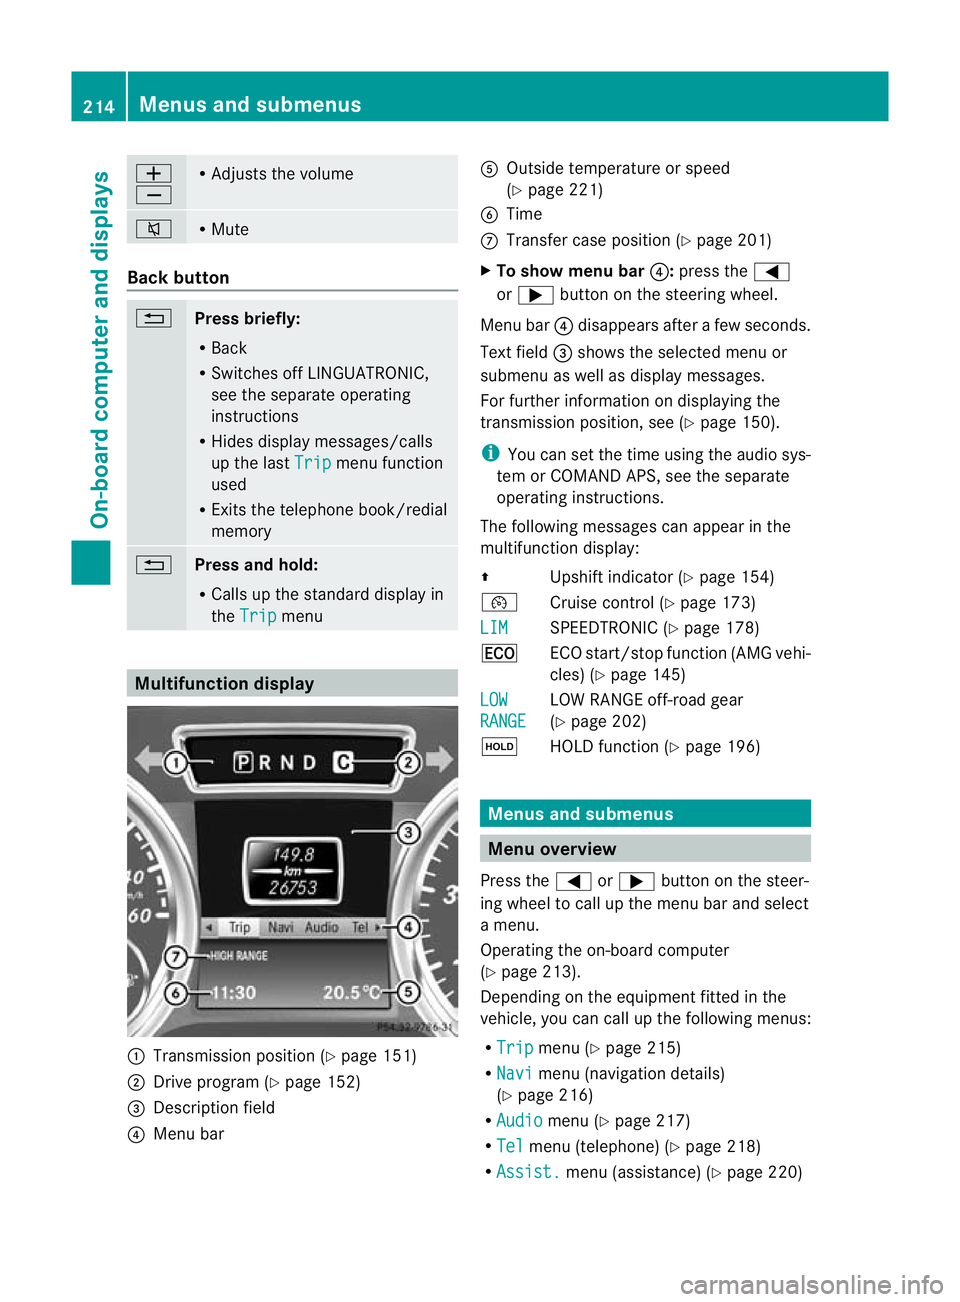
Multifunction display
:
Transmission positio n(Ypage 151)
; Drive program (Y page 152)
= Description field
? Menu bar A
Outside temperature or speed
(Ypage 221)
B Time
C Transfer case position (Y page 201)
X To show menu bar ?:press the =
or ; button on the steering wheel.
Menu bar ?disappears after a few seconds.
Text field =shows the selected menu or
submenu as well as display messages.
For further information on displaying the
transmission position, see (Y page 150).
i You can set the time using the audio sys-
tem or COMAND APS, see the separate
operating instructions.
The following messages can appear in the
multifunction display:
Z Upshift indicator (Y page 154)
¯ Cruise control (Y page 173)
LIM SPEEDTRONIC (Y
page 178)
¤ ECO start/stop function (AMG vehi-
cles) (Ypage 145)
LOW RANGE LOW RANGE off-road gear
(Y
page 202)
ë HOLD function (Y page 196) Menus and submenus
Menu overview
Press the =or; button on the steer-
ing wheel to call up the menu bar and select
a menu.
Operating the on-board computer
(Y page 213).
Depending on the equipment fitted in the
vehicle, you can call up the following menus:
R Trip menu (Y
page 215)
R Navi menu (navigation details)
(Y page 216)
R Audio menu (Y
page 217)
R Tel menu (telephone) (Y
page 218)
R Assist. menu (assistance) (Y
page 220)214
Menus and submenusOn-board computer and displays