2012 MERCEDES-BENZ G-CLASS SUV change time
[x] Cancel search: change timePage 4 of 357
Welcome to the world of Mercedes-Benz
Before you first drive off, read this Owner's
Manual carefully and familiarise yourself with
yourv ehicle. For your own safety and a longer
vehicle life, follow the instructions and warn-
ing notices in this manual. Disregarding them
may lead to damage to the vehicle or personal
injury.
The equipment or model designation of your
vehicle may vary according to:
R model
R order
R country variant
R availability
The illustrations in this manual show a left-
hand-drive vehicle. On right-hand-drive vehi-
cles, the layout of components and controls
differs accordingly.
Mercedes-Benzi s constantly updating its
vehicles to the state of the art.
Mercedes-Benz therefore reserves the right
to introduce changes in the following areas:
R design
R equipment
R technical features
The equipment in your vehicle may therefore
differ from that shown in the descriptions and
illustrations.
The following are integral components of the
vehicle:
R Owner's Manual
R Service Booklet
R equipment-dependent supplements
Keep printed copies of the documents in the
vehicle at all times. If you sell the vehicle,
always pass the documents on to the new
owner.
i You can get to know the important fea-
tures of your vehicle in the interactive Own-
er's Manual on the Internet at:
http://www.mercedes-benz.de/
betriebsanleitung The technical documentation team at
Daimler AG wishes you safe and pleasant
motoring.
4635845372 É4635845372ÇËÍ
Page 23 of 357
Protection of the environment
General notes
H
Environmental note
Daimler's declared policy is one of compre-
hensive environmental protection.
The objectives are for the natural resources
which form the basis of our existence on this
planet to be used sparingly and in a manner
which takes the requirements of both nature
and humanity into account.
You too can help to protect the environment
by operating your vehicle in an environmen-
tally-responsible manner.
Fuel consumption and the rate of engine,
transmission, brake and tyre wear depend on
the following factors:
R operating conditions of your vehicle
R your personal driving style
You can influence both factors. You should
bear the following in mind:
Operating conditions:
R avoid short trips as these increase fuel con-
sumption.
R make sure that the tyre pressures are
always correct.
R do not carry any unnecessary weight.
R keep an eye on the vehicle's fuel consump-
tion.
R remove roof racks once you no longer need
them.
R a regularly serviced vehicle will contribute
to environmental protection. You should
therefore adhere to the service intervals.
R always have service work carried out at a
qualified specialist workshop.
Personal driving style:
R do not depress the accelerator pedal when
starting the engine.
R do not warm up the engine with the vehicle
stationary.
R drive carefully and maintain a safe distance
from the vehicle in front. R
avoid frequent, sudden acceleration.
R change gear in good time and use each gear
only up to Ôof its maximum engine speed.
R switch off the engine in stationary traffic. Returning an end-of-life vehicle
Mercedes-Benz will take back your
Mercedes-Benz to dispose of it in an environ-
mentally responsible manner, in accordance
with the European Union (EU) End of Life
Vehicles Directive.
The End of Life Vehicles Directive applies to
vehicles with a gross vehicle weight of up to
3.5 t, in accordance with national regulations.
For several years, Mercedes-Benz has been
meeting all the legal requirements for a
design which allows for recycling and re-use.
There is a network of return points and dis-
assembly plants which can recycle your vehi-
cle in an environmentally-responsible man-
ner. The methods employed in vehicle and
parts recycling are constantly being devel-
oped and improved. This means that your
Mercedes-Benz will also continue to meet
even the increased recycling quotas in the
future in good time. You can obtain further
information from your national Mercedes-
Benz homepage or your national hotline num-
ber. Owner's Manual
General notes
Before you first drive off, read this Owner's
Manual carefully and familiarise yourself with
your vehicle.
For your own safety and a longer vehicle life,
follow the instructions and warning notices in
this manual. Disregarding them may lead to
damage to the vehicle or personal injury. 20
Introduction
Page 47 of 357
R
Only one person should use each seat belt
at any one time. Children must never travel
sitting on the lap of another occupant. The
child will not be secured in the event of an
accident, heavy braking or sudden change
of direction. This may result in the child or
other occupants being seriously or fatally
injured.
R Persons under 1.50 mtall cannot wear the
seat belts correctly. For this reason secure
persons less than 1.50 m tall in specially
designed, suitable restraint systems.
R Children unde r1.50 mtall and younger
than twelve years of age canno twear the
seat belts correctly. For this reason secure
them in special suitable child restraint sys-
tems installed on a suitable seat. Additional
information can be found in the Operating
Instructions in the chapter "Safety", "Chil-
dren in the Vehicle". Observe the installa-
tion instructions of the child restraint sys-
tem manufacturer.
R Do not secure an object with a seat belt if
the seat belt is also being used by one of
the vehicle's occupants. G
WARNING
The seat belt does not offer the intended level
of protection unless the backrest is almost
vertical. Under certain circumstances, this
could cause severe or even fatal injuries in the
event of an accident.
Before starting a journey, make sure that the
seat is properly adjusted and that the back-
rest is almost vertical. G
WARNING
Ad irty or damaged seat belt or one that has
been modified or subjected to a load in an
accident no longer offers the intended level of
protection. Under certain circumstances, this
could cause severe or even fatal injuries in the
event of an accident.
For this reason, chec kregularly that the seat
belts are not damaged or dirty. Always have damaged seat belts or seat belts
that have been subjected to a load in an acci-
dent replaced at a qualified specialist work-
shop.
For safety reasons, Mercedes-Benz recom-
mends that you only use seat belts which have
been approved by Mercedes-Benz for your
vehicle.
Seat belts are the most effective means of
restraining the movement of vehicle occu-
pants in the event of an accident. This
reduces the risk of vehicle occupants coming
into contact with parts of the vehicle interior.
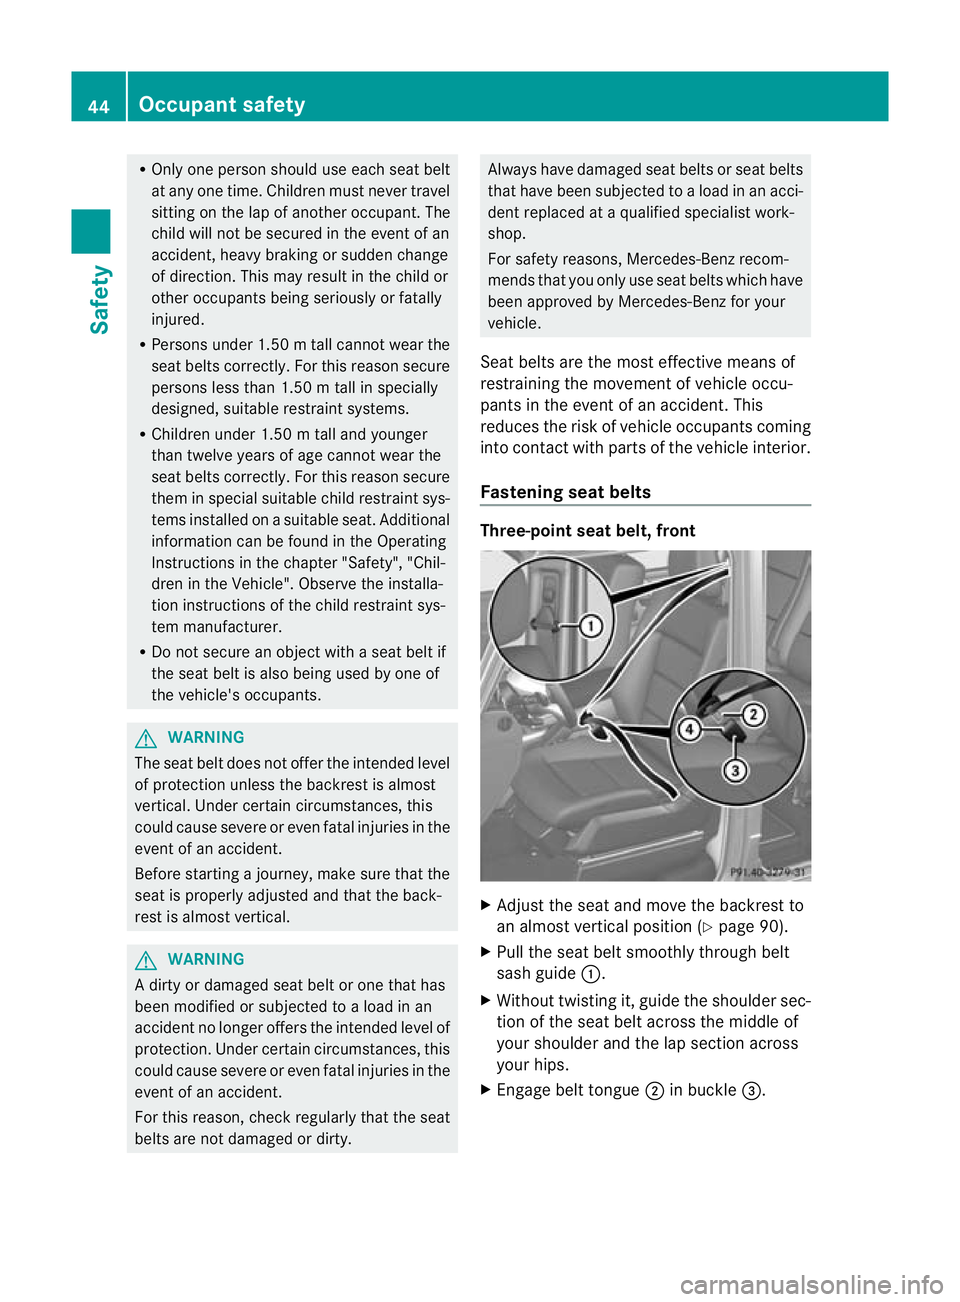
Fastening seat belts Three-point seat belt, front
X
Adjust the seat and move the backrest to
an almost vertical position (Y page 90).
X Pull the seat belt smoothly through belt
sash guide :.
X Without twisting it, guide the shoulder sec-
tion of the seat belt across the middle of
your shoulder and the lap section across
your hips.
X Engage belt tongue ;in buckle =. 44
Occupant safetySafety
Page 71 of 357
Useful information
i This Owner's Manual describes all mod-
els, series and optional equipment for your
vehicle that were available at the time of
going to press. Country-specific differen-
ces are possible. Note that your vehicle
may not be fitted with all features descri-
bed. This is also the case for systems and
functions relevant to safety.
i Read the information on qualified special-
ist workshops: (Y page 22). Key
Important safety notes
G
WARNING
If children are left unsupervised in the vehicle,
they could:
R open the doors, thus endangering other
people or road users.
R get out and disrupt traffic.
R operate the vehicle's equipment.
Additionally, children could set the vehicle in
motion if, for example, they:
R release the parking brake.
R shift the automatic transmission out of
parking position P.
R shift the manual transmission into neutral.
R start the engine.
There is a risk of an accident and injury.
When leaving the vehicle, always take the key
with you and lock the vehicle. Never leave
children or animals unattended in the vehicle.
Always keep the key out of reach of children. G
WARNING
Do not transport any heavy or hard objects in
the vehicle interior or in the load compart-
ment if these are not properly secured. Loads which are not secured or not stored
properly increase the risk of children being
injured in the following circumstances:
R strong braking manoeuvres
R sudden changes of direction
R in the event of an accident G
WARNING
If you attach heavy or large objects to the key,
the key could be unintentionally turned in the
ignition lock .This could cause the engine to
be switched off. There is a risk of an accident.
Do not attach any heavy or large objects to
the key. Remove any bulky keyrings before
inserting the key into the ignition lock. Key functions
G
WARNING
If children are left unsupervised in the vehicle,
they could:
R open the doors, thus endangering other
people or road users.
R get out and disrupt traffic.
R operate the vehicle's equipment.
Additionally, children could set the vehicle in
motion if, for example, they:
R release the parking brake.
R shift the automatic transmission out of
parking position P.
R shift the manual transmission into neutral.
R start the engine.
There is a risk of an accident and injury.
When leaving the vehicle, always take the key
with you and lock the vehicle. Never leave
children or animals unattended in the vehicle.
Always keep the key out of reach of children. G
WARNING
If you attach heavy or large objects to the key,
the key could be unintentionally turned in the
ignition lock. This could cause the engine to
be switched off. There is a risk of an accident. 68
KeyOpening and closing
Page 72 of 357

Do not attach any heavy or large objects to
the key .Remove any bulky keyrings before
inserting the key into the ignition lock. G
WARNING
When the double locks are activated, the
doors can no longer be opened from the
inside. People in the vehicle can no longer get
out, e.g. in hazardous situations. There is a
risk of injury.
Therefore, do not leave any people unsuper-
vised in the vehicle, particularly children, eld-
erly people or people in need of special assis-
tance. Do not activate the double lock when
people are in the vehicle.
Deactivating the double lock
i If the vehicle has been locked with the
key, the double lock function is activated
as standard. It is then not possible to open
the doors from inside the vehicle.
X Deactivate the interior motion sensor
(Y page 65).
X Lock the vehicle with the key.
The double lock is deactivated and the
doors can be opened from the inside. :
& To lock the vehicle
; % To unlock the vehicle
X To unlock centrally: press the%but-
ton. If you do not open the vehicle within
approximately 40 seconds of unlocking:
R
the vehicle is locked again.
R the anti-theft system is primed again.
X To lock centrally: press the&button.
The key centrally locks/unlocks:
R the doors
R the rear door
R the fuel filler flap
i When unlocking, the turn signals flash
once. When locking, they flash three times.
You can also set an audible signal to confirm
that the vehicle has been locked. The audible
signal can be activated and deactivated using
the on-board computer (Y page 223).
When it is dark, the surround lighting also
comes on if it is activated in the on-board
computer (Y page 222). Changing the settings of the locking
system
You can change the setting of the locking
system in such a way that only the driver's
door and the fuel filler flap are unlocked. This
is useful if you frequently travel on your own.
i
If the setting of the locking system is
changed within the signal range of the vehi-
cle, pressing the &or% button locks
or unlocks the vehicle.
X To change the setting: press and hold
down the %and& buttons simulta- Key
69Opening and closing Z
Page 117 of 357
Courtesy lighting in the front doors
The courtesy light is switched on to help you
see bette rwhen it is dark.
X To switch on: activate the interior lighting
automatic control.
X Open the door.
X To switch off: close the door. Replacing bulbs
Important safety notes
Xenon bulbs G
DANGER
Xenon bulbs carry a high voltage. You could
get an electric shock and be seriously or even
fatally injured if you touch the electric con-
tacts on xenon bulbs. Therefore, never
remove the cover from xenon bulbs.
Do not change the xenon bulbs yourself, but
have them replaced at a qualified workshop.
If your vehicle is equipped with xenon bulbs,
you can recognise this by the following: the
cone of light from the xenon bulbs moves
from the top to the bottom and back again
when you start the engine. For this to be
observed, the lights must be switched on
before starting the engine.
Bulbs and lamps are an important aspect of
vehicle safety. You must therefore make sure
that these function correctly at all times.
Have the headlamp setting checked regularly.
LED lamps You can neither replace xenon bulbs nor LED
bulbs. Have LED bulbs changed at a qualified
specialist workshop.
Bulbs and lamps are an important aspect of
vehicle safety. You must therefore make sure
that these function correctly at all times.
Have the headlamp setting checked regularly. Other bulbs G
WARNING
Bulbs and lamps can be very hot. You should
therefore allow them to cool down before you
change them. Otherwise, you could be burned
if you touch them.
Keep bulbs out of the reach of children. Oth-
erwise, they could damage the bulbs, for
example, and injure themselves.
Never use a bulb which has been dropped.
Such a bulb may break or even explode and
injure you.
Halogen bulbs are pressurised and can
explode when you change them, particularly
if they are very hot. You should therefore wear
eye protection and gloves when you are
changing them.
There are bulbs other than the xenon bulbs
that you cannot replace. Replace only the
bulbs listed (Y page 115). Have the bulbs that
you cannot replace yourself changed at a
qualified specialist workshop.
If you require assistance replacing bulbs, con-
sult a qualified specialist workshop.
Do not touch the glass tube of new bulbs with
your bare hands. Even minor contamination
can burn into the glass surface and reduce
the service life of the bulbs. Always use a lint-
free cloth or only touch the base of the bulb
when fitting.
Only use bulbs of the correct type.
If the new bulb still does not light up, consult
a qualified specialist workshop.
Bulbs and lamps are an important aspect of
vehicle safety. You must therefore make sure
that these function correctly at all times.
Have the headlamp setting checked regularly. 114
Replacing bulbsLights and windscreen wipers
Page 118 of 357
Before changing bulbs
Have the following bulbs changed at a quali-
fied specialist workshop:
R
additional turn signals in the exterio rmir-
rors
R third brake lamp
R main-beam/dipped-beam headlamps
(xenon bulbs)
R daytime driving lights
R licence plate lamp
i Individual segments of the licence plate
lamp LEDs may fail without a display mes-
sage appearing in the multifunction dis-
play. Regularly chec kthe licence plate
lighting. If necessary, visit a qualified spe-
cialist workshop.
You can replace the following bulbs:
R side lamps/parking lamps
R foglamp/cornering lamp with foglamp
function
R turn signal lamp (front)
R brake/tail lamp
R turn signal lamp (rear)
R tail lamp/parking lamp
R reversing lamp
R rear foglamp Overview of bulb replacement
–bulbs
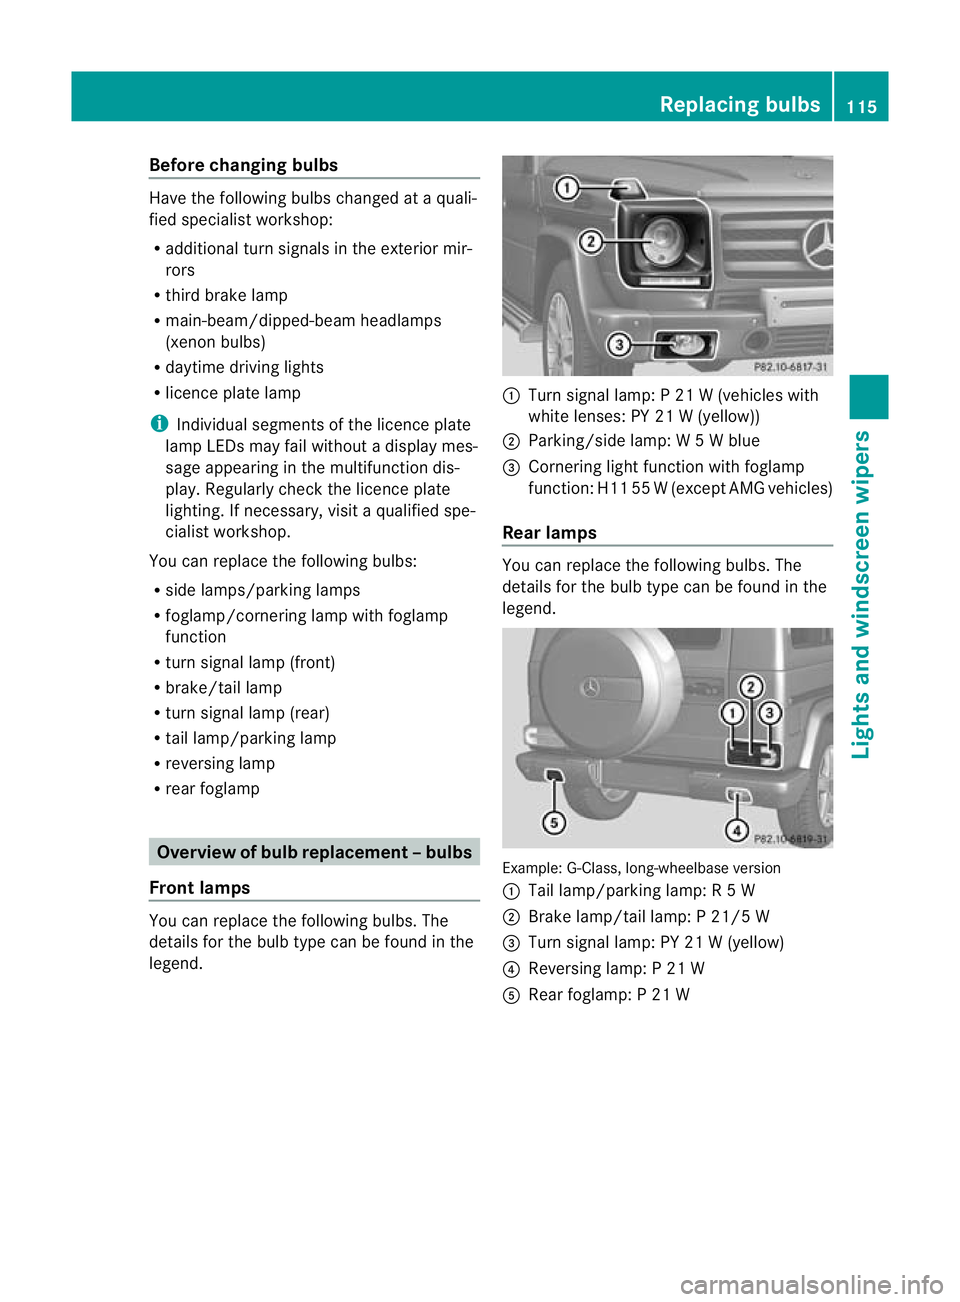
Front lamps You can replace the following bulbs. The
details for the bulb type can be found in the
legend. :
Turn signal lamp: P 21 W (vehicles with
white lenses: PY 21 W (yellow))
; Parking/side lamp: W 5Wblue
= Cornering light function with foglamp
function: H11 55 W(except AMG vehicles)
Rear lamps You can replace the following bulbs. The
details for the bulb type can be found in the
legend.
Example: G-Class, long-wheelbase version
:
Tail lamp/parking lamp: R 5W
; Brake lamp/tail lamp: P 21/5 W
= Turn signal lamp: PY 21 W (yellow)
? Reversing lamp: P 21 W
A Rear foglamp: P 21 W Replacing bulbs
115Lights and windscreen wipers Z
Page 137 of 357

ary vehicle for up to 30 minutes after the
engine has been switched off
.The heating
time depends on the coolant temperature and
on the interior temperature that has been set.
i The blower will run at a low speed regard-
less of the airflow setting.
i If you activate the residual heat function
at high temperatures, only the ventilation
will be activated.
X Turn the key to position 0(Ypage 143) in
the ignition lock or remove it.
X To activate: press theÁbutton.
The indicator lamp in the Ábutton lights
up.
X To deactivate: press theÁbutton.
The indicator lamp in the Ábutton goes
out.
i Residual heat is deactivated automati-
cally:
R after approximately 30 minutes
R when the ignition is switched on
R if the battery voltage drops
R if the coolant temperature is too low Auxiliary heating
Important safety notes G
WARNING
Exhaust fumes are produced when the auxili-
ary heating is in operation. Inhaling these
exhaust fumes can be poisonous. You should
therefore switch off the auxiliary heating in
confined spaces without an extraction sys-
tem, e.g. a garage. G
WARNING
When operating the auxiliary heating parts of
the vehicle can get very hot. Make sure that
the exhaust system does not under any cir-
cumstances come into contact with easily
ignitable material such as dry grass or fuels.
The material could otherwise ignite and set the vehicle alight. Choose your parking spot
accordingly.
Operating the auxiliary heating is thus pro-
hibited at filling stations or when your vehicle
is being refuelled. You must therefore switch
off the auxiliary heating at filling stations.
! Operating the auxiliary heating/ventila-
tion draws on the vehicle battery. After you
have heated or ventilated the vehicle a
maximum of two times, drive for a longer
distance.
i Switch the auxiliary heating on regularly
once a month for approximately ten
minutes.
The auxiliary heating heats the air in the vehi-
cle interior without using the heat of the run-
ning engine. The auxiliary heating is operated
directly using the vehicle's fuel. For this rea-
son, the tank content must be at least at
reserve fuel level to ensure that the auxiliary
heating functions.
The auxiliary heating/ventilation automati-
cally adjusts to changes in temperature and
weather conditions. For this reason, the aux-
iliary heating could switch from ventilation
mode to heating mode or from heating mode
to ventilation mode.
You cannot use the auxiliary ventilation to
cool the vehicle interior to a temperature
lower than the outside temperature.
Before switching on X
Turn the key to position 2(Ypage 143) in
the ignition lock.
X Set the temperature.
The auxiliary heating/ventilation can be acti-
vated even when climate control is set to
manual. Optimum comfort can be attained
when the system is set to automatic mode.
Set the temperature to 22 †.
The auxiliary heating/ventilation can be acti-
vated or deactivated using the remote control
or the button on the centre console. 134
Operating the climate control systemClimate control