2012 MERCEDES-BENZ G-CLASS SUV change time
[x] Cancel search: change timePage 139 of 357
?
u To switch on the auxiliary heating/
ventilation
A , To check the status/set the depar-
ture time
Your vehicle comes with one remote control.
You may use one additional remote control
for your vehicle. For more information, please
contact a qualified specialist workshop.
The remote control has a maximum range of
approximately 300 metres. This range is
reduced by:
R sources of radio interference
R solid objects between the remote control
and the vehicle
R the remote control being in an unfavoura-
ble position in relation to the vehicle
R transmitting from an enclosed space
i The optimum range can be achieved if you
hold the remote control vertically, pointing
upwards when you press one of the but-
tons.
Switching on the auxiliar yheating/venti-
lation
X Press the ubutton.
ON is shown in the remote control display.
Switching off the auxiliary heating/venti-
lation
X Press the ^button.
OFF is shown in the remote control display.
Checkin gthe status of the auxiliary heat-
ing/ventilation
X Press the ,or. button.
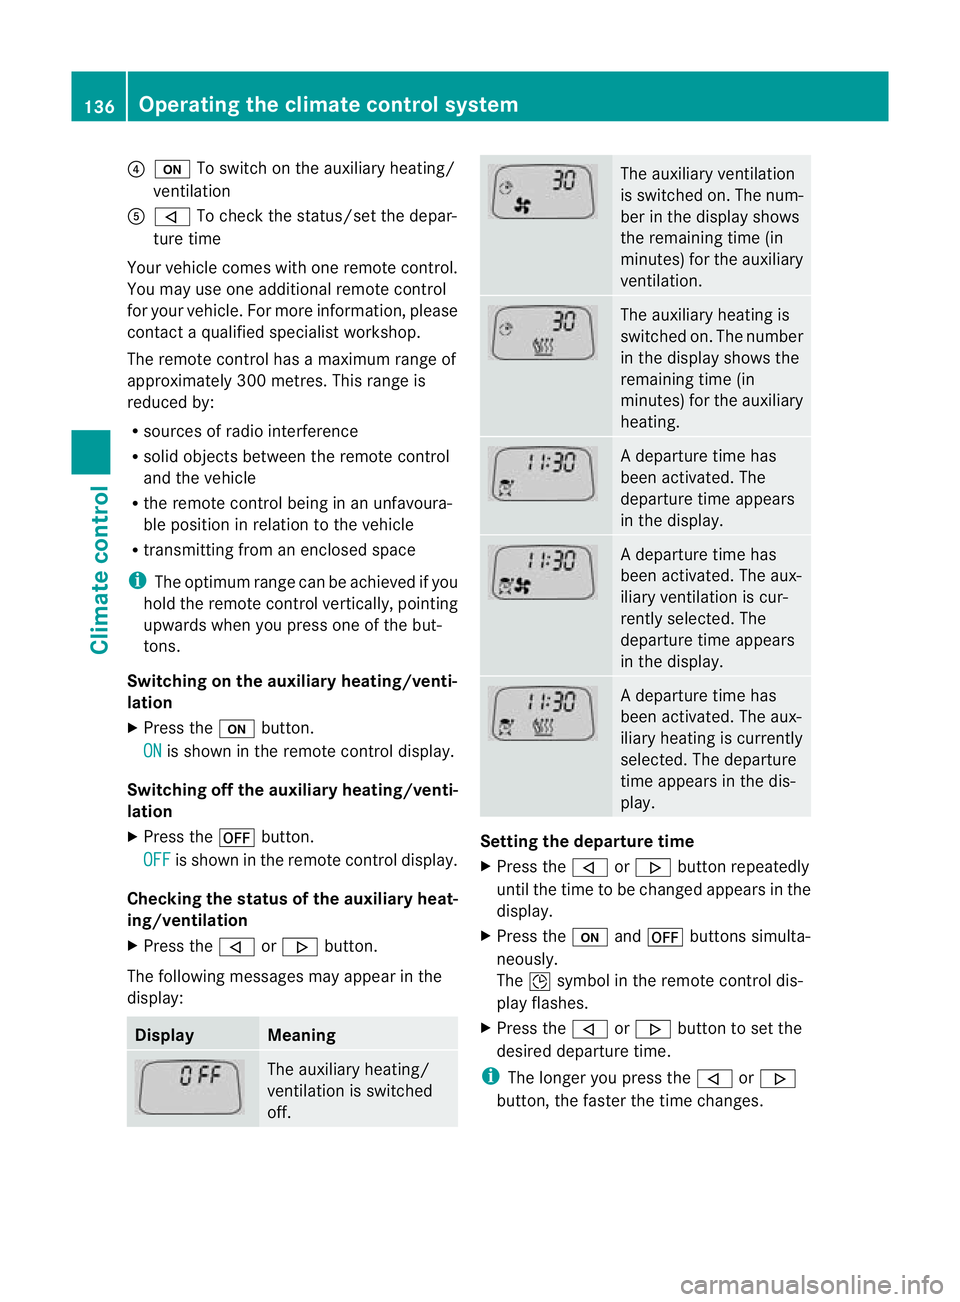
The following messages may appear in the
display: Display Meaning
The auxiliary heating/
ventilation is switched
off. The auxiliary ventilation
is switched on. The num-
ber in the display shows
the remaining time (in
minutes) for the auxiliary
ventilation.
The auxiliary heating is
switched on. The number
in the display shows the
remaining time (in
minutes) for the auxiliary
heating.
Ad
eparture time has
been activated. The
departure time appears
in the display. Ad
eparture time has
been activated. The aux-
iliary ventilation is cur-
rently selected. The
departure time appears
in the display. Ad
eparture time has
been activated. The aux-
iliary heating is currently
selected. The departure
time appears in the dis-
play. Setting the departure time
X
Press the ,or. button repeatedly
until the time to be changed appears in the
display.
X Press the uand^ buttons simulta-
neously.
The Îsymbol in the remote control dis-
play flashes.
X Press the ,or. button to set the
desired departure time.
i The longer you press the ,or.
button, the faster the time changes. 136
Operating the climate control systemClimate control
Page 145 of 357
Useful information
i This Owner's Manual describes all mod-
els, series and optional equipment for your
vehicle that were available at the time of
going to press. Country-specific differen-
ces are possible. Note that your vehicle
may not be fitted with all features descri-
bed. This is also the case for systems and
functions relevant to safety.
i Read the information on qualified special-
ist workshops: (Y page 22). Running-in notes
Important safety notes
New brake pads/brake pads and discs that
have been replaced only achieve optimum
braking effec tafter several hundred kilome-
tres of driving. Compensate for the reduced
braking effect by applying greater force to the
brake pedal. The first 1,500 km
If you treat the engine with sufficient care
from the very start, you will be rewarded with
excellent performance for the remainder of
the engine's life.
R Drive at varying vehicle speeds and engine
speeds for the first 1,500 km.
R Avoid overstraining the vehicle during this
period, e.g. driving at full throttle.
R Change gea ringood time, before the rev
counter needle is Ôof the way to the red
area of the rev counter.
R Do not shift down a gear manually in order
to brake.
R Try to avoid depressing the accelerator
pedal beyond the point of resistance (kick-
down).
R The shift ranges 3,2or 1should only be
engaged when driving slowly, e.g. when
driving in mountainous terrain. After 1,500 km, you may gradually bring the
vehicle up to full road and engine speeds.
Additional running-in notes for AMG vehicles:
R
Do not drive at speeds above 140 km/h for
the first 1,500 km.
R Only allow the engine to reach a maximum
engine speed of 4,500 rpm briefly.
R Avoid driving off-road before the differen-
tial oil change at 3,000 km.
R Drive the vehicle mainly in drive program
Cfor the first 1,500 km.
i You should also observe these notes on
running in if the engine or parts of the drive
train on your vehicle have been replaced. AMG vehicles with rear axle differen-
tial lock
To improve the protection of the differential,
change the oil after a run-in distance of
3,000 km. This oil change will lengthen the
service life of the differential. Have the oil
change carried out at a qualified specialist
workshop. Driving
Important safety notes
G
WARNING
Objects in the driver's footwell can restric tthe
pedal travel or obstruct adepressed pedal.
The operating and road safety of the vehicle
is jeopardised. There is a risk of an accident.
Make sure that all objects in the vehicle are
stowed correctly, and that they cannot enter
the driver's footwell. Fit the floormats
securely and as specified in order to ensure
sufficien tclearance for the pedals. Do not use
loose floormats. 142
DrivingDriving and parking
Page 173 of 357
R
Chec kthat items of luggage and loads are
stowed safely and are well secured
(Y page 271).
R To avoid damaging the vehicle, make sure
there is always sufficient ground clearance.
R Always keep the engine running and in gear
when driving on a downhill gradient.
R Always keep the engine running and in gear
when driving on a slope.
R Drive slowly and evenly, if necessary at
walking pace.
R Ensure that the wheels are in contact with
the ground at all times.
R Drive with extreme care on unknown off-
road routes where visibility is poor. For
safety reasons, get out of the vehicle first
and survey the off-road route.
R Check the depth of water before fording
rivers and streams.
R When fording, do not stop and do not
switch off the engine.
R Look out for obstacles such as rocks, holes,
tree stumps and furrows.
R Always keep the doors, the rear door or
tailgate (G-Class Cabriolet), the side win-
dows and the sliding sunroof closed while
the vehicle is in motion.
R Switch off cruise control and variable
SPEEDTRONIC.
R Do not stray from marked routes or paths.
R Adapt your speed to the terrain. The
rougher, steeper or more ruts on the ter-
rain, the slower your speed should be.
R Drive slowly and at a constant speed
through the water. Ensure that a bow wave
does not form as you drive.
R On sand, drive quickly to overcome the roll-
ing resistance. Otherwise, the vehicle could
dig itself into the sand.
R Do not jump with the vehicle as this will
interrupt the vehicle's propulsion. R
Avoid high engine speeds. Drive at appro-
priate engine speeds.
R Always check the vehicle for damage after
off-road driving.
i Information about retrofitting special all-
terrain tyres is available from any qualified
specialist workshop.
i Do not use the HOLD function when driv-
ing off-road, on steep uphill or downhill gra-
dients or on slippery or loose surfaces. The
HOLD function cannot hold the vehicle on
such surfaces.
Checklist before driving off-road !
If the engine oil warning lamp lights up
during the journey, stop the vehicle in a
safe place as soon as is possible. Check the
engine oil level. The warning given by the
engine oil warning light must not be
ignored. Continuing your journey when the
symbol is shown may result in engine dam-
age.
X Engine oil level: check the engine oil and
top it up if necessary.
Only then does the engine receive enough
oil when the vehicle is standing on a steep
incline.
X G3 50 BlueTEC: have the AdBlue ®
level
checked at a qualified specialist workshop
(Y page 160).
X Tyre-change tool kit: check that the jack
is working and make sure you have the
wheelbrace, a robust tow cable and a fold-
ing spade in the vehicle.
X Wheels and tyres: check the tyre tread
depth and tyre pressure.
X Check for damage and remove any foreign
objects, e.g. small stones, from the
wheels/tyres.
X Replace any missing valve caps.
X Replace dented or damaged wheels.
X Carry a sound spare wheel. 170
Driving tipsDriving and parking
Page 188 of 357
Switching on while stationary
This function may be useful if you want to
keep up with the traffic flow, e.g. at the end
of a tailback.
You can only activate DISTRONIC PLUS if:
R the vehicle in front and
R your vehicle are stationary
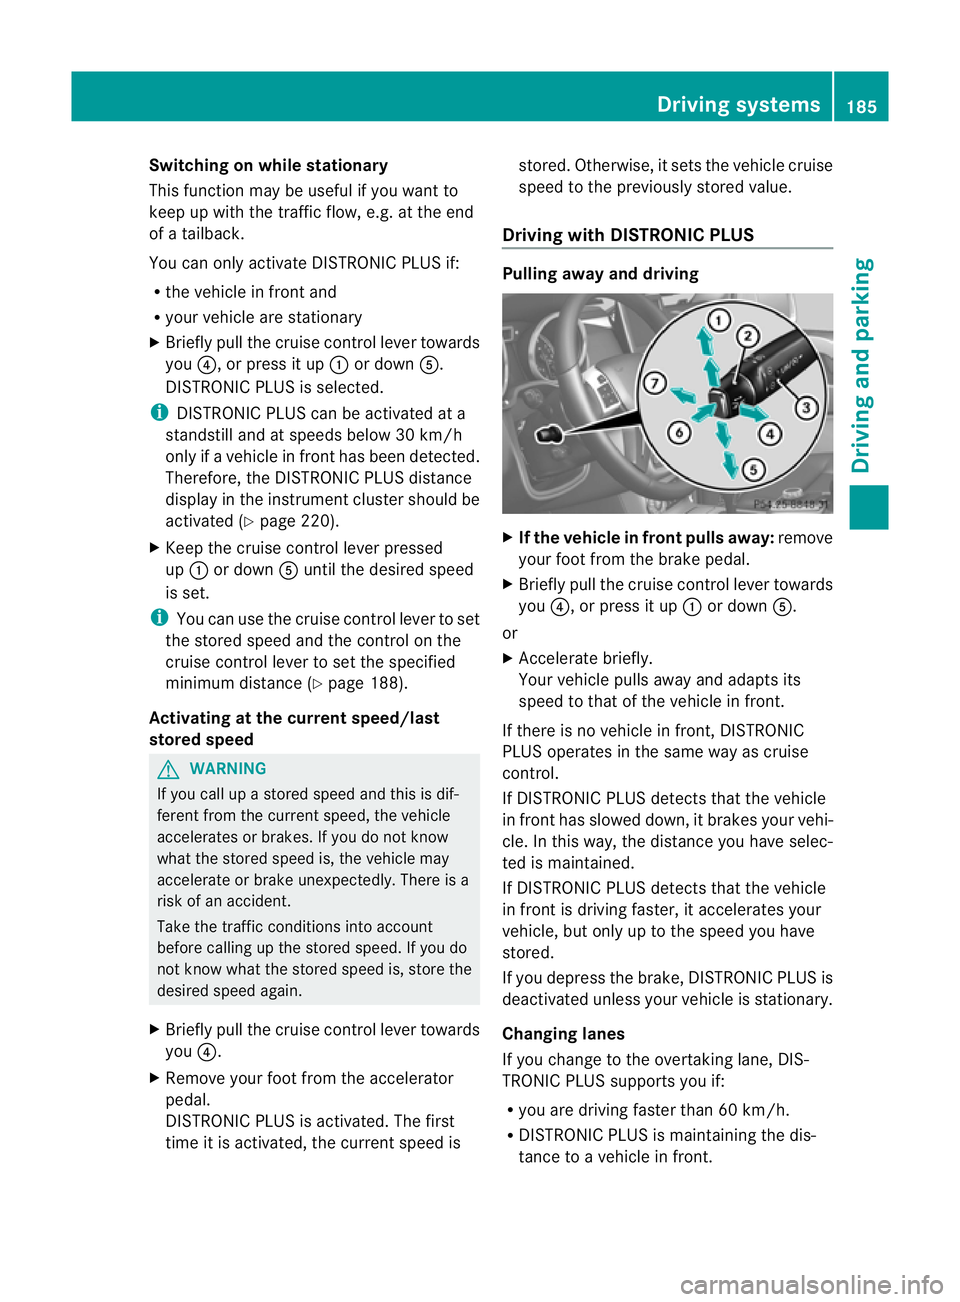
X Briefly pull the cruise control lever towards
you ?, or press it up :or down A.
DISTRONIC PLUS is selected.
i DISTRONIC PLUS can be activated at a
standstill and at speeds below 30 km/h
only if a vehicle in front has been detected.
Therefore, the DISTRONIC PLUS distance
display in the instrumen tcluster should be
activated (Y page 220).
X Keep the cruise control lever pressed
up : or down Auntil the desired speed
is set.
i You can use the cruise control lever to set
the stored speed and the control on the
cruise control lever to set the specified
minimum distance (Y page 188).
Activating at the current speed/last
stored speed G
WARNING
If you call up a stored speed and this is dif-
ferent from the current speed, the vehicle
accelerates or brakes. If you do not know
what the stored speed is, the vehicle may
accelerate or brake unexpectedly. There is a
risk of an accident.
Take the traffic conditions into account
before calling up the stored speed. If you do
not know what the stored speed is, store the
desired speed again.
X Briefly pull the cruise control lever towards
you ?.
X Remove your foot fro mthe accelerator
pedal.
DISTRONIC PLUS is activated. The first
time it is activated, the current speed is stored. Otherwise, it sets the vehicle cruise
speed to the previously stored value.
Driving with DISTRONIC PLUS Pulling away and driving
X
If the vehicle in front pulls away: remove
your foot from the brake pedal.
X Briefly pull the cruise control lever towards
you ?, or press it up :or down A.
or
X Accelerate briefly.
Your vehicle pulls away and adapts its
speed to that of the vehicle in front.
If there is no vehicle in front, DISTRONIC
PLUS operates in the same way as cruise
control.
If DISTRONIC PLUS detects that the vehicle
in front has slowed down, it brakes your vehi-
cle. In this way, the distance you have selec-
ted is maintained.
If DISTRONIC PLUS detects that the vehicle
in front is driving faster, it accelerates your
vehicle, but only up to the speed you have
stored.
If you depress the brake, DISTRONIC PLUS is
deactivated unless your vehicle is stationary.
Changing lanes
If you change to the overtaking lane, DIS-
TRONIC PLUS supports you if:
R you are driving faster than 60 km/h.
R DISTRONIC PLUS is maintaining the dis-
tance to a vehicle in front. Driving systems
185Driving and parking Z
Page 196 of 357

In such situations, Active Blind Spot Assist
cannot warn you or intervene. There is a risk
of an accident.
Always observe the traffic conditions care-
fully, and maintain a safe lateral distance.
Active Blind Spot Assist is only an aid.Itm ay
fail to detect some vehicles and is no substi-
tute for attentive driving.
In particular, the detection of obstacles can
be impaired if:
R there is dirt on the sensors or anything else
covering the sensors.
R visibility is poor, e.g .due to fog, heavy rain
or snow.
R there is a narrow vehicl etravelling in front,
e.g. a motorcycle or bicycle.
R the road has very wide lanes.
R the road has narrow lanes.
R you are not driving in the middle of the lane.
R there are barriers or other road boundaries.
General notes Active Blind Spot Assist uses a rada
rsensor
system to monitor the side areas of your vehi-
cle which are behind the driver. Awarning
display in the exterior mirrors draws your
attentio nto vehicles detected in the moni-
tored area. If you then switch on the corre-
sponding turn signal to change lane, you will
also receive an optical and audible collision
warning. If a risk of lateral collision is detec-
ted, corrective braking may help you avoid a
collision. To support the course-correcting
brake application, Active Blind Spot Assist
also uses the forward-facing radar sensor sys-
tem.
Active Blind Spot Assist supports you from a
speed of approximately 30 km/h.
Monitoring range G
WARNING
Active Blind Spot Assist monitors certain
areas in the immediate vicinity of your vehicle. Vehicles that approach and drive past at high
speeds are not detected. No visual nor audi-
ble warnings are emitted and the system does
not brake the vehicle to correct your course.
If the lanes are very wide, it may not be pos-
sible to monitor the complete width of the
neighbouring lane. For this reason, vehicles in
the next lane may not be detected, especially
if they are driving in a staggered formation.
This may be the case if vehicles are driving at
the edge of their lane that is furthest away
from your vehicle.
Always pay attention to traffic conditions and
your surroundings. Otherwise, you may fail to
recognise dangers in time, cause an accident
and injure yourself and others.
Active Blind Spot Assist monitors the area up
to 3.0 m behind your vehicle and directly next
to your vehicle, as shown in the diagram. For
this purpose, Active Blind Spot Assist uses
radar sensors in the rear bumper.
If the lanes are narrow, vehicles driving in the
lane beyond the lane next to your vehicle may
be indicated, especially if the vehicles are not
driving in the middle of their lane. This may
be the case if there are vehicles at the edge
of their lane nearest your vehicle. Driving systems
193Driving and parking Z
Page 197 of 357

Due to the nature of the system:
R
warnings may be issued in error when driv-
ing close to crash barriers or simila rsolid
lane borders.
R warnings may be interrupted when driving
alongside particularly long vehicles, for
example lorries, for a prolonged time.
Two Active Blind Spot Assist radar sensors
are integrated into the front and rear bumpers
respectively. An additional radar sensor is
located behind the cover in the radiator grille.
Make sure that the bumpers and the cover in
the radiator grille are free of dirt, ice or slush.
The rear sensors must not be covered, e.g. by
bicycle racks or overhanging loads. Following
a severe impact or in the event of damage to
the bumpers, have the function of the radar
sensors checked at a qualified specialist
workshop. Active Blind Spot Assist may oth-
erwise no longer work properly.
Indicator and warning display G
WARNING
Active Blind Spot Assist is not active at speeds
below 30 km/h. The indicator lamps in the
exterior mirrors are yellow .Vehicles in the
monitoring range are then not indicated.
Always pay attention to traffic conditions and
your surroundings. Otherwise, you may fail to
recognise dangers in time and cause an acci-
dent and injure yourself and others. :
Yellow indicator lamp/red warning lamp
When Active Blind Spot Assist is activated,
indicator lamp :in the exterior mirrors lights up yellow at speeds of up to 30 km/h. At
speeds above 30 km/h, the indicator lamp
goes out and Active Blind Spot Assist is
operational.
If a vehicle is detected within the monitoring
range of Blind Spot Assist at speeds above
30 km/h, warning lamp :on the corre-
sponding side lights up red. This warning
always occurs when a vehicle enters the blind
spot monitoring range from behind or from
the side. When you overtake a vehicle, the
warning only occurs if the difference in speed
is less than 12 km/h.
The yellow indicator lamp goes out if reverse
gear is engaged. Active Blind Spot Assist is
then no longer active.
The brightness of the indicator/warning
lamps is adjusted automatically according to
the ambient light.
Visual and acoustic collision warning When you switch on the turn signals to
change lanes and a vehicle is detected in the
side monitoring range, you receive a visual
and acoustic collision warning. You then hear
a double warning tone and red warning
lamp
:flashes. If the turn signal remains on,
detected vehicles are indicated by the flash-
ing of red warning lamp :.There are no fur-
ther warning tones. 194
Driving systemsDriving and parking
Page 227 of 357
maximum of two times, drive for a longer
distance.
This function is only available on vehicles with
auxiliary heating (Y page 126).
In the Heating submenu, you can select a
stored departure time or change a departure
time.
The auxiliary heating timer function calcu-
lates the switch-on time according to the out-
side temperature so that the vehicle is pre-
heated by the departure time. When the
departure time is reached, the auxiliary heat-
ing continues to heat for a further five
minutes and then switches off. The auxiliary
heating adopts the THERMATIC temperature
setting.
You can switch off the auxiliary heating by
using the remote control or the &auxiliary
heating button on the centre console.
Selecting the departure time or deactivat-
ing a selected departure time
X Press the =or; button on the steer-
ing wheel to select the Settings menu.
X Press the :or9 button to select the
Heating submenu.
X Press ato confirm.
You will see the selected setting.
X Press ato confirm.
X Press the :or9 button to select
one of the three departure times or Timeroff (no timer active).
X Press ato confirm.
If a departure time is selected, the yellow
indicator lamp lights up on the &auxil-
iary heating button.
Changing the departure time
X Press the =or; button on the steer-
ing wheel to select the Settings menu.
X Press the :or9 button to select the
Heating submenu.
X Press ato confirm.
You will see the selected setting. X
Press ato confirm.
X Press the :or9 button to select
Change A ,
B or
C .
X Press ato confirm.
You can now change the departure time.
X Press the =or; button to select the
display to be changed :hours, minutes.
X Press the :or9 button to set the
selected display.
X Press the abutton to store the entry.
The yellow indicator lamp on the &aux-
iliary heating button lights up.
Convenience Activating/deactivating the EASY-
ENTRY/EXIT feature
G
WARNING
The steering wheel moves when the EASY-
ENTRY/EXIT feature is active. There is a risk
of occupants becoming trapped. Before acti-
vating the EASY-ENTRY/EXIT feature, make
sure that nobody can become trapped.
Do not leave children unsupervised in the
vehicle, even if they are secured in a child
restraint system. The children could open the
driver's door and thereby unintentionally acti-
vate the EASY-ENTRY/EXIT feature and
become trapped.
X Press the =or; button on the steer-
ing wheel to select the Settings menu.
X Press the :or9 button to select the
CONVENIENCE submenu.
X Press ato confirm.
X Press :or9 to select the Easy Entry/Exit: function.
If the Easy Entry/Exit function is activa-
ted, the vehicle steering wheel is displayed
in red in the multifunction display.
X Press the abutton to save the setting.
Further information on the EASY-ENTRY/EXIT
feature (Y page 98). 224
Menus and submenusOn-board computer and displays
Page 269 of 357
Useful information
i This Owner's Manual describes all mod-
els, series and optional equipment for your
vehicle that were available at the time of
going to press. Country-specific differen-
ces are possible. Note that your vehicle
may not be fitted with all features descri-
bed. This is also the case for systems and
functions relevant to safety.
i Read the information on qualified special-
ist workshops: (Y page 22). Loading guidelines
G
WARNING
Secure and position the load as described in
the loading guidelines.
Otherwise, vehicle occupants could
be injured by the load being thrown around in
the even tofsharp braking, a sudden change
in direction or an accident. This also applies
to seats which have been removed.
You will find further information in the "Secur-
ing a load" section.
Even if you follow all the loading guidelines,
the load will increase the risk of injury in the
event of an accident. G
WARNING
Keep the boot lid/tailgate closed when the
engine is running. Otherwise, you could be
poisoned by exhaust fumes entering the vehi-
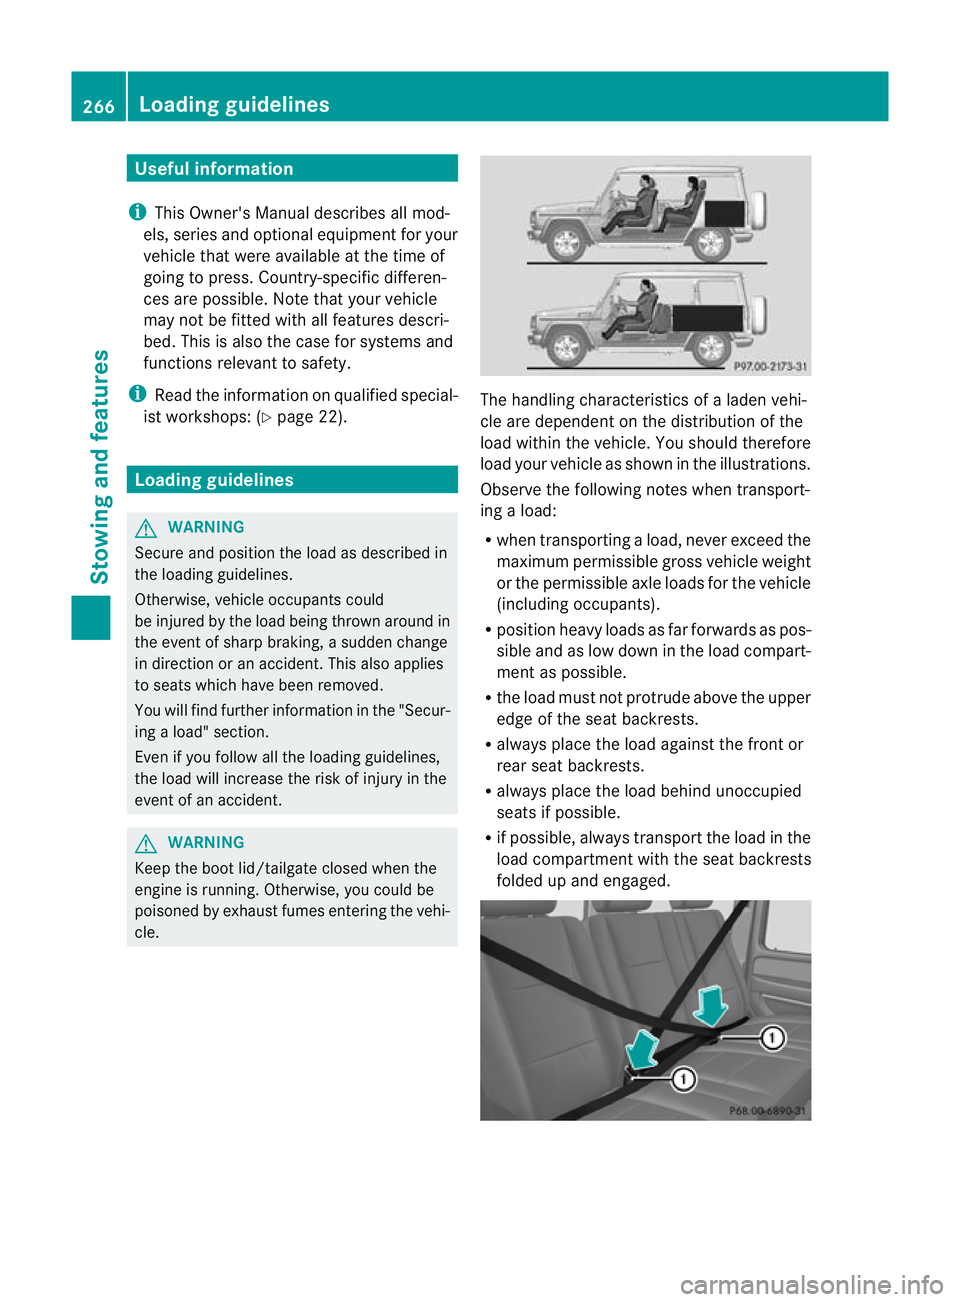
cle. The handling characteristics of a laden vehi-
cle are dependent on the distribution of the
load within the vehicle. You should therefore
load your vehicle as shown in the illustrations.
Observe the following notes when transport-
ing a load:
R when transporting a load, never exceed the
maximum permissible gross vehicle weight
or the permissible axle loads for the vehicle
(including occupants).
R position heavy loads as far forwards as pos-
sible and as low down in the load compart-
ment as possible.
R the load must not protrude above the upper
edge of the seat backrests.
R always place the load against the front or
rear seat backrests.
R always place the load behind unoccupied
seats if possible.
R if possible, always transport the load in the
load compartmentw ith the seat backrests
folded up and engaged. 266
Loading guidelinesStowing and features