2012 MERCEDES-BENZ G-CLASS SUV remove seats
[x] Cancel search: remove seatsPage 95 of 357

the seat back. There is a risk tha
tthe seats
and/or the objects could be damaged.
! When the rear bench seat is folded for-
wards, the front seats cannot be moved to
their rearmost position. You could other-
wise damage the seats and the rear bench
seat.
! Make sure that the sun visor is folded up
before adjusting the backrest and head
restraint height. The head restraint and sun
visor could otherwise collide when the head
restraint is fully extended.
i If the front door is open, the seats can be
adjusted for up 30 minutes after the igni-
tion has been switched off.
i The rear-compartment head restraints
can be removed (Y page 93).
For more information, contact a qualified
specialist workshop.
i You can find further information about
enlarging the luggage compartment( fold-
ing the rear bench sea tforwards) on
(Y page 270). Adjusting the seats electrically
! Make sure that the cupholder on the
centre console is folded down before you
move the front-passenger seat forwards. :
Head restraint height
; Seat cushion angle
= Seat height ?
Seat fore-and-aft adjustment
A Backrest angle
i You can store the seat settings using the
memory function (Y page 102). Adjusting the head restraints
Important safety notes G
WARNING
Occupants should only travel sitting on seats
that have the head restraints fitted. This
reduces the risk of injury to the occupant in
the event of an accident.
Adjusting the front seat head restraint
height :
Head restraint height
; Seat cushion angle
= Seat height
? Seat fore-and-aft adjustment
A Backrest angle
X Slide head restraint adjustmen tbutton :
up or down in the direction of the arrow.
Adjusting the luxury head restraints G
WARNING
When folding bac kthe head restraint side bol-
sters, do not put your hands between the side
bolster and the cushion holder. There is a
danger of becoming trapped. 92
SeatsSeats, steering wheel and mirrors
Page 96 of 357
X
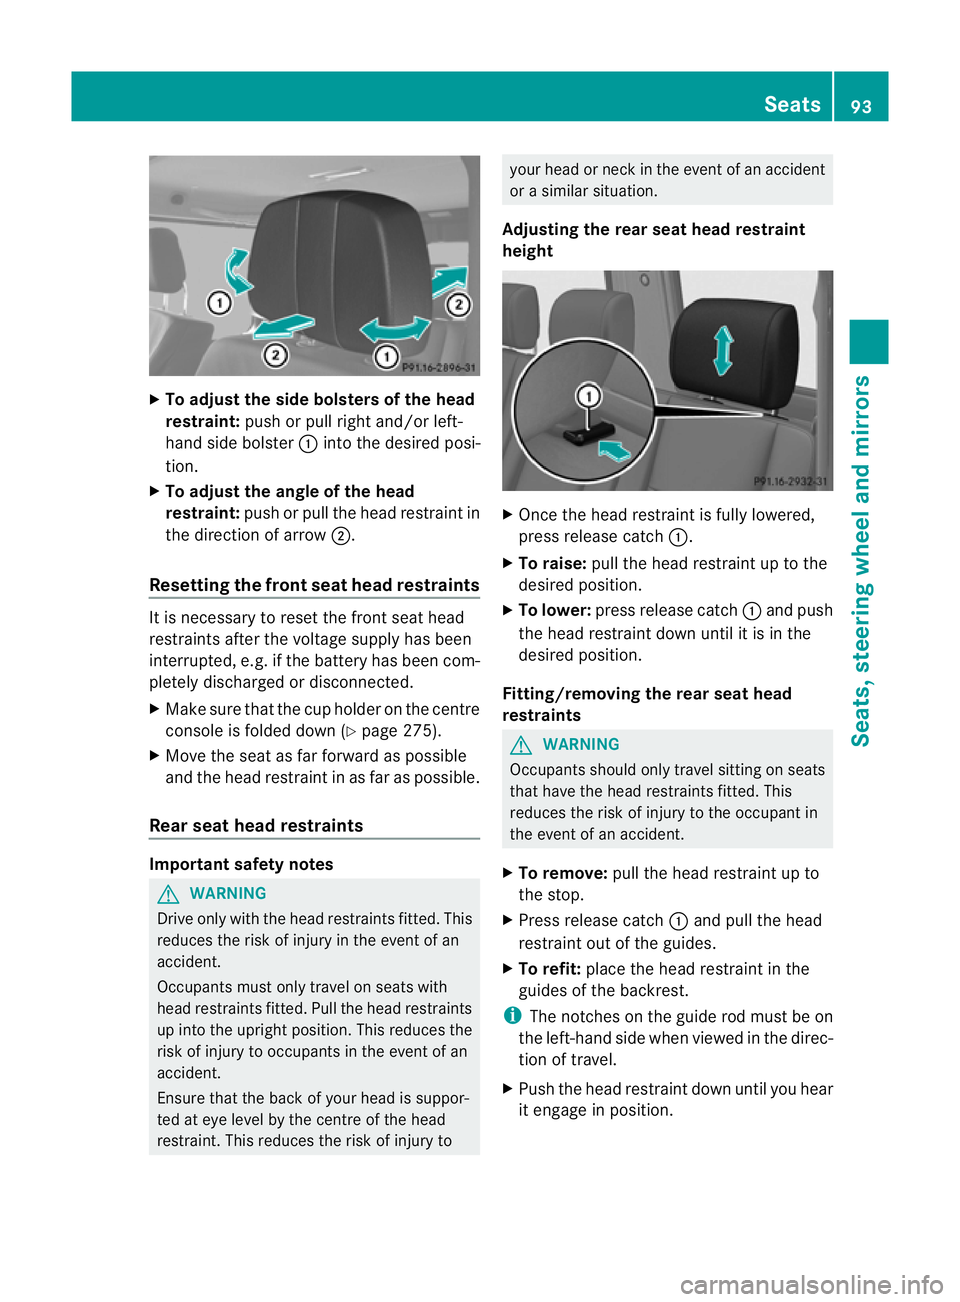
To adjust the side bolsters of the head
restraint: push or pull right and/or left-
hand side bolster :into the desired posi-
tion.
X To adjust the angle of the head
restraint: push or pull the head restraint in
the direction of arrow ;.
Resetting the front seat head restraints It is necessary to reset the front seat head
restraints after the voltage supply has been
interrupted, e.g .ifthe battery has been com-
pletely discharged or disconnected.
X Make sure that the cup holder on the centre
console is folded down (Y page 275).
X Move the seat as far forward as possible
and the head restraint in as far as possible.
Rear seat head restraints Important safety notes
G
WARNING
Drive only with the head restraints fitted. This
reduces the risk of injury in the event of an
accident.
Occupants must only travel on seats with
head restraints fitted. Pull the head restraints
up into the upright position. This reduces the
risk of injury to occupants in the event of an
accident.
Ensure that the back of your head is suppor-
ted at eye level by the centre of the head
restraint. This reduces the risk of injury to your head or neck in the event of an accident
or a similar situation.
Adjusting the rear seat head restraint
height X
Once the head restraint is fully lowered,
press release catch :.
X To raise: pull the head restraint up to the
desired position.
X To lower: press release catch :and push
the head restraint down until it is in the
desired position.
Fitting/removing the rear seat head
restraints G
WARNING
Occupants should only travel sitting on seats
that have the head restraints fitted. This
reduces the risk of injury to the occupant in
the event of an accident.
X To remove: pull the head restraint up to
the stop.
X Press release catch :and pull the head
restraint out of the guides.
X To refit: place the head restraint in the
guides of the backrest.
i The notches on the guide rod must be on
the left-hand side when viewed in the direc-
tion of travel.
X Push the head restraint down until you hear
it engage in position. Seats
93Seats, steering wheel and mirrors Z
Page 102 of 357
Position of the steering wheel when the
EASY-ENTRY/EXIT featurei s activeThe steering wheel moves upwards and
towards the dashboard if:
R you remove the key from the ignition lock
or
R you open the driver's door with the key in
position 0or 1in the ignition lock.
i The steering wheel only moves upwards
and towards the dashboard if it has not
already reached the upper end stop.
Position of the steering wheel for driv-
ing The steering wheel is moved to the previously
set position if:
R the driver's door is closed and
R you insert the key into the ignition lock
The last position of the steering wheel is
stored when you switch off the ignition or
when you store the setting with the memory
function (Y page 102). Mirrors
Rear-view mirror
X Adjust the rear-view mirror by hand so you
have a good overview of the traffic condi-
tions behind you. Exterior mirrors
Adjusting the exterior mirrors G
WARNING
The exterior mirrors reduce the size of the
image. Objects are actually closer than they
appear. You could misjudge the distance from
vehicles driving behind and cause an acci-
dent, e.g. when changin glane. For this rea-
son, make sure of the actual distance from the
vehicle driving behind by glancing ove ryour
shoulder. X
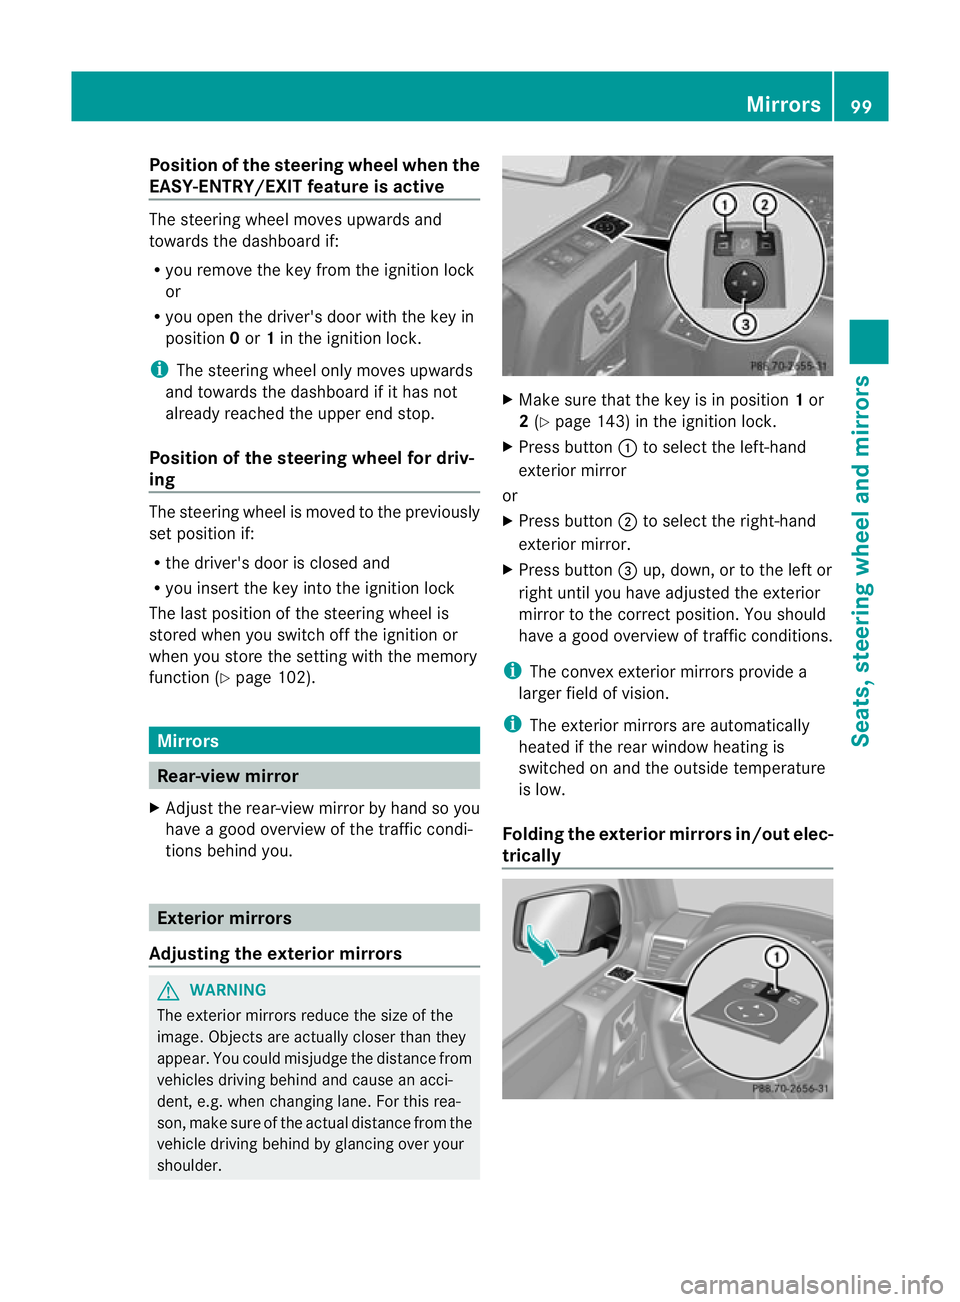
Make sure that the key is in position 1or
2 (Y page 143) in the ignition lock.
X Press button :to select the left-hand
exterior mirror
or
X Press button ;to select the right-hand
exterior mirror.
X Press button =up, down, or to the left or
right until you have adjusted the exterior
mirror to the correc tposition. You should
have a good overview of traffic conditions.
i The convex exterior mirrors provide a
larger field of vision.
i The exterior mirrors are automatically
heated if the rear window heating is
switched on and the outside temperature
is low.
Folding the exterior mirrors in/out elec-
trically Mirrors
99Seats, steering wheel and mirrors Z
Page 105 of 357
Calling up
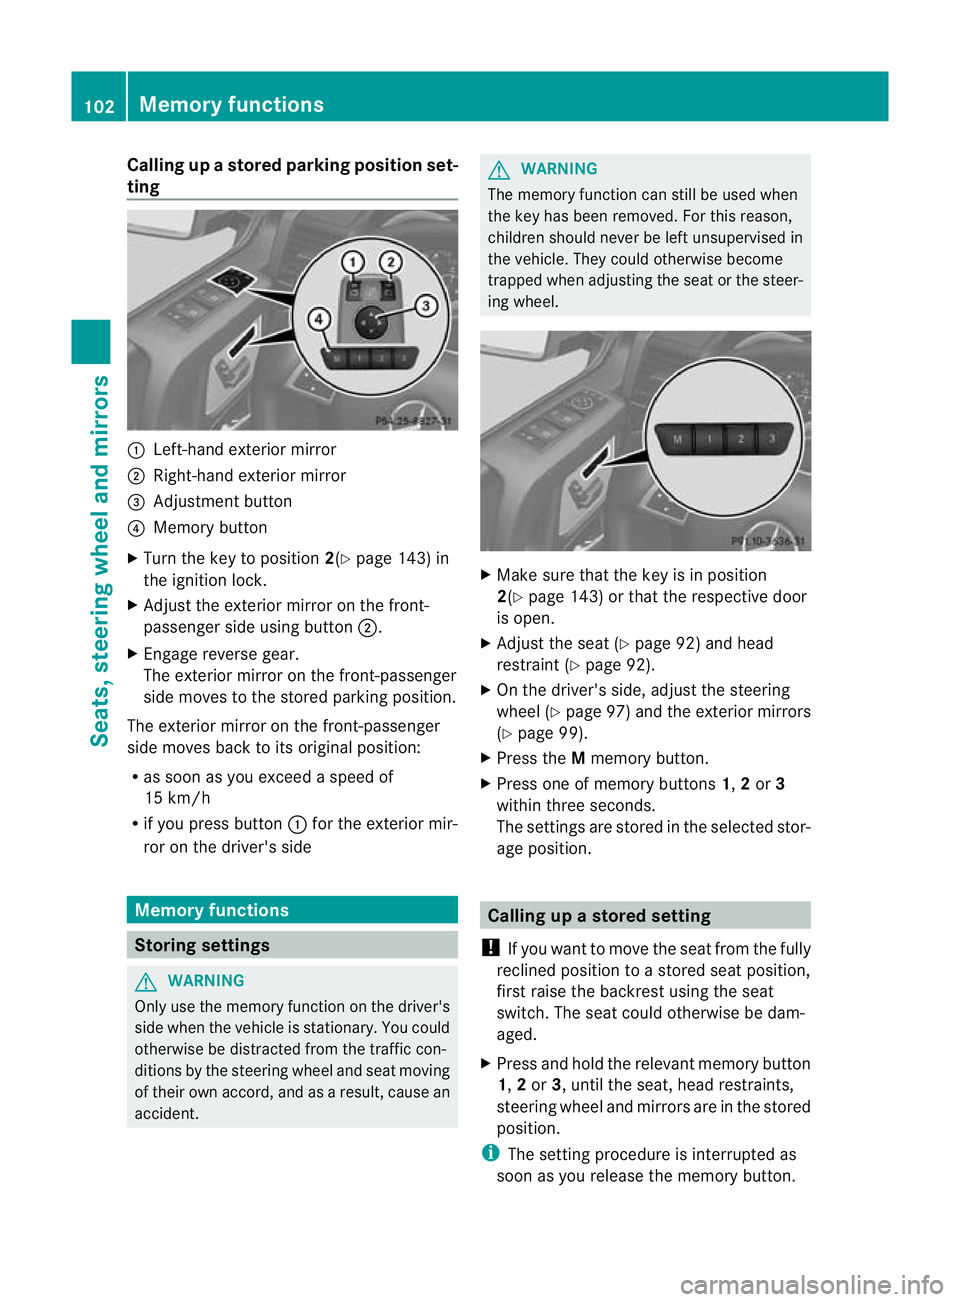
astore dparking position set-
ting :
Left-hand exterior mirror
; Right-hand exterio rmirror
= Adjustment button
? Memory button
X Turn the key to position 2(Ypage 143) in
the ignition lock.
X Adjust the exterior mirror on the front-
passenger side using button ;.
X Engage reverse gear.
The exterior mirror on the front-passenger
side moves to the stored parking position.
The exterior mirror on the front-passenger
side moves back to its original position:
R as soon as you exceed a speed of
15 km/h
R if you press button :for the exterior mir-
ror on the driver's side Memory functions
Storing settings
G
WARNING
Only use the memory function on the driver's
side when the vehicle is stationary. You could
otherwise be distracted from the traffic con-
ditions by the steering wheel and seat moving
of their own accord, and as a result, cause an
accident. G
WARNING
The memory function can still be used when
the key has been removed. For this reason,
children should never be left unsupervised in
the vehicle. They could otherwise become
trapped when adjusting the seat or the steer-
ing wheel. X
Make sure that the key is in position
2(Y page 143) or that the respective door
is open.
X Adjust the seat (Y page 92) and head
restraint (Y page 92).
X On the driver's side, adjust the steering
wheel (Y page 97) and the exterior mirrors
(Y page 99).
X Press the Mmemory button.
X Press one of memory buttons 1,2or 3
within three seconds.
The settings are stored in the selected stor-
age position. Calling up
astore dsetting
! If you want to move the seat from the fully
reclined position to a stored seat position,
first raise the backres tusing the seat
switch. The seat could otherwise be dam-
aged.
X Press and hold the relevant memory button
1, 2or 3, until the seat, head restraints,
steering wheel and mirrors are in the stored
position.
i The setting procedure is interrupted as
soon as you release the memory button. 102
Memory functionsSeats, steering wheel and mirrors
Page 269 of 357
Useful information
i This Owner's Manual describes all mod-
els, series and optional equipment for your
vehicle that were available at the time of
going to press. Country-specific differen-
ces are possible. Note that your vehicle
may not be fitted with all features descri-
bed. This is also the case for systems and
functions relevant to safety.
i Read the information on qualified special-
ist workshops: (Y page 22). Loading guidelines
G
WARNING
Secure and position the load as described in
the loading guidelines.
Otherwise, vehicle occupants could
be injured by the load being thrown around in
the even tofsharp braking, a sudden change
in direction or an accident. This also applies
to seats which have been removed.
You will find further information in the "Secur-
ing a load" section.
Even if you follow all the loading guidelines,
the load will increase the risk of injury in the
event of an accident. G
WARNING
Keep the boot lid/tailgate closed when the
engine is running. Otherwise, you could be
poisoned by exhaust fumes entering the vehi-
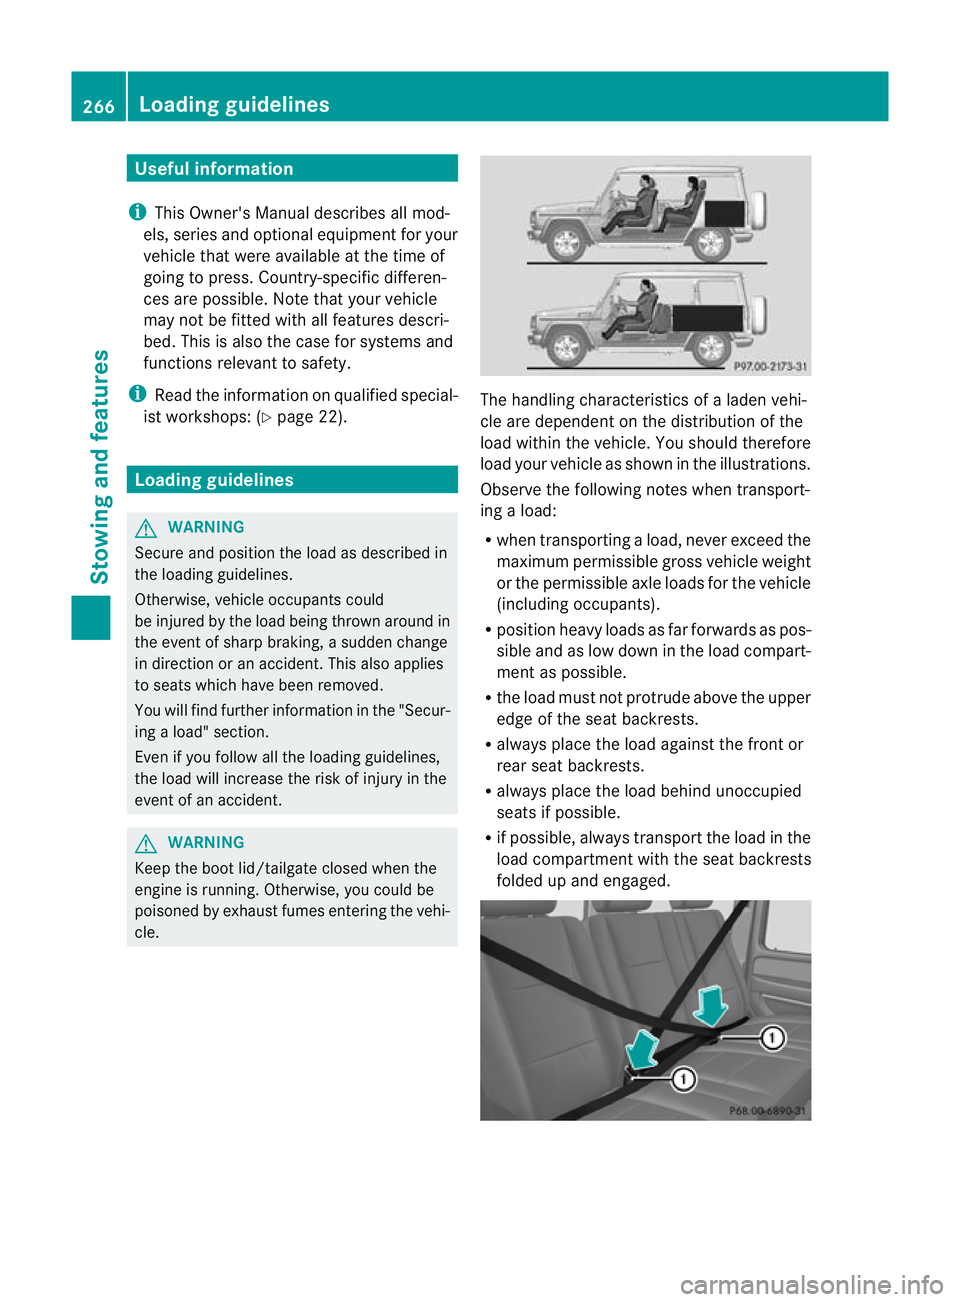
cle. The handling characteristics of a laden vehi-
cle are dependent on the distribution of the
load within the vehicle. You should therefore
load your vehicle as shown in the illustrations.
Observe the following notes when transport-
ing a load:
R when transporting a load, never exceed the
maximum permissible gross vehicle weight
or the permissible axle loads for the vehicle
(including occupants).
R position heavy loads as far forwards as pos-
sible and as low down in the load compart-
ment as possible.
R the load must not protrude above the upper
edge of the seat backrests.
R always place the load against the front or
rear seat backrests.
R always place the load behind unoccupied
seats if possible.
R if possible, always transport the load in the
load compartmentw ith the seat backrests
folded up and engaged. 266
Loading guidelinesStowing and features
Page 272 of 357
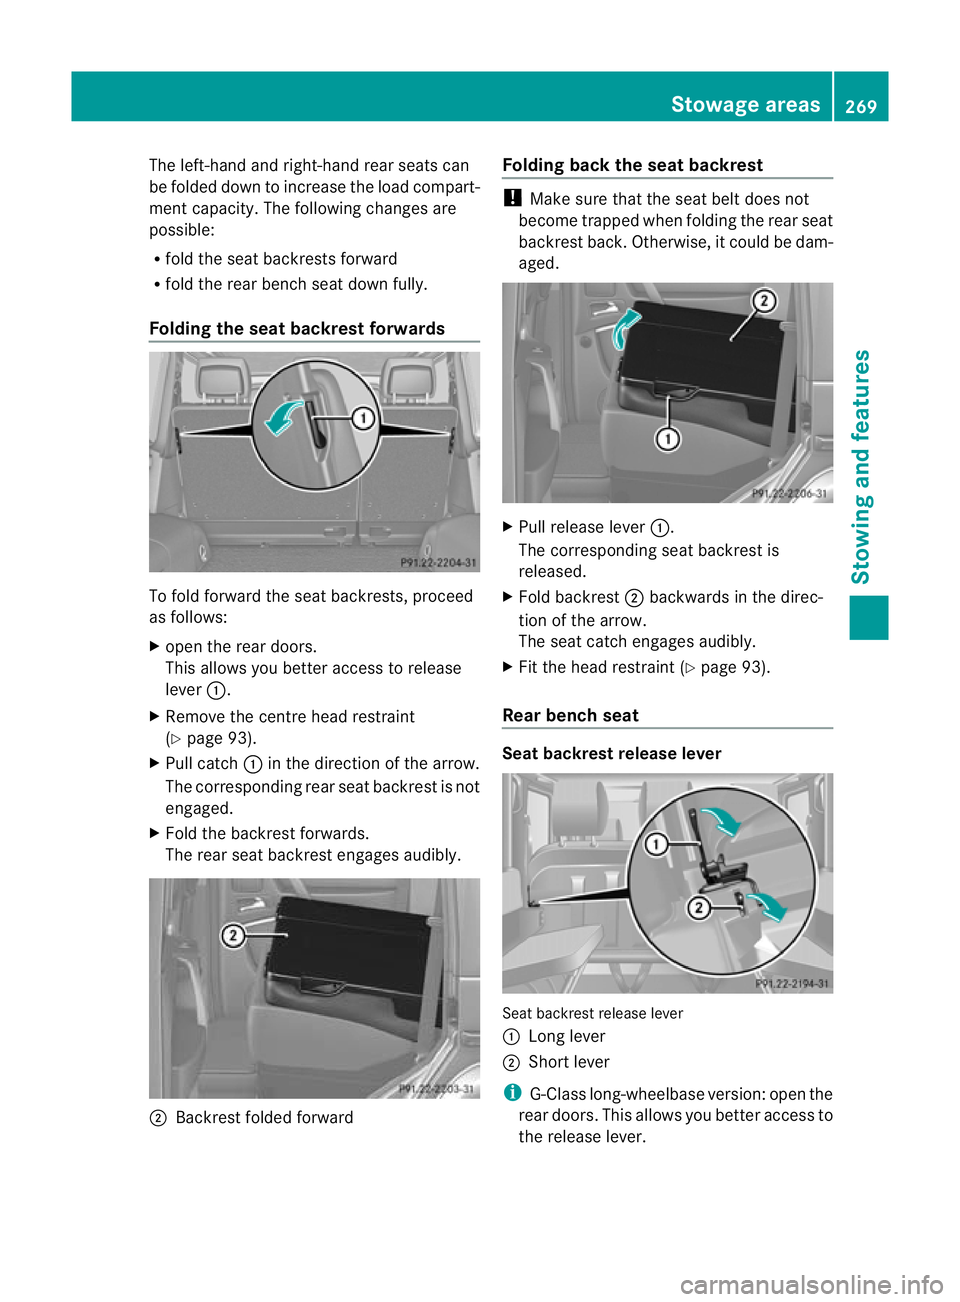
The left-hand and right-hand rear seats can
be folded down to increase the load compart-
ment capacity. The following changes are
possible:
R fold the seat backrests forward
R fold the rear bench seat down fully.
Folding the seat backrest forwards To fold forward the seat backrests, proceed
as follows:
X open the rear doors.
This allows you better access to release
lever :.
X Remove the centre head restraint
(Y page 93).
X Pull catch :in the direction of the arrow.
The corresponding rear seat backrest is not
engaged.
X Fold the backrest forwards.
The rear seat backrest engages audibly. ;
Backrest folded forward Folding back the seat backrest !
Make sure that the seat belt does not
become trapped when folding the rear seat
backrest back. Otherwise, it could be dam-
aged. X
Pull release lever :.
The corresponding seat backrest is
released.
X Fold backrest ;backwards in the direc-
tion of the arrow.
The seat catch engages audibly.
X Fit the head restraint (Y page 93).
Rear bench seat Seat backrest release lever
Seat backrest release lever
:
Long lever
; Short lever
i G-Class long-wheelbase version: open the
rear doors. This allows you better access to
the release lever. Stowage areas
269Stowing and features Z
Page 273 of 357
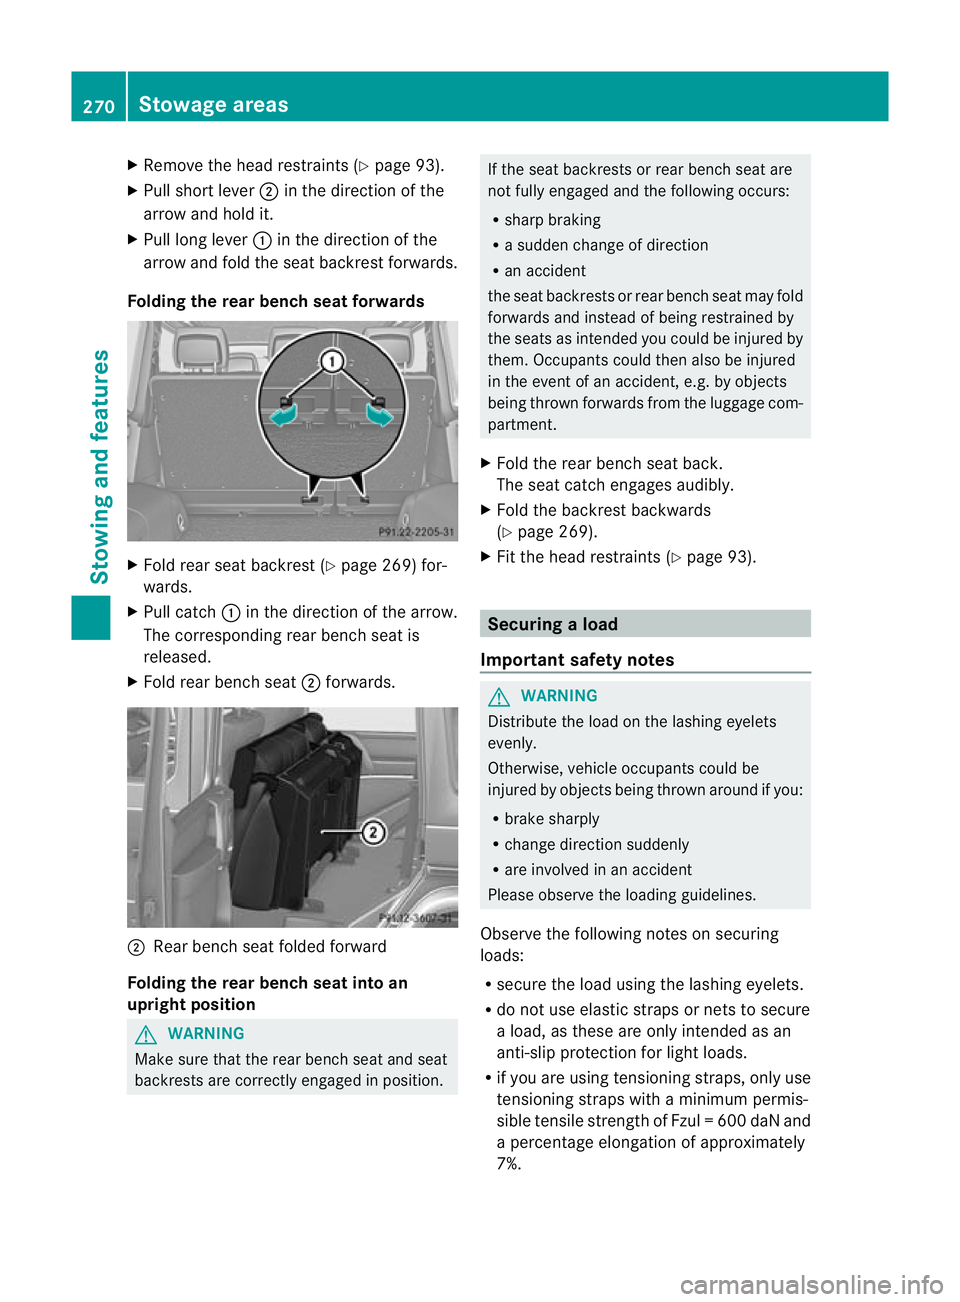
X
Remove the head restraints (Y page 93).
X Pull short lever ;in the direction of the
arrow and hold it.
X Pull long lever :in the direction of the
arrow and fold the seat backrest forwards.
Folding the rear bench seat forwards X
Fold rear seat backrest (Y page 269) for-
wards.
X Pull catch :in the direction of the arrow.
The corresponding rear bench seat is
released.
X Fold rear bench seat ;forwards. ;
Rear bench seat folded forward
Folding the rear bench sea tinto an
upright position G
WARNING
Make sure that the rear bench seat and seat
backrests are correctly engaged in position. If the seat backrests or rear bench seat are
not fully engaged and the following occurs:
R sharp braking
R a sudden change of direction
R an accident
the seat backrests or rear bench seat may fold
forwards and instead of being restrained by
the seats as intended you could be injured by
them. Occupants could then also be injured
in the event of an accident, e.g. by objects
being thrown forwards from the luggage com-
partment.
X Fold the rear bench seat back.
The seat catch engages audibly.
X Fold the backrest backwards
(Y page 269).
X Fit the head restraints (Y page 93). Securing
aload
Important safety notes G
WARNING
Distribute the load on the lashing eyelets
evenly.
Otherwise, vehicle occupants could be
injured by objects being thrown around if you:
R brake sharply
R change directio nsuddenly
R are involved in an accident
Please observe the loading guidelines.
Observe the following notes on securing
loads:
R secure the load using the lashing eyelets.
R do no tuse elastic straps or nets to secure
a load, as these are only intended as an
anti-slip protection for light loads.
R if you are using tensioning straps, only use
tensioning straps with a minimum permis-
sible tensile strength of Fzul =600 daN and
a percentage elongatio nofapproximately
7%. 270
Stowage areasStowing and features
Page 314 of 357

In order for the battery to achieve the maxi-
mum possible service life, it must always be
sufficiently charged.
Comply with safety precautions and take pro-
tective measures when handling batteries. WARNING
Avoid the creation of sparks and
heat.
Avoid fire, naked flames and smok-
ing. Creation of sparks.
Battery acid is caustic.
Avoid contact with the skin, eyes
or clothing.
Wear eye protection.
Keep childre
naway. Observe this Owner's Manual.
The vehicle battery, like other batteries, can
discharge over time if you do not use the
vehicle. In such cases, have the battery dis-
connected at a qualified specialist workshop.
You can also charge the battery with a
charger recommended by Mercedes-Benz.
For more information, please contac taquali-
fied specialist workshop.
Explosive gases are created during charging
and jump-starting.
For safety reasons, Mercedes-Benz recom-
mends that you only use batteries which have
been tested and approved for your vehicle by
Mercedes-Benz .These batteries provide
increased impact protection to prevent vehi-
cle occupants from suffering acid burns
should the battery be damaged in the event
of an accident.
Have the battery charge checked more fre-
quently if you use the vehicle mainly for short trips or if you leave it standing idle for a
lengthy period. Consult a qualified specialist
workshop if you wish to leave your vehicle
parked up for a long period of time.
i
When you park the vehicle, remove the
key if you do not require any electrical con-
sumers. The vehicle will then use very little
energy, thus conserving battery power.
i If the power supply has been interrupted,
e.g. due to a discharged battery, you will
have to:
R set the clock. Information on setting the
clock can be found in the separate oper-
ating instructions.
On vehicles with COMAND Online and a
navigation system, the clock is set auto-
matically.
R reset the head restraints on the front
seats (Y page 93).
R reset the function for folding the exterior
mirrors in/out automatically, by folding
the mirrors out once (Y page 100). Charging the battery
G
WARNING
During charging and jump-starting, explosive
gases can escape from the battery. There is a
risk of an explosion.
Particularly avoid fire, naked flames, creating
sparks and smoking. Ensure there is sufficient
ventilation while charging and jump-starting.
Do not lean over a battery. G
WARNING
Battery acid is caustic. There is a risk of injury.
Avoid contact with the skin, eyes or clothing.
Do not inhale any battery gases. Do not lean
over the battery. Keep children away from
batteries. Wash battery acid immediately with
water and seek medical attention. Battery (vehicle)
311Breakdown assistance Z