2012 MERCEDES-BENZ G-CLASS SUV steering
[x] Cancel search: steeringPage 44 of 357
front-passenger seat, you must move the
front-passenger sea tas far back as possi-
ble.
R make sure there are no heavy or sharp-
edged objects in the pockets of clothing.
R do not lean forwards, e.g. over the cover of
the driver's/front-passenger airbag, partic-
ularly when the vehicle is in motion.
R do not put your feet on the dashboard.
R only hold the steering wheel on the outside.
This allows the airbag to be fully deployed.
You could be injured if the airbag is
deployed and you are holding the inside of
the steering wheel.
R do not lean on the doors from inside the
vehicle.
R make sure that there are no people, ani-
mals or objects between the vehicle occu-
pants and the area where the airbags are
deployed.
R do not place any objects between the seat
backrest and the door.
R do not hang any hard objects, for example,
coat hangers, on the grab handles or coat
hooks.
R do not attach accessories, e.g. cup holders,
to the doors.
It is not possible to rule out a risk of injury
being caused by an airbag, due to the high
speed at which the airbag must be deployed. G
WARNING
The airbag's functionality can only be assured
if the following parts are not covered and no
badges or stickers are attached to them:
R padded steering wheel boss
R front-passenger front airbag cover G
WARNING
When an airbag deploys, a small amount of
powder is released.T he powder may cause
short-term breathing difficulties to persons
suffering from asthma or other pulmonary
conditions. In order to prevent potential breathing diffi-
culties, you should leave the vehicle as soon
as it is safe to do so. You can also open the
window to allow fresh air to enter the vehicle
interior. The powder does not constitute a
health hazard and does not indicate that there
is a fire in the vehicle. G
WARNING
The airbag parts are hot after the airbag has
been deployed. Do not touch them as you
could burn yourself.
Have the airbags replaced at a qualified spe-
cialist workshop. Otherwise, occupants are
not protected by the airbags in the event of
another accident.
Airbag deployment slows down and restricts
the movement of the vehicle occupant.
If the airbags are deployed, you will hear a
bang, and a small amount of powder may also
be released. Only in rare cases will the bang
affect your hearing. The powder that is
released generally does not constitute a
health hazard. The 6SRS warning lamp
lights up.
The airbag installation locations are identified
by the AIRBAG symbol.
Front airbags !
Do not place heavy objects on the front-
passenger seat. The system may then
detect that the seat is occupied and if there
is an accident, the restraint systems on the
front-passenger side could be deployed.
Have restraint systems that have been trig-
gered replaced. Occupant safety
41Safety Z
Page 45 of 357
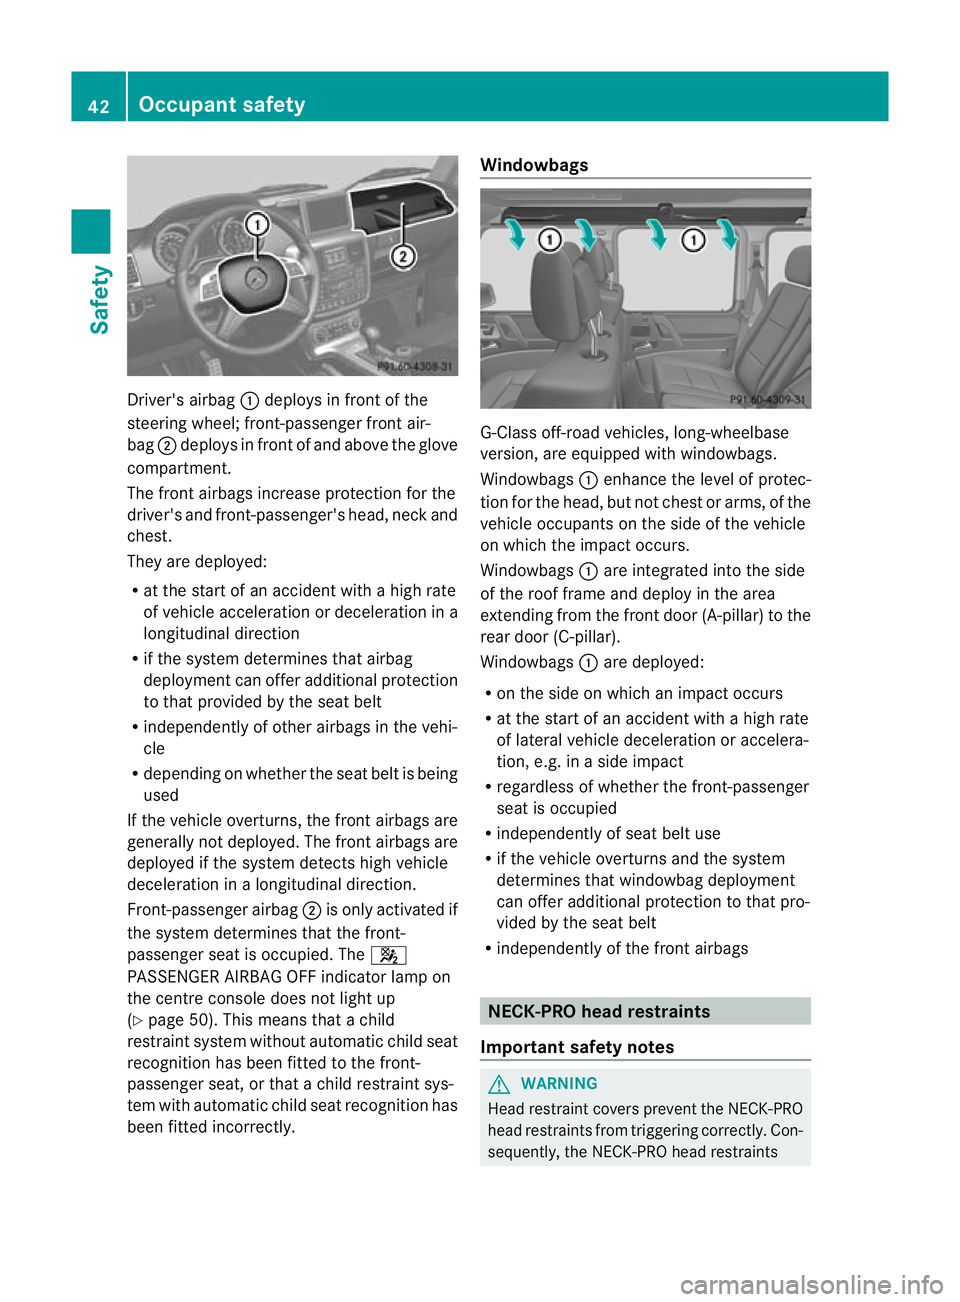
Driver's airbag
:deploys in front of the
steering wheel; front-passenge rfront air-
bag ;deploys in front of and above the glove
compartment.
The front airbags increase protection for the
driver's and front-passenger's head, neck and
chest.
They are deployed:
R at the start of an accident with a high rate
of vehicle acceleration or deceleratio nina
longitudinal direction
R if the system determines that airbag
deploymen tcan offer additional protection
to that provided by the seat belt
R independently of other airbag sinthe vehi-
cle
R depending on whether the seat belt is being
used
If the vehicle overturns, the front airbags are
generally not deployed. The front airbags are
deployed if the system detects high vehicle
deceleration in a longitudinal direction.
Front-passenger airbag ;is only activated if
the system determines that the front-
passenger seat is occupied. The 4
PASSENGER AIRBAG OFF indicator lamp on
the centre console does not light up
(Y page 50). This means that a child
restraint system without automatic child seat
recognition has been fitted to the front-
passenger seat, or that a child restraint sys-
tem with automatic child seat recognition has
been fitted incorrectly. Windowbags
G-Class off-road vehicles, long-wheelbase
version, are equipped with windowbags.
Windowbags
:enhance the level of protec-
tion for the head, but not chest or arms, of the
vehicle occupants on the side of the vehicle
on which the impact occurs.
Windowbags :are integrated into the side
of the roof frame and deploy in the area
extending from the front door (A-pillar) to the
rear door (C-pillar).
Windowbags :are deployed:
R on the side on which an impact occurs
R at the start of an accident with a high rate
of lateral vehicle deceleration or accelera-
tion, e.g. in a side impact
R regardless of whether the front-passenger
seat is occupied
R independently of seat belt use
R if the vehicle overturns and the system
determines that windowbag deployment
can offer additional protection to that pro-
vided by the seat belt
R independently of the front airbags NECK-PRO head restraints
Important safety notes G
WARNING
Head restraint covers prevent the NECK-PRO
head restraints from triggering correctly. Con-
sequently, the NECK-PRO head restraints 42
Occupant safetySafety
Page 64 of 357

G
WARNING
If ABS is faulty, the wheels could lock when
braking. The steerability and braking charac-
teristics may be severely impaired .Addition-
ally, further driving safety systems are deac-
tivated. There is an increased danger of skid-
ding and accidents.
Drive on carefully. Have ABS checked imme-
diately at a qualified specialist workshop.
If ABS is malfunctioning, other systems,
including driving safety systems, will also
become inoperative. Observe the information
on the ABS warning lamp (Y page 254) and
any display messages that may appear in the
instrument cluster (Y page 229).
ABSr egulates brake pressure in such a way
that the wheels do not lock when you brake.
This allows you to continue steering the vehi-
cle when braking.
ABS works from a speed of about 8 km/h
upwards, regardless of road-surface condi-
tions. ABSw orks on slippery surfaces, even
when you only brake gently.
The yellow !ABS warning lamp in the
instrument cluster lights up when the ignition
is switched on. It goes out when the engine is
running.
Brakes If ABS intervenes when braking, you will feel
a pulsing in the brake pedal.
X If ABS intervenes: continue to depress the
brake pedal with force until the braking sit-
uation is over.
X To make a full brake application:
depress the brake pedal with full force.
The pulsating brake pedal can be an indica-
tion of hazardous road conditions, and func-
tions as a reminder to take extra care while
driving. Off-road ABS If the
LOW RANGE shift range is selected by
the transfer case, (Y page 202), an ABS sys-
tem specifically suited to off-road terrain is
automatically activated.
At speeds below 60 km/h, the front wheels
lock cyclically during braking. The digging-in
effect achieved in the process reduces the
stopping distance when driving off-road. This
limits steering capability. BAS (Brake Assist System)
i Observe the "Important safety notes" sec-
tion (Y page 60). G
WARNING
If BAS is malfunctioning, the braking distance
in an emergency braking situation is
increased. There is a risk of accident.
In an emergency braking situation, depress
the brake pedal with full force. ABS prevents
the wheels from locking.
BAS operates in emergency braking situa-
tions. If you depress the brake pedal quickly,
BAS automatically boosts the braking force,
thus shortening the stopping distance.
X Keep the brake pedal depressed firmly until
the emergency braking situation is over.
ABS prevents the wheels from locking.
The brakes will function as usual once you
release the brake pedal. BAS is deactivated. Adaptive brake lamps
If you brake sharply from a speed of more
than 50 km/ho rifbraking is assisted by BAS,
the brake lamps flash rapidly.Int his way,
traffic travelling behind you is warned in an
even more noticeable manner.
If you brake sharply from a speed of more
than 70 km/h to a standstill, the hazard warn-
ing lamps are activated automatically .Ifthe
brakes are applied again, the brake lamps Driving safety systems
61Safety Z
Page 92 of 357
Useful information
..............................90
Correct driver's seat position ............90
Seats .................................................... 91
Steering wheel .................................... 97
Mirrors ................................................. 99
Memor yfunctions ............................. 102 89Seats, steering wheel and mirrors
Page 93 of 357
Useful information
i This Owner's Manual describes all mod-
els, series and optional equipment for your
vehicle that were available at the time of
going to press. Country-specific differen-
ces are possible. Note that your vehicle
may not be fitted with all features descri-
bed. This is also the case for systems and
functions relevant to safety.
i Read the information on qualified special-
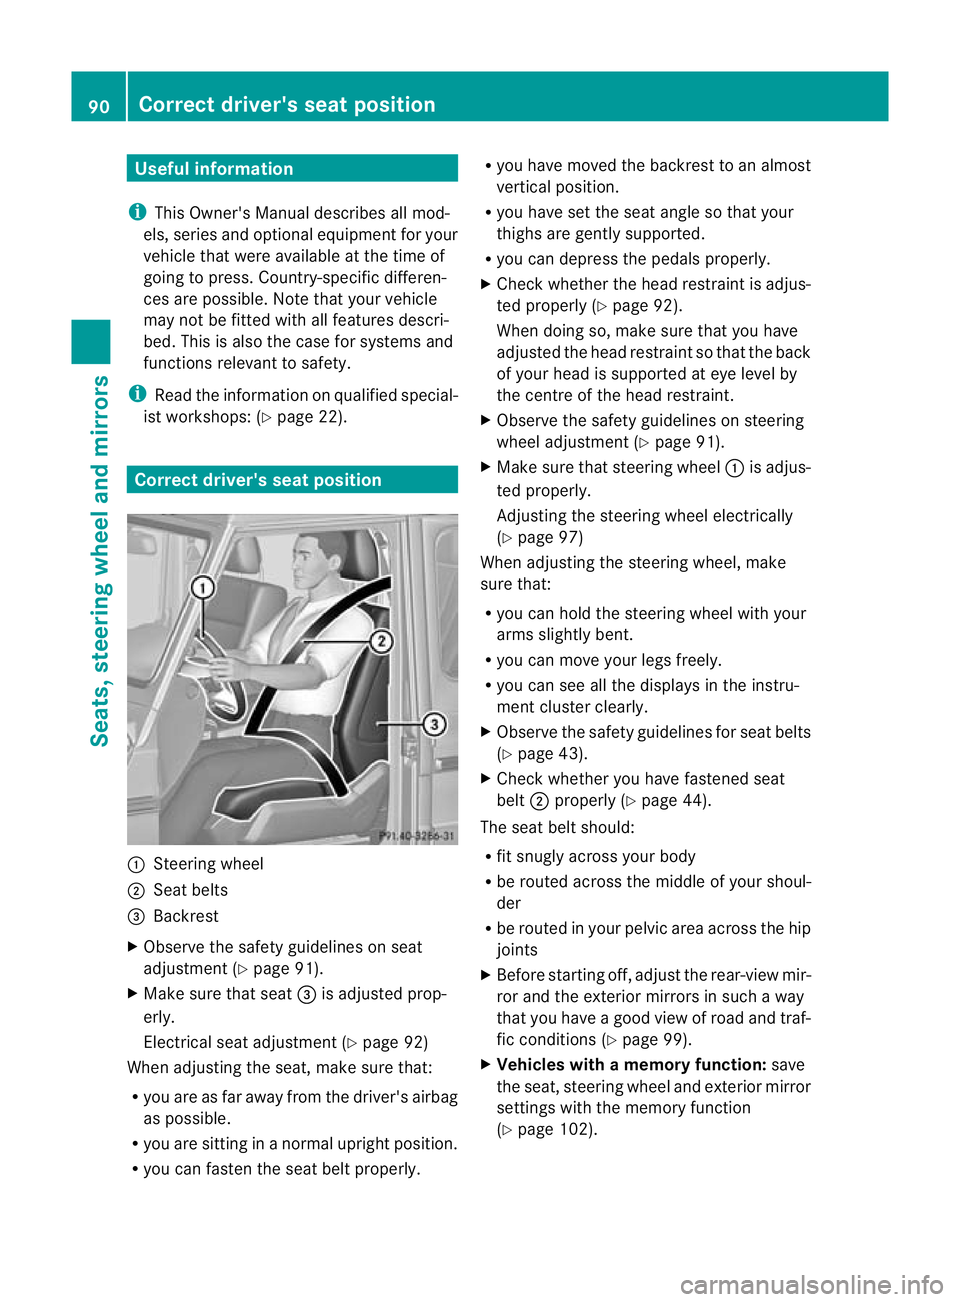
ist workshops: (Y page 22). Correct driver's seat position
:
Steering wheel
; Seat belts
= Backrest
X Observe the safety guidelines on seat
adjustment (Y page 91).
X Make sure that seat =is adjusted prop-
erly.
Electrical seat adjustment (Y page 92)
When adjusting the seat, make sure that:
R you are as far away from the driver's airbag
as possible.
R you are sitting in a normal upright position.
R you can faste nthe seat belt properly. R
you have moved the backrest to an almost
vertical position.
R you have set the seat angle so that your
thighs are gently supported.
R you can depress the pedals properly.
X Check whether the head restraint is adjus-
ted properly (Y page 92).
When doing so, make sure that you have
adjusted the head restraint so that the back
of your head is supported at eye level by
the centre of the head restraint.
X Observe the safety guidelines on steering
wheel adjustment (Y page 91).
X Make sure that steering wheel :is adjus-
ted properly.
Adjusting the steering wheel electrically
(Y page 97)
When adjusting the steering wheel, make
sure that:
R you can hold the steering wheel with your
arms slightly bent.
R you can move your legs freely.
R you can see all the displays in the instru-
ment cluster clearly.
X Observe the safety guidelines for seat belts
(Y page 43).
X Check whether you have fastened seat
belt ;properly (Y page 44).
The seat belt should:
R fit snugly across your body
R be routed across the middle of your shoul-
der
R be routed in your pelvic area across the hip
joints
X Before starting off, adjust the rear-view mir-
ror and the exterior mirrors in such a way
that you have a good view of road and traf-
fic conditions (Y page 99).
X Vehicles with a memory function: save
the seat, steering wheel and exterior mirror
settings with the memory function
(Y page 102). 90
Correct driver's seat positionSeats, steering wheel and mirrors
Page 94 of 357
Seats
Important safety notes
G
WARNING
The seats can still be adjusted when there is
no key in the ignition lock. For this reason,
children should never be left unsupervised in
the vehicle. They could adjust the seats and
become trapped. G
WARNING
Only adjust the driver's seat when the vehicle
is stationary. You will otherwise be distracted
from the road and traffic conditions and you
could lose control of the vehicle as a result of
the seat moving. This could cause an acci-
dent. G
WARNING
If you adjust the seat height carelessly, you or
others could be trapped and thereby injured.
Children in particular could unintentionally
press the buttons to electrically adjust the
seats and become trapped.
Take care that:
R while moving the seats, your hands do not
get under the lever assembly of the seat
adjustment system.
R children in the vehicle do not slide their
hands under the levers. G
WARNING
Make sure that nobody can become trapped
when adjusting the seats.
Observe the notes on airbags.
Secure children as recommended; see the
"Children in the vehicle" section. G
WARNING
Make sure that the back of your head is sup-
ported at eye level by the central area of the
head restraint .Ifyour head is not supported
correctly by the head restraint, you could suf-
fer a severe neck injury in the event of an accident
.Never drive if the head restraints are
not engaged and set correctly. G
WARNING
Occupants should only travel sitting on seats
which have the head restraints fitted. On a
seat which is occupied, move the head
restraint into the upright position .This
reduces the risk of injury to the passenger in
the event of an accident. G
WARNING
As eat belt can only offer its intended degree
of protection when the backrest is almost ver-
tical and the occupant is sitting upright. Avoid
seat positions that do not allow the seat belt
to be routed correctly. Adjust the backrest so
that it is as upright as possible. Never travel
with the backrest reclined too far backwards.
You could otherwise be seriously or even
fatally injured in the event of an accident or
sudden braking.
! To avoid damage to the seats and the seat
heating, observe the following information:
R do not spill any liquids on the seats. If
liquid is spilled on the seats, dry them as
soon as possible.
R if the seat covers are damp or wet, do not
switch on the seat heating. The seat
heating should also not be used to dry
the seats.
R clean the seat covers as recommended;
see the "Interior care" section.
R do not transport heavy loads on the
seats. Do not place sharp objects on the
seat cushions, e.g. knives, nails or tools.
The seats should only be occupied by
passengers, if possible.
R when the seat heating is in operation, do
not cover the seats with insulating mate-
rials, e.g. blankets, coats, bags, seat cov-
ers, child seats or booster seats.
! Make sure that there are no objects in the
footwell or behind the seats when moving Seats
91Seats, steering wheel and mirrors Z
Page 95 of 357

the seat back. There is a risk tha
tthe seats
and/or the objects could be damaged.
! When the rear bench seat is folded for-
wards, the front seats cannot be moved to
their rearmost position. You could other-
wise damage the seats and the rear bench
seat.
! Make sure that the sun visor is folded up
before adjusting the backrest and head
restraint height. The head restraint and sun
visor could otherwise collide when the head
restraint is fully extended.
i If the front door is open, the seats can be
adjusted for up 30 minutes after the igni-
tion has been switched off.
i The rear-compartment head restraints
can be removed (Y page 93).
For more information, contact a qualified
specialist workshop.
i You can find further information about
enlarging the luggage compartment( fold-
ing the rear bench sea tforwards) on
(Y page 270). Adjusting the seats electrically
! Make sure that the cupholder on the
centre console is folded down before you
move the front-passenger seat forwards. :
Head restraint height
; Seat cushion angle
= Seat height ?
Seat fore-and-aft adjustment
A Backrest angle
i You can store the seat settings using the
memory function (Y page 102). Adjusting the head restraints
Important safety notes G
WARNING
Occupants should only travel sitting on seats
that have the head restraints fitted. This
reduces the risk of injury to the occupant in
the event of an accident.
Adjusting the front seat head restraint
height :
Head restraint height
; Seat cushion angle
= Seat height
? Seat fore-and-aft adjustment
A Backrest angle
X Slide head restraint adjustmen tbutton :
up or down in the direction of the arrow.
Adjusting the luxury head restraints G
WARNING
When folding bac kthe head restraint side bol-
sters, do not put your hands between the side
bolster and the cushion holder. There is a
danger of becoming trapped. 92
SeatsSeats, steering wheel and mirrors
Page 96 of 357
X
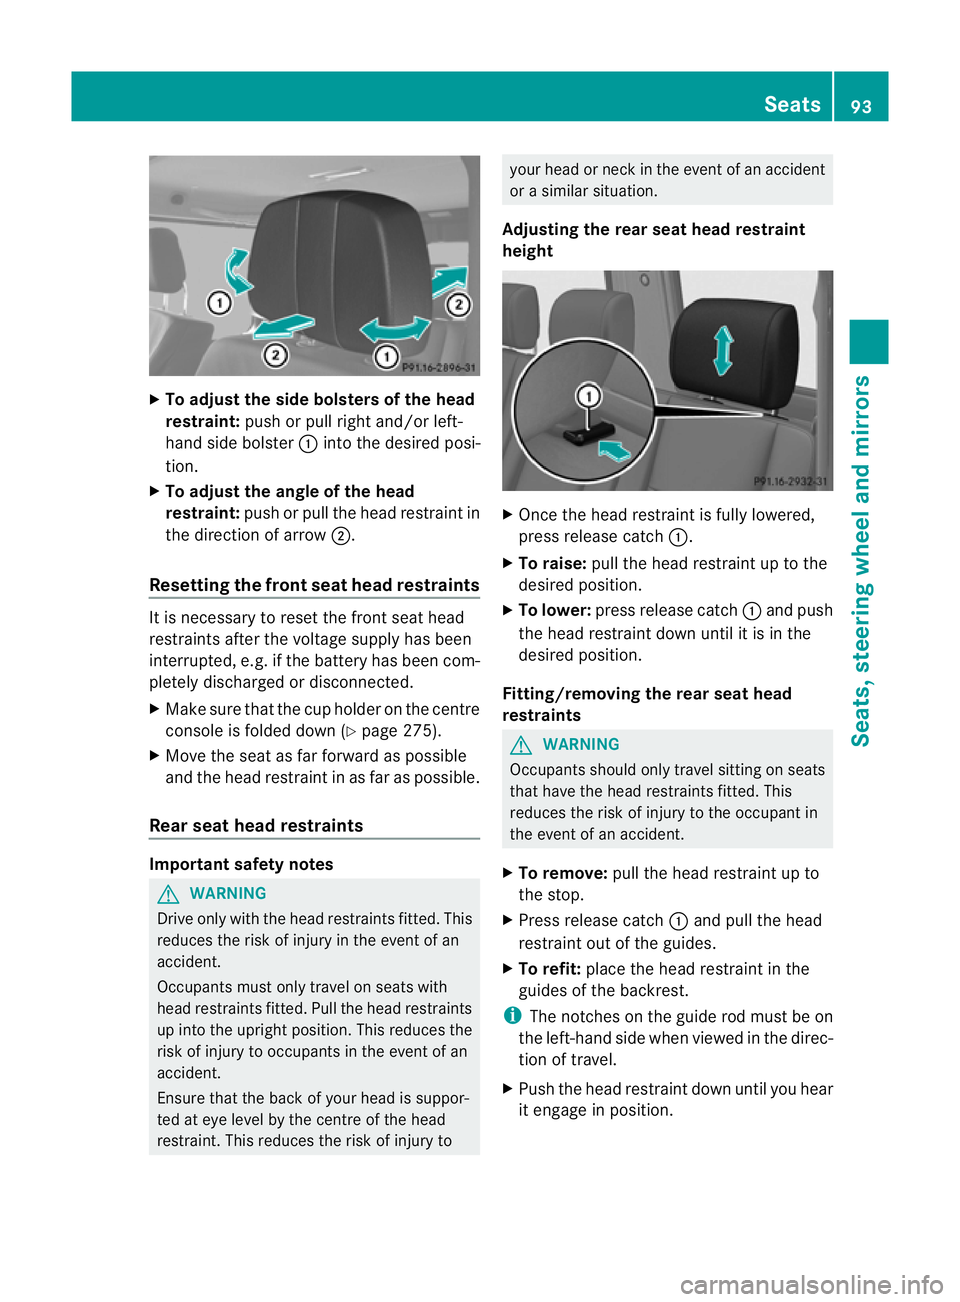
To adjust the side bolsters of the head
restraint: push or pull right and/or left-
hand side bolster :into the desired posi-
tion.
X To adjust the angle of the head
restraint: push or pull the head restraint in
the direction of arrow ;.
Resetting the front seat head restraints It is necessary to reset the front seat head
restraints after the voltage supply has been
interrupted, e.g .ifthe battery has been com-
pletely discharged or disconnected.
X Make sure that the cup holder on the centre
console is folded down (Y page 275).
X Move the seat as far forward as possible
and the head restraint in as far as possible.
Rear seat head restraints Important safety notes
G
WARNING
Drive only with the head restraints fitted. This
reduces the risk of injury in the event of an
accident.
Occupants must only travel on seats with
head restraints fitted. Pull the head restraints
up into the upright position. This reduces the
risk of injury to occupants in the event of an
accident.
Ensure that the back of your head is suppor-
ted at eye level by the centre of the head
restraint. This reduces the risk of injury to your head or neck in the event of an accident
or a similar situation.
Adjusting the rear seat head restraint
height X
Once the head restraint is fully lowered,
press release catch :.
X To raise: pull the head restraint up to the
desired position.
X To lower: press release catch :and push
the head restraint down until it is in the
desired position.
Fitting/removing the rear seat head
restraints G
WARNING
Occupants should only travel sitting on seats
that have the head restraints fitted. This
reduces the risk of injury to the occupant in
the event of an accident.
X To remove: pull the head restraint up to
the stop.
X Press release catch :and pull the head
restraint out of the guides.
X To refit: place the head restraint in the
guides of the backrest.
i The notches on the guide rod must be on
the left-hand side when viewed in the direc-
tion of travel.
X Push the head restraint down until you hear
it engage in position. Seats
93Seats, steering wheel and mirrors Z