2012 MERCEDES-BENZ G-CLASS SUV spare wheel
[x] Cancel search: spare wheelPage 18 of 357

Bel
ttensioner .................................. 47
Cleaning ......................................... 301
Display message ............................ 232
Fastening ......................................... 44
Fastening, front ............................... 44
Fastening in the rear, centre ............45
Important safety guidelines .............43
Rea rseat belt status indicator .........47
Releasing ......................................... 46
Warning lamp ................................. 252
Warning lamp (function) ................... 47
Seat heating
Malfunction indicator lamp ..............96
Seats
Adjusting (electrically). ....................92
Adjusting the 4-way lumba rsup-
por t.................................................. 94
Adjusting the head restraint ............92
Cleaning the cover .........................300
Correct driver's seat position ........... 90
Important safety notes ....................91
Overview .......................................... 91
Storing settings (memory function) 102
Switching sea theating on/off .........95
Switching the sea tventilation on/
off .................................................... 96
Seat ventilation
Malfunction indicator lamp ..............97
Securing aload .................................. 270
Sensors (cleaning instructions) .......298
Service menu (on-board computer) .220
Service products
AdBlue ®
special additive s.............. 345
Brake fluid ..................................... 346
Coolant (engine) ............................ 347
Engine oil ....................................... 345
Fuel ................................................ 341
Important safety notes ..................341
Notes ............................................. 341
Washer fluid .................................. .347
Settings
Calling up a stored setting .............102
Factory (on-board computer) .........225
On-board computer .......................221
Setting the air distribution ...............131
SETUP (on-board computer) .............226
Shift ranges ....................................... 153Short journeys (diesel particle fil-
ter)
...................................................... 164
Side lamps Switching on/off ........................... 107
Side windows
Convenience opening ......................78
Important safety notes ....................77
Opening/closing .............................. 77
Overview .......................................... 77
Troubleshooting ............................... 78
Ski rack .............................................. 275
Sliding sunroof Important safety information ...........79
Opening/closing .............................. 79
Operating manually ..........................79
Problem (malfunction) .....................80
Snow chains ...................................... 324
Socket Front-passenger footwell ...............278
Luggage compartment ...................278
Rea rcompartmen t......................... 278
Soft top
Closing ............................................ .82
Closing manually in an emergenc y... 82
Important safety notes ....................81
Opening ........................................... 81
Troubleshooting ............................... 87
Spare fuses ........................................ 318
Spare wheel Fitting ............................................ 329
Notes/data .................................... 333
Spare wheel bracket at the rear ....307
Stainless-steel spare wheel cover ..308
Specialist workshop ............................ 22
Speed, controlling see Cruise control
Speedometer
Digita l............................................ 216
In the Instrument cluster ...............211
Segments ...................................... 212
Selecting the unit of measurement 221
see Instrument cluster
SPEEDTRONIC
Display message ............................ 244
Permanent ..................................... 182
Selecting ........................................ 179
Variabl e......................................... 178 Index
15
Page 79 of 357
Closing
X Push the rear door closed from outside the
vehicle.
X If necessary, loc kthe vehicle with the
& button on the key. Tailgate (G-Class Cabriolet)
Important safety notes
G
WARNING
Combustion engines emit poisonous exhaust
gases such as carbon monoxide. If the tailgate
is open when the engine is running, particu-
larly if the vehicle is moving, exhaust fumes
could enter the passenger compartment.
There is a risk of poisoning.
Turn off the engine before opening the tail-
gate. Never drive with the tailgate open. G
WARNING
If the spare wheel bracket is not correctly
closed and engaged, it could swing to the side
while the vehicle is in motion. There is a risk
of an accident and injury.
Close the spare wheel bracket completely
before the journey and make sure that it is
engaged. Opening
! Make sure that there is sufficient clear-
ance.
You can only open the tailgate after it has
been unlocked.
X Press the %button on the key.
The tailgate is unlocked. X
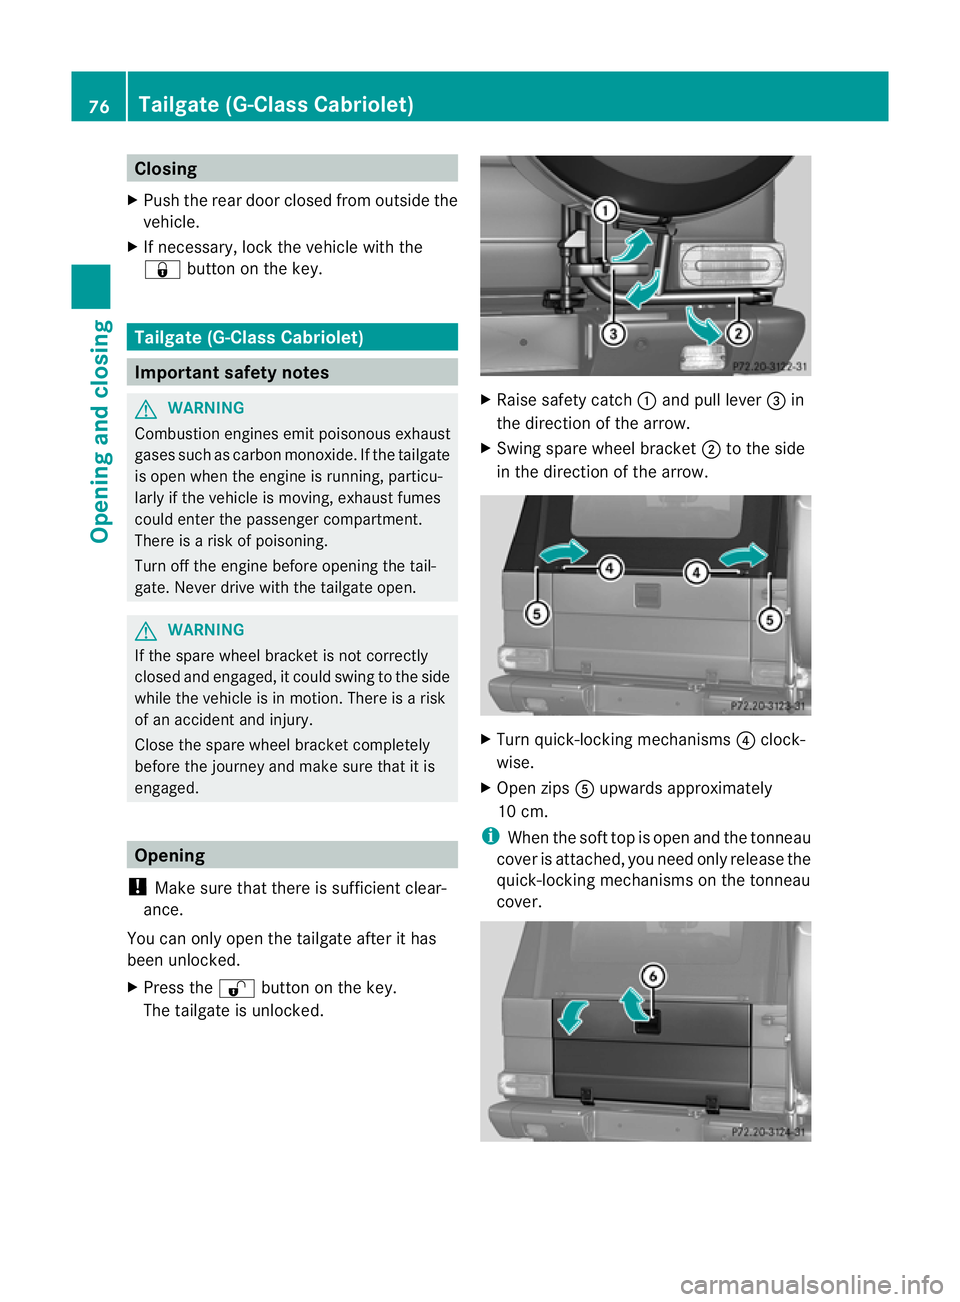
Raise safety catch :and pull lever =in
the direction of the arrow.
X Swing spare wheel bracket ;to the side
in the direction of the arrow. X
Turn quick-locking mechanisms ?clock-
wise.
X Open zips Aupwards approximately
10 cm.
i When the soft top is open and the tonneau
cover is attached, you need only release the
quick-locking mechanisms on the tonneau
cover. 76
Tailgate (G-Class Cabriolet)Opening and closing
Page 80 of 357
X
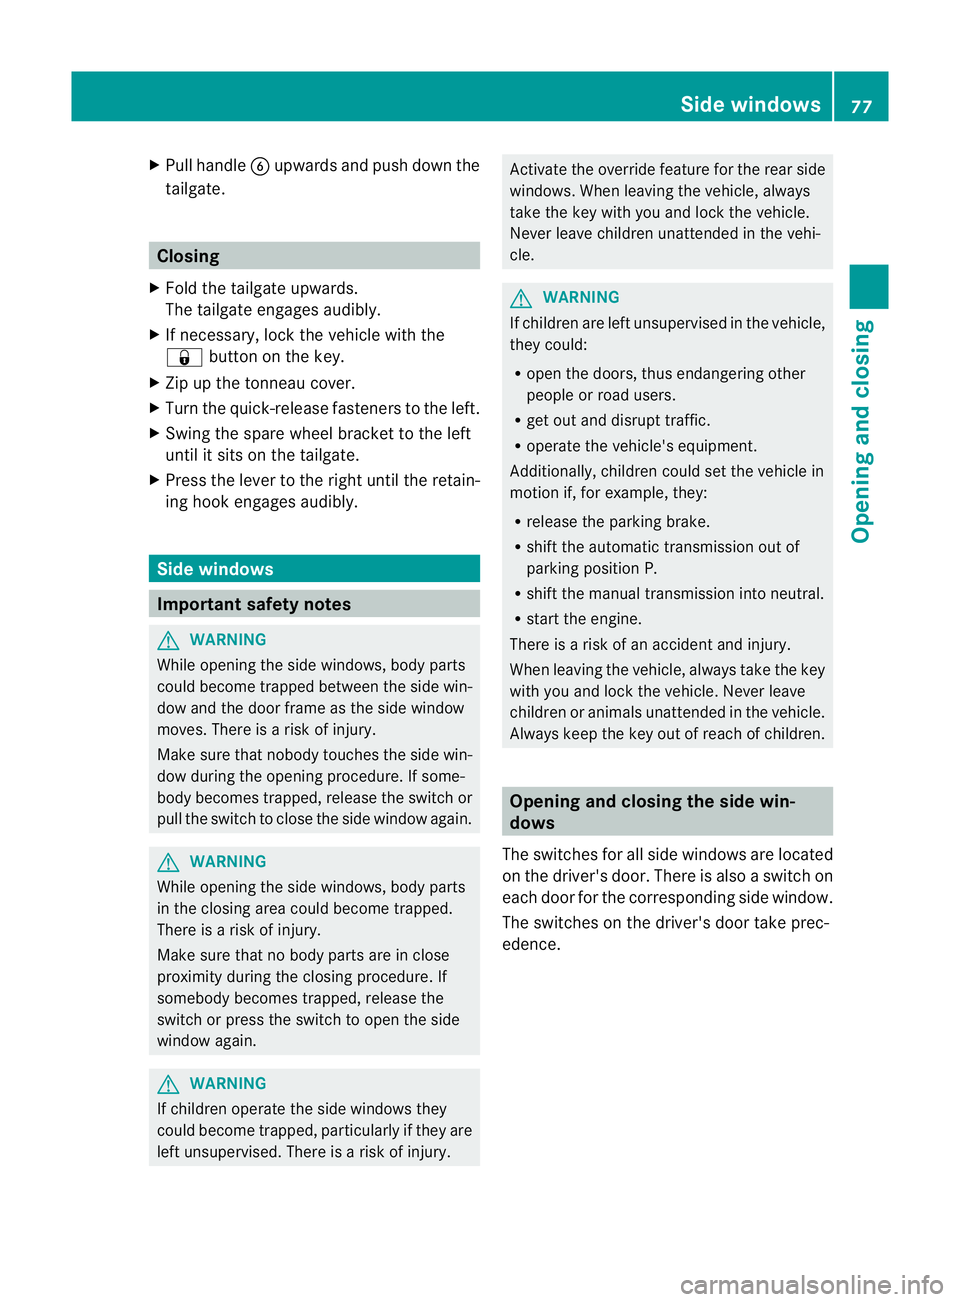
Pull handle Bupwards and push down the
tailgate. Closing
X Fold the tailgate upwards.
The tailgate engages audibly.
X If necessary, lock the vehicle with the
& button on the key.
X Zip up the tonneau cover.
X Turn the quick-release fasteners to the left.
X Swing the spare wheel bracket to the left
until it sits on the tailgate.
X Press the lever to the right until the retain-
ing hook engages audibly. Side windows
Important safety notes
G
WARNING
While opening the side windows, body parts
could become trapped between the side win-
dow and the door frame as the side window
moves. There is a risk of injury.
Make sure that nobody touches the side win-
dow during the opening procedure. If some-
body becomes trapped, release the switch or
pull the switch to close the side window again. G
WARNING
While opening the side windows, body parts
in the closing area could become trapped.
There is a risk of injury.
Make sure that no body parts are in close
proximity during the closing procedure. If
somebody becomes trapped, release the
switch or press the switch to open the side
window again. G
WARNING
If children operate the side windows they
could become trapped, particularly if they are
left unsupervised. There is a risk of injury. Activate the override feature for the rear side
windows. When leaving the vehicle, always
take the key with you and lock the vehicle.
Never leave children unattended in the vehi-
cle.
G
WARNING
If children are left unsupervised in the vehicle,
they could:
R open the doors, thus endangering other
people or road users.
R get out and disrupt traffic.
R operate the vehicle's equipment.
Additionally, children could set the vehicle in
motion if, for example, they:
R release the parking brake.
R shift the automatic transmission out of
parking position P.
R shift the manual transmission into neutral.
R start the engine.
There is a risk of an accident and injury.
When leaving the vehicle, always take the key
with you and lock the vehicle. Never leave
children or animals unattended in the vehicle.
Always keep the key out of reach of children. Opening and closing the side win-
dows
The switches for all side windows are located
on the driver's door. There is also a switch on
each door for the corresponding side window.
The switches on the driver's door take prec-
edence. Side windows
77Opening and closing Z
Page 173 of 357
R
Chec kthat items of luggage and loads are
stowed safely and are well secured
(Y page 271).
R To avoid damaging the vehicle, make sure
there is always sufficient ground clearance.
R Always keep the engine running and in gear
when driving on a downhill gradient.
R Always keep the engine running and in gear
when driving on a slope.
R Drive slowly and evenly, if necessary at
walking pace.
R Ensure that the wheels are in contact with
the ground at all times.
R Drive with extreme care on unknown off-
road routes where visibility is poor. For
safety reasons, get out of the vehicle first
and survey the off-road route.
R Check the depth of water before fording
rivers and streams.
R When fording, do not stop and do not
switch off the engine.
R Look out for obstacles such as rocks, holes,
tree stumps and furrows.
R Always keep the doors, the rear door or
tailgate (G-Class Cabriolet), the side win-
dows and the sliding sunroof closed while
the vehicle is in motion.
R Switch off cruise control and variable
SPEEDTRONIC.
R Do not stray from marked routes or paths.
R Adapt your speed to the terrain. The
rougher, steeper or more ruts on the ter-
rain, the slower your speed should be.
R Drive slowly and at a constant speed
through the water. Ensure that a bow wave
does not form as you drive.
R On sand, drive quickly to overcome the roll-
ing resistance. Otherwise, the vehicle could
dig itself into the sand.
R Do not jump with the vehicle as this will
interrupt the vehicle's propulsion. R
Avoid high engine speeds. Drive at appro-
priate engine speeds.
R Always check the vehicle for damage after
off-road driving.
i Information about retrofitting special all-
terrain tyres is available from any qualified
specialist workshop.
i Do not use the HOLD function when driv-
ing off-road, on steep uphill or downhill gra-
dients or on slippery or loose surfaces. The
HOLD function cannot hold the vehicle on
such surfaces.
Checklist before driving off-road !
If the engine oil warning lamp lights up
during the journey, stop the vehicle in a
safe place as soon as is possible. Check the
engine oil level. The warning given by the
engine oil warning light must not be
ignored. Continuing your journey when the
symbol is shown may result in engine dam-
age.
X Engine oil level: check the engine oil and
top it up if necessary.
Only then does the engine receive enough
oil when the vehicle is standing on a steep
incline.
X G3 50 BlueTEC: have the AdBlue ®
level
checked at a qualified specialist workshop
(Y page 160).
X Tyre-change tool kit: check that the jack
is working and make sure you have the
wheelbrace, a robust tow cable and a fold-
ing spade in the vehicle.
X Wheels and tyres: check the tyre tread
depth and tyre pressure.
X Check for damage and remove any foreign
objects, e.g. small stones, from the
wheels/tyres.
X Replace any missing valve caps.
X Replace dented or damaged wheels.
X Carry a sound spare wheel. 170
Driving tipsDriving and parking
Page 201 of 357

PARKTRONIC is an electronic parking aid with
ultrasonic sensors
.Itindicates visually and
audibly the distance between your vehicle
and an object.
PARKTRONIC is only an aid. It is not a replace-
ment for your attention to your immediate
surroundings. You are always responsible for
safe manoeuvring, parking and exiting a park-
ing space. Check in front, behind and to the
sides of the vehicle before manoeuvring,
parking or exiting a parking space. There
must not be any persons, animals or objects
in the area in which yo uare manoeuvring.
PARKTRONIC cannot identify any persons or
objects outside of the detection range. As a
result, PARKTRONIC cannot warn you about
objects in this area.
PARKTRONIC is activated automatically if
you:
R switch on the ignition
R shift the transmission to position D,Ror N
R release the parking brake
PARKTRONIC is deactivated at speeds above
18 km/h. It is reactivated at lower speeds.
PARKTRONIC monitors the area around your
vehicle using six sensors in the front bumper
and four sensors in the rear bumper.
Range of the sensors General notes
:
Example: sensors in the front bumper,
left-hand side Side view
Top view
The sensors must be free of dirt, ice and
slush. Otherwise, they may not function cor-
rectly. Clean the sensors regularly, taking
care not to scratch or damage them
(Y
page 298).
Front sensors Centre Approximately 100 cm
Corners Approximately 60 cm
Rear sensors
Centre Approximately 90 cm
(from spare wheel)
Corners Approximately 80 cm
Minimum distance
Centre Approximately 20 cm
Corners Approximately 20 cm
If there is an obstacle withi
nthis range, the
relevant warning displays light up and a warn-
ing tone sounds. If the distance falls below
the minimum, the distance may no longer be
shown. 198
Driving systemsDriving and parking
Page 310 of 357
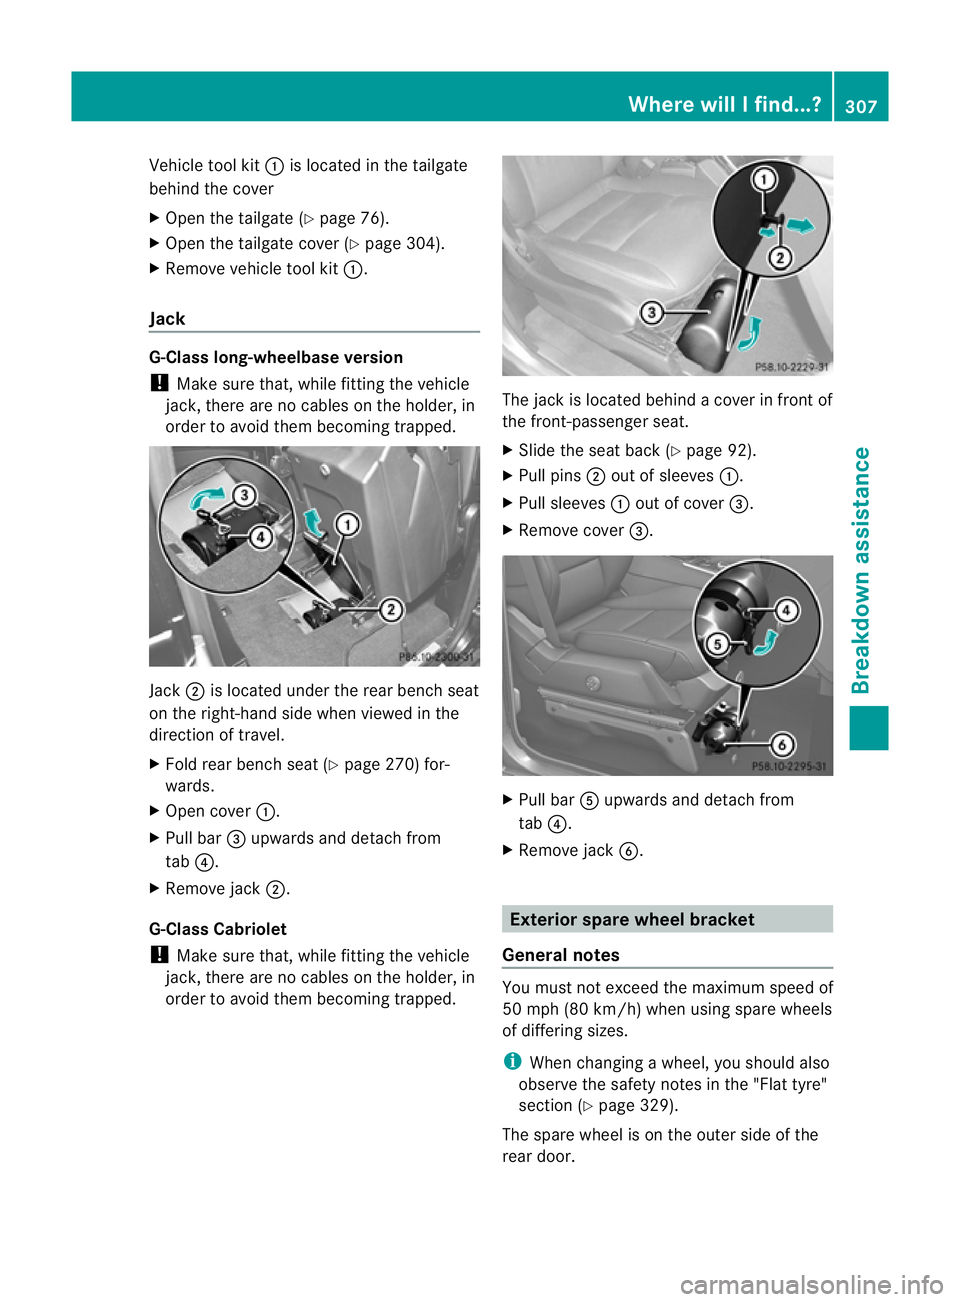
Vehicle tool kit
:is located in the tailgate
behind the cover
X Open the tailgate (Y page 76).
X Open the tailgate cover (Y page 304).
X Remove vehicle tool kit :.
Jack G-Class long-wheelbase version
!
Make sure that, while fitting the vehicle
jack, there are no cables on the holder, in
order to avoid them becoming trapped. Jack
;is located under the rear bench seat
on the right-hand side when viewed in the
direction of travel.
X Fold rear bench seat (Y page 270) for-
wards.
X Open cover :.
X Pull bar =upwards and detach from
tab ?.
X Remove jack ;.
G-Class Cabriolet
! Make sure that, while fitting the vehicle
jack, there are no cables on the holder, in
order to avoid them becoming trapped. The jack is located behind a cover in front of
the front-passenger seat.
X
Slide the seat back (Y page 92).
X Pull pins ;out of sleeves :.
X Pull sleeves :out of cover =.
X Remove cover =. X
Pull bar Aupwards and detach from
tab ?.
X Remove jack B. Exterior spare wheel bracket
General notes You must not exceed the maximum speed of
50 mph (80 km/h) when using spare wheels
of differing sizes.
i
When changing a wheel, you should also
observe the safety notes in the "Flat tyre"
section (Y page 329).
The spare wheel is on the outer side of the
rear door. Where will I find...?
307Breakdown assistance
Page 311 of 357
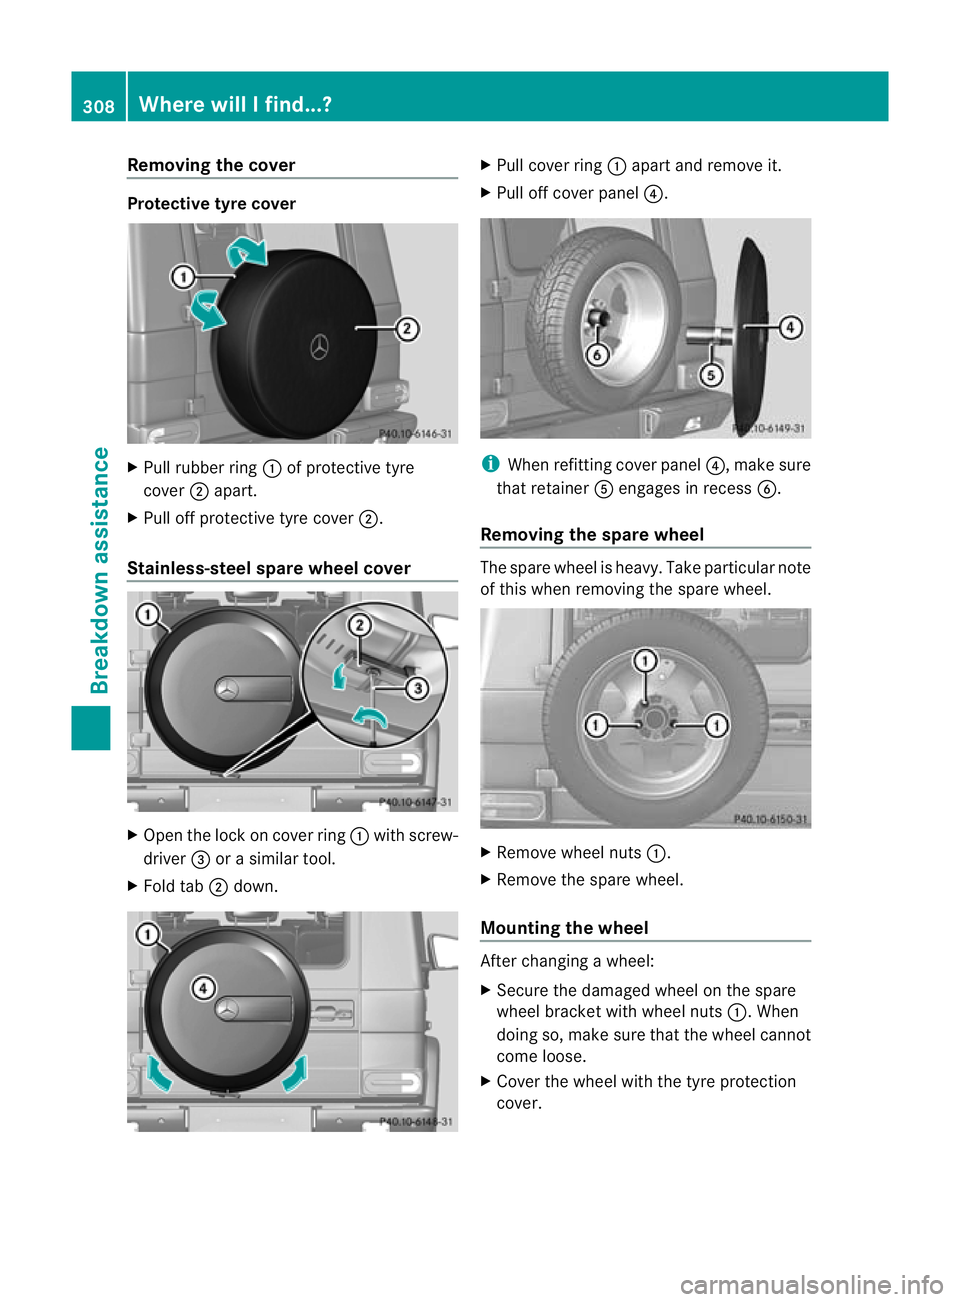
Removing the cover
Protective tyre cover
X
Pull rubber ring :of protective tyre
cover ;apart.
X Pull off protective tyre cover ;.
Stainless-steel spare wheel cover X
Ope nthe lock on cover ring :with screw-
driver =or a similar tool.
X Fold tab ;down. X
Pull cover ring :apart and remove it.
X Pull off cover panel ?. i
When refitting cover panel ?, make sure
that retainer Aengages in recess B.
Removing the spare wheel The spare wheel is heavy. Take particular note
of this when removing the spare wheel.
X
Remove wheel nuts :.
X Remove the spare wheel.
Mounting the wheel After changing a wheel:
X Secure the damaged wheel on the spare
wheel bracket with wheel nuts :.When
doing so, make sure that the wheel cannot
come loose.
X Cover the wheel with the tyre protection
cover. 308
Where will I find...?Breakdown assistance
Page 312 of 357
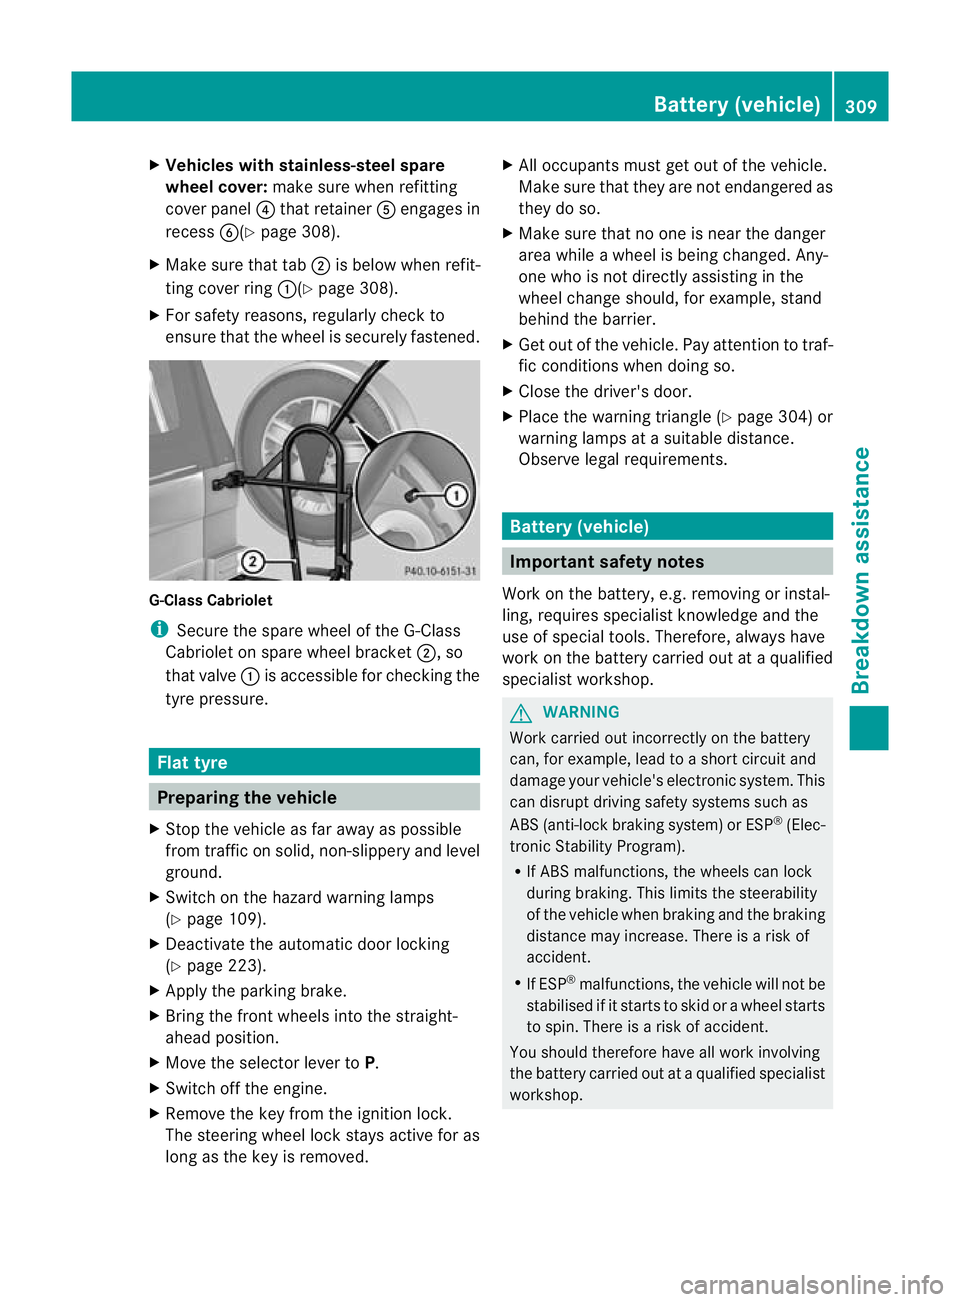
X
Vehicles with stainless-steel spare
wheel cover: make sure when refitting
cove rpanel ?that retainer Aengages in
recess B(Ypage 308).
X Make sure that tab ;is below when refit-
ting cover ring :(Ypage 308).
X For safety reasons, regularly check to
ensure that the wheel is securely fastened. G-Class Cabriolet
i
Secure the spare wheel of the G-Class
Cabriolet on spare wheel bracket ;, so
that valve :is accessible for checking the
tyre pressure. Flat tyre
Preparing the vehicle
X Stop the vehicle as far away as possible
from traffic on solid ,non-slippery and level
ground.
X Switch on the hazard warning lamps
(Y page 109).
X Deactivate the automatic door locking
(Y page 223).
X Apply the parking brake.
X Bring the front wheels into the straight-
ahead position.
X Move the selector lever to P.
X Switch off the engine.
X Remove the key from the ignition lock.
The steering wheel lock stays active for as
long as the key is removed. X
All occupants must get out of the vehicle.
Make sure that they are not endangered as
they do so.
X Make sure that no one is near the danger
area while a wheel is being changed. Any-
one who is not directly assisting in the
wheel change should, for example, stand
behind the barrier.
X Get out of the vehicle. Pay attention to traf-
fic conditions when doing so.
X Close the driver's door.
X Place the warning triangle (Y page 304) or
warning lamps at a suitable distance.
Observe legal requirements. Battery (vehicle)
Important safety notes
Work on the battery, e.g. removing or instal-
ling, requires specialist knowledge and the
use of special tools. Therefore, always have
work on the battery carried out at a qualified
specialist workshop. G
WARNING
Work carried out incorrectly on the battery
can, for example, lead to a short circuit and
damage your vehicle's electronic system. This
can disrupt driving safety systems such as
ABS (anti-lock braking system) or ESP ®
(Elec-
tronic Stability Program).
R If ABS malfunctions, the wheels can lock
during braking. This limits the steerability
of the vehicle when braking and the braking
distance may increase. There is a risk of
accident.
R If ESP ®
malfunctions, the vehicle will not be
stabilised if it starts to skid or a wheel starts
to spin. There is a risk of accident.
You should therefore have all work involving
the battery carried out at a qualified specialist
workshop. Battery (vehicle)
309Breakdown assistance Z