2012 MERCEDES-BENZ G-CLASS SUV ESP
[x] Cancel search: ESPPage 111 of 357
BN
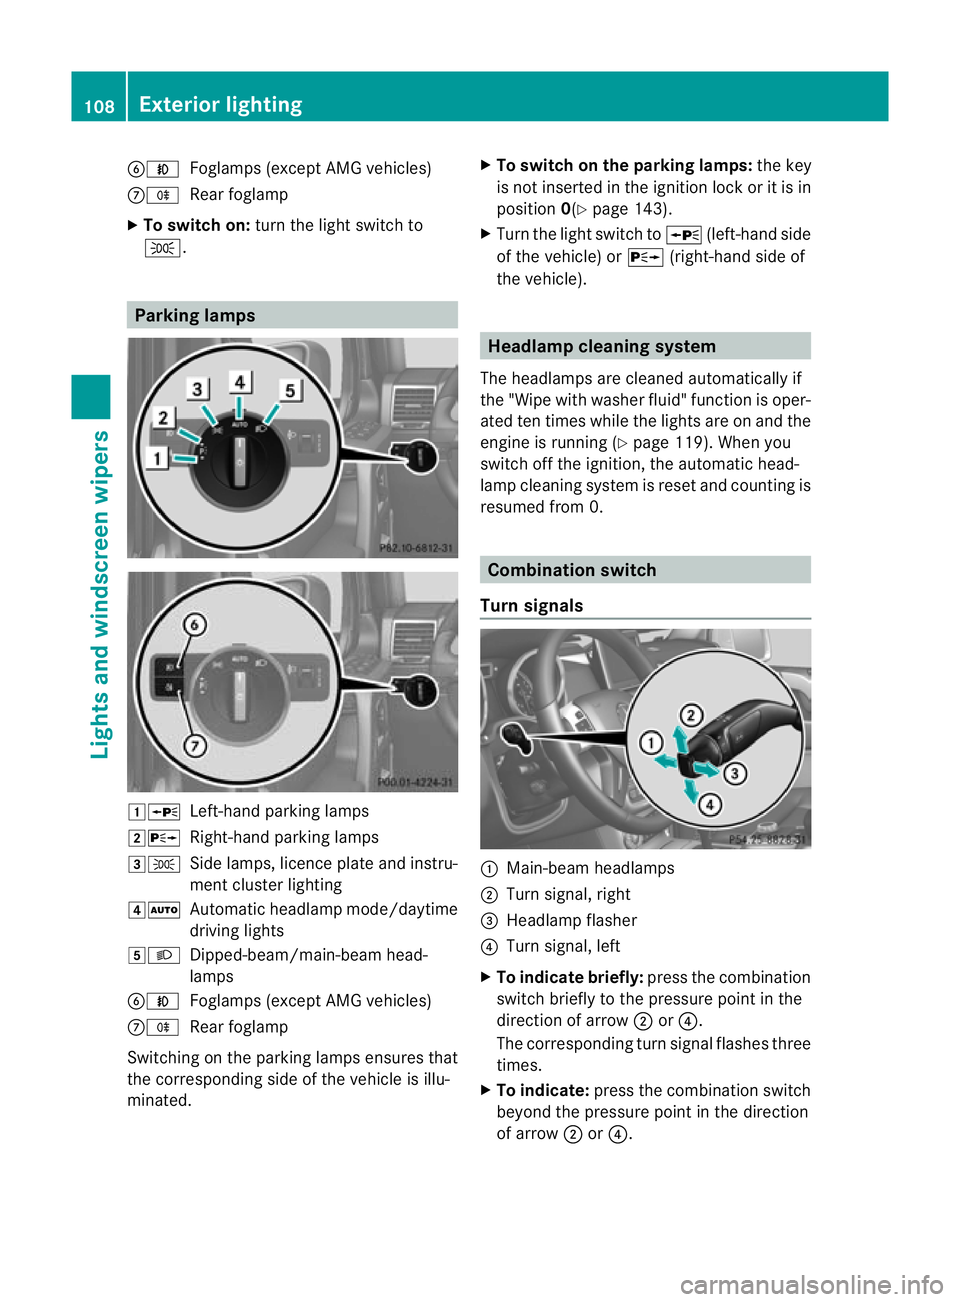
Foglamps (except AMG vehicles)
CR Rear foglamp
X To switc hon:turn the light switch to
T. Parking lamps
1W
Left-hand parking lamps
2X Right-hand parking lamps
3T Side lamps, licence plate and instru-
ment cluster lighting
4Ã Automatic headlamp mode/daytime
driving lights
5L Dipped-beam/main-beam head-
lamps
BN Foglamps (except AMG vehicles)
CR Rear foglamp
Switching on the parking lamps ensures that
the corresponding side of the vehicle is illu-
minated. X
To switch on the parking lamps: the key
is not inserted in the ignition lock or it is in
position 0(Ypage 143).
X Turn the light switch to W(left-hand side
of the vehicle) or X(right-hand side of
the vehicle). Headlamp cleaning system
The headlamps are cleaned automatically if
the "Wipe with washer fluid" function is oper-
ated ten times while the lights are on and the
engine is running (Y page 119). When you
switch off the ignition, the automatic head-
lamp cleaning system is reset and counting is
resumed from 0. Combination switch
Turn signals :
Main-beam headlamps
; Turn signal, right
= Headlamp flasher
? Turn signal, left
X To indicate briefly: press the combination
switch briefly to the pressure point in the
direction of arrow ;or?.
The corresponding turn signal flashes three
times.
X To indicate: press the combination switch
beyond the pressure point in the direction
of arrow ;or?. 108
Exterior lightingLights and windscreen wipers
Page 121 of 357
X
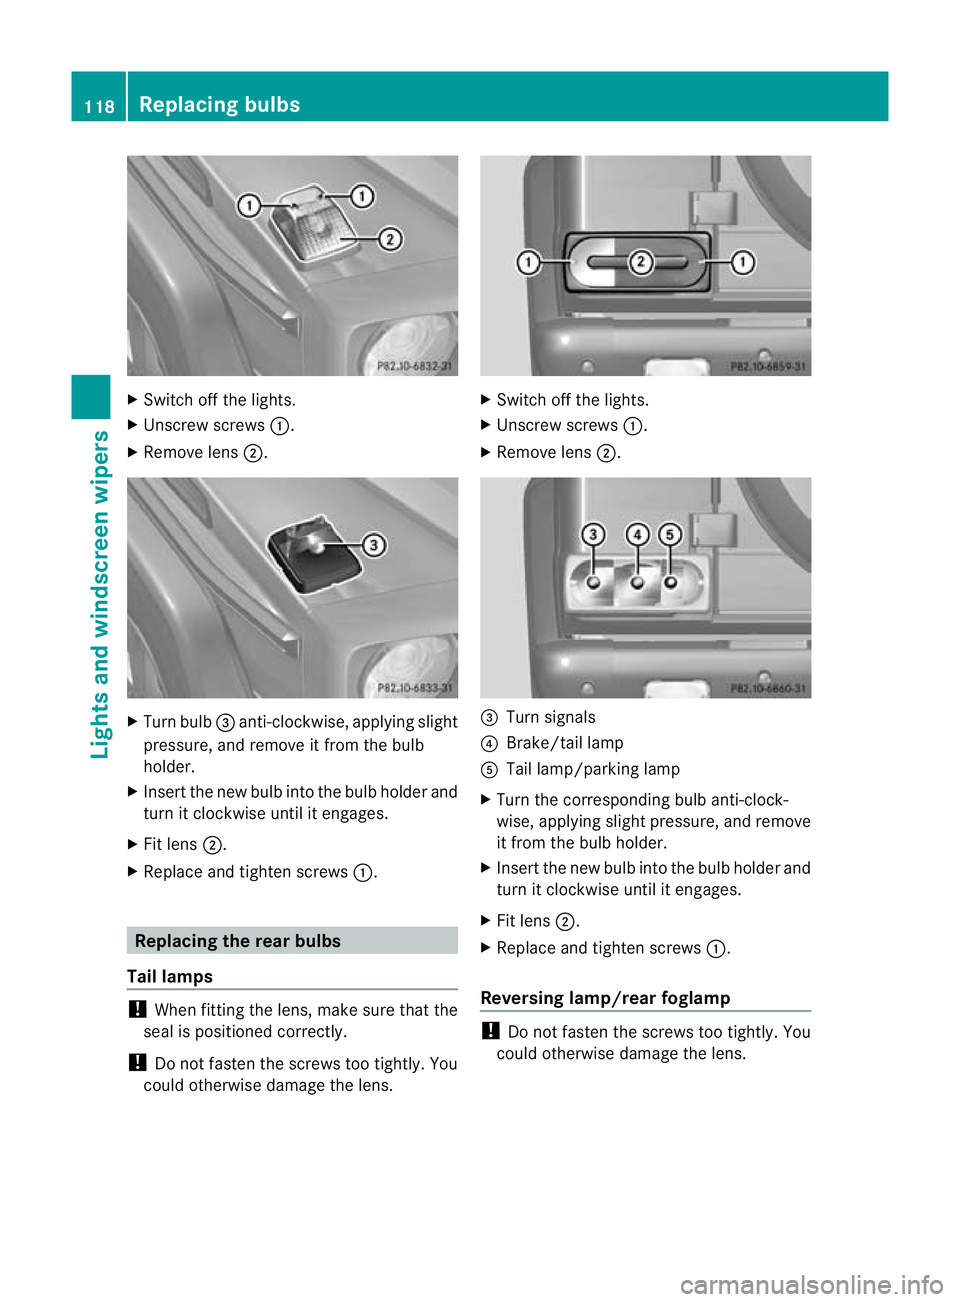
Switch off the lights.
X Unscrew screws :.
X Remove lens ;. X
Turn bulb =anti-clockwise, applying slight
pressure, and remove it from the bulb
holder.
X Insert the new bulb into the bulb holde rand
tur nitc lockwise until it engages.
X Fit lens ;.
X Replace and tighten screws :.Replacing the rear bulbs
Tail lamps !
When fitting the lens, make sure that the
seal is positioned correctly.
! Do not fasten the screws too tightly. You
could otherwise damage the lens. X
Switch off the lights.
X Unscrew screws :.
X Remove lens ;. =
Turn signals
? Brake/tail lamp
A Tail lamp/parking lamp
X Turn the corresponding bulb anti-clock-
wise, applying slight pressure, and remove
it fro mthe bulb holder.
X Insert the new bulb into the bulb holder and
turn it clockwise until it engages.
X Fit lens ;.
X Replace and tighten screws :.
Reversing lamp/rear foglamp !
Do not fasten the screws too tightly. You
could otherwise damage the lens. 118
Replacing bulbsLights and windscreen wipers
Page 123 of 357

4
° Continuous wipe, slow
5 ¯ Continuous wipe, fast
B í Single wipe
C î To wipe with washe rfluid
X Turn the key to position 1or 2in the ignition
lock.
X Turn the combination switch to the corre-
sponding position.
Intermittent wiping is interrupted if you stop
and open a front door. This protects people
getting into and out of the vehicle fro mbeing
sprayed with water.
In the ÄorÅ position, the appropriate
wiping frequency is set automatically accord-
ing to the intensity of the rain. In the Å
position, the rain sensor is more sensitive
than in the Äposition, causing the wind-
screen wipers to wipe more frequently.
i When the windscreen wipers are
switched on and you stop the vehicle, the
windscreen wipers wipe more slowly. Switching the rear window wiper on/
off
Combination switch
:
è Switch
2 b To wipe with washer fluid
3 ITo switch on intermittent wiping
4 0To switch off intermittent wiping
5 b To wipe with washer fluid X
Turn the key to position 1or 2in the ignition
lock.
X Turn switch :on the combination switch
to the corresponding position.
When the rear window wiper is switched on,
the symbol appears in the instrument clus-
ter.
i The rear window wiper comes on auto-
matically if you shift the selector lever to
R while the windscreen wipers are on. Replacing the wiper blades
Important safety notes G
WARNING
The wiper arms could start moving and cause
an injury if you leave the windscreen wipers
switched on.
Remove the key from the ignition lock before
replacing the wiper blades.
! To avoid damaging the windscreen wiper
blades, make sure that you touch only the
wiper arm of the windscreen wiper.
! Never open the bonnet if a windscreen
wiper arm has been folded away from the
windscreen.
Never fold a windscreen wiper arm without
a wiper blade back onto the windscreen/
rear window.
Hold the windscreen wiper arm firmly when
you change the wiper blade. If you release
the windscreen wiper arm without a wiper
blade and it falls onto the windscreen, the
windscreen may be damaged by the force
of the impact.
Mercedes-Benzr ecommends that you have
the wiper blades changed at aqualified
specialist workshop. 120
Windscreen wipersLights and windscreen wipers
Page 140 of 357
X
Press the uand^ buttons simulta-
neously.
The new departure time is stored.
Activating the set departure time
X Press the ,or. button repeatedly
until the desired departure time appears in
the display.
X Press the ubutton.
The Ísymbol and the departure time
appear in the display.
Deactivating a set departure time
X Press the ,or. button.
The status of the auxiliary heating is shown
in the display.
X Press the .button.
The first departure time stored appears in
the display.
X Press the ^button.
The display message OFF appears in the
display.
Replacing the batteries in the remote
control G
WARNING
Batteries contain poisonous substances.
Swallowing/ingesting batteries can result in
serious personal injury or death.
Always keep batteries away from children. If
a battery is swallowed, seek immediate med-
ical attention. H
Environmental note Batteries contain pollutants.
It is illegal to dispose of them
with the household rubbish.
They must be collected sep-
arately and disposed of in an
environmentally responsible
recycling system.
Dispose of batteries in an
environmentally responsible
manner
.Take discharged
batteries to a qualified spe- cialis
tworkshop or to a col-
lection point for used batter-
ies. You require a 6-V pin battery, type
2CR11108.
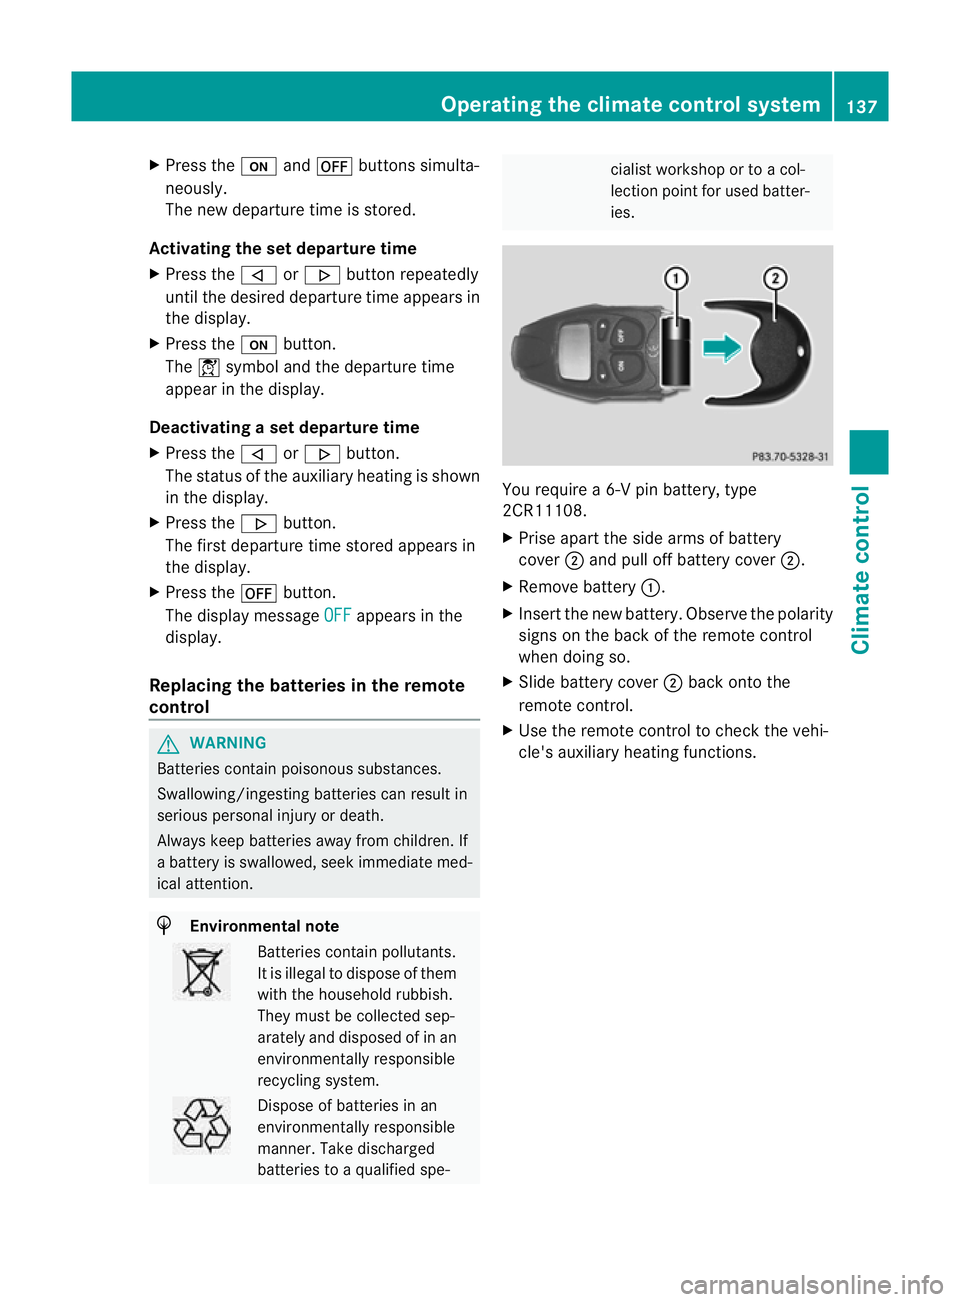
X
Prise apart the side arms of battery
cover ;and pull off battery cover ;.
X Remove battery :.
X Insert the new battery. Observe the polarity
signs on the back of the remote control
when doing so.
X Slide battery cover ;back onto the
remote control.
X Use the remote control to check the vehi-
cle's auxiliary heating functions. Operating the climate control system
137Climate control Z
Page 143 of 357
X
To open/close: turnthumbwheel =to the
left or right. Setting the rear-compartment air
vents
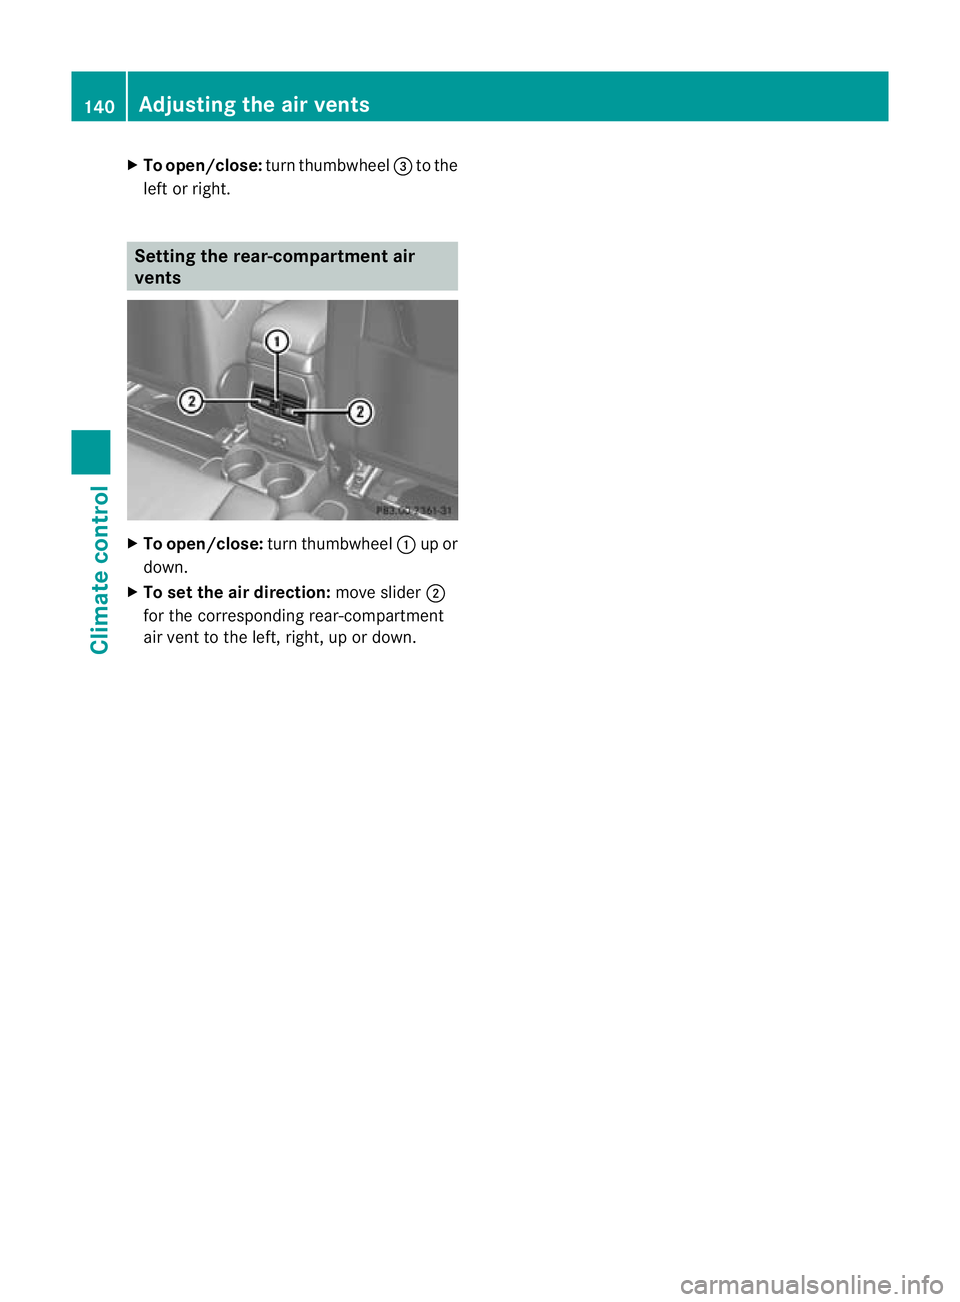
X
To open/close: turn thumbwheel :up or
down.
X To set the air direction: move slider;
for the corresponding rear-compartment
air vent to the left, right, up or down. 140
Adjusting the air ventsClimate control
Page 146 of 357
G
WARNING
Unsuitable footwea rcan hinder correc tusage
of the pedals, e.g.:
R shoes with thick soles
R shoes with high heels
R slippers
There is a risk of an accident.
Wear suitable footwear to ensure correct
usage of the pedals. G
WARNING
If you switch off the ignition while driving,
safety-relevant functions are only available
with limitations, or not at all. This could affect,
for example, the power steering and the brake
boosting effect. You will require considerably
more effort to steer and brake. There is a risk
of an accident.
Do not switch off the ignition while driving. G
WARNING
If the parking brake has not been fully
released when driving, the parking brake can:
R overheat and cause a fire
R lose its hold function.
There is a risk of fire and an accident. Release
the parking brake fully before driving off.
! Warm up the engine quickly. Do not use
the engine's full performance until it has
reached operating temperature.
Only set the automatic transmission to the
respective drive positions when the vehicle
is stationary.
Where possible, avoid spinning the drive
wheels when pulling away on slippery
roads. Otherwise, you could damage the
drive train.
! Avoid high engine speeds when the
engine is cold. The engine's service life
could otherwise be significantly shortened.
Do not use the engine's full performance
until it has reached operating temperature. !
AMG vehicles: at low engine oil temper-
atures (below +20 †), the maximum
engine speed is restricted in order to pro-
tect the engine. To protect the engine and
maintain smooth engine operation, avoid
driving at full throttle when the engine is
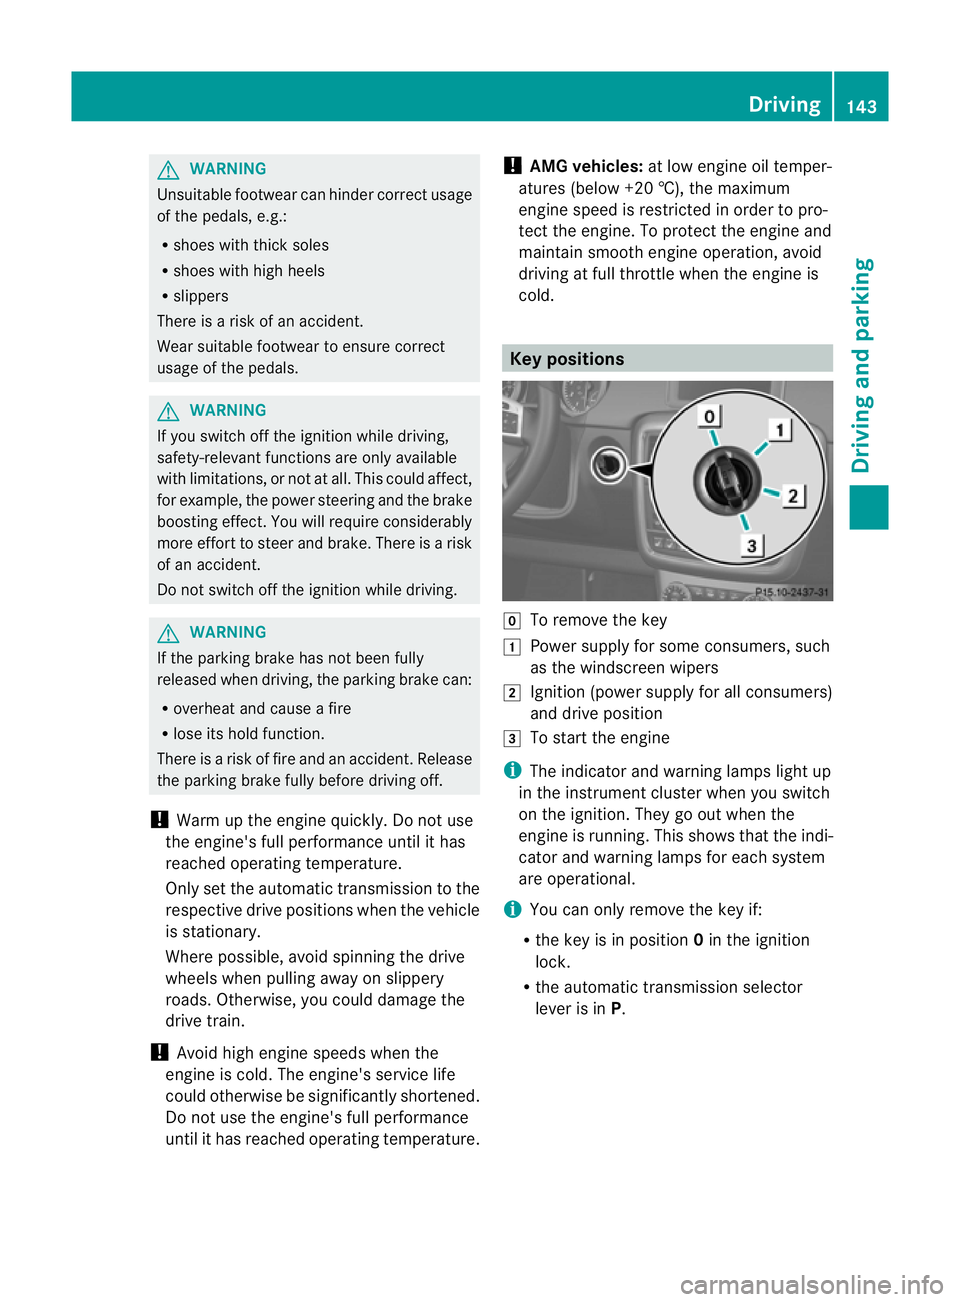
cold. Key positions
g
To remove the key
1 Power supply for some consumers, such
as the windscreen wipers
2 Ignition (power supply for all consumers)
and drive position
3 To start the engine
i The indicator and warning lamps light up
in the instrument cluster when you switch
on the ignition. They go out when the
engine is running. This shows that the indi-
cator and warning lamps for each system
are operational.
i You can only remove the key if:
R the key is in position 0in the ignition
lock.
R the automatic transmission selector
lever is in P. Driving
143Driving and parking Z
Page 148 of 357
You can open the doors fro
mthe inside at
any time.
You can also deactivate the automatic lock-
ing feature (Y page 223).
i Upshifts take place at higher engine
speeds after a cold start. This helps the
catalytic converter to reach its operating
temperature more quickly.
Hill starta ssist G
WARNING
After a short time, hill start assist will no lon-
ger brake your vehicle and it could roll away.
There is a risk of an accident and injury.
Therefore, quickly move your foot from the
brake pedal to the accelerator pedal. Never
leave the vehicle when it is held by hill start
assist.
Hill start assist helps you when pulling away
forwards or in reverse on an uphill gradient.
It holds the vehicle for a short time after you
have removed your foot from the brake pedal.
This gives you enough time to move your foot
from the brake pedal to the accelerator pedal
and depress it before the vehicle begins to
roll.
X Take your foot off the brake pedal.
i Once you have taken your foot off the
brake pedal, the vehicle is held for around
one second.
X Pull away.
Hill start assist will not function if:
R you are pulling away on a level road or a
downhill gradient.
R the transmission is in position N.
R the parking brake is applied.
R ESP ®
is malfunctioning. ECO start/stop function (AMG vehi-
cles)
Important safety notes G
WARNING
If the engine is switched off automatically and
you exit the vehicle, the engine is restarted
automatically. The vehicle may begin moving.
There is a risk of accident and injury.
If you wish to exit the vehicle, always turn off
the ignition and secure the vehicle against
rolling away.
General notes The ECO start/stop function is only available
for the G 63 AMG.
The ECO start/stop function switches the
engine off automatically if the vehicle stops
moving.
When pulling away again, the engine starts
automatically. The ECO start/stop function
thereby helps you to reduce the fuel con-
sumption and emissions of your vehicle.
The ECO start/stop function is activated each
time the engine is switched on.
The ECO start/stop function is only available
in drive program
C.
The system is operational when the ¤
symbol is shown in green in the multifunction
display.
The system is operational if all conditions for
automatic engine switch-off have been fulfil-
led (Y page 146) and the ¤symbol is
shown in green in the multifunction display.
In addition, the Stop/Start active mes-
sage is shown in the AMG menu in the multi-
function display.
If not all conditions for automatic engine
switch-off are fulfilled (Y page 146), the
¤ symbol is shown in yellow in the multi-
function display.
In addition, the Stop/Start inactive mes-
sage is shown in the AMG menu in the multi-
function display. Driving
145Driving and parking Z
Page 151 of 357
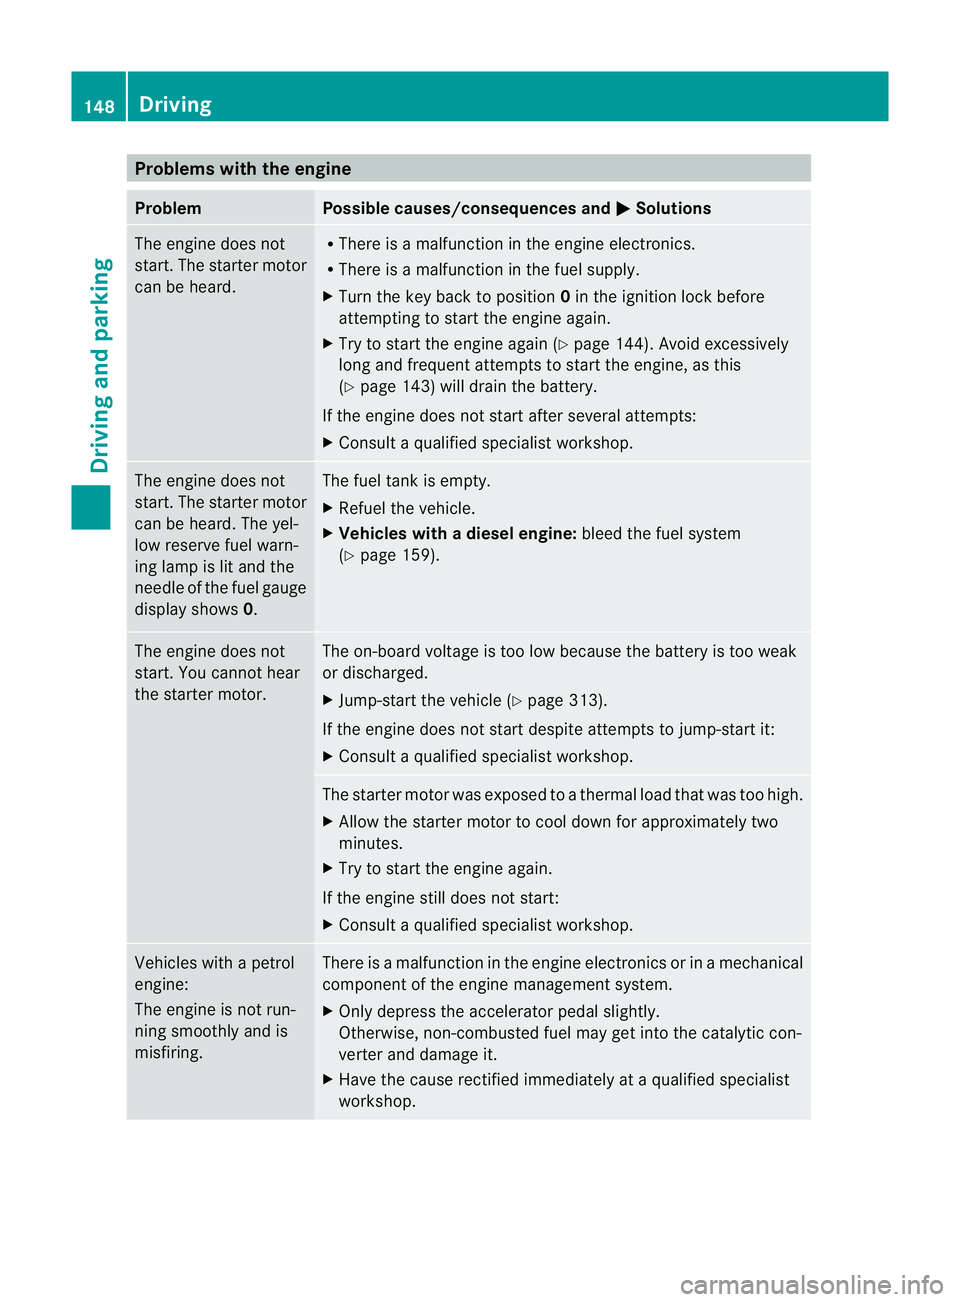
Problems with the engine
Problem Possible causes/consequences and
M Solutions
The engine does not
start. The starter motor
can be heard. R
There is a malfunction in the engine electronics.
R There is a malfunction in the fuel supply.
X Turn the key back to position 0in the ignition lock before
attempting to start the engine again.
X Try to start the engine again (Y page 144). Avoid excessively
long and frequent attemptst o start the engine, as this
(Y page 143) will drain the battery.
If the engine does not start after several attempts:
X Consult a qualified specialist workshop. The engine does not
start.T
he starter motor
can be heard. The yel-
low reserve fuel warn-
ing lamp is lit and the
needle of the fuel gauge
display shows 0. The fuel tank is empty.
X
Refuel the vehicle.
X Vehicles with adiesel engine: bleed the fuel system
(Y page 159). The engine does not
start. You cannot hear
the starter motor. The on-board voltage is too low because the battery is too weak
or discharged.
X
Jump-start the vehicle (Y page 313).
If the engine does not start despite attempts to jump-start it:
X Consult a qualified specialist workshop. The starter motor was exposed to a thermal load that was too high.
X
Allow the starter motor to cool down for approximately two
minutes.
X Try to star tthe engine again.
If the engine still does not start:
X Consult a qualified specialist workshop. Vehicles with a petrol
engine:
The engine is not run-
ning smoothly and is
misfiring. There is a malfunction in the engine electronics or in a mechanical
component of the engine management system.
X
Only depress the accelerator pedal slightly.
Otherwise, non-combusted fuel may get into the catalytic con-
verter and damage it.
X Have the cause rectified immediately at a qualified specialist
workshop. 148
DrivingDriving and parking