2012 MERCEDES-BENZ G-CLASS SUV turn signal bulb
[x] Cancel search: turn signal bulbPage 9 of 357

C
Cabriolet Draught stop .................................... 84
Soft top ............................................ 81
Tonnea ucover ................................. 85
Cabriole tsoft top
Cleaning ........................................ .297
Calling up a fault
see Display messages
Care
Automatic car wash .......................296
Cabriolet soft top ........................... 297
Chrome parts ................................. 299
Display ........................................... 300
Headlamps ..................................... 298
High-pressure cleaner .................... 296
Interior ........................................... 300
Matt paintwork .............................. 297
Notes ............................................. 295
Paint .............................................. 297
Plastic trim .................................... 300
Reversing camera ..........................299
Seat bel t........................................ 301
Seat covers .................................... 300
Sensors ......................................... 298
Tai lpipes ....................................... 299
Trailer coupling .............................. 299
Trim strips ..................................... 300
Wheels ........................................... 297
Windows ........................................ 298
Wiper blades .................................. 298
Wooden trim .................................. 300
CD player/CD changer(on-board
computer) .......................................... 218
Central locking Automatic locking (on-board com-
puter) ............................................. 223
Locking/unlocking (key ).................. 68
Centre console
Overview .......................................... 32
Uppe rsection .................................. 32
Changing bulbs
Important safety notes ..................114
Overview of bul btypes .................. 115
Parking lamps (front) .....................116
Reversing lamps ............................ 118Standing lamps
.............................. 116
Turn signals (front) ......................... 117
Changing gears .................................. 152
Checklist After driving off-roa d...................... 171
Before driving off-road ...................170
Child-proof locks
Important safety notes ....................59
Rea rdoors ....................................... 59
Children
In the vehicle ................................... 48
Restraint systems ............................ 48
Child seat
Automatic recognition .....................50
ISOFIX .............................................. 51
On the front-passenger sea t............ 49
Recommendations ...........................56
Suitable positions ............................ 54
Top Tether ....................................... 52
Troubleshooting ............................... 54
Chrome parts (cleaning instruc-
tions) .................................................. 299
Cigarette lighter ................................ 277
Climate control Auxiliary heating/ventilation .......... 126
Controlling automatically ...............130
Cooling with aird ehumidification..128
Demisting the windows .................. 132
Demisting the windscreen .............131
Important safety notes ..................124
Indicator lamp ................................ 130
Notes on using THERMATIC auto-
matic climate control .....................125
Overview of systems ......................124
Problems with "cooling with air
dehumidification" ........................... 130
Problem with the rear window
heating .......................................... 133
Setting the aird istribution.............131
Setting the airflow .........................131
Setting the airv ents...................... 139
Setting the temperature ................131
Switching air-recirculation mode
on/off ............................................ 133
Switching on/off ........................... 126
Switching residual hea ton/off ......133
Switching the rear window heat-
ing on/off ...................................... 1336
Index
Page 14 of 357

I
Immobiliser .......................................... 64
Indicator and warning lamps Coolan t.......................................... 260
DISTRONI CPLUS ........................... 262
Engine diagnostics .........................259
Indicator lamps
Display message ............................ 235
Instrument cluster
Overview ........................................ 211
Warning and indicator lamps .........251
Instrument cluster lighting ..............212
Interior lighting ................................. 110
Automatic control system ..............111
Delayed switch-off (on-board
computer) ...................................... 222
Luggage compartment lighting ......112
Manual control ............................... 112
Overview ........................................ 110
Reading lamp ................................. 112
Rea rinterior lighting ...................... 113
Interior motion sensor ........................65
ISOFIX child seat securing system ....51 J
Jack Pump lever ..................................... 331
Storage location ............................ 306
Using ............................................. 330
Jump starting (engine) ......................313 K
Key Changing the battery .......................71
Checking the battery .......................71
Convenience opening feature ..........78
Display message ............................ 251
Door central locking/unlocking .......68
Emergency key element ................... 70
Important safety notes ....................68
Loss ................................................. 72
Malfunction ...................................... 72
Modifying the programming .............69
Overview .......................................... 68Problem (malfunction)
.....................72
Starting the engine ........................144
Keyp ositions
Key ................................................ 143
Kickdown
Manual drive program ....................155 L
Lap time (RACETIMER) ......................226
Lashing eyelets ................................. 271
Licence plate lamp (display mes-
sage) ................................................... 235
Lights Activating/deactivating the inte-
rior lighting delayed switch-off .......222
Automatic headlamp mode ............105
Cornering light function .................110
Courtesy lights ............................... 114
Dipped-bea mheadlamps ............... 105
Driving abroad ............................... 104
Foglamps ....................................... 106
Hazard warning lamps ...................109
Headlamp flasher ........................... 109
Ligh tswitc h................................... 104
Main-beam headlamps ................... 109
Parking lamps ................................ 108
Rea rfoglamp ................................. 107
Side lamps ..................................... 107
Switching the daytime driving
lights on/off (on-board computer) .222
Switching the daytime driving
lights on/off (switch) .....................105
Switching the exterio rlighting
delayed switch-off on/off (on-
board computer )............................ 222
Switching the surround lighting
on/off (on-board computer) ..........222
Turn signals ................................... 108
see Changing bulbs
see Interior lighting
Light sensor (display message) .......236
LIM indicator lamp Cruise control ................................ 174
DISTRONI CPLUS ........................... 183
Variabl eSPEEDTRONIC .................179
Limiting the speed
see SPEEDTRONIC Index
11
Page 20 of 357

Towing
Important safety notes ..................315
In the event of malfunctions ..........317
Towing atrailer
Activ eBlind Spot Assist .................196
Axle load, permissible ....................350
Trailer tow hitch ............................. 350
Towing away
With both axles on the ground .......317
Towing eye
Front .............................................. 316
Rea r............................................... 316
Tow-starting
Important safety notes ..................315
Trailer
7-pin connector ............................. 208
Power supply ................................. 208
Trailer coupling (cleaning instruc-
tions) .................................................. 299
Trailer loads Technical data ............................... 350
Trailer towing
Blind Spot Assist ............................ 192
Driving tips .................................... 206
ESP ®
................................................ 63
Lights displa ymessage .................. 234
Mounting dimensions ....................350
Parktroni c...................................... 199
Shift range ..................................... 152
Trailer loads ................................... 350
Transfer case
General notes ................................ 201
Shifting .......................................... 202
Shifting (general notes) .................. 202
Shifting (important safety notes) ...202
Shifting to neutra l.......................... 203
Shift range ..................................... 201
Switching off the off-road gear
ratio ............................................... 203
Switching on the off-road gear
ratio ............................................... 202
Transmission
see Automatic transmission
Transmission positions ....................151
Transport (vehicle) ............................317
Travelling uphill Brow of hill ..................................... 173 Trip computer (on-board computer)
215
Trip meter Calling up ....................................... 215
Resetting (on-board computer) ......216
Turn signals
Changing bulbs (front) ...................117
Switching on/off ........................... 108
Two-way radio
Frequencies ................................... 339
Installatio n..................................... 339
Transmission output (maximum) .... 339
Type identification plate
see Vehicle identification plate
Tyre pressure
Calling up (on-board computer) .....327
Checking manually ........................327
Display message ............................ 245
Recommended ............................... 325
Table (single tyres )......................... 326
Tyre pressure monitor
Checking the tyre pressure elec-
tronically ........................................ 328
Function/notes ............................. 327
Restarting ...................................... 328
Warning lamp ................................. 263
Warning message .......................... 328
Tyres
Changing awheel .......................... 329
Checking ........................................ 323
Direction of rotatio n...................... 330
Display message ............................ 245
Grip ................................................ 166
Important safety notes ..................322
Replacing ....................................... 329
Service life ..................................... 323
Storing ........................................... 330
Technical data ............................... 333
Tyr esize (data) .............................. 333
Tyr etread ...................................... 323
see Flat tyre U
Unladen weight ................................. 348
Unlocking Emergency unlocking .......................74
From inside the vehicle (central
unlocking button) ............................. 73 Index
17
Page 118 of 357
Before changing bulbs
Have the following bulbs changed at a quali-
fied specialist workshop:
R
additional turn signals in the exterio rmir-
rors
R third brake lamp
R main-beam/dipped-beam headlamps
(xenon bulbs)
R daytime driving lights
R licence plate lamp
i Individual segments of the licence plate
lamp LEDs may fail without a display mes-
sage appearing in the multifunction dis-
play. Regularly chec kthe licence plate
lighting. If necessary, visit a qualified spe-
cialist workshop.
You can replace the following bulbs:
R side lamps/parking lamps
R foglamp/cornering lamp with foglamp
function
R turn signal lamp (front)
R brake/tail lamp
R turn signal lamp (rear)
R tail lamp/parking lamp
R reversing lamp
R rear foglamp Overview of bulb replacement
–bulbs
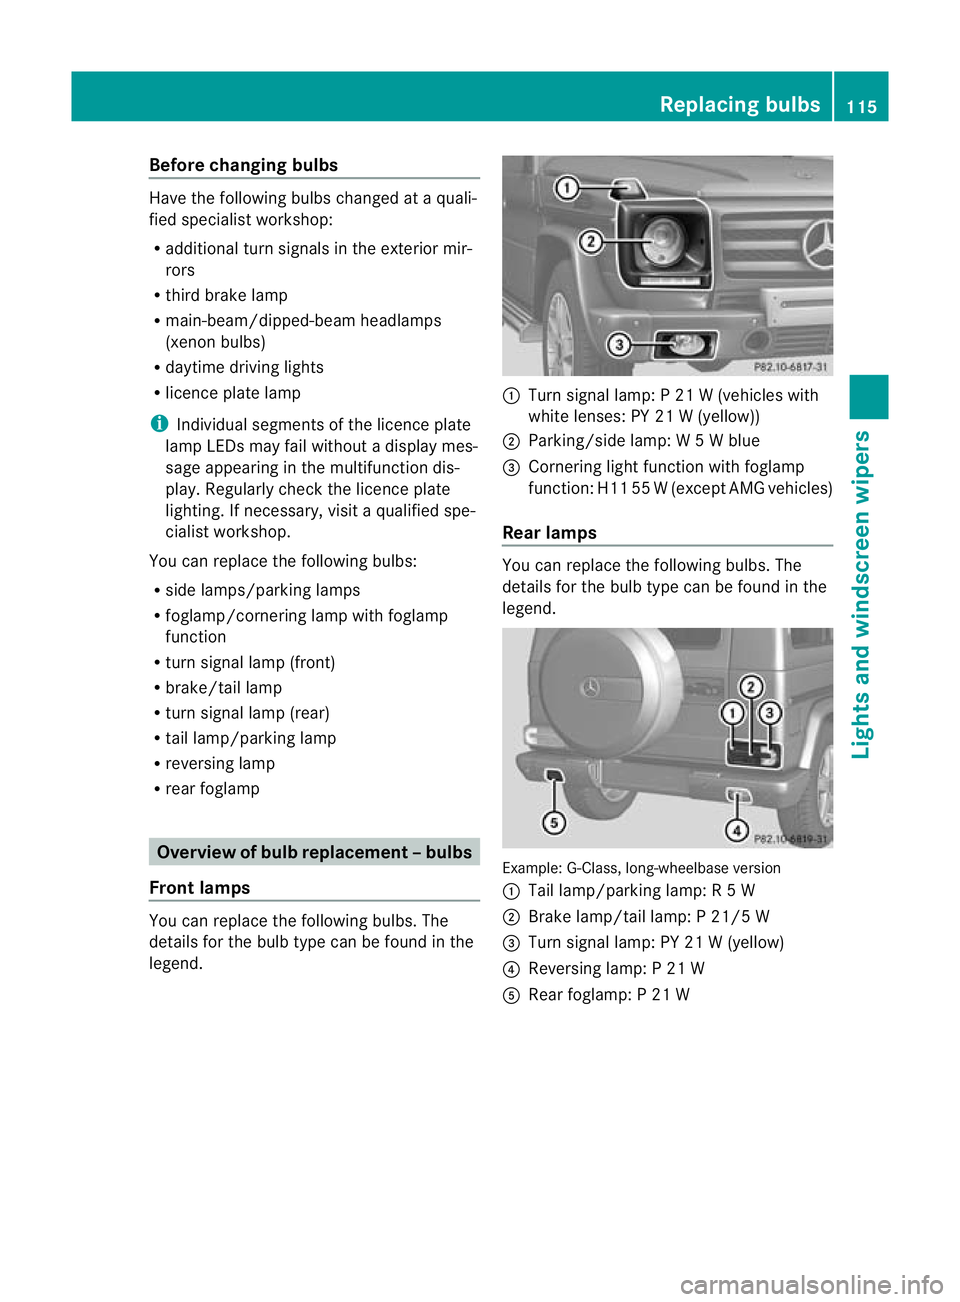
Front lamps You can replace the following bulbs. The
details for the bulb type can be found in the
legend. :
Turn signal lamp: P 21 W (vehicles with
white lenses: PY 21 W (yellow))
; Parking/side lamp: W 5Wblue
= Cornering light function with foglamp
function: H11 55 W(except AMG vehicles)
Rear lamps You can replace the following bulbs. The
details for the bulb type can be found in the
legend.
Example: G-Class, long-wheelbase version
:
Tail lamp/parking lamp: R 5W
; Brake lamp/tail lamp: P 21/5 W
= Turn signal lamp: PY 21 W (yellow)
? Reversing lamp: P 21 W
A Rear foglamp: P 21 W Replacing bulbs
115Lights and windscreen wipers Z
Page 120 of 357
Fron
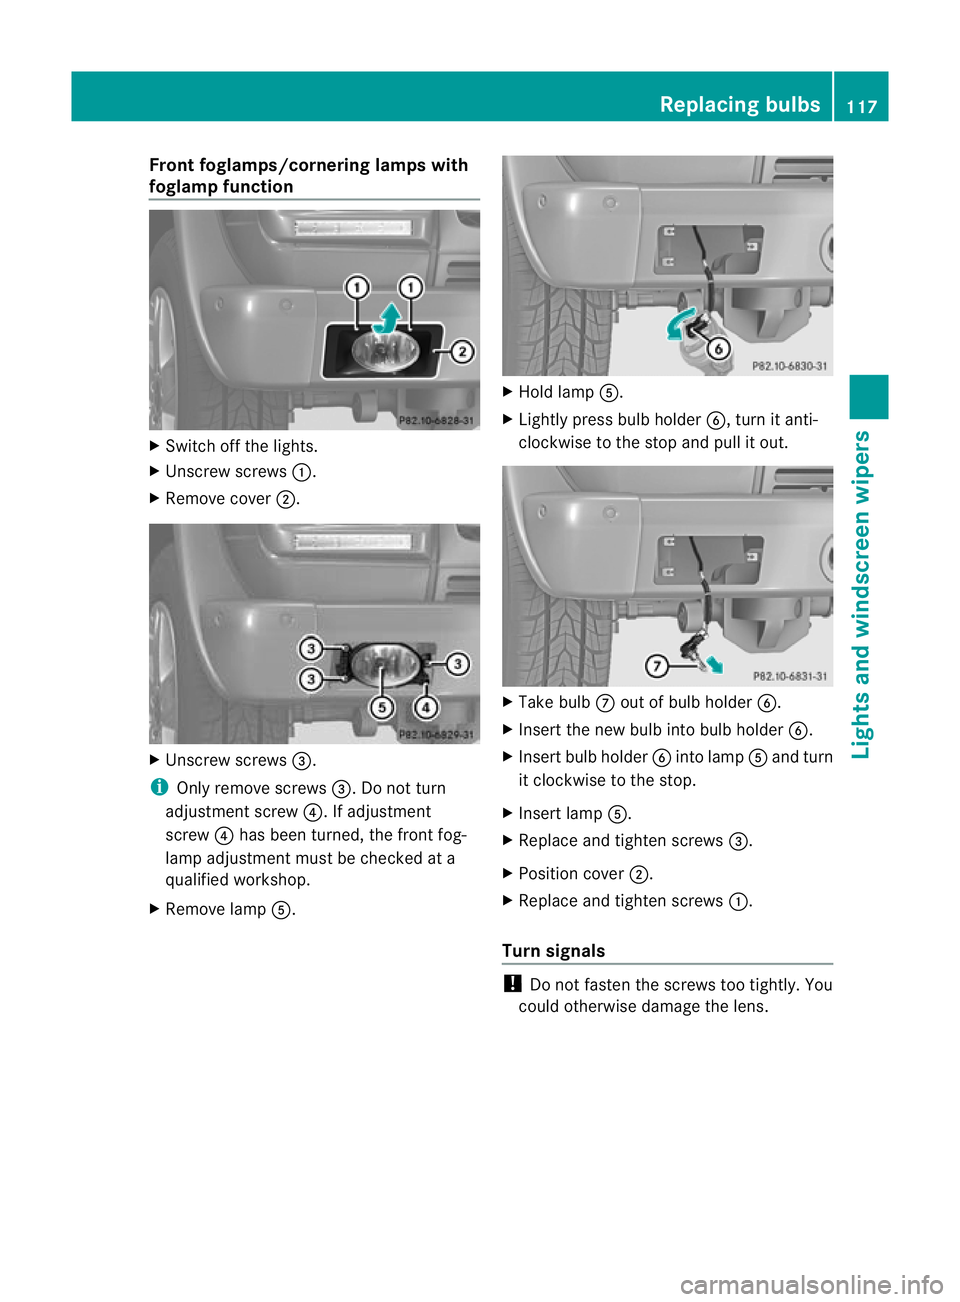
tfoglamps/cornering lamps with
foglamp function X
Switch off the lights.
X Unscrew screws :.
X Remove cover ;. X
Unscrew screws =.
i Only remove screws =. Do not turn
adjustment screw ?. If adjustment
screw ?has been turned, the front fog-
lamp adjustment must be checked at a
qualified workshop.
X Remove lamp A. X
Hold lamp A.
X Lightly press bulb holder B, turn it anti-
clockwise to the stop and pull it out. X
Take bulb Cout of bulb holder B.
X Inser tthe new bulb into bulb holder B.
X Insert bulb holder Binto lamp Aand turn
it clockwise to the stop.
X Insert lamp A.
X Replace and tighten screws =.
X Position cover ;.
X Replace and tighten screws :.
Turn signals !
Do not fasten the screws too tightly. You
could otherwise damage the lens. Replacing bulbs
117Lights and windscreen wipers Z
Page 121 of 357
X
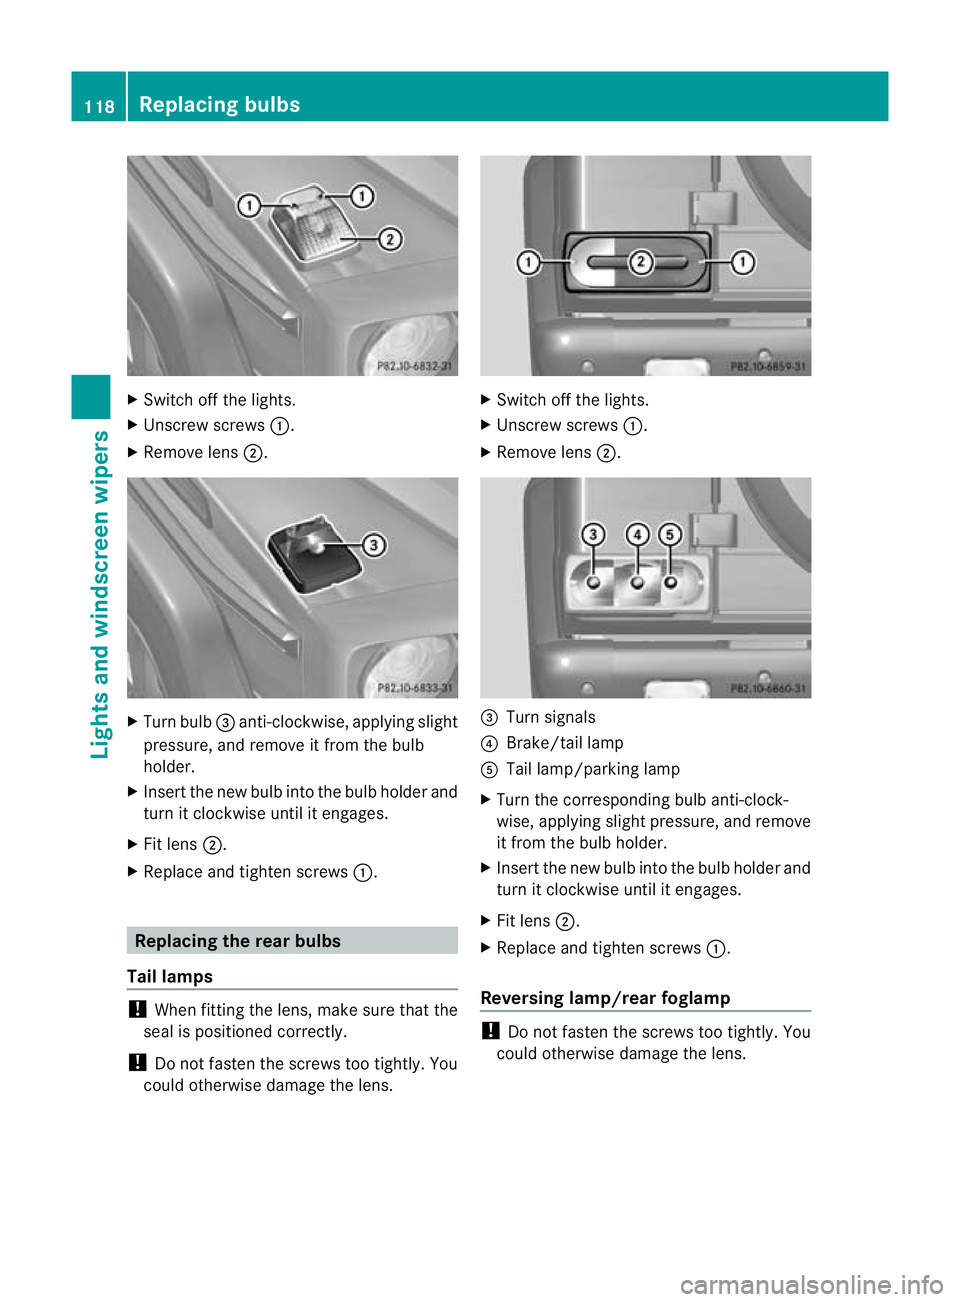
Switch off the lights.
X Unscrew screws :.
X Remove lens ;. X
Turn bulb =anti-clockwise, applying slight
pressure, and remove it from the bulb
holder.
X Insert the new bulb into the bulb holde rand
tur nitc lockwise until it engages.
X Fit lens ;.
X Replace and tighten screws :.Replacing the rear bulbs
Tail lamps !
When fitting the lens, make sure that the
seal is positioned correctly.
! Do not fasten the screws too tightly. You
could otherwise damage the lens. X
Switch off the lights.
X Unscrew screws :.
X Remove lens ;. =
Turn signals
? Brake/tail lamp
A Tail lamp/parking lamp
X Turn the corresponding bulb anti-clock-
wise, applying slight pressure, and remove
it fro mthe bulb holder.
X Insert the new bulb into the bulb holder and
turn it clockwise until it engages.
X Fit lens ;.
X Replace and tighten screws :.
Reversing lamp/rear foglamp !
Do not fasten the screws too tightly. You
could otherwise damage the lens. 118
Replacing bulbsLights and windscreen wipers
Page 237 of 357
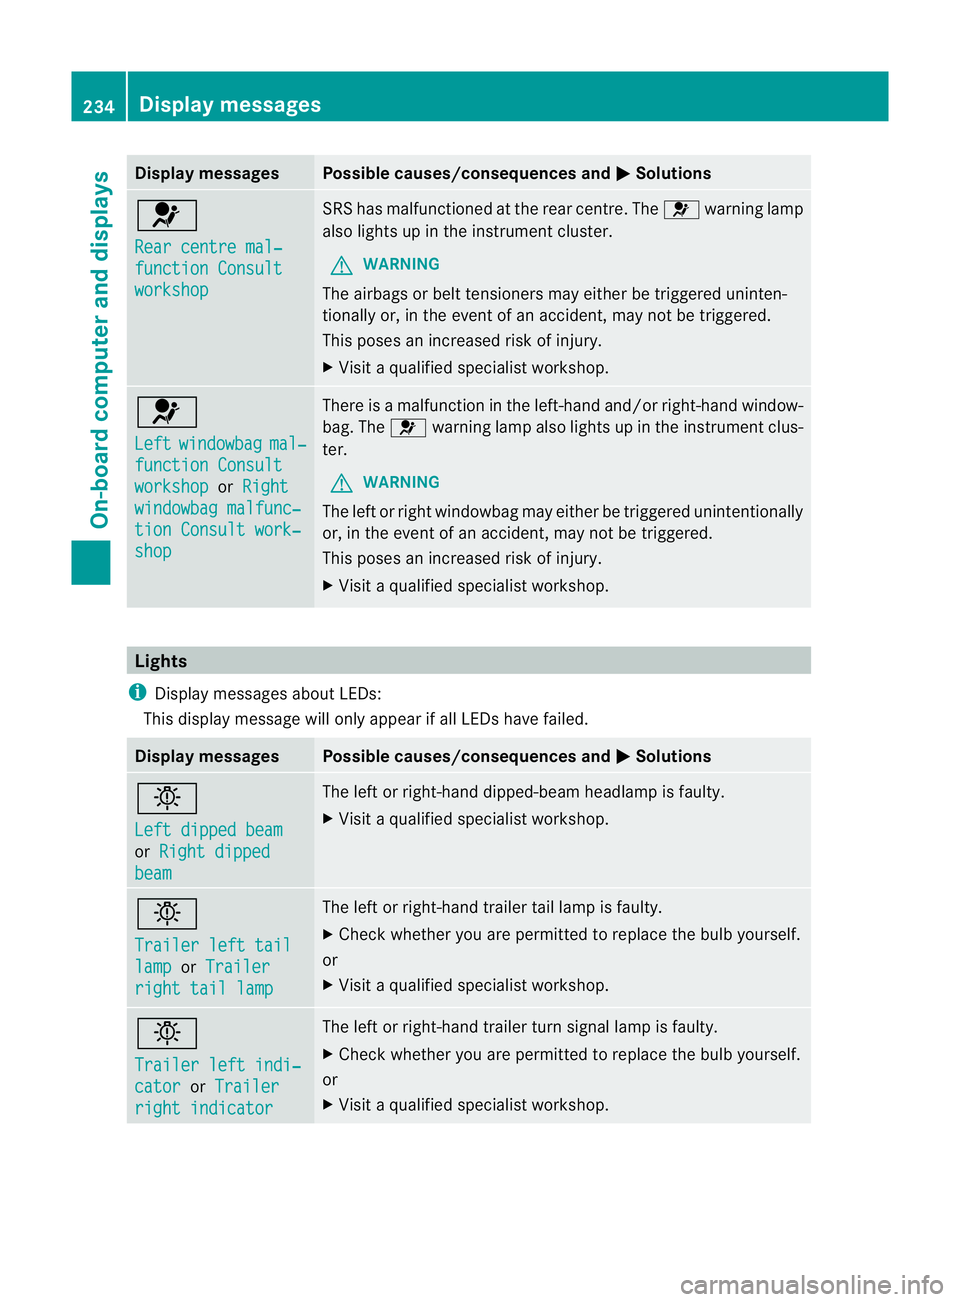
Display messages Possible causes/consequences and
M Solutions
6
Rear centre mal‐
function Consult
workshop SRS has malfunctioned at the rear centre. The
6warning lamp
also lights up in the instrumen tcluster.
G WARNING
The airbags or belt tensioners may either be triggered uninten-
tionally or, in the even tofanaccident, may not be triggered.
This poses an increased ris kofinjury.
X Visi taqualified specialist workshop. 6
Left
windowbag mal‐
function Consult
workshop or
Right windowbag malfunc‐
tion Consult work‐
shop There is a malfunction in the left-hand and/or right-hand window-
bag. The
6warning lamp also lights up in the instrument clus-
ter.
G WARNING
The left or right windowbag may either be triggered unintentionally
or, in the event of an accident, may not be triggered.
This poses an increased risk of injury.
X Visit a qualified specialist workshop. Lights
i Display messages about LEDs:
This display message will only appear if all LEDs have failed. Display messages Possible causes/consequences and
M Solutions
b
Left dipped beam
or
Right dipped beam The left or right-hand dipped-beam headlamp is faulty.
X
Visit a qualified specialist workshop. b
Trailer left tail
lamp or
Trailer right tail lamp The left or right-hand trailer tail lamp is faulty.
X
Check whether you are permitted to replace the bulb yourself.
or
X Visit a qualified specialist workshop. b
Trailer left indi‐
cator or
Trailer right indicator The left or right-hand trailer turn signal lamp is faulty.
X
Check whether you are permitted to replace the bulb yourself.
or
X Visit a qualified specialist workshop. 234
Display messagesOn-board computer and displays
Page 238 of 357
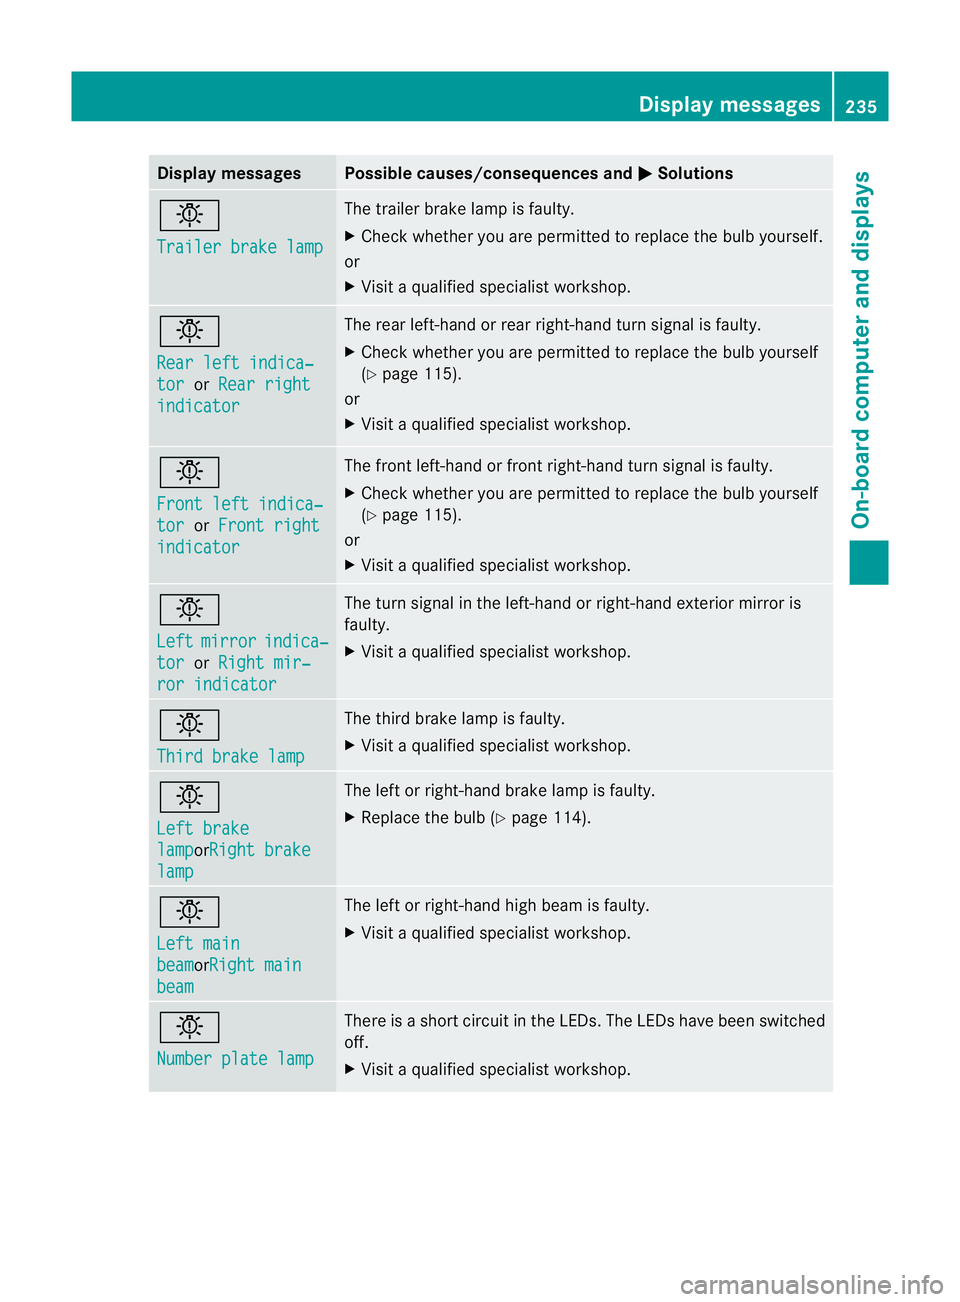
Display messages Possible causes/consequences and
M Solutions
b
Trailer brake lamp The trailer brake lamp is faulty.
X
Chec kwhether you are permitted to replace the bulb yourself.
or
X Visit a qualified specialist workshop. b
Rear left indica‐
tor or
Rear right indicator The rear left-hand or rear right-hand turn signal is faulty.
X
Check whether you are permitted to replace the bulb yourself
(Y page 115).
or
X Visit a qualified specialist workshop. b
Front left indica‐
tor or
Front right indicator The front left-hand or front right-hand turn signal is faulty.
X
Check whether you are permitted to replace the bulb yourself
(Y page 115).
or
X Visit a qualified specialist workshop. b
Left
mirror indica‐
tor or
Right mir‐ ror indicator The turn signal in the left-hand or right-hand exterior mirror is
faulty.
X
Visit a qualified specialist workshop. b
Third brake lamp The third brake lamp is faulty.
X
Visit a qualified specialist workshop. b
Left brake
lamp orRight brake
lamp The left or right-hand brake lamp is faulty.
X
Replace the bulb (Y page 114). b
Left main
beam orRight main
beam The left or right-hand high beam is faulty.
X
Visit a qualified specialist workshop. b
Number plate lamp There is a short circuit in the LEDs. The LEDs have been switched
off.
X Visit a qualified specialist workshop. Display messages
235On-board computer and displays Z