2012 MERCEDES-BENZ G-CLASS SUV wheelbase
[x] Cancel search: wheelbasePage 45 of 357
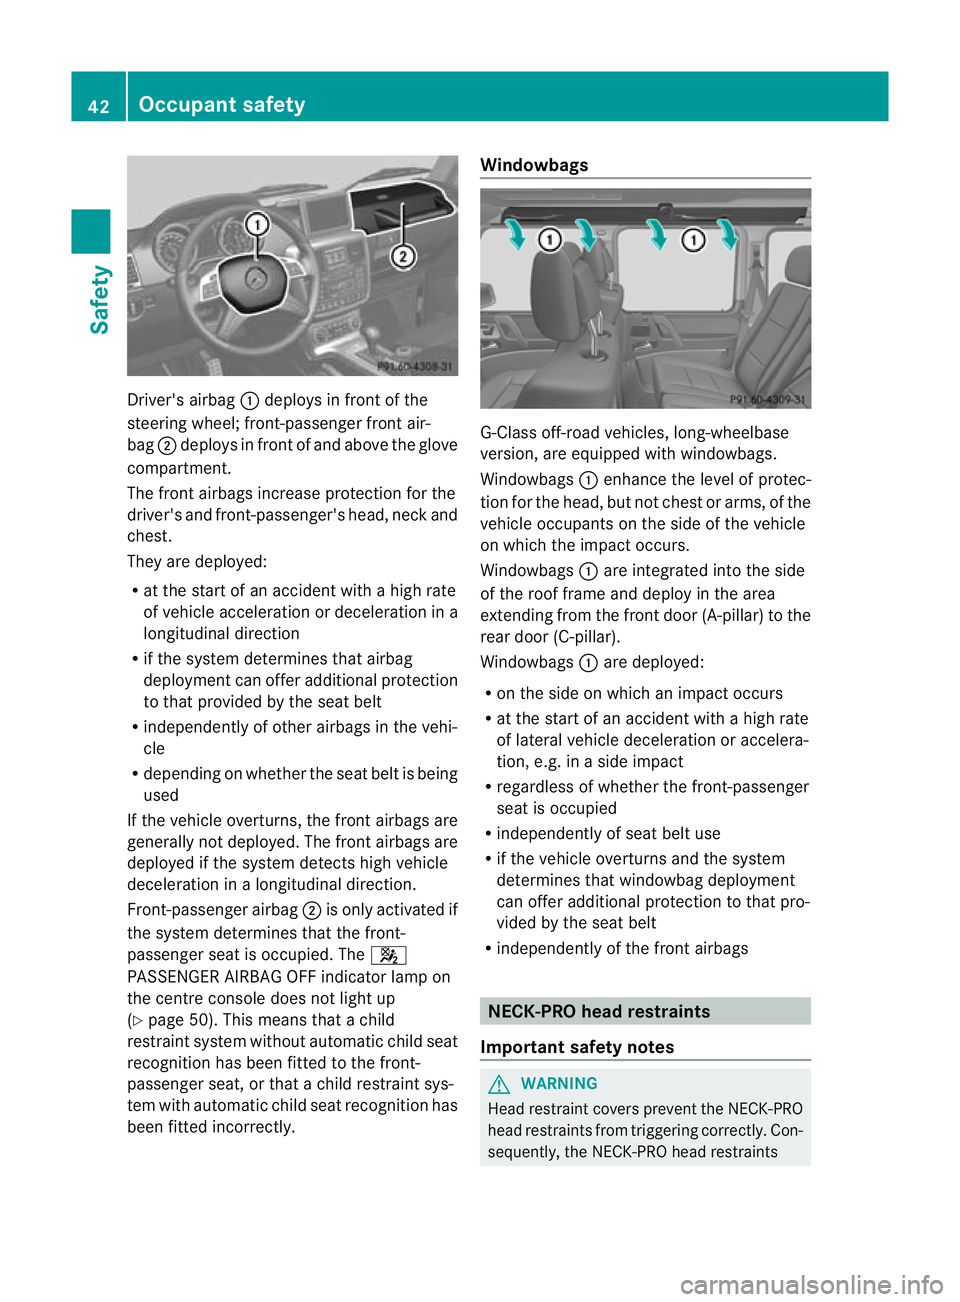
Driver's airbag
:deploys in front of the
steering wheel; front-passenge rfront air-
bag ;deploys in front of and above the glove
compartment.
The front airbags increase protection for the
driver's and front-passenger's head, neck and
chest.
They are deployed:
R at the start of an accident with a high rate
of vehicle acceleration or deceleratio nina
longitudinal direction
R if the system determines that airbag
deploymen tcan offer additional protection
to that provided by the seat belt
R independently of other airbag sinthe vehi-
cle
R depending on whether the seat belt is being
used
If the vehicle overturns, the front airbags are
generally not deployed. The front airbags are
deployed if the system detects high vehicle
deceleration in a longitudinal direction.
Front-passenger airbag ;is only activated if
the system determines that the front-
passenger seat is occupied. The 4
PASSENGER AIRBAG OFF indicator lamp on
the centre console does not light up
(Y page 50). This means that a child
restraint system without automatic child seat
recognition has been fitted to the front-
passenger seat, or that a child restraint sys-
tem with automatic child seat recognition has
been fitted incorrectly. Windowbags
G-Class off-road vehicles, long-wheelbase
version, are equipped with windowbags.
Windowbags
:enhance the level of protec-
tion for the head, but not chest or arms, of the
vehicle occupants on the side of the vehicle
on which the impact occurs.
Windowbags :are integrated into the side
of the roof frame and deploy in the area
extending from the front door (A-pillar) to the
rear door (C-pillar).
Windowbags :are deployed:
R on the side on which an impact occurs
R at the start of an accident with a high rate
of lateral vehicle deceleration or accelera-
tion, e.g. in a side impact
R regardless of whether the front-passenger
seat is occupied
R independently of seat belt use
R if the vehicle overturns and the system
determines that windowbag deployment
can offer additional protection to that pro-
vided by the seat belt
R independently of the front airbags NECK-PRO head restraints
Important safety notes G
WARNING
Head restraint covers prevent the NECK-PRO
head restraints from triggering correctly. Con-
sequently, the NECK-PRO head restraints 42
Occupant safetySafety
Page 70 of 357
Useful information
..............................68
Key ....................................................... 68
Doors .................................................... 73
Rear door (G-Class long-wheelbase
version) ................................................ 75
Tailgate (G-Class Cabriolet) ................76
Side windows ...................................... 77
Sliding sunroof .................................... 79
Soft top (G-Class Cabriolet) ................81 67Opening and closing
Page 78 of 357
X
Turn the emergency key element back and
remove it.
X Insert the emergency key element into the
key. Locking the vehicle
If the vehicle can no longer be centrally
locked with the key, use the emergency key
element.
X Close the front-passenger door, the rear
compartment doors and the rear door or
tailgate (G-Class Cabriolet).
X Press the locking button (Y page 73).
X Make sure that the lockin gknobs on the
doors are still visible .Press downt he lock-
ing knobs by hand, if necessary.
X Close the driver's door from the outside. X
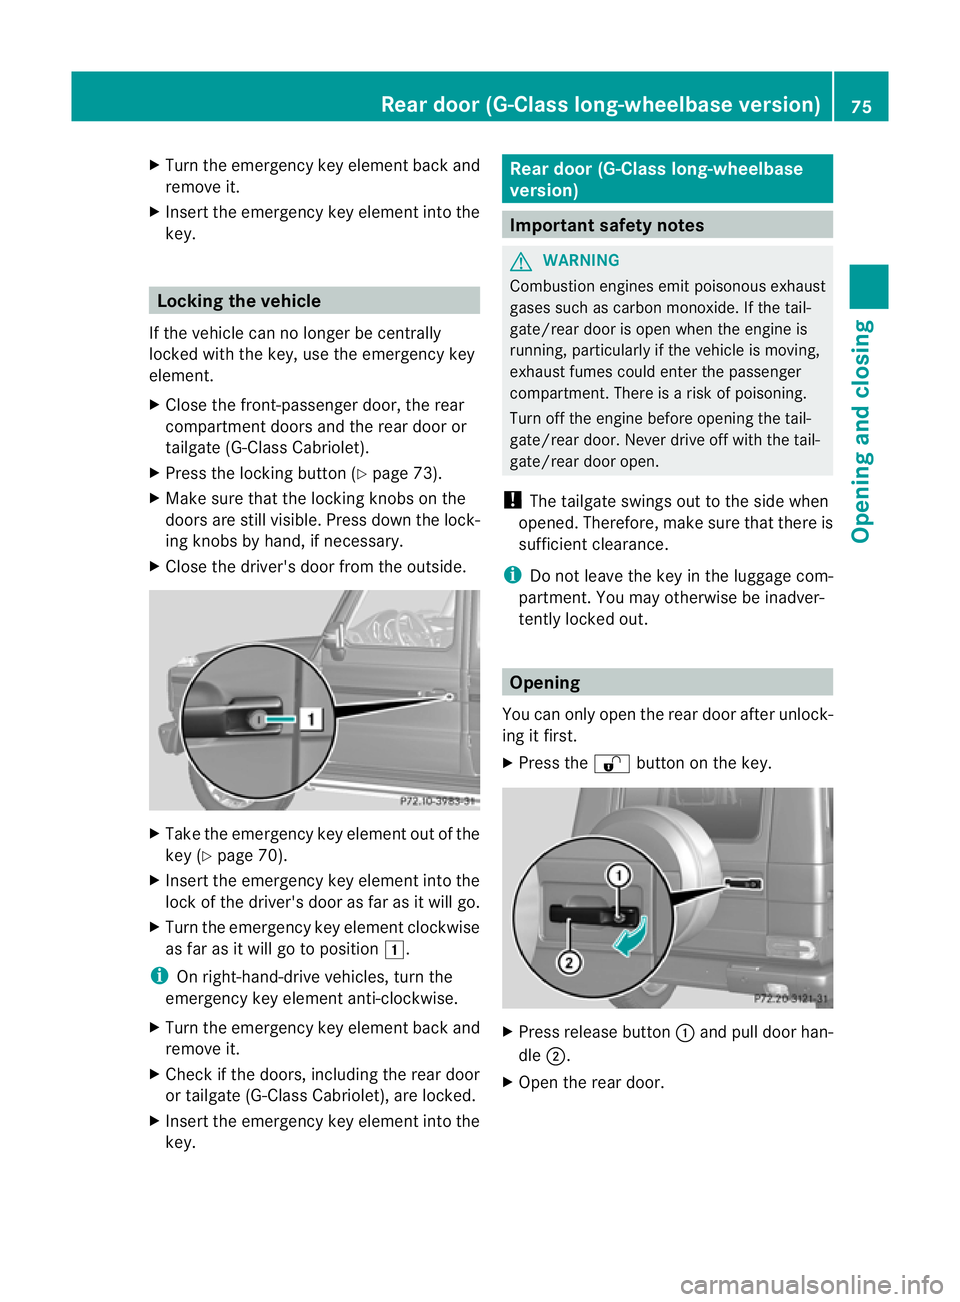
Take the emergency key element out of the
key (Y page 70).
X Insert the emergency key element into the
lock of the driver's door as far as it will go.
X Turn the emergency key element clockwise
as far as it will go to position 1.
i On right-hand-drive vehicles, turn the
emergency key element anti-clockwise.
X Turn the emergency key element back and
remove it.
X Check if the doors, including the rear door
or tailgate (G-Class Cabriolet), are locked.
X Insert the emergency key element into the
key. Rear door (G-Class long-wheelbase
version)
Important safety notes
G
WARNING
Combustion engines emit poisonous exhaust
gases such as carbon monoxide. If the tail-
gate/rear door is open when the engine is
running, particularly if the vehicle is moving,
exhaust fumes could enter the passenger
compartment. There is a risk of poisoning.
Turn off the engine before opening the tail-
gate/rear door. Never drive off with the tail-
gate/rear door open.
! The tailgate swings out to the side when
opened. Therefore, make sure that there is
sufficient clearance.
i Do not leave the key in the luggage com-
partment.Y ou may otherwise be inadver-
tently locked out. Opening
You can only open the rear door after unlock-
ing it first.
X Press the %button on the key. X
Press release button :and pull door han-
dle ;.
X Open the rear door. Rear door (G-Class long-wheelbase version)
75Opening and closing Z
Page 81 of 357
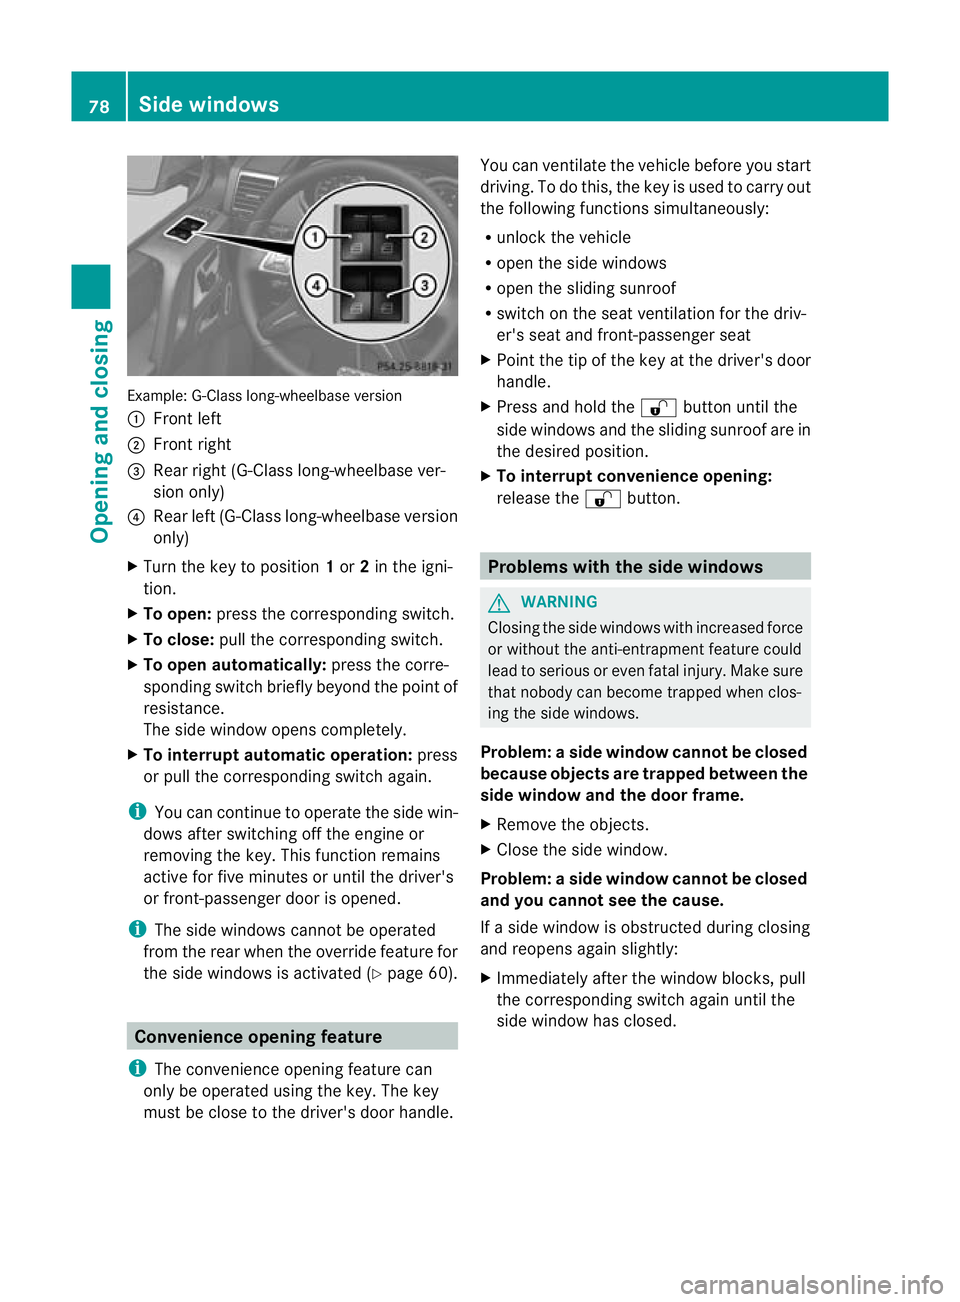
Example: G-Class long-wheelbase version
: Front left
; Front right
= Rear right (G-Class long-wheelbase ver-
sion only)
? Rear left (G-Class long-wheelbase version
only)
X Turn the key to position 1or 2in the igni-
tion.
X To open: press the corresponding switch.
X To close: pull the corresponding switch.
X To open automatically: press the corre-
sponding switch briefly beyond the point of
resistance.
The side window opens completely.
X To interrupt automatic operation: press
or pull the corresponding switch again.
i You can continue to operate the side win-
dows after switching off the engine or
removing the key. This function remains
active for five minutes or until the driver's
or front-passenger door is opened.
i The side windows canno tbe operated
from the rear when the override feature for
the side windows is activated (Y page 60).Convenience opening feature
i The convenience opening feature can
only be operated using the key. The key
must be close to the driver's door handle. You can ventilate the vehicle before you start
driving. To do this, the key is used to carry out
the following functions simultaneously:
R unlock the vehicle
R open the side windows
R open the sliding sunroof
R switch on the seat ventilation for the driv-
er's seat and front-passenger seat
X Point the tip of the key at the driver's door
handle.
X Press and hold the %button until the
side windows and the sliding sunroof are in
the desired position.
X To interrupt convenience opening:
release the %button. Problems with the side windows
G
WARNING
Closing the side windows with increased force
or without the anti-entrapment feature could
lead to serious or even fatal injury. Make sure
that nobody can become trapped when clos-
ing the side windows.
Problem: aside window cannot be closed
because objects are trapped between the
side window and the door frame.
X Remove the objects.
X Close the side window.
Problem :aside window cannot be closed
and you cannot see the cause.
If a side window is obstructed during closing
and reopens again slightly:
X Immediately afte rthe window blocks, pull
the corresponding switch again until the
side window has closed. 78
Side windowsOpening and closing
Page 114 of 357
A
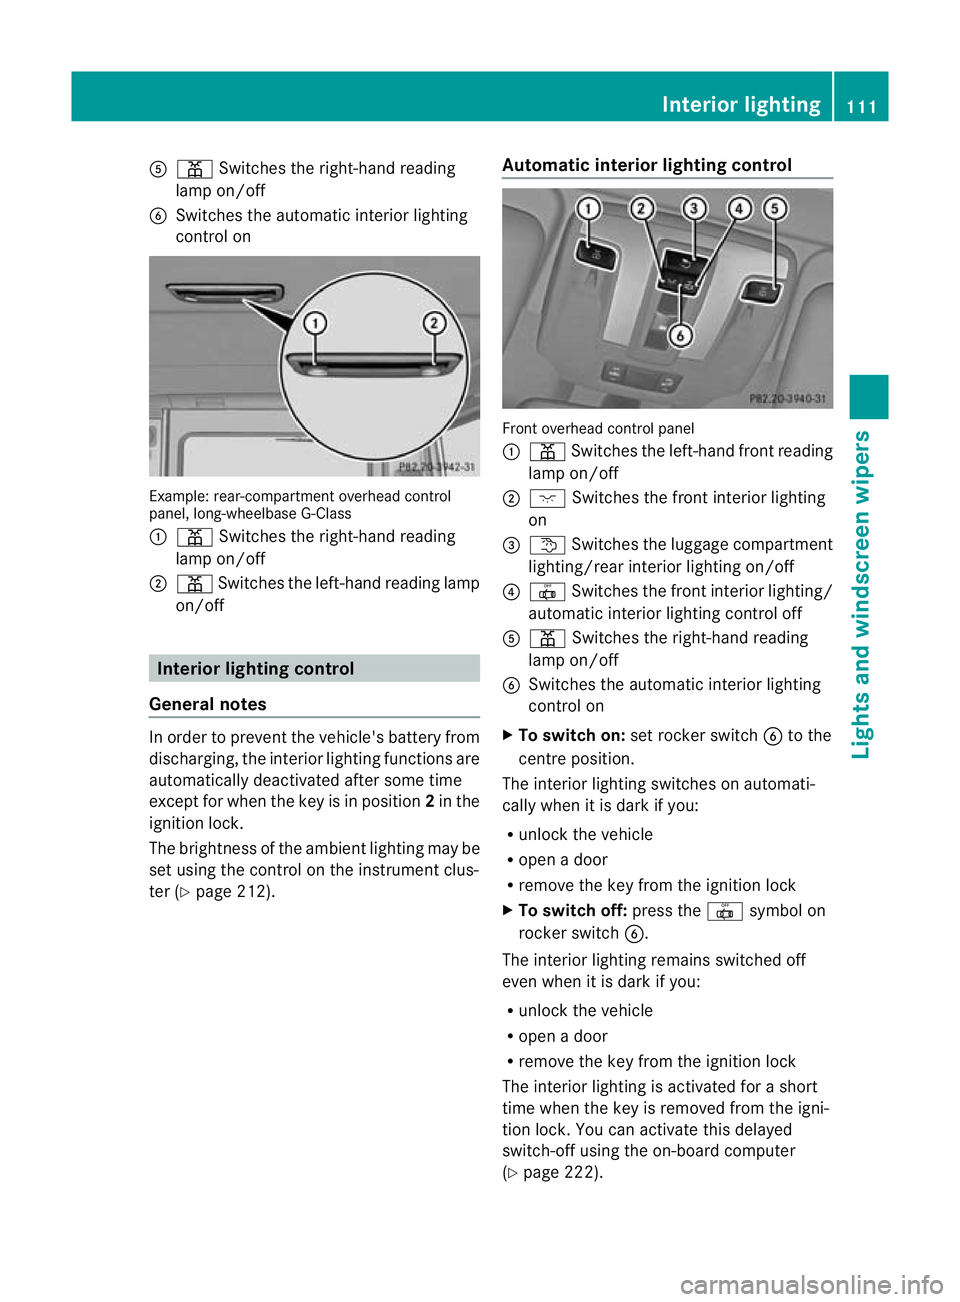
p Switches the right-hand reading
lamp on/off
B Switches the automatic interio rlighting
control on Example: rear-compartment overhead control
panel, long-wheelbase G-Class
: p Switches the right-hand reading
lamp on/off
; p Switches the left-hand reading lamp
on/off Interior lighting control
General notes In order to prevent the vehicle's battery from
discharging, the interior lighting functions are
automatically deactivated after some time
except for when the key is in position 2in the
ignition lock.
The brightness of the ambien tlighting may be
set using the control on the instrument clus-
ter (Y page 212). Automatic interior lighting control Front overhead control panel
:
p Switches the left-hand front reading
lamp on/off
; c Switches the front interior lighting
on
= t Switches the luggage compartment
lighting/rear interior lighting on/off
? | Switches the front interior lighting/
automatic interior lighting control off
A p Switches the right-hand reading
lamp on/off
B Switches the automatic interior lighting
control on
X To switch on: set rocker switch Bto the
centre position.
The interior lighting switches on automati-
cally when it is dark if you:
R unloc kthe vehicle
R open a door
R remove the key from the ignition lock
X To switch off: press the|symbol on
rocker switch B.
The interior lighting remains switched off
even when it is dark if you:
R unlock the vehicle
R open a door
R remove the key from the ignition lock
The interior lighting is activated for a short
time when the key is removed from the igni-
tion lock. You can activate this delayed
switch-off using the on-board computer
(Y page 222). Interior lighting
111Lights and windscreen wipers Z
Page 118 of 357
Before changing bulbs
Have the following bulbs changed at a quali-
fied specialist workshop:
R
additional turn signals in the exterio rmir-
rors
R third brake lamp
R main-beam/dipped-beam headlamps
(xenon bulbs)
R daytime driving lights
R licence plate lamp
i Individual segments of the licence plate
lamp LEDs may fail without a display mes-
sage appearing in the multifunction dis-
play. Regularly chec kthe licence plate
lighting. If necessary, visit a qualified spe-
cialist workshop.
You can replace the following bulbs:
R side lamps/parking lamps
R foglamp/cornering lamp with foglamp
function
R turn signal lamp (front)
R brake/tail lamp
R turn signal lamp (rear)
R tail lamp/parking lamp
R reversing lamp
R rear foglamp Overview of bulb replacement
–bulbs
Front lamps You can replace the following bulbs. The
details for the bulb type can be found in the
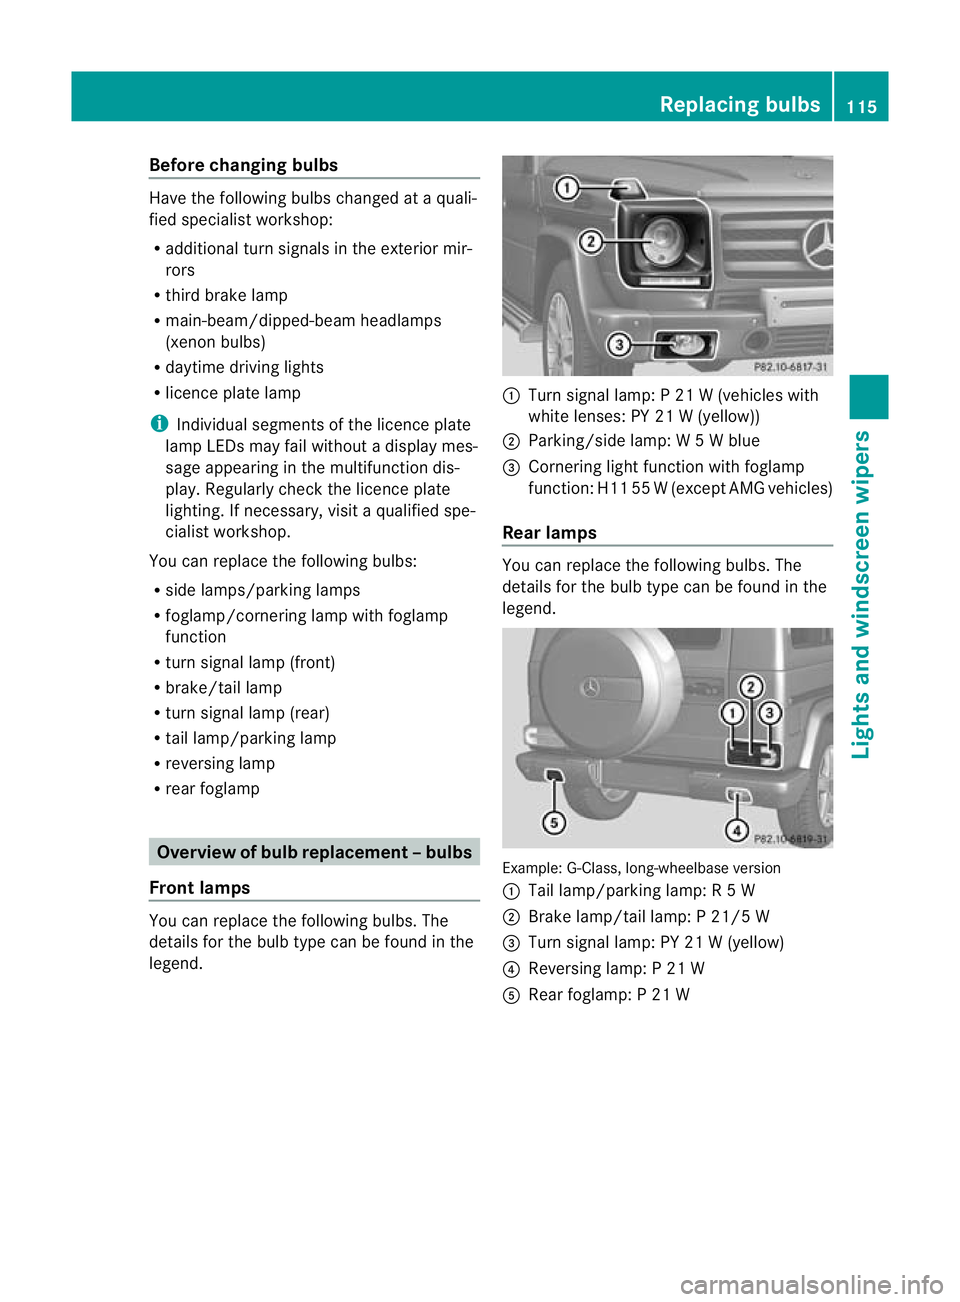
legend. :
Turn signal lamp: P 21 W (vehicles with
white lenses: PY 21 W (yellow))
; Parking/side lamp: W 5Wblue
= Cornering light function with foglamp
function: H11 55 W(except AMG vehicles)
Rear lamps You can replace the following bulbs. The
details for the bulb type can be found in the
legend.
Example: G-Class, long-wheelbase version
:
Tail lamp/parking lamp: R 5W
; Brake lamp/tail lamp: P 21/5 W
= Turn signal lamp: PY 21 W (yellow)
? Reversing lamp: P 21 W
A Rear foglamp: P 21 W Replacing bulbs
115Lights and windscreen wipers Z
Page 161 of 357
X
Turn the fuel filler cap anti-clockwise and
remove it.
AdBlue ®
vehicles: do not confuse the fuel
filler cap with the blue AdBlue ®
filler cap.
X Insert the fuel filler cap into the holder
bracket on the inside of filler flap ?.
i AdBlue ®
vehicles do not have a bracket
on the inside of the filler flap.
X Completely insert the filler neck of the fuel
pump nozzle into the tank and refuel.
i Do not add any more fuel after the pump
stops filling for the first time. Otherwise,
fuel may leak out.
Closing X
Replace the fuel filler cap and turn it clock-
wise. The fuel filler cap audibly engages.
X Press the fuel filler flap closed until it
engages. Fuel filler flap emergency release
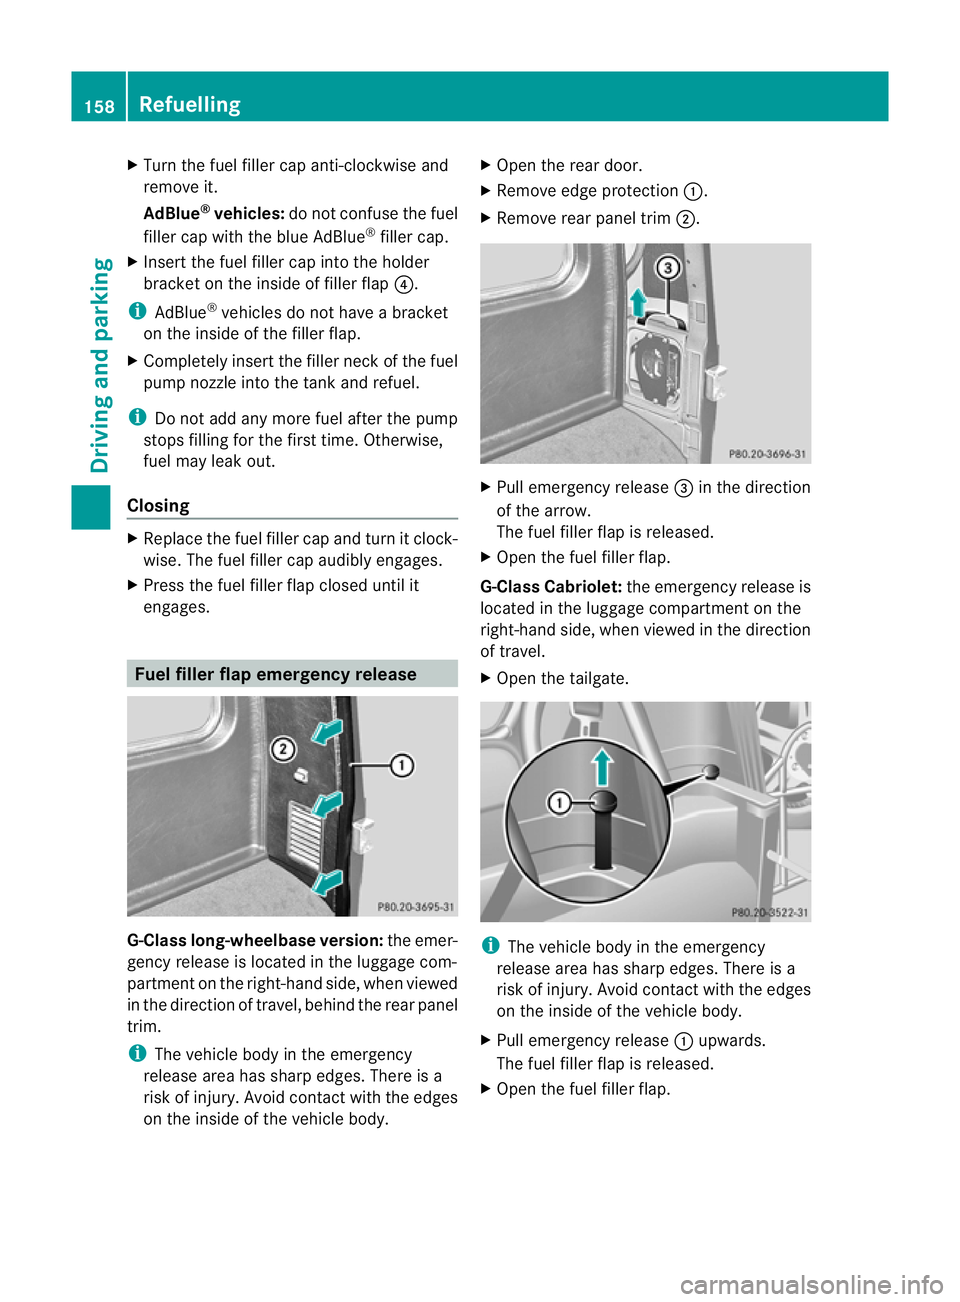
G-Class long-wheelbase version:
the emer-
gency release is located in the luggage com-
partmen tonthe right-hand side, when viewed
in the direction of travel, behind the rear panel
trim.
i The vehicle body in the emergency
release area has sharp edges. There is a
risk of injury. Avoid contact with the edges
on the inside of the vehicle body. X
Open the rear door.
X Remove edge protection :.
X Remove rear panel trim ;. X
Pull emergency release =in the direction
of the arrow.
The fuel filler flap is released.
X Open the fuel filler flap.
G-Class Cabriolet: the emergency release is
located in the luggage compartmentont he
right-hand side, when viewed in the direction
of travel.
X Open the tailgate. i
The vehicle body in the emergency
release area has sharp edges. There is a
risk of injury. Avoid contact with the edges
on the inside of the vehicle body.
X Pull emergency release :upwards.
The fuel filler flap is released.
X Open the fuel filler flap. 158
RefuellingDriving and parking
Page 210 of 357

for a maximu
mload; see the tyre pressure
table in the fuel filler flap (Y page 325).
You will find installation dimensions and loads
in the technical data (Y page 350).
The maximum permissible trailer drawbar
noseweight on the ball coupling is:
R 140 kg (G-Class long-wheelbase version)
R 115 kg (G-Class Cabriolet)
However, the actual noseweight must not
exceed the value given on the trailer tow hitch
or trailer identification plates. The lowest
weight applies.
i When towing a trailer, set the tyre pres-
sure on the rear axle of the towing vehicle
for a maximum load; see the tyre pressure
table in the fuel filler flap (Y page 325).
Please note that when towing a trailer, PARK-
TRONIC (Y page 197) and Blind Spot Assist
(Y page 190) are only available with limita-
tions, or not at all.
i On vehicles without level control, the
height of the ball coupling will alter accord-
ing to the load placed on the vehicle. If nec-
essary, use a trailer with a height-adjusta-
ble drawbar.
Driving tips X
On long and steep downhill gradients,
select shift range 1,2or 3(Y page 153) in
good time.
i This also applies if you have activated
cruise control or SPEEDTRONIC.
X If necessary, shift the transfer case to LOW
RANGE(Y page 202).
This will use the braking effect of the
engine, so less braking will be required to
prevent the vehicle from gaining speed.
This relieves the load on the brake system
and prevents the brakes from overheating
and wearing too quickly. If you need addi-
tional braking, depress the brake pedal
repeatedly rather than continuously. The maximum permissible speed for vehicle/
trailer combinations depends on the type of
trailer. Before beginning the journey, check
the trailer's documents to see what the max-
imum permitted speed is. Observe the legally
prescribed maximum speed in the relevant
country.
For certain Mercedes-Benz vehicles, the max-
imum permissible rear axle load is increased
when towing a trailer. Refer to the "Technical
data" section to find out whether this applies
to your vehicle. If you utilise any of the added
maximum rear axle load when towing a trailer,
the vehicle/trailer combination may not
exceed a maximum speed of 100 km/h for
reasons concerning the operating permit.
This also applies in countries in which the
permissible maximum speed for vehicle/
trailer combinations is above 100 km/h.
When towing a trailer, your vehicle's handling
characteristics will be different in comparison
to when driving without a trailer, and it will
consume more fuel.
Driving tips
If the trailer swings from side to side:
X
Do not accelerate.
X Do not countersteer.
X Brake if necessary.
R Maintain a greater distance from the vehi-
cle in front than when driving without a
trailer.
R Avoid braking abruptly. If possible, brake
gently at first to allow the trailer to run on.
Then, increase the braking force rapidly.
R The values given for gradient-climbing
capabilities from a standstill refer to sea
level. When driving in mountainous areas,
note that the power output of the engine,
and consequently the vehicle's gradient-
climbing capability, decrease with increas-
ing altitude. Towing
atrailer
207Driving an d parking Z