2012 MERCEDES-BENZ G-CLASS SUV refuelling
[x] Cancel search: refuellingPage 13 of 357

Front-passenger seat
Display message ............................ 249
Fuel
Additives ........................................ 343
Consumption statistics ..................215
Displaying the current consump-
tion ................................................ 215
Displaying the range ......................215
Fuel gauge ..................................... 211
Grade (petrol) ................................ 342
Important safety notes ..................341
Notes for AMG vehicles .................343
Premium-grade unleaded petrol ..... 342
Problem (malfunction) ...................159
Quality (diesel )............................... 343
Refuelling ...................................... .156
Tank content/reserve fuel .............342
Fuel/water separator
Service .......................................... .295
Fuel filler flap
Emergency release ........................158
Opening/closing ............................ 157
Fuel filte r(white display message) .240
Fuel level Calling up the range (on-board
computer) ...................................... 215
Gauge ............................................ 211
Fuel reserve
see Fuel
Fuel tank
Capacity ........................................ 342
Problem (malfunction) ...................159
Fuse allocation chart ........................318
Fuse box Battery case ................................... 320
Dashboard ..................................... 319
Front-passenger footwell ...............319
Transmission tunnel ....................... 319
Fuse extractor ................................... 318
Fuses Allocation chart ............................. 318
Before changing ............................. 318
Dashboard fuse box .......................319
Fuse allocation chart .....................318
Fuse box in the front-passenger
footwell .......................................... 319
Fuse box in the transmission tun-
nel ................................................. 319Important safety notes
..................318
In the battery case .........................320 G
Garage door opener Clearing the memory .....................283
Frequencies ................................... 283
Important safety notes ..................280
Opening/closing the garage door ..282
Programming the remote control ...280
Gear indicator (on-board computer) 225
Gearshift program SETUP (on-board computer) ..........226
Genuine Mercedes-Benz parts .........338
Genuine wood trim and trim strips
(cleaning instructions) ......................300
Glove compartment ..........................267
Gradient-climbing capability (max-
imum) ................................................. 173 H
Hazard warning lamps ......................109
Headlamp Cleaning system (function) ............108
Cleaning system (notes) ................347
Headlamps
Cleaning ......................................... 298
Misting up ...................................... 110
Topping up the cleaning system ....294
see Automatic headlamp mode
Head restraints
Adjusting ......................................... 92
Adjusting (rear) ................................ 93
Fitting/removing (rear) ....................93
Luxury .............................................. 92
Resetting (front) ............................... 93
Heating
see Climate control
High-pressure cleaners ....................296
Hill start assist .................................. 145
HOLD function Function/notes ............................. 19610
Index
Page 17 of 357

Resetting the current lap
...............227
Starting anew lap .......................... 226
Stopping ........................................ 226
RACETIMER (on-board computer) ....226
Radar sensors Overview ........................................ 351
Radiator cover ................................... 291
Radio Selecting astation ......................... 217
see separate operating instructions
Reading lamp ..................................... 110
Rear bench seat Folding forward .............................. 270
Rear compartment
Setting the airv ents...................... 140
Rear-compartment seat belt sta-
tus indicator ........................................ 47
Rear door Closing ............................................ .76
Display message ............................ 249
Important safety notes ....................75
Opening ........................................... 75
Opening/closing .............................. 75
Rear foglamp
Display message ............................ 236
Switching on/off ........................... 107
Rear lamps
see Lights
Rear seat bench
Folding into an upright position .....270
Rear-view mirror
Anti-dazzle mode (automatic) ........100
Rear window heating
Problem (fault) ............................... 133
Switching on/off ........................... 133
Rear window wiper
Switching on/off ........................... 120
Refuelling
Fuel gauge ..................................... 211
Important safety notes ..................156
Refuelling proces s......................... 157
see Fuel
Remote control
Auxiliary heating/ventilation .......... 135
Changing the batteries (auxiliary
heating) ......................................... 137
Programming (garage door opener) 280 Reserve (fuel tank)
see Fuel
Reserve fuel
Display message ............................ 240
Warning lamp ................................. 260
Residual heat
Switching on/off ........................... 133
Restraint systems
see SRS (Supplemental Restraint
System)
Rev counter ........................................ 212
Reversing camera Function/notes ............................. 200
Reversing camera (cleaning
instructions) ...................................... 299
Reversing lamp Changing bulbs .............................. 118
Reversing lamp (display message) ..236
Roof see Soft top
Roof load (maximum) ........................348
Route (navigation) see Route guidance (navigation)
Route guidance (navigation) ............216 S
Safety Childre ninthe vehicle ..................... 48
Child restraint systems ....................48
Safety net
Detaching and storing .................... 274
Important safety information .........272
Releasing ....................................... 274
with luggage compartment
enlargement .................................. 273
without luggage compartment
enlargement .................................. 272
Safety systems
see Driving safety systems
Seat
Folding the front seat backrests
forwards (EASY-ENTRY feature) .......94
Seat backrest
Folding back .................................. 269
Seat belt
Adjusting the height ......................... 46
Belt force limiter .............................. 4714
Index
Page 144 of 357
Useful information
............................142
Running-in notes ............................... 142
Driving ............................................... 142
Automatic transmission ...................149
Refuelling ........................................... 156
Parking ............................................... 163
Driving tips ........................................ 164
Driving systems ................................ 173
Off-road driving systems ..................201
Towing atrailer ................................. 206 141Driving and parking
Page 159 of 357
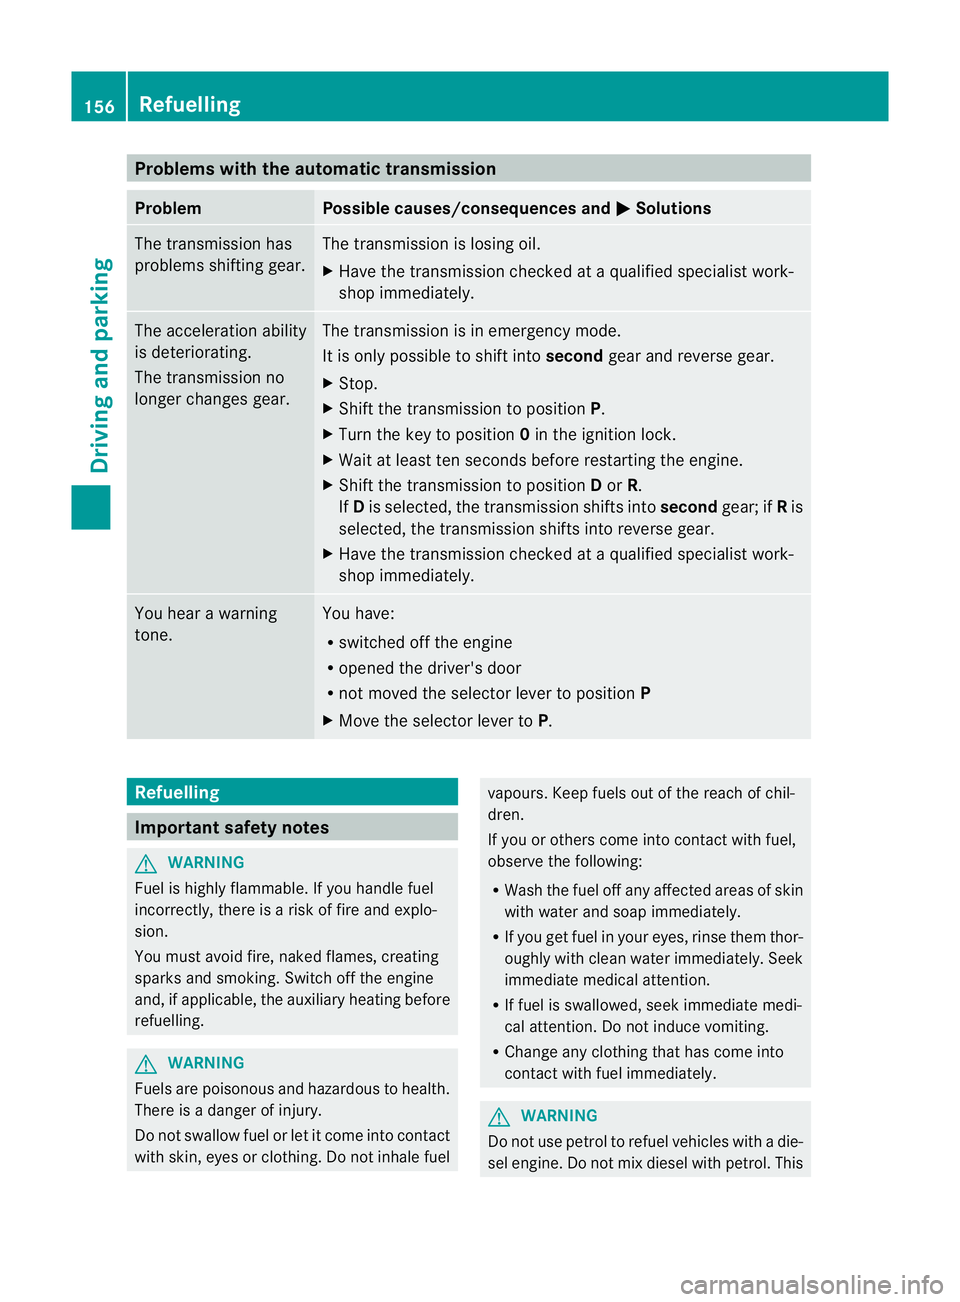
Problems with the automatic transmission
Problem Possible causes/consequences and
M Solutions
The transmission has
problems shifting gear. The transmission is losing oil.
X
Have the transmission checked at a qualified specialist work-
shop immediately. The acceleration ability
is deteriorating.
The transmission no
longer changes gear. The transmission is in emergency mode.
It is only possible to shift into
secondgear and reverse gear.
X Stop.
X Shift the transmission to position P.
X Turn the key to position 0in the ignition lock.
X Wait at least ten seconds before restarting the engine.
X Shift the transmission to position Dor R.
If D is selected, the transmission shifts into secondgear; ifRis
selected, the transmission shifts into reverse gear.
X Have the transmission checked at a qualified specialist work-
shop immediately. You hear a warning
tone. You have:
R
switched off the engine
R opened the driver's door
R not moved the selector lever to position P
X Move the selector lever to P.Refuelling
Important safety notes
G
WARNING
Fuel is highly flammable. If you handle fuel
incorrectly, there is a risk of fire and explo-
sion.
You must avoid fire, naked flames, creating
sparks and smoking. Switch off the engine
and, if applicable, the auxiliary heating before
refuelling. G
WARNING
Fuels are poisonous and hazardous to health.
There is a danger of injury.
Do not swallow fuel or let it come into contact
with skin, eyes or clothing. Do not inhale fuel vapours. Keep fuels out of the reach of chil-
dren.
If you or others come into contact with fuel,
observe the following:
R Wash the fuel off any affected areas of skin
with water and soap immediately.
R If you get fuel in your eyes, rinse them thor-
oughly with clean water immediately. Seek
immediate medical attention.
R If fuel is swallowed, seek immediate medi-
cal attention. Do not induce vomiting.
R Change any clothing that has come into
contact with fuel immediately. G
WARNING
Do not use petrol to refuel vehicles with a die-
sel engine. Do not mix diesel with petrol. This 156
RefuellingDriving and parking
Page 160 of 357
would result in damage to the fuel system and
engine, which could lead to a vehicle fire.
! Do not use petrol to refuel vehicles with a
diesel engine. Do not use diesel to refuel
vehicles with a petrol engine. Even small
amounts of the wrong fuel result in damage
to the fuel system and the engine.
! Do not switch on the ignition if you acci-
dentally refuel with the wrong fuel. Other-
wise, the fuel will enter the fuel lines .Notify
a qualified specialist workshop and have
the fuel tank and fuel lines drained com-
pletely.
! Overfilling the fuel tank could damage the
fuel system.
! Take care not to spill any fuel on painted
surfaces. You could otherwise damage the
paintwork.
! Use a filter when adding fuel from a fuel
can. The fuel lines and/or the diesel injec-
tion system could otherwise be blocked by
particles from the fuel can.
For further information on fuel and fuel quality
(Y page 341). Refuelling
Fuel filler flap !
AdBlue ®
is not a fuel additive and must
not be added to the fuel tank.IfA dBlue®
is
added to the fuel tank, this can lead to
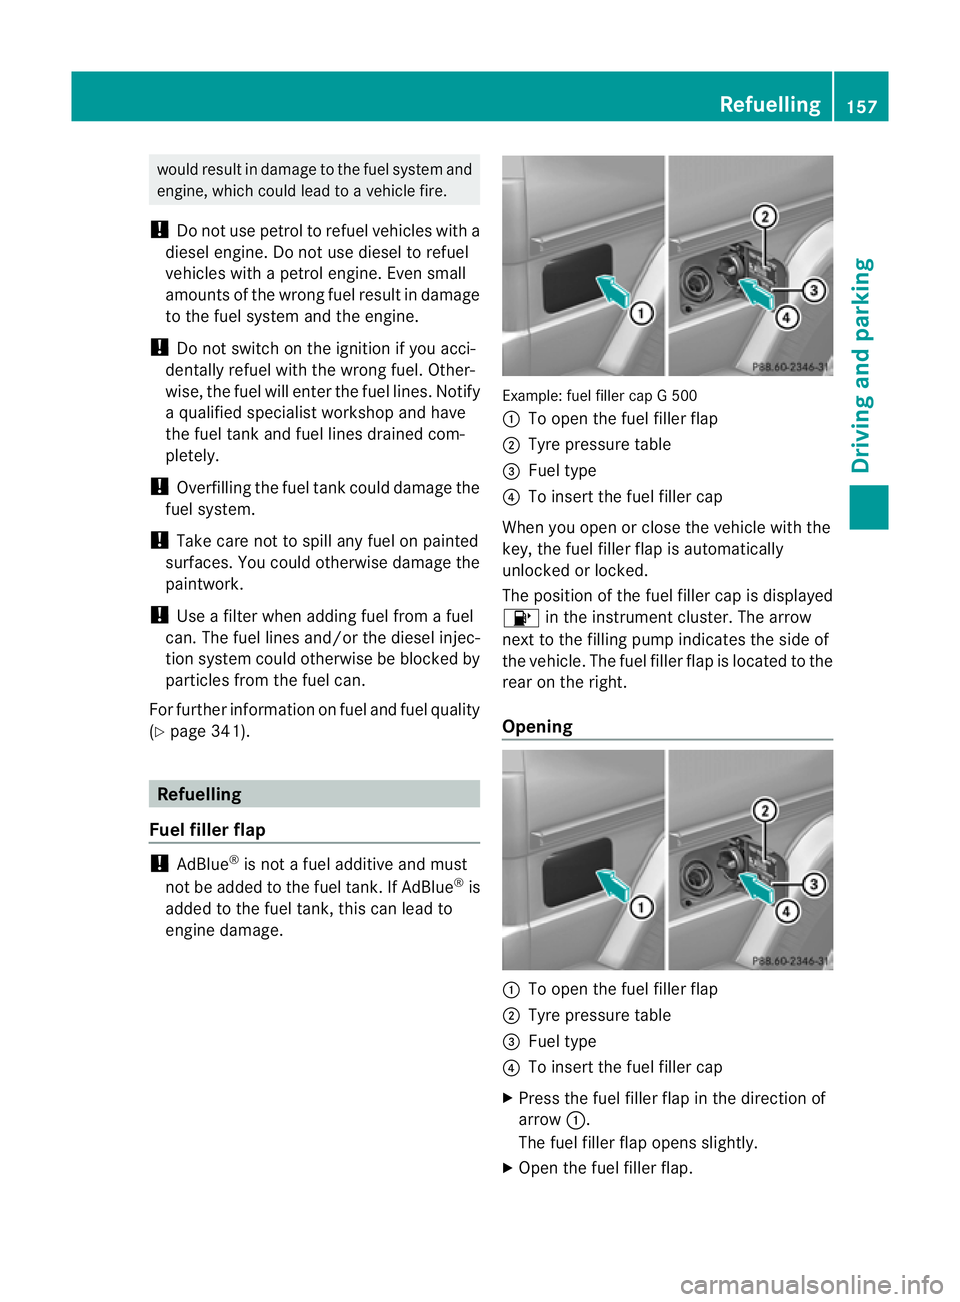
engine damage. Example: fuel filler cap G 500
:
To open the fuel filler flap
; Tyre pressure table
= Fuel type
? To insert the fuel filler cap
When you open or close the vehicle with the
key, the fuel filler flap is automatically
unlocked or locked.
The position of the fuel filler cap is displayed
8 in the instrument cluster. The arrow
nex tto the filling pump indicates the side of
the vehicle. The fuel filler flap is located to the
rear on the right.
Opening :
To open the fuel filler flap
; Tyre pressure table
= Fuel type
? To insert the fuel filler cap
X Press the fuel filler flap in the direction of
arrow :.
The fuel filler flap opens slightly.
X Open the fuel filler flap. Refuelling
157Driving and parking Z
Page 161 of 357
X
Turn the fuel filler cap anti-clockwise and
remove it.
AdBlue ®
vehicles: do not confuse the fuel
filler cap with the blue AdBlue ®
filler cap.
X Insert the fuel filler cap into the holder
bracket on the inside of filler flap ?.
i AdBlue ®
vehicles do not have a bracket
on the inside of the filler flap.
X Completely insert the filler neck of the fuel
pump nozzle into the tank and refuel.
i Do not add any more fuel after the pump
stops filling for the first time. Otherwise,
fuel may leak out.
Closing X
Replace the fuel filler cap and turn it clock-
wise. The fuel filler cap audibly engages.
X Press the fuel filler flap closed until it
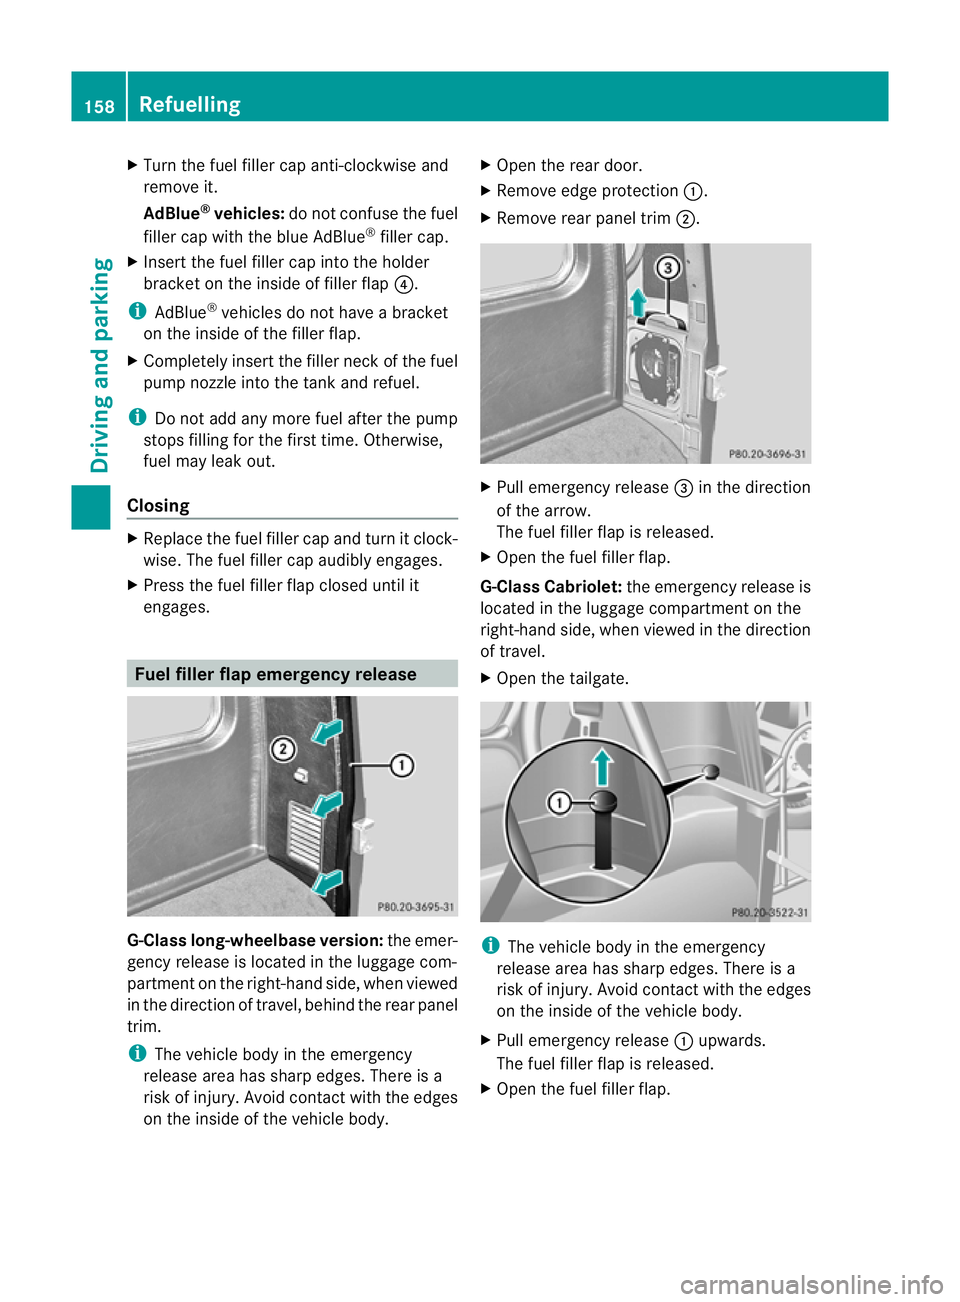
engages. Fuel filler flap emergency release
G-Class long-wheelbase version:
the emer-
gency release is located in the luggage com-
partmen tonthe right-hand side, when viewed
in the direction of travel, behind the rear panel
trim.
i The vehicle body in the emergency
release area has sharp edges. There is a
risk of injury. Avoid contact with the edges
on the inside of the vehicle body. X
Open the rear door.
X Remove edge protection :.
X Remove rear panel trim ;. X
Pull emergency release =in the direction
of the arrow.
The fuel filler flap is released.
X Open the fuel filler flap.
G-Class Cabriolet: the emergency release is
located in the luggage compartmentont he
right-hand side, when viewed in the direction
of travel.
X Open the tailgate. i
The vehicle body in the emergency
release area has sharp edges. There is a
risk of injury. Avoid contact with the edges
on the inside of the vehicle body.
X Pull emergency release :upwards.
The fuel filler flap is released.
X Open the fuel filler flap. 158
RefuellingDriving and parking
Page 162 of 357
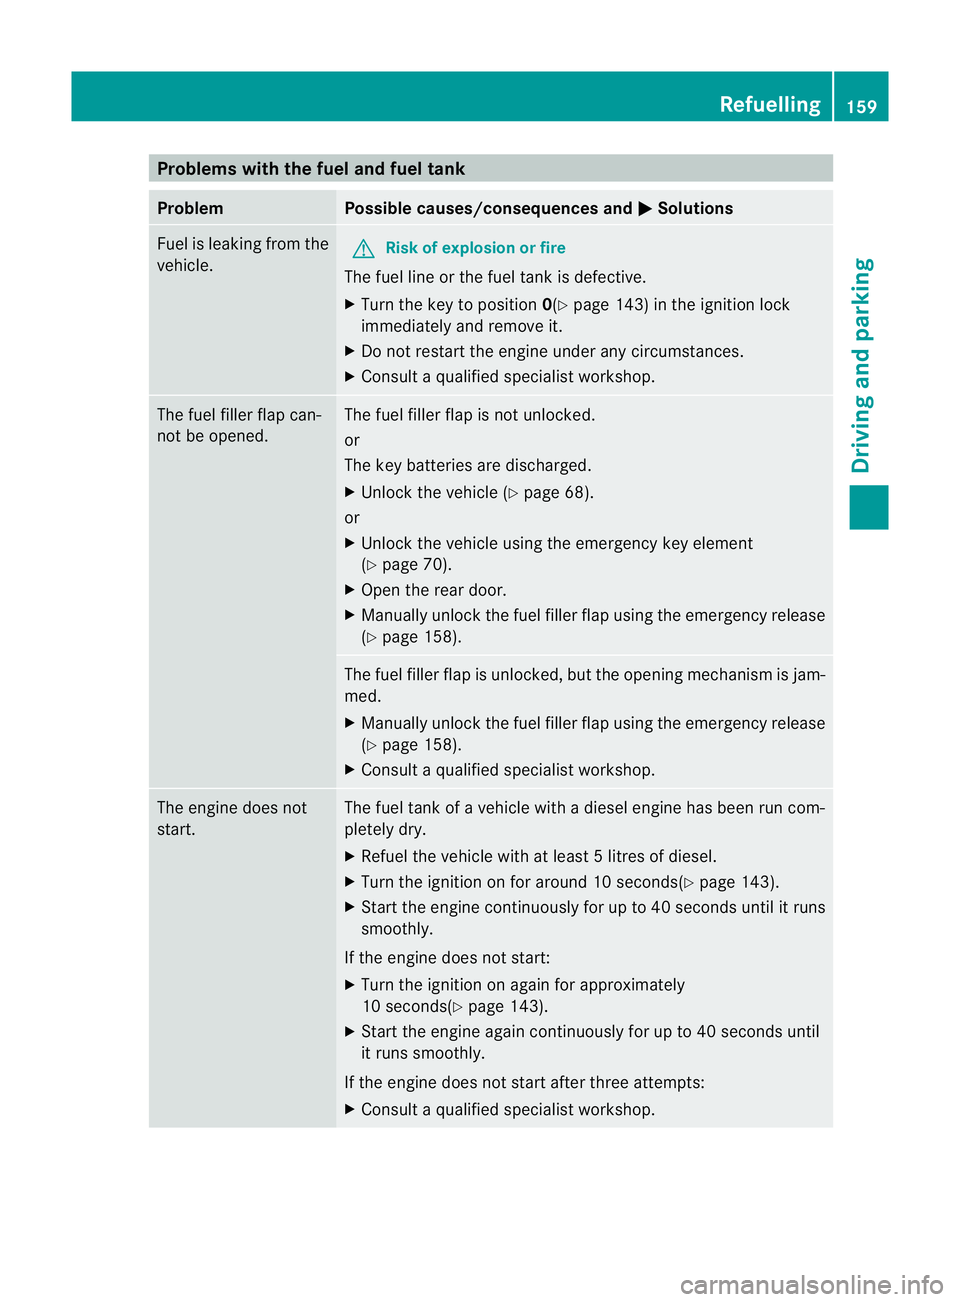
Problems with the fuel and fuel tank
Problem Possible causes/consequences and
M Solutions
Fuel is leaking from the
vehicle.
G
Risk of explosion or fire
The fuel line or the fuel tank is defective.
X Turn the key to position 0(Ypage 143) in the ignition lock
immediately and remove it.
X Do not restart the engine under any circumstances.
X Consult a qualified specialist workshop. The fuel filler flap can-
not be opened. The fuel filler flap is not unlocked.
or
The key batteries are discharged.
X
Unlock the vehicle (Y page 68).
or
X Unlock the vehicle using the emergency key element
(Y page 70).
X Open the rear door.
X Manually unlock the fuel filler flap using the emergency release
(Y page 158). The fuel filler flap is unlocked, but the opening mechanism is jam-
med.
X
Manually unlock the fuel filler flap using the emergency release
(Y page 158).
X Consult a qualified specialist workshop. The engine does not
start. The fuel tank of a vehicle with a diesel engine has been run com-
pletely dry.
X
Refuel the vehicle with at least 5litres of diesel.
X Turn the ignition on for around 10 seconds(Y page 143).
X Start the engine continuously for up to 40 seconds until it runs
smoothly.
If the engine does not start:
X Turn the ignition on again for approximately
10 seconds(Y page 143).
X Start the engine again continuously for up to 40 seconds until
it runs smoothly.
If the engine does not start after three attempts:
X Consult a qualified specialist workshop. Refuelling
159Driving and parking Z
Page 163 of 357
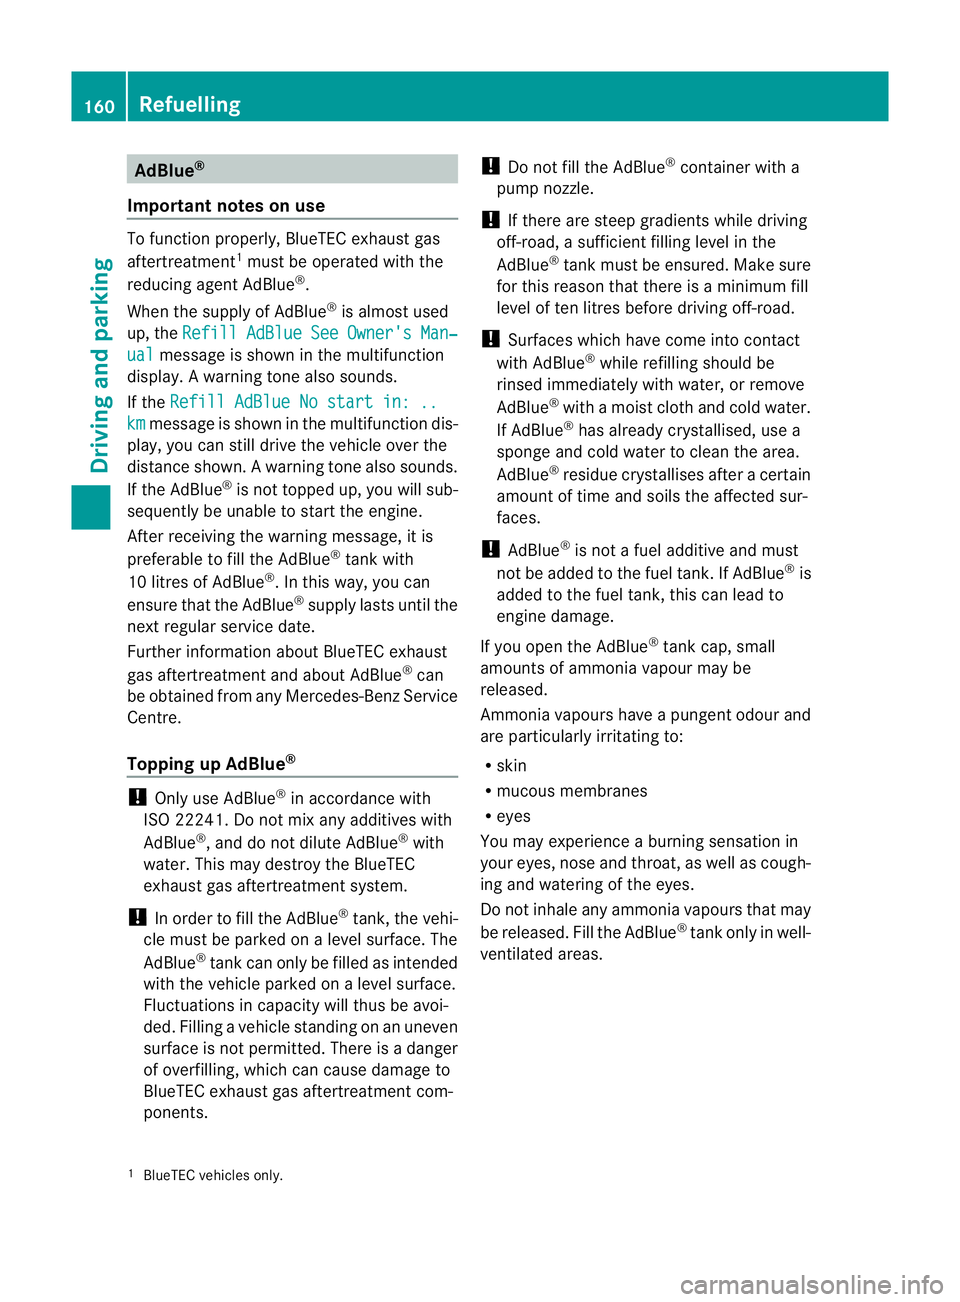
AdBlue
®
Important notes on use To function properly, BlueTEC exhaust gas
aftertreatment 1
mus tbe operated with the
reducing agent AdBlue ®
.
When the supply of AdBlue ®
is almost used
up, the Refill AdBlue See Owner's Man‐
ual message is shown in the multifunction
display. Awarning tone also sounds.
If the Refill AdBlue No start in: .. km message is shown in the multifunction dis-
play, you can still driv ethe vehicle over the
distance shown. Awarning tone also sounds.
If the AdBlue ®
is no ttopped up, you will sub-
sequently be unable to start the engine.
After receiving the warning message, it is
preferable to fill the AdBlue ®
tank with
10 litres of AdBlue ®
.Int his way, you can
ensure that the AdBlue ®
supply lasts until the
next regular service date.
Further information about BlueTEC exhaust
gas aftertreatment and about AdBlue ®
can
be obtained from any Mercedes-Ben zService
Centre.
Topping up AdBlue ®!
Only use AdBlue ®
in accordance with
ISO 22241. Do not mix any additives with
AdBlue ®
, and do not dilute AdBlue ®
with
water. This may destroy the BlueTEC
exhaust gas aftertreatmen tsystem.
! In order to fill the AdBlue ®
tank, the vehi-
cle mus tbe parked on a level surface. The
AdBlue ®
tank can only be filled as intended
with the vehicle parked on a level surface.
Fluctuations in capacity will thus be avoi-
ded. Filling a vehicle standing on an uneven
surface is not permitted. There is a danger
of overfilling, which can cause damage to
BlueTEC exhaust gas aftertreatmen tcom-
ponents. !
Do not fill the AdBlue ®
container with a
pump nozzle.
! If there are steep gradients while driving
off-road, a sufficient filling level in the
AdBlue ®
tank must be ensured. Make sure
for this reason that there is a minimum fill
level of ten litres before driving off-road.
! Surfaces which have come into contact
with AdBlue ®
while refilling should be
rinsed immediately with water, or remove
AdBlue ®
with a moist cloth and cold water.
If AdBlue ®
has already crystallised, use a
sponge and cold water to clean the area.
AdBlue ®
residue crystallises after a certain
amount of time and soils the affected sur-
faces.
! AdBlue ®
is not a fuel additive and must
not be added to the fuel tank.IfA dBlue®
is
added to the fuel tank, this can lead to
engine damage.
If you open the AdBlue ®
tank cap, small
amounts of ammonia vapour may be
released.
Ammonia vapours have a pungen todour and
are particularly irritating to:
R skin
R mucous membranes
R eyes
You may experience a burning sensation in
your eyes, nose and throat, as well as cough-
ing and watering of the eyes.
Do not inhale any ammonia vapours that may
be released. Fill the AdBlue ®
tank only in well-
ventilated areas.
1 BlueTEC vehicles only. 160
RefuellingDriving and parking