2012 MERCEDES-BENZ G-CLASS SUV rear view mirror
[x] Cancel search: rear view mirrorPage 15 of 357

Limit speed
Variable SPEEDTRONI C................. 178
Loading guidelines ............................266
Locking Emergency locking ........................... 75
From the inside (central locking
button) ............................................. 73
see Centra llocking
Locking (doors)
Automatic ........................................ 74
Locking centrally
see Centra llocking
Locking verification signal (on-
board computer) ............................... 223
LOW RANGE off-road gear ................202
Luggage compartment cover Fitting/removing ........................... 272
Notes/function .............................. 271
Opening and closing ......................272
Overview ........................................ 271
Luggage compartment enlarge-
ment
Important safety notes ..................268
Overview ........................................ 268
Luggage net ....................................... 268
Lumbar support Adjusting the 4-way lumba rsup-
por t.................................................. 94
Luxury head restraint .........................92 M
M+S tyres ........................................... 324
Main-beam headlamps Display message ............................ 235
Switching on/off ........................... 109
Matt finish (cleaning instructions) ..297
Memory card (audio) .........................218
Memory function ............................... 102
Mercedes-Benz Service Centre see Qualified specialist workshop
Message memory (on-board com-
puter) ................................................. .228
Messages see Display messages Mirrors
Sun visor ........................................ 276
see Exterior mirrors
see Rear-view mirror
Mobile phone
Frequencies ................................... 339
Important notes ............................. 278
Installatio n..................................... 339
Menu (on-board computer) ............218
Notes/placing in the bracket ......... 279
Operating (on-board computer) .....280
Transmission output (maximum) .... 339
Mobile telephone
Pre-installe dbracket ...................... 279
MP3
Operating ...................................... .218
see Separate operating instructions
Multifunction display
Function/notes ............................. 214
Permanent displa y......................... 221
Multifunction steering wheel
Back button ................................... 214
Operating the on-board computer .213
Overview .......................................... 31 N
Navigation Menu (on-board computer) ............216
see separate operating instructions
NECK-PRO head restraints
Operation ........................................ .42
Resetting after being triggered ........43
Notes on running in anew vehicle ..142 O
Occupant safety Childre ninthe vehicle ..................... 48
Important safety notes ....................38
Odometer
see Total distance recorder
see Trip meter
Off-road
Differential locks ............................ 204
Off-road ABS .................................... 6112
Index
Page 17 of 357

Resetting the current lap
...............227
Starting anew lap .......................... 226
Stopping ........................................ 226
RACETIMER (on-board computer) ....226
Radar sensors Overview ........................................ 351
Radiator cover ................................... 291
Radio Selecting astation ......................... 217
see separate operating instructions
Reading lamp ..................................... 110
Rear bench seat Folding forward .............................. 270
Rear compartment
Setting the airv ents...................... 140
Rear-compartment seat belt sta-
tus indicator ........................................ 47
Rear door Closing ............................................ .76
Display message ............................ 249
Important safety notes ....................75
Opening ........................................... 75
Opening/closing .............................. 75
Rear foglamp
Display message ............................ 236
Switching on/off ........................... 107
Rear lamps
see Lights
Rear seat bench
Folding into an upright position .....270
Rear-view mirror
Anti-dazzle mode (automatic) ........100
Rear window heating
Problem (fault) ............................... 133
Switching on/off ........................... 133
Rear window wiper
Switching on/off ........................... 120
Refuelling
Fuel gauge ..................................... 211
Important safety notes ..................156
Refuelling proces s......................... 157
see Fuel
Remote control
Auxiliary heating/ventilation .......... 135
Changing the batteries (auxiliary
heating) ......................................... 137
Programming (garage door opener) 280 Reserve (fuel tank)
see Fuel
Reserve fuel
Display message ............................ 240
Warning lamp ................................. 260
Residual heat
Switching on/off ........................... 133
Restraint systems
see SRS (Supplemental Restraint
System)
Rev counter ........................................ 212
Reversing camera Function/notes ............................. 200
Reversing camera (cleaning
instructions) ...................................... 299
Reversing lamp Changing bulbs .............................. 118
Reversing lamp (display message) ..236
Roof see Soft top
Roof load (maximum) ........................348
Route (navigation) see Route guidance (navigation)
Route guidance (navigation) ............216 S
Safety Childre ninthe vehicle ..................... 48
Child restraint systems ....................48
Safety net
Detaching and storing .................... 274
Important safety information .........272
Releasing ....................................... 274
with luggage compartment
enlargement .................................. 273
without luggage compartment
enlargement .................................. 272
Safety systems
see Driving safety systems
Seat
Folding the front seat backrests
forwards (EASY-ENTRY feature) .......94
Seat backrest
Folding back .................................. 269
Seat belt
Adjusting the height ......................... 46
Belt force limiter .............................. 4714
Index
Page 37 of 357

Overhea
dcontrol panel Function Page
:
p
Switches the left-
hand reading lamp on/off 110
;
c
Switches the front
interio rlighting on 112
=
u
Switches the rear
interior lighting on/off 112
?
|
Switches the front
interior lighting/automatic
interior lighting control off 111
A
p
Switches the right-
hand reading lamp on/off 110 Function Page
B
¡
Opens/closes the
sliding sunroof 79
C
ë
Deactivates tow-
away protection 65
D
Rear-view mirror 99
E
Buttons for the garage door
opener 282
F
ê
Deactivates the inte-
rior motion sensor 6534
Overhead control panelAt a glance
Page 68 of 357

Tow-away protection
Function An audible and visual alar
mis triggered if your
vehicle's angle of inclination is altered while
tow-away protection is primed. This occurs if
the vehicle is jacked up on one side, for exam-
ple.
Activating X
To prime: lock the vehicle with the key.
Tow-away protection is primed after
approximately 30 seconds.
Switching off X
To deactivate: unlock the vehicle with the
key.
Tow-away protection is switched off auto-
matically.
i To prevent a false alarm, deactivate tow-
away protection manually if your vehicle:
R is being transported
R is being loaded onto a ferry or car trans-
porter, for example
R is parked on a movable surface, e.g. in a
split-level garage
Deactivating X
Remove the key from the ignition lock.
X Press button :.
Indicator lamp ;lights up briefly.
X Lock the vehicle with the key.
Tow-away protection remains deactivated
until the vehicle is unlocked and locked
again. Interior motion sensor
Function When the interior motion sensor is primed, a
visual and audible alarm is triggered if move-
ment is detected in the vehicle interior. This
can occur if someone reaches into the vehicle
interior, for example.
Activating
X
Make sure that:
R
the side windows are closed.
R the sliding sunroof is closed.
R there are no objects, e.g. mascots, hang-
ing on the rear-view mirror or on the grab
handles on the roof trim.
This will prevent false alarms.
X Lock the vehicle with the key.
The interior motion sensor is primed after
approximately 30 seconds.
Switching off X
Unlock the vehicle with the key.
The interior motion sensor is switched off
automatically.
i To prevent a false alarm, deactivate the
interior motion sensor if you lock your vehi-
cle and:
R people or animals remain in the vehicle.
R the side windows remain open.
R the sliding sunroof remains open. Anti-theft systems
65Safety Z
Page 93 of 357

Useful information
i This Owner's Manual describes all mod-
els, series and optional equipment for your
vehicle that were available at the time of
going to press. Country-specific differen-
ces are possible. Note that your vehicle
may not be fitted with all features descri-
bed. This is also the case for systems and
functions relevant to safety.
i Read the information on qualified special-
ist workshops: (Y page 22). Correct driver's seat position
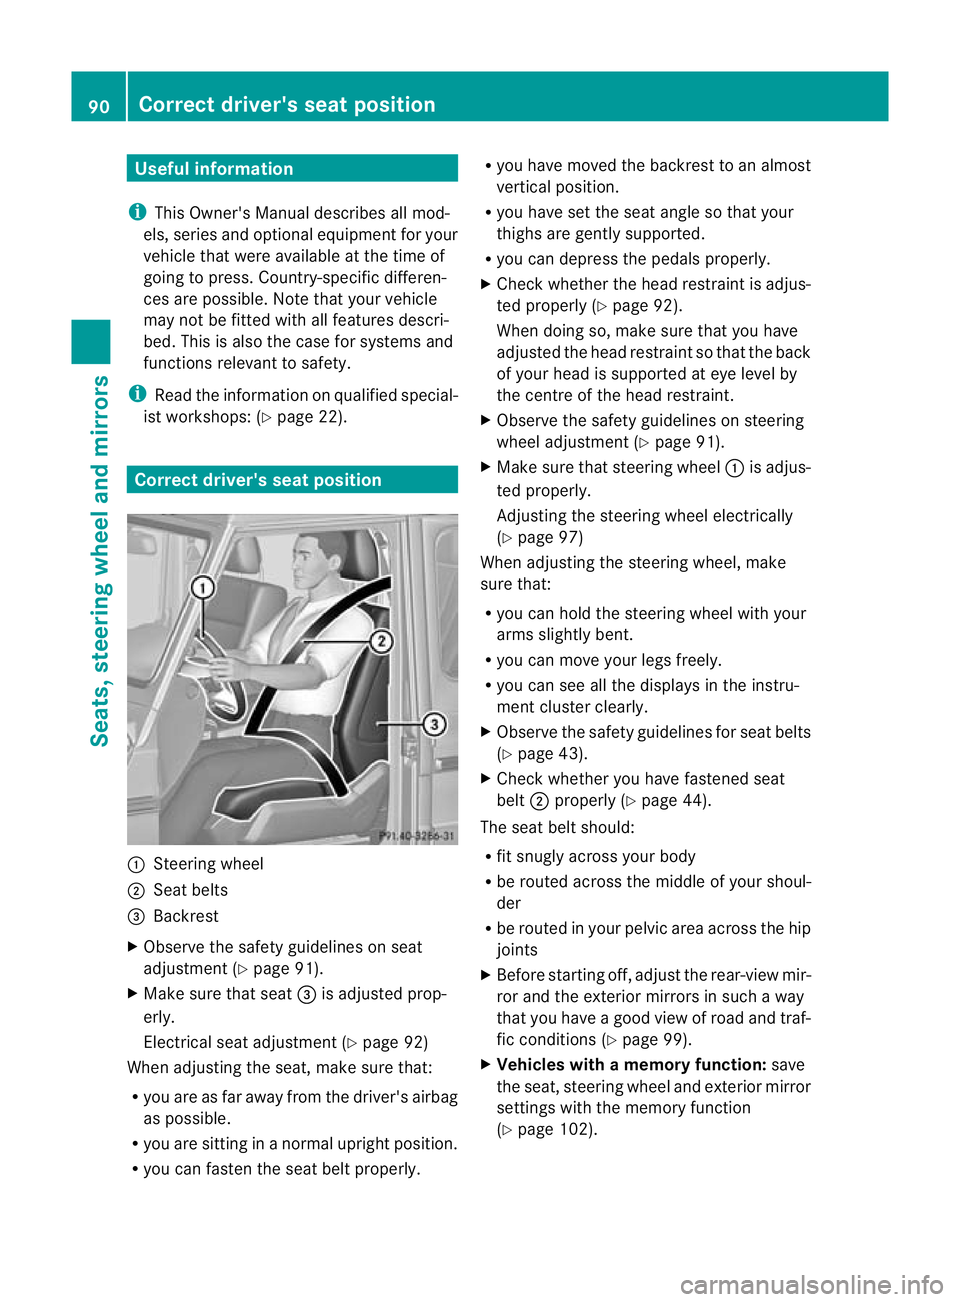
:
Steering wheel
; Seat belts
= Backrest
X Observe the safety guidelines on seat
adjustment (Y page 91).
X Make sure that seat =is adjusted prop-
erly.
Electrical seat adjustment (Y page 92)
When adjusting the seat, make sure that:
R you are as far away from the driver's airbag
as possible.
R you are sitting in a normal upright position.
R you can faste nthe seat belt properly. R
you have moved the backrest to an almost
vertical position.
R you have set the seat angle so that your
thighs are gently supported.
R you can depress the pedals properly.
X Check whether the head restraint is adjus-
ted properly (Y page 92).
When doing so, make sure that you have
adjusted the head restraint so that the back
of your head is supported at eye level by
the centre of the head restraint.
X Observe the safety guidelines on steering
wheel adjustment (Y page 91).
X Make sure that steering wheel :is adjus-
ted properly.
Adjusting the steering wheel electrically
(Y page 97)
When adjusting the steering wheel, make
sure that:
R you can hold the steering wheel with your
arms slightly bent.
R you can move your legs freely.
R you can see all the displays in the instru-
ment cluster clearly.
X Observe the safety guidelines for seat belts
(Y page 43).
X Check whether you have fastened seat
belt ;properly (Y page 44).
The seat belt should:
R fit snugly across your body
R be routed across the middle of your shoul-
der
R be routed in your pelvic area across the hip
joints
X Before starting off, adjust the rear-view mir-
ror and the exterior mirrors in such a way
that you have a good view of road and traf-
fic conditions (Y page 99).
X Vehicles with a memory function: save
the seat, steering wheel and exterior mirror
settings with the memory function
(Y page 102). 90
Correct driver's seat positionSeats, steering wheel and mirrors
Page 96 of 357

X
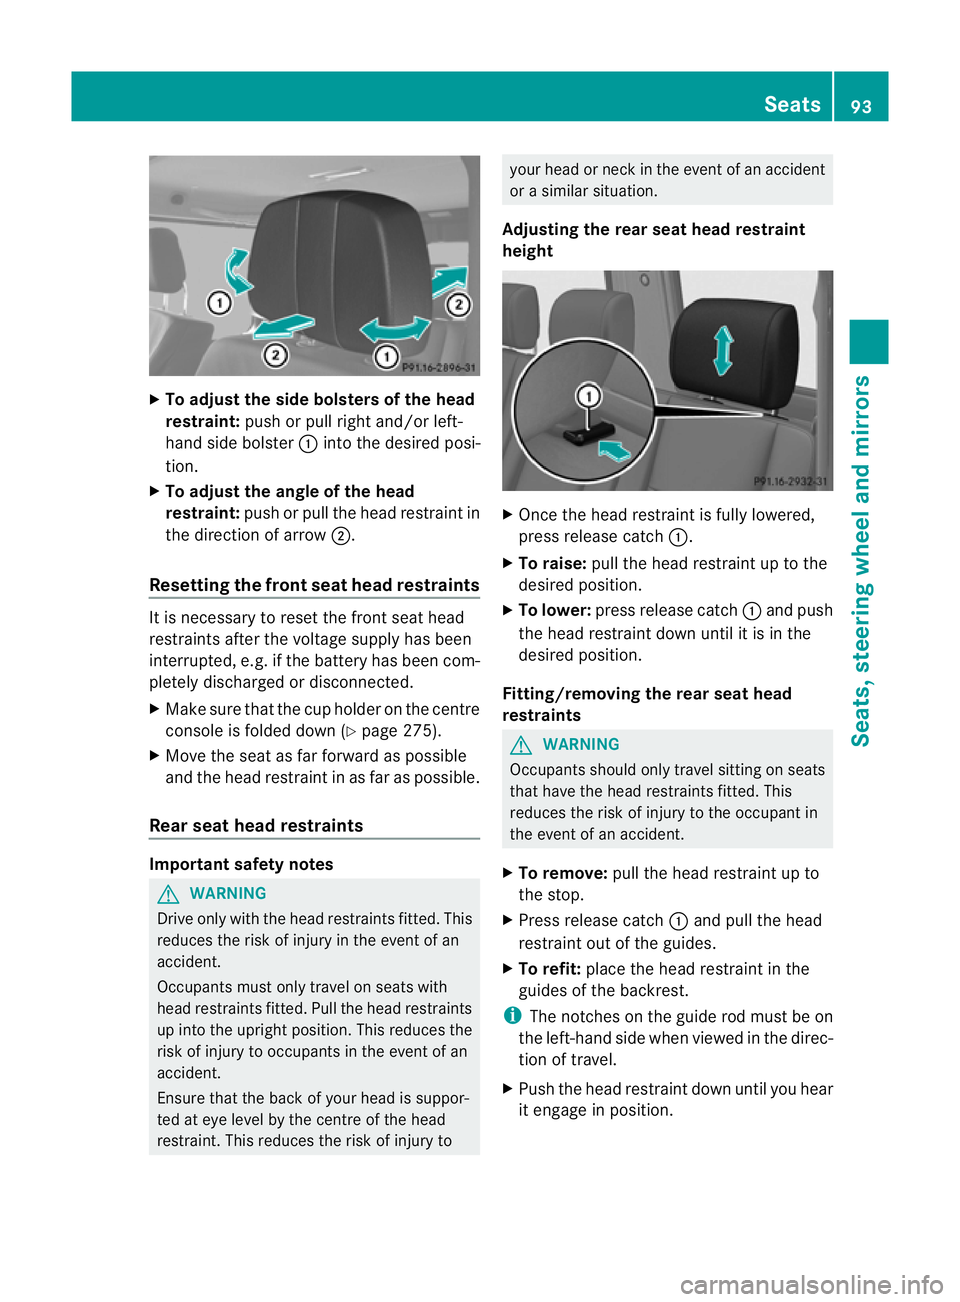
To adjust the side bolsters of the head
restraint: push or pull right and/or left-
hand side bolster :into the desired posi-
tion.
X To adjust the angle of the head
restraint: push or pull the head restraint in
the direction of arrow ;.
Resetting the front seat head restraints It is necessary to reset the front seat head
restraints after the voltage supply has been
interrupted, e.g .ifthe battery has been com-
pletely discharged or disconnected.
X Make sure that the cup holder on the centre
console is folded down (Y page 275).
X Move the seat as far forward as possible
and the head restraint in as far as possible.
Rear seat head restraints Important safety notes
G
WARNING
Drive only with the head restraints fitted. This
reduces the risk of injury in the event of an
accident.
Occupants must only travel on seats with
head restraints fitted. Pull the head restraints
up into the upright position. This reduces the
risk of injury to occupants in the event of an
accident.
Ensure that the back of your head is suppor-
ted at eye level by the centre of the head
restraint. This reduces the risk of injury to your head or neck in the event of an accident
or a similar situation.
Adjusting the rear seat head restraint
height X
Once the head restraint is fully lowered,
press release catch :.
X To raise: pull the head restraint up to the
desired position.
X To lower: press release catch :and push
the head restraint down until it is in the
desired position.
Fitting/removing the rear seat head
restraints G
WARNING
Occupants should only travel sitting on seats
that have the head restraints fitted. This
reduces the risk of injury to the occupant in
the event of an accident.
X To remove: pull the head restraint up to
the stop.
X Press release catch :and pull the head
restraint out of the guides.
X To refit: place the head restraint in the
guides of the backrest.
i The notches on the guide rod must be on
the left-hand side when viewed in the direc-
tion of travel.
X Push the head restraint down until you hear
it engage in position. Seats
93Seats, steering wheel and mirrors Z
Page 102 of 357

Position of the steering wheel when the
EASY-ENTRY/EXIT featurei s activeThe steering wheel moves upwards and
towards the dashboard if:
R you remove the key from the ignition lock
or
R you open the driver's door with the key in
position 0or 1in the ignition lock.
i The steering wheel only moves upwards
and towards the dashboard if it has not
already reached the upper end stop.
Position of the steering wheel for driv-
ing The steering wheel is moved to the previously
set position if:
R the driver's door is closed and
R you insert the key into the ignition lock
The last position of the steering wheel is
stored when you switch off the ignition or
when you store the setting with the memory
function (Y page 102). Mirrors
Rear-view mirror
X Adjust the rear-view mirror by hand so you
have a good overview of the traffic condi-
tions behind you. Exterior mirrors
Adjusting the exterior mirrors G
WARNING
The exterior mirrors reduce the size of the
image. Objects are actually closer than they
appear. You could misjudge the distance from
vehicles driving behind and cause an acci-
dent, e.g. when changin glane. For this rea-
son, make sure of the actual distance from the
vehicle driving behind by glancing ove ryour
shoulder. X
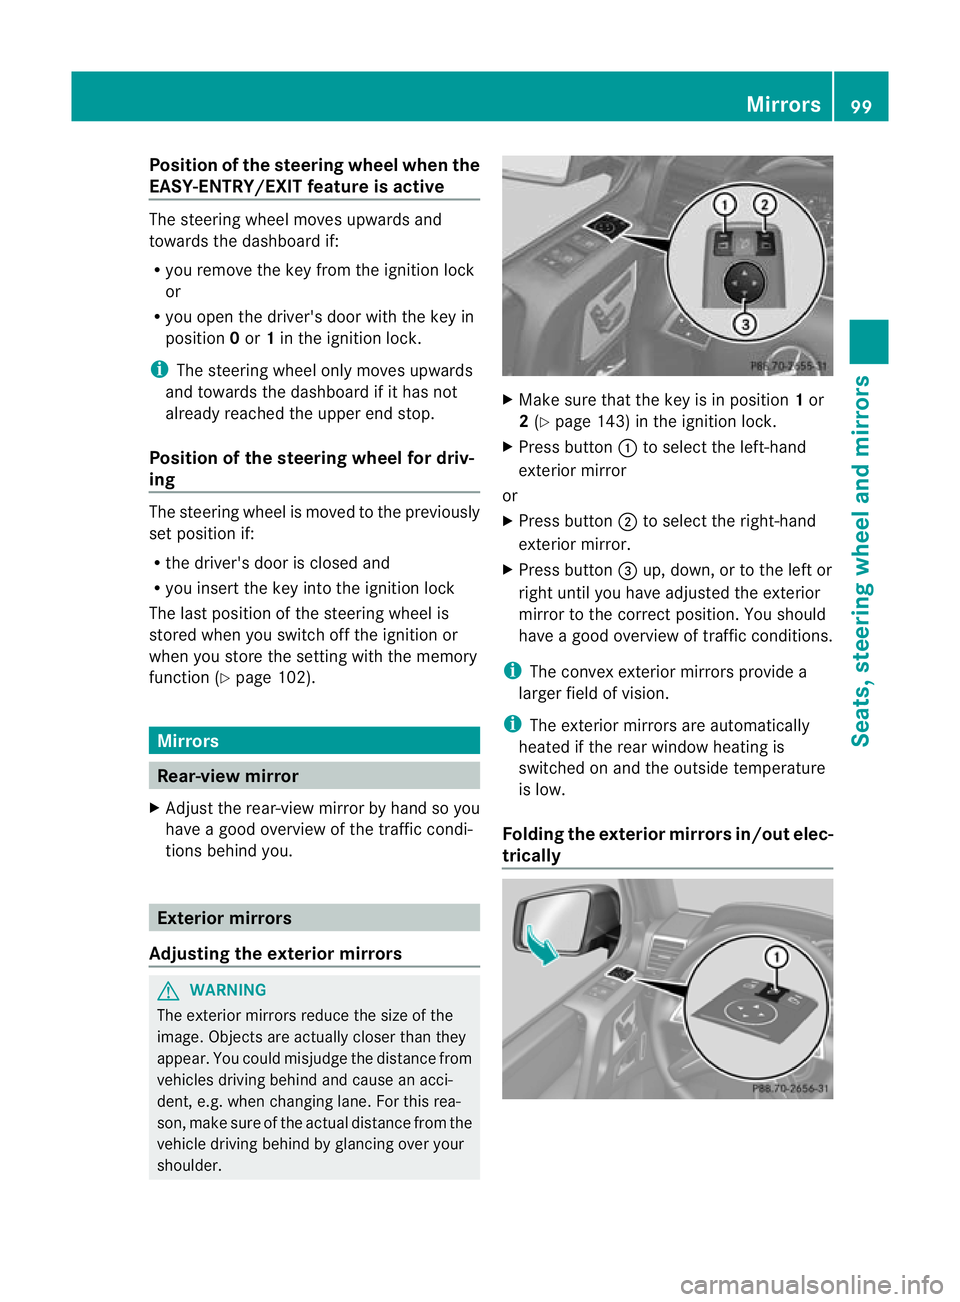
Make sure that the key is in position 1or
2 (Y page 143) in the ignition lock.
X Press button :to select the left-hand
exterior mirror
or
X Press button ;to select the right-hand
exterior mirror.
X Press button =up, down, or to the left or
right until you have adjusted the exterior
mirror to the correc tposition. You should
have a good overview of traffic conditions.
i The convex exterior mirrors provide a
larger field of vision.
i The exterior mirrors are automatically
heated if the rear window heating is
switched on and the outside temperature
is low.
Folding the exterior mirrors in/out elec-
trically Mirrors
99Seats, steering wheel and mirrors Z
Page 103 of 357

X
Make sure that the key is in position 1or
2 (Y page 143) in the ignition lock.
X Briefly press button :.
Both exterior mirrors fold in or out.
i Make sure that the exterior mirrors are
always folded out fully while driving. They
could otherwise vibrate.
Setting the exterior mirrors If the battery has been disconnected or com-
pletely discharged, the exterior mirrors must
be reset. The exterior mirrors will otherwise
not fold in when you select the "Fold in mir-
rors when locking" function in the on-board
computer (Y page 225).
X Make sure that the key is in position
1(Y page 143)in the ignition lock.
X Briefly press button :.
Folding the exterior mirrors in/out
automatically If the "Fold in mirrors when locking" function
is activated in the on-board computer
(Y
page 225):
R the exterior mirrors fold in automatically as
soon as you lock the vehicle from the out-
side.
R the exterior mirrors fold out again automat-
ically as soon as you unlock the vehicle and
then open the driver's or front-passenger
door. Exterior mirror pushed out of position X
Press button :repeatedly until you hear
the mirror engage in position.
The mirror housing is engaged again and
you can adjust the exterior mirrors as usual
(Y page 99). Automatic anti-dazzle mirrors
G
WARNING
If incident light from headlamps is prevented
from striking the sensor in the rear-view mir-
ror, for instance, by luggage piled too high in
the vehicle, the mirror's automatic anti-dazzle
function will not operate.
Incident light could then blind you. This may
distract you from the traffic conditions and,
as a result, you may cause an accident.
The rear-view mirror and the exterior mirror
on the driver's side automatically go into anti-
dazzle mode if:
R the ignition is switched on and
R incident light from headlamps strikes the
sensor in the rear-view mirror.
i The mirrors do not go into anti-dazzle
mode if reverse gear is engaged or if the
interior lighting is switched on. 100
MirrorsSeats, steering wheel and mirrors