2012 MERCEDES-BENZ G-CLASS SUV rear view mirror
[x] Cancel search: rear view mirrorPage 113 of 357

The hazard warning lamps automatically
switch on if:
R
an airbag is deployed
R the seat belt tensioners are triggered, or
R the vehicle decelerates rapidly from a
speed of more than 70 km/ha nd comes to
a standstill.
The hazard warning lamp switches on auto-
matically if an airbag or the belt tensioners
are triggered and the key is in position 1in
the ignition lock.
The hazard warning lamps switch off auto-
matically if the vehicle reaches a speed of
over 10 km/h again after a full brake appli-
cation.
i The hazard warning lamps still operate if
the ignition is switched off. Cornering light function
The cornering light functio
nimproves the illu-
mination of the road over a wide angle in the
directio nyou are turning, enabling better vis-
ibility in tight bends, for example. The corner-
ing light function can only be activated if the
dipped-beam headlamps are switched on and
the foglamps are switched off.
Active: if you are driving at speeds below
40 km/ha nd switch on the tur nsignal or turn
the steering wheel
Not active: if you are driving at speeds above
40 km/h or switch off the turn signal or turn
the steering wheel to the straight-ahead posi-
tion The cornering lamp may remain lit for a short
time, but is automatically switched off after
no more than three minutes. Headlamps and turn signals misted
up on the inside
The headlamps and the indicator lamps in the
exterior mirrors may mist up on the inside if
there is high atmospheric humidity.
X Drive with the headlamps switched on.
The level of moisture diminishes, depend-
ing on the length of the journey and the
weathe rconditions (humidity and temper-
ature).
If the level of moisture does not diminish:
X Have the headlamps checked at a qualified
specialist workshop. Interior lighting
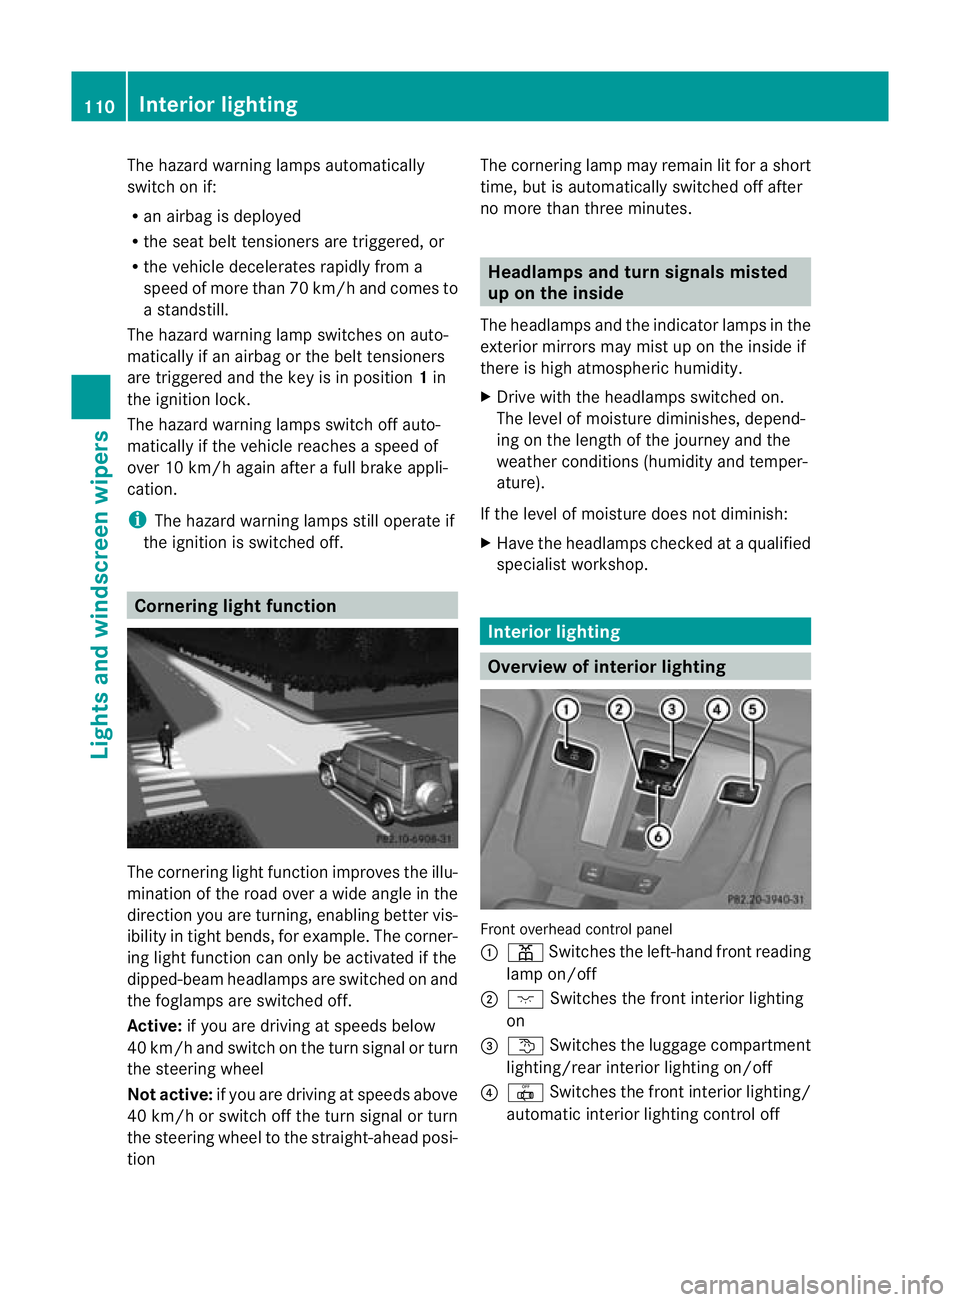
Overview of interior lighting
Front overhead control panel
:
p Switches the left-hand front reading
lamp on/off
; c Switches the front interior lighting
on
= t Switches the luggage compartment
lighting/rear interior lighting on/off
? | Switches the front interior lighting/
automatic interior lighting control off 110
Interior lightingLights and windscreen wipers
Page 279 of 357

before folding forward the backrests and
seat cushions of the rear bench seat.
:
Cup holders Sun visors
Sun visor overview G
WARNING
Keep the vanity mirror sinthe sun visors cov-
ered while driving. You could otherwise be
dazzled, which may impair your view of traffic
conditions and as a result could cause an
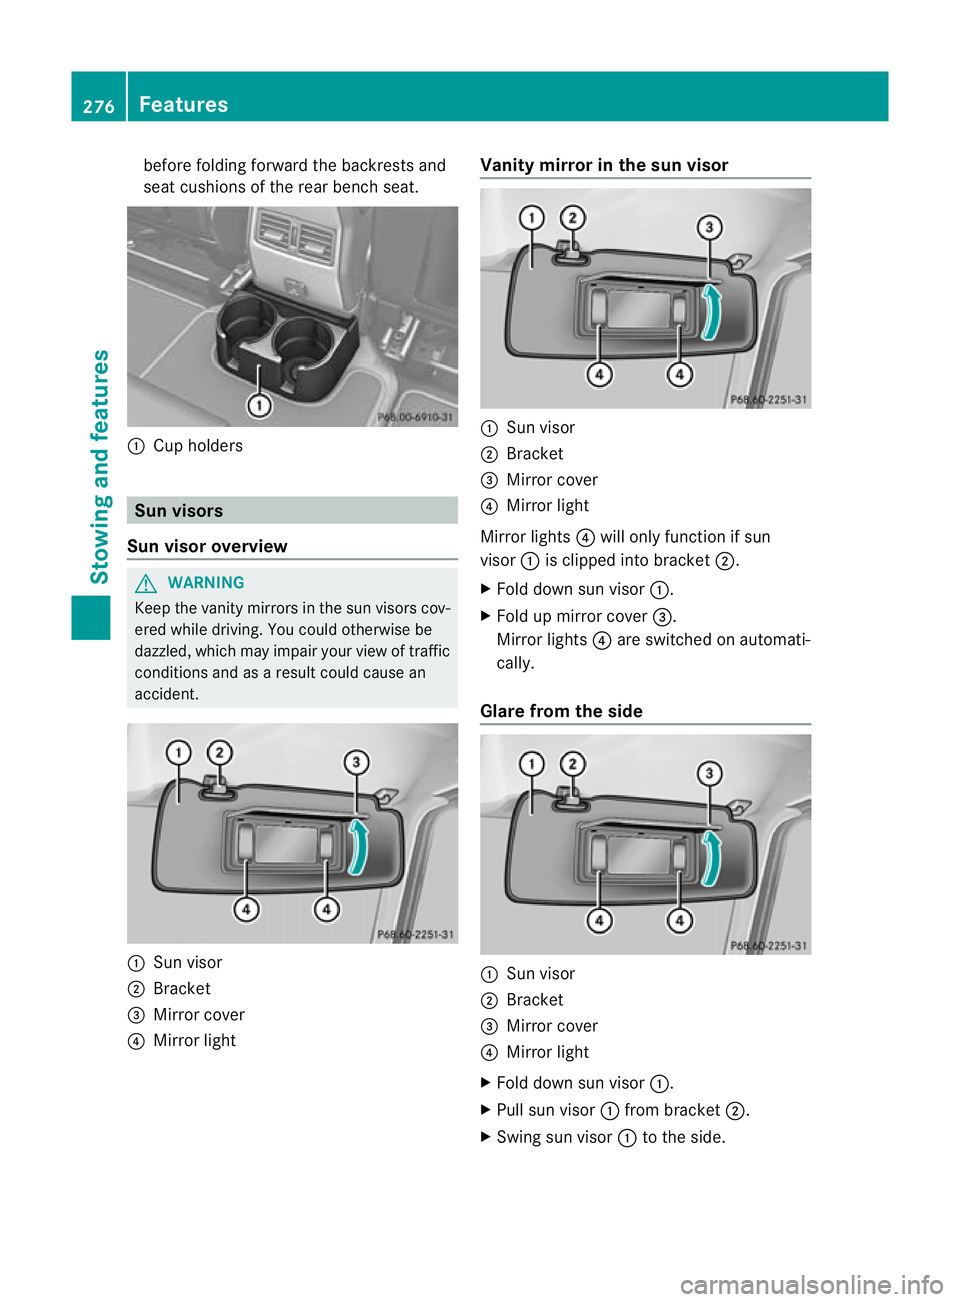
accident. :
Sun visor
; Bracket
= Mirror cover
? Mirror light Vanity mirror in the sun visor
:
Sun visor
; Bracket
= Mirror cover
? Mirror light
Mirror lights ?will only function if sun
visor :is clipped into bracket ;.
X Fold down sun visor :.
X Fold up mirror cover =.
Mirror lights ?are switched on automati-
cally.
Glare from the side :
Sun visor
; Bracket
= Mirror cover
? Mirror light
X Fold down sun visor :.
X Pull sun visor :from bracket ;.
X Swing sun visor :to the side. 276
FeaturesStowing and features
Page 283 of 357

Operating the mobile phone
You can operate the telephon
eusing the
6 and~ buttons on the multifunction
steering wheel. You can operate other mobile
phone functions via the on-board computer
(Y page 218).
When you remove the key from the ignition
lock, the mobile phone remains switched on
for approximately ten minutes (run-on time).
If you make a call during this time, the mobile
phone will be switched off approximately ten
minutes after you have ended the call. Garage door opener
Important safety notes You can use the HomeLink
®
garage door
opener integrated into the rear-view mirror to
operate up to three different gate/garage
door opener systems.
i The garage door opener is only available
for certain countries. Observe the legal
requirements for each individual country.
The HomeLink ®
garage door opener is
compatible with most European garage and
gate opener drives. More information on
HomeLink ®
and/or compatible products is
available from:
R any Mercedes-Benz Service Centre
R the HomeLink ®
hotline
(0) 08000 466 354 65 (free of charge) or
+49 (0) 6838 907 277 (charges apply)
R on the Internet at:
http://www.homelink.com
Programming the remote control Programming
G
WARNING
Only press the button on the integrated
garage door opener if there are no persons or
objects present within the sweep of the garage door. Persons could otherwise be
injured as the door moves.
Remote control in the rear-view mirror
:
Indicator lamp
;=? Transmitter buttons
A Garage door remote control
B Transmitter button on the garage
door remote control
Garage door remote control Ais not part of
the garage door opener.
i To achieve the best result, insert new bat-
teries in garage door remote control Aof
your garage door drive before program-
ming.
X Delete the memory of the integrated
remote control (Y page 283) before pro-
gramming it for the first time.
X Turn the key to position 2(Ypage 143) in
the ignition lock.
X Press and hold transmitter button ;,=
or ?.
After a short time, indicator lamp :will
start flashing. It flashes abouto nce per
second.
i Indicato rlamp :flashes immediately
th ef irst tim ethat the transmitter button is
programmed. If this transmitter button has
already been programmed, indicator
lamp :will only start flashing at a rate of
once a second after 20 seconds have
elapsed.
X Keep the transmitter button depressed. 280
FeaturesStowing and features
Page 284 of 357

X
Point transmitter button Bof garage door
remote control Atowards the transmitter
buttons on the rear-view mirror at a dis-
tance of 5to 30 cm.
i The distance between garage door
remote control Aand the integrated
garage door opener depends on the system
of the garage door drive. Several attempts
may be required. You should test every
position for at least 20 seconds before try-
ing another position.
X Keep transmitter button Bon garage door
remote control Apressed until indicator
lamp :starts to flash rapidly.
The programming has been successful if
indicator lamp :flashes rapidly.
X Release transmitter buttons ;,=or?
on the integrated remot econtrol and trans-
mitter button Bon the garage door remote
control.
If indicator lamp :goes out after approx-
imately 20 seconds and has not flashed rap-
idly:
X Release transmitter buttons ;,=or?
on the integrated remote control and trans-
mitter button Bon the garage door remote
control.
X Repeat the procedure for the other trans-
mitter buttons. When doing so, vary the
distance between the garage door's
remote control and the transmitter buttons
in the rear-view mirror.
i If the garage door system works with a
rolling code, you must synchronise the
remote control integrated into the rear-
view mirror with the garage door system
receiver after programming.
You will find further information in the
garage door system's operating instruc-
tions, e.g. the section son"Synchronising
the transmitter" or "Registering a new
transmitter". You can also call the hotline
mentioned above. Synchronising the rolling code
Remote control in the rear-view mirror
:
Indicator lamp
;=? Transmitter buttons
A Garage doo rremote control
B Transmitter button on the garage
door remote control
Your vehicle must be within range of the
garage door or exterior gate drive. Make sure
that neither your vehicle nor any persons/
objects are present within the sweep of the
door or gate.
Observe the safety notes when performing
the rolling code synchronisation
(Y page 280).
X Turn the key to position 2(Ypage 143) in
the ignition lock.
X Press the programming button of the door
or gate drive (see the door or gate drive
operating instructions, e.g. under "Pro-
gramming of additional remote controls").
i Usually, you now have 30 seconds to ini-
tiate the next step.
X Press previously programmed button ;,
= or? of the integrated garage door
opener until the door closes.
The rolling code synchronisation is then
complete. Features
281Stowing and features Z
Page 285 of 357

Problems when programming
Remote control in the rear-view mirror
:
Indicator lamp
;=? Transmitter buttons
A Garage door remote control
B Transmitter button on the garage
door remote control
If you have problems when programming the
integrated remote control, please note the
following:
R check the transmitter frequency of garage
door remote control A(which can usually
be found on the back of the remote con-
trol).
The integrated remote control is compati-
ble with devices that have units which oper-
ate in the frequency range of 280 to
390 MHz.
R Replace the batteries in garage door
remote control A.This increases the prob-
ability of garage door remote control A
sending a strong and more precise signal
to the integrated remote control on the
rear-view mirror.
R when programming, hold garage door
remote control Aat varying distances and
angles from the transmitter button which
you are programming. Try various angles at
a distance between 5and 30 cm or at the
same angle but at varying distances.
R if there is another garage door remote con-
trol for the same device, perform the pro-
gramming steps again using that garage
door opener. Before performing these steps, make sure that new batteries have
been fitted in the garage door remote con-
trol.
R Align the aerial cable of the garage door
opener unit. This can improve signal recep-
tion/transmission.
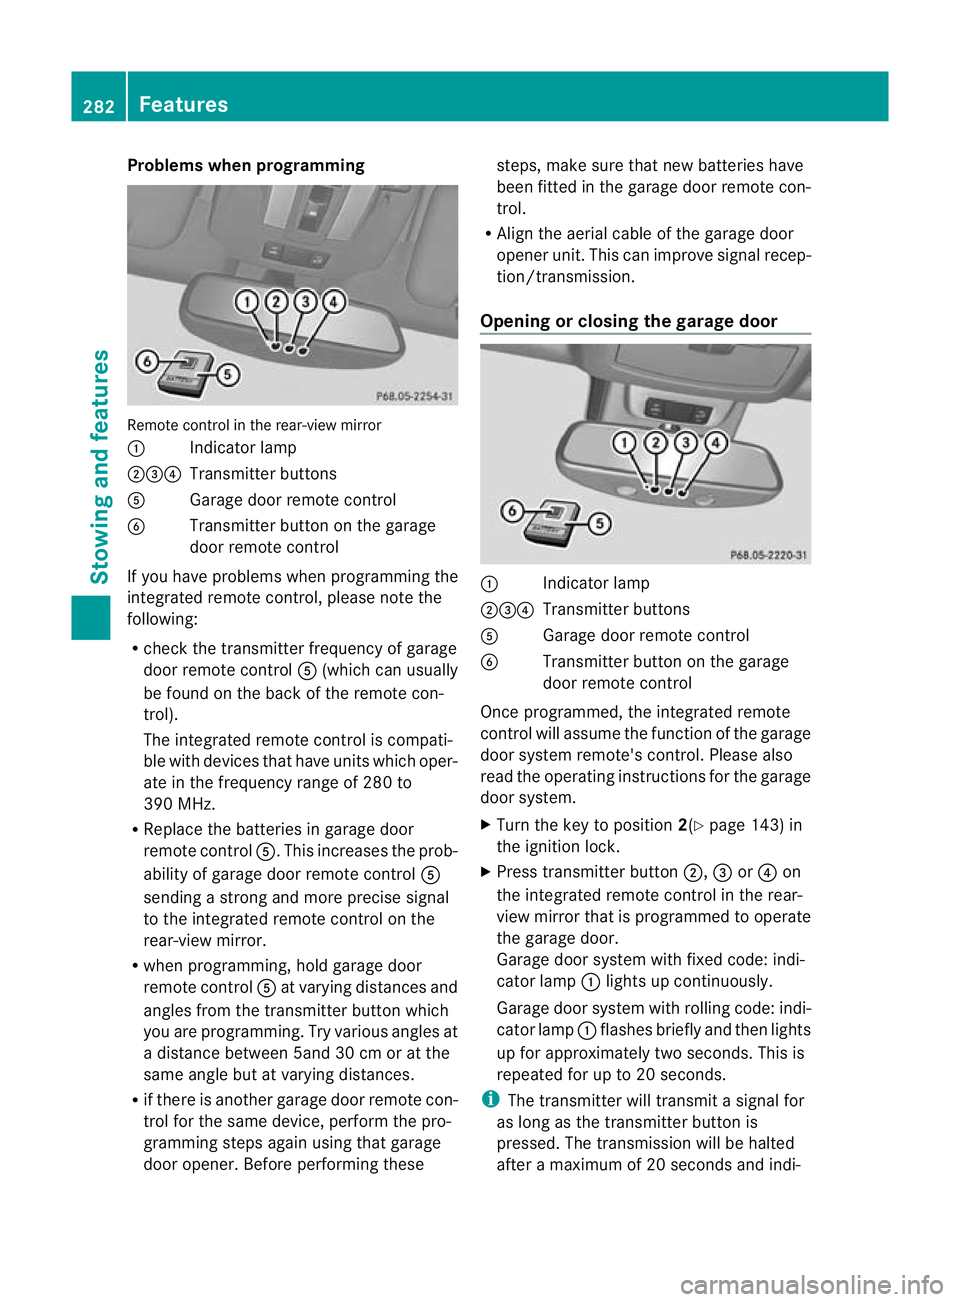
Opening or closing the garage door :
Indicator lamp
;=? Transmitter buttons
A Garage door remote control
B Transmitter button on the garage
door remote control
Once programmed, the integrated remote
control will assume the function of the garage
door system remote's control. Please also
read the operating instructions for the garage
door system.
X Turn the key to position 2(Ypage 143) in
the ignition lock.
X Press transmitter button ;,=or? on
the integrated remote control in the rear-
view mirror that is programmed to operate
the garage door.
Garage door system with fixed code: indi-
cator lamp :lights up continuously.
Garage door system with rolling code: indi-
cator lamp :flashes briefly and then lights
up for approximately two seconds. This is
repeated for up to 20 seconds.
i The transmitter will transmit a signal for
as long as the transmitter button is
pressed. The transmission will be halted
after a maximum of 20 seconds and indi- 282
FeaturesStowing and features