2012 MERCEDES-BENZ G-CLASS SUV change wheel
[x] Cancel search: change wheelPage 9 of 357

C
Cabriolet Draught stop .................................... 84
Soft top ............................................ 81
Tonnea ucover ................................. 85
Cabriole tsoft top
Cleaning ........................................ .297
Calling up a fault
see Display messages
Care
Automatic car wash .......................296
Cabriolet soft top ........................... 297
Chrome parts ................................. 299
Display ........................................... 300
Headlamps ..................................... 298
High-pressure cleaner .................... 296
Interior ........................................... 300
Matt paintwork .............................. 297
Notes ............................................. 295
Paint .............................................. 297
Plastic trim .................................... 300
Reversing camera ..........................299
Seat bel t........................................ 301
Seat covers .................................... 300
Sensors ......................................... 298
Tai lpipes ....................................... 299
Trailer coupling .............................. 299
Trim strips ..................................... 300
Wheels ........................................... 297
Windows ........................................ 298
Wiper blades .................................. 298
Wooden trim .................................. 300
CD player/CD changer(on-board
computer) .......................................... 218
Central locking Automatic locking (on-board com-
puter) ............................................. 223
Locking/unlocking (key ).................. 68
Centre console
Overview .......................................... 32
Uppe rsection .................................. 32
Changing bulbs
Important safety notes ..................114
Overview of bul btypes .................. 115
Parking lamps (front) .....................116
Reversing lamps ............................ 118Standing lamps
.............................. 116
Turn signals (front) ......................... 117
Changing gears .................................. 152
Checklist After driving off-roa d...................... 171
Before driving off-road ...................170
Child-proof locks
Important safety notes ....................59
Rea rdoors ....................................... 59
Children
In the vehicle ................................... 48
Restraint systems ............................ 48
Child seat
Automatic recognition .....................50
ISOFIX .............................................. 51
On the front-passenger sea t............ 49
Recommendations ...........................56
Suitable positions ............................ 54
Top Tether ....................................... 52
Troubleshooting ............................... 54
Chrome parts (cleaning instruc-
tions) .................................................. 299
Cigarette lighter ................................ 277
Climate control Auxiliary heating/ventilation .......... 126
Controlling automatically ...............130
Cooling with aird ehumidification..128
Demisting the windows .................. 132
Demisting the windscreen .............131
Important safety notes ..................124
Indicator lamp ................................ 130
Notes on using THERMATIC auto-
matic climate control .....................125
Overview of systems ......................124
Problems with "cooling with air
dehumidification" ........................... 130
Problem with the rear window
heating .......................................... 133
Setting the aird istribution.............131
Setting the airflow .........................131
Setting the airv ents...................... 139
Setting the temperature ................131
Switching air-recirculation mode
on/off ............................................ 133
Switching on/off ........................... 126
Switching residual hea ton/off ......133
Switching the rear window heat-
ing on/off ...................................... 1336
Index
Page 67 of 357

by braking and limiting the engine output until
the vehicle/trailer combination has stabi-
lised.
Trailer stabilisation is active above speeds of
about 60 km/h.
EBD (electronic brake force distribu-
tion)
i Observe the "Important safety notes" sec-
tion (Y page 60). G
WARNING
If EBDh as malfunctioned, the rear wheels can
still lock, e.g .unde rfull braking .This increa-
ses the risk of skidding and an accident.
You should therefore adapt your driving style
to the different handling characteristics. Have
the brake system checked at a qualified spe-
cialist workshop.
Observe information regarding indicator and
warning lamps (Y page 254) as well as dis-
play messages (Y page 231).
EBD monitors and controls the brake pres-
sure on the rear wheels to improve driving
stability while braking. ADAPTIVE BRAKE
ADAPTIVE BRAKE provides increased braking
safety. In addition to the braking function,
ADAPTIVE BRAKE also has the HOLD function
(Y page 196) and hill start assist
(Y page 145). Anti-theft systems
Immobiliser
X To activate: remove the key from the igni-
tion lock.
X To deactivate: switch on the ignition.
The immobiliser prevents your vehicle from
being started without the correct key. i
The immobiliser is always deactivated
when you start the engine. ATA (Anti-Theft Alarm system)
X
To prime: lock the vehicle with the key.
Indicator lamp :flashes. The alarm sys-
tem is primed after approximately
15 seconds.
X To deactivate: unlock the vehicle with the
key.
i If you then do not open a door or the rear
door, the alarm system switches back on
again after approximately 40 seconds.
X To stop the alarm: insert the key into the
ignition lock.
The alarm is switched off.
or
X Press the %or& button on the key.
The alarm is switched off.
Av isual and audible alarm is triggered if the
alarm system is primed and you open:
R a door
R a door using the emergency key element
R the rear door/tailgate
R the bonnet
The alarm is also triggered if:
R the position of the vehicle is changed
R a window is smashed
The alarm is not switched off, even if you
close the open door that has triggered it,
for example. 64
Anti-theft systemsSafety
Page 118 of 357
Before changing bulbs
Have the following bulbs changed at a quali-
fied specialist workshop:
R
additional turn signals in the exterio rmir-
rors
R third brake lamp
R main-beam/dipped-beam headlamps
(xenon bulbs)
R daytime driving lights
R licence plate lamp
i Individual segments of the licence plate
lamp LEDs may fail without a display mes-
sage appearing in the multifunction dis-
play. Regularly chec kthe licence plate
lighting. If necessary, visit a qualified spe-
cialist workshop.
You can replace the following bulbs:
R side lamps/parking lamps
R foglamp/cornering lamp with foglamp
function
R turn signal lamp (front)
R brake/tail lamp
R turn signal lamp (rear)
R tail lamp/parking lamp
R reversing lamp
R rear foglamp Overview of bulb replacement
–bulbs
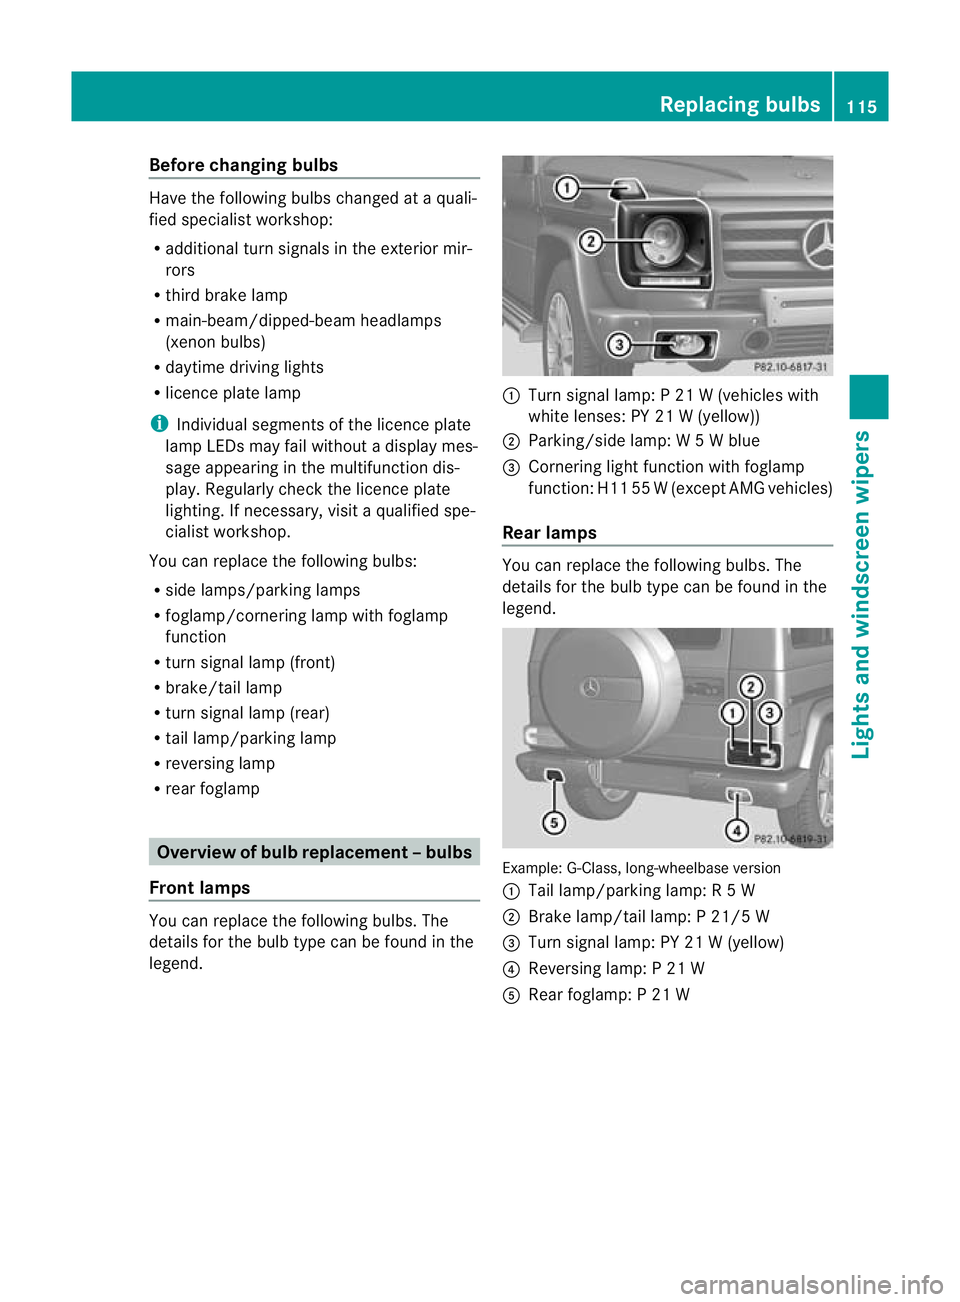
Front lamps You can replace the following bulbs. The
details for the bulb type can be found in the
legend. :
Turn signal lamp: P 21 W (vehicles with
white lenses: PY 21 W (yellow))
; Parking/side lamp: W 5Wblue
= Cornering light function with foglamp
function: H11 55 W(except AMG vehicles)
Rear lamps You can replace the following bulbs. The
details for the bulb type can be found in the
legend.
Example: G-Class, long-wheelbase version
:
Tail lamp/parking lamp: R 5W
; Brake lamp/tail lamp: P 21/5 W
= Turn signal lamp: PY 21 W (yellow)
? Reversing lamp: P 21 W
A Rear foglamp: P 21 W Replacing bulbs
115Lights and windscreen wipers Z
Page 154 of 357
Staying in neutral (N)
G
WARNING
If children are left unsupervised in the vehicle,
they could:
R open the doors, thus endangering other
people or road users.
R get out and disrupt traffic.
R operate the vehicle's equipment.
Additionally, children could set the vehicle in
motion if, for example, they:
R release the parking brake.
R shift the automatic transmission out of
parking position P.
R start the engine.
There is a risk of an accident and injury.
When leaving the vehicle, always take the key
with you and lock the vehicle. Never leave
children or animals unattended in the vehicle.
Always keep the key out of reach of children.
X Make sure the ignition is switched on.
X When the vehicle is stationary, depress the
brake pedal and keep it depressed.
X Select neutral N.
X Release the brake pedal.
X If the parking brake is applied, release it.
X Switch off the ignition and leave the key in
the ignition lock.
Shifting to transmission position D X
When the vehicle is stationary, depress the
brake pedal and keep it depressed.
X Push the selector lever back past the first
point of resistance.
Transmission position Dis engaged.
i For AMG vehicles: the ECO start/stop
function switches the engine off automati-
cally if the vehicle is braked to a standstill
when in transmission position Dand the
brake is still depressed (Y page 145). Transmission positions
B
Park position
This prevents the vehicle from roll-
ing away when stopped. Do not
shift the transmission into position
P(Y
page 149) unless the vehicle is
stationary.
i The key can only be removed if
the transmission is in position P.
When there is no key in the igni-
tion lock, the selector lever is
locked in position P.
Have the vehicle electronics
checked immediately at a qualified
specialist workshop. C
Reverse gear
Only shift the transmission to
R
when the vehicle is stationary. A
Neutral
No power is transmitted from the
engine to the drive wheels.
Releasing the brakes will allow you
to move the vehicle freely, e.g. to
push it or tow it.
Do not shift the transmission to N
while driving. Otherwise, the auto-
matic transmission could be dam-
aged.
If ESP ®
is deactivated or faulty:
only shift the transmission to posi-
tion Nif the vehicle is in danger of
skidding, e.g. on icy roads.
If you want to engage the transfer
case, shift briefly into N
(Y page 202).
! Rolling in neutral Ncan lead to
damage to the transmission. 7
Drive
The automatic transmission
changes gear automatically. All
forward gears are available. Automatic transmission
151Driving and parking Z
Page 156 of 357
Steering wheel gearshift paddles
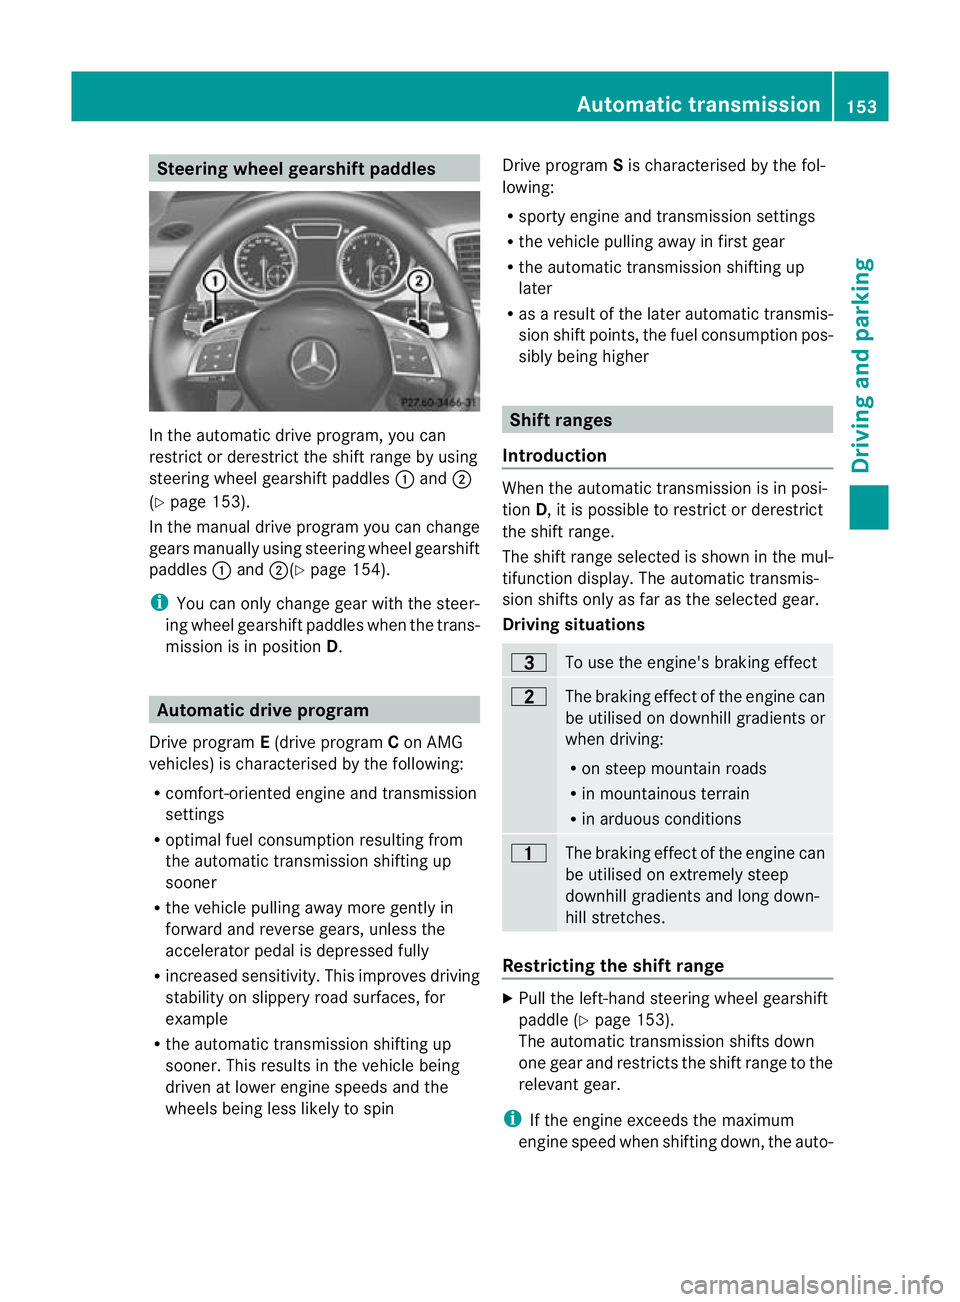
In the automatic drive program, you can
restrict or derestrict the shift range by using
steering wheel gearshift paddles :and ;
(Y page 153).
In the manual drive program you can change
gears manually using steering wheel gearshift
paddles :and ;(Y page 154).
i You can only change gear with the steer-
ing wheel gearshift paddles when the trans-
mission is in position D.Automatic drive program
Drive program E(drive program Con AMG
vehicles) is characterised by the following:
R comfort-oriented engine and transmission
settings
R optimal fuel consumption resulting from
the automatic transmission shifting up
sooner
R the vehicle pulling away more gently in
forward and reverse gears, unless the
accelerator pedal is depressed fully
R increased sensitivity. This improves driving
stability on slippery road surfaces, for
example
R the automatic transmission shifting up
sooner. This results in the vehicle being
driven at lower engine speeds and the
wheels being less likely to spin Drive program
Sis characterised by the fol-
lowing:
R sporty engine and transmission settings
R the vehicle pulling away in first gear
R the automatic transmission shifting up
later
R as a result of the later automatic transmis-
sion shift points, the fuel consumption pos-
sibly being higher Shift ranges
Introduction When the automatic transmission is in posi-
tion
D, it is possible to restrictord erestrict
the shift range.
The shift range selected is shown in the mul-
tifunction display. The automatic transmis-
sion shifts only as far as the selected gear.
Driving situations =
To use the engine's brakin
geffect 5
The braking effect of the engine can
be utilised on downhill gradients or
whe
ndriving:
R on steep mountai nroads
R in mountainous terrain
R in arduous conditions 4
The braking effect of the engine can
be utilised on extremely steep
downhill gradients and long down-
hill stretches.
Restricting the shift range
X
Pull the left-hand steerin gwheel gearshift
paddle (Y page 153).
The automatic transmission shifts down
one gear and restricts the shift range to the
relevant gear.
i If the engine exceeds the maximum
engine speed when shifting down, the auto- Automatic transmission
153Driving and parking Z
Page 157 of 357
matic transmission protects against engine
damage by not shifting down.
i If the maximu mengine speed for the shift
range is reached and you continue to accel-
erate, the automatic transmission shifts up
in order to prevent the engine from over-
revving, eve nifthe shift range is restricted.
Extending the shift range X
Pull the right-hand steering wheel gearshift
paddle (Y page 153).
The automatic transmission shifts up one
gear and restricts the shift range to the rel-
evant gear.
Clearing the shift range restriction X
Pull and hold the right-hand steering wheel
gearshift paddle (Y page 153) untilDis
shown again in the multifunction display.
The automatic transmission shifts from the
current shift range directly to D.
Selecting the ideal shift range X
Pull the left-hand steering wheel gearshift
paddle (Y page 153) and hold it in position.
The automatic transmission shifts to the
gear which allows optimum acceleration
and deceleration. To do this, the automatic
transmission shifts down one or more
gears.
i The automatic transmission cannot shift
down beyond second gear. To shift to first
gear, you have to pull the left steering
wheel gearshift paddle. Manual drive program
Introduction In drive program
M, you can change gear
manually using the steering wheel gearshift
paddles. For this, the transmission must be in
position D.The gear currently selected and engaged is shown in the multifunction dis-
play.
Manual drive program
Mdiffers from drive
programs Eand Swith regard to spontaneity,
responsiveness and smoothness of gear
changes.
Activating the manual drive program X
Press the program selector button
(Y page 152) repeatedly until Mappears in
the multifunction display.
Upshifting (except AMG vehicles) X
Pull the right-hand paddle (Y page 153).
The automatic transmission shifts up to the
next gear.
Upshifting (AMG vehicles) !
In manual gearshift program M, the auto-
matic transmission does not shift up auto-
matically even when the engine limiting
speed for the current gear is reached.
When the engine limiting speed is reached,
the fuel supply is cut to prevent the engine
from overrevving. You must make sure that
the engine speed does not reach the red
area of the rev counter. Otherwise, there is
a risk of engine damage.
X Pull the right-hand paddle (Y page 153).
The automatic transmission shifts up to the
next gear.
Before the engine speed reaches the red area,
an upshift indicator will be shown in the mul-
tifunction display.
X If the colour in the speedometer multifunc-
tion display changes to red and the UP dis-
play message is shown, shift up a gear.
Downshifting X
Pull the left-hand paddle (Y page 153).
The automatic transmission shifts down to
the next gear. 154
Automatic transmissionDriving and parking
Page 173 of 357
R
Chec kthat items of luggage and loads are
stowed safely and are well secured
(Y page 271).
R To avoid damaging the vehicle, make sure
there is always sufficient ground clearance.
R Always keep the engine running and in gear
when driving on a downhill gradient.
R Always keep the engine running and in gear
when driving on a slope.
R Drive slowly and evenly, if necessary at
walking pace.
R Ensure that the wheels are in contact with
the ground at all times.
R Drive with extreme care on unknown off-
road routes where visibility is poor. For
safety reasons, get out of the vehicle first
and survey the off-road route.
R Check the depth of water before fording
rivers and streams.
R When fording, do not stop and do not
switch off the engine.
R Look out for obstacles such as rocks, holes,
tree stumps and furrows.
R Always keep the doors, the rear door or
tailgate (G-Class Cabriolet), the side win-
dows and the sliding sunroof closed while
the vehicle is in motion.
R Switch off cruise control and variable
SPEEDTRONIC.
R Do not stray from marked routes or paths.
R Adapt your speed to the terrain. The
rougher, steeper or more ruts on the ter-
rain, the slower your speed should be.
R Drive slowly and at a constant speed
through the water. Ensure that a bow wave
does not form as you drive.
R On sand, drive quickly to overcome the roll-
ing resistance. Otherwise, the vehicle could
dig itself into the sand.
R Do not jump with the vehicle as this will
interrupt the vehicle's propulsion. R
Avoid high engine speeds. Drive at appro-
priate engine speeds.
R Always check the vehicle for damage after
off-road driving.
i Information about retrofitting special all-
terrain tyres is available from any qualified
specialist workshop.
i Do not use the HOLD function when driv-
ing off-road, on steep uphill or downhill gra-
dients or on slippery or loose surfaces. The
HOLD function cannot hold the vehicle on
such surfaces.
Checklist before driving off-road !
If the engine oil warning lamp lights up
during the journey, stop the vehicle in a
safe place as soon as is possible. Check the
engine oil level. The warning given by the
engine oil warning light must not be
ignored. Continuing your journey when the
symbol is shown may result in engine dam-
age.
X Engine oil level: check the engine oil and
top it up if necessary.
Only then does the engine receive enough
oil when the vehicle is standing on a steep
incline.
X G3 50 BlueTEC: have the AdBlue ®
level
checked at a qualified specialist workshop
(Y page 160).
X Tyre-change tool kit: check that the jack
is working and make sure you have the
wheelbrace, a robust tow cable and a fold-
ing spade in the vehicle.
X Wheels and tyres: check the tyre tread
depth and tyre pressure.
X Check for damage and remove any foreign
objects, e.g. small stones, from the
wheels/tyres.
X Replace any missing valve caps.
X Replace dented or damaged wheels.
X Carry a sound spare wheel. 170
Driving tipsDriving and parking
Page 204 of 357
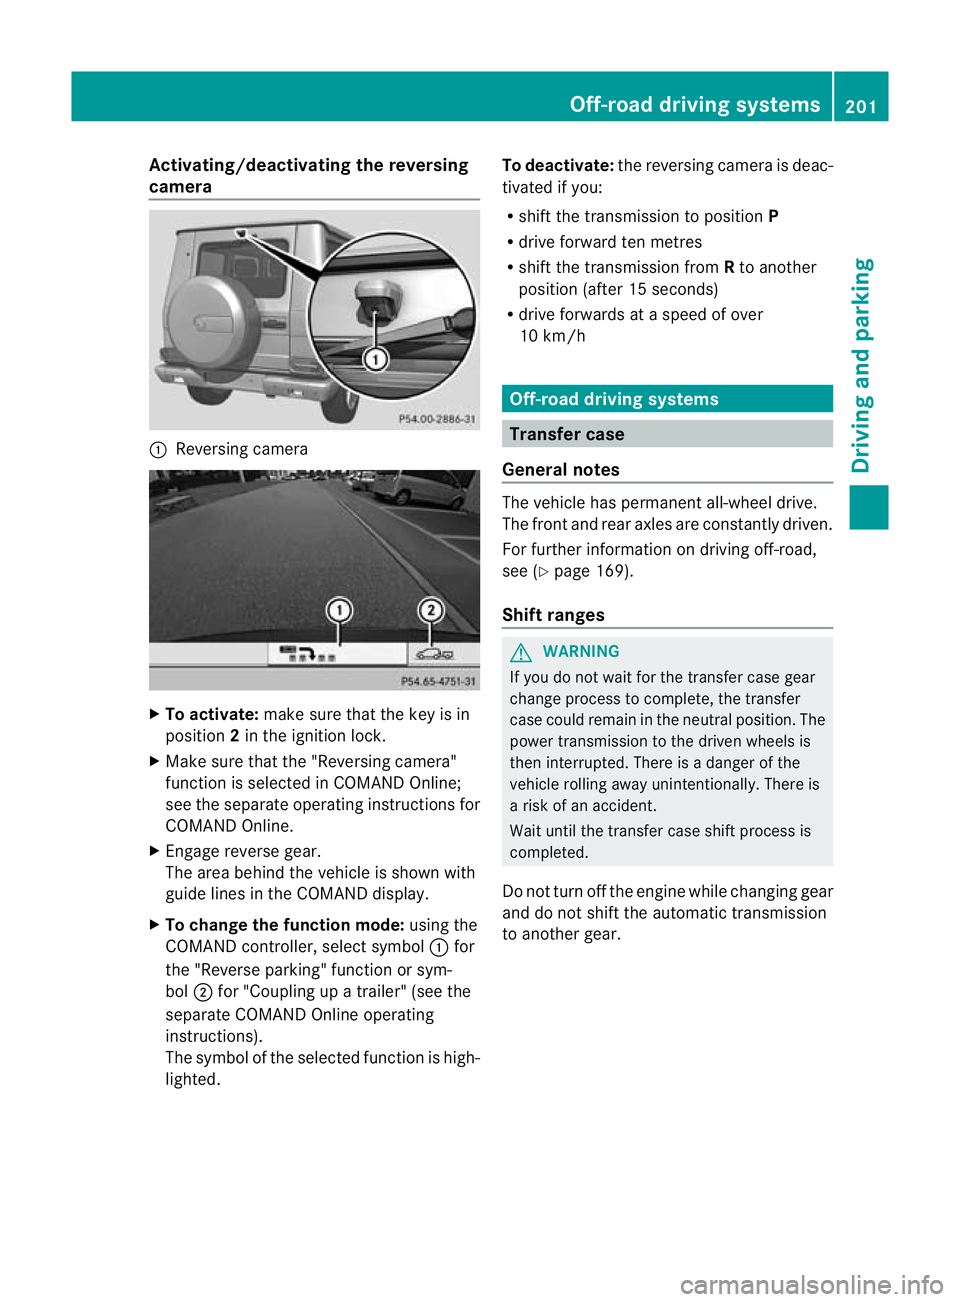
Activating/deactivating the reversing
camera
:
Reversing camera X
To activate: make sure that the key is in
position 2in the ignition lock.
X Make sure that the "Reversing camera"
function is selected in COMAND Online;
see the separate operating instructions for
COMAND Online.
X Engage reverse gear.
The area behind the vehicle is shown with
guide lines in the COMAND display.
X To change the function mode: using the
COMAND controller, select symbol :for
the "Reverse parking" function or sym-
bol ;for "Coupling up a trailer" (see the
separate COMAND Online operating
instructions).
The symbol of the selected function is high-
lighted. To deactivate:
the reversing camera is deac-
tivated if you:
R shif tthe transmission to position P
R drive forward ten metres
R shift the transmission from Rto another
position (after 15 seconds)
R drive forwards at a speed of over
10 km/h Off-road driving systems
Transfer case
General notes The vehicle has permanent all-wheel drive.
The front and rear axles are constantly driven.
For further information on driving off-road,
see (Y
page 169).
Shift ranges G
WARNING
If you do not wait for the transfer case gear
change process to complete, the transfer
case could remain in the neutral position. The
power transmission to the driven wheels is
then interrupted. There is a danger of the
vehicle rolling away unintentionally. There is
a risk of an accident.
Wait until the transfer case shift process is
completed.
Do not turn off the engine while changing gear
and do not shift the automatic transmission
to another gear. Off-road driving systems
201Driving and parking Z