2012 MERCEDES-BENZ G-CLASS SUV ESP
[x] Cancel search: ESPPage 66 of 357

Traction control brakes the drive wheels indi-
vidually if they spin. This enables you to pull
away and accelerate on slippery surfaces, for
example if the road surface is slippery on one
side. In addition, more drive torque is trans-
ferred to the wheel or wheels with traction.
Deactivating/activating ESP ®G
WARNING
If you deactivate ESP ®
, ESP ®
no longer sta-
bilises the vehicle. There is an increased risk
of skidding and an accident.
Only deactivate ESP ®
in the situations descri-
bed in the following. X
To deactivate: press button:until the
å warning lamp lights up in the instru-
ment cluster.
X To activate: press button :until the
å warning lamp goes out in the instru-
ment cluster.
ESP ®
is activated automatically when the
engine is started.
i Vehicles with the ECO start/stop func-
tion: the ECO start/stop function automat-
ically switches the engine off when the
vehicle comes to a stop. When pulling away
again, the engine starts automatically.
ESP ®
remains in its previously selected sta-
tus. Example: if ESP ®
was deactivated
before the engine was switched off, ESP ®
remains deactivated when the engine is
switched on again. It may be best to deactivate ESP
®
in the fol-
lowing situations:
R when using snow chains
R in deep snow
R on sand or gravel
If you deactivate ESP ®
:
R ESP ®
no longer improves driving stability.
R the engine's torque is no longer limited, and
the drive wheels can spin. The spinning of
the wheels results in a cutting action, which
provides better grip.
R traction control is still activated.
R ESP ®
still provides support if you brake.
R and are driving at above 60 km/h, ESP ®
still intervenes when one wheel reaches its
grip limit even though it is switched off.
i If ESP ®
is deactivated and one or more
wheels start to spin, the ÷warning lamp
in the instrument cluster flashes. In such
situations, ESP ®
will not stabilise the vehi-
cle.
Trailer stabilisation G
WARNING
If road and weather conditions are poor,
trailer stabilisation will not be able to prevent
the vehicle/trailer combination from swerv-
ing. Trailers with a high centre of gravity can
tip over before ESP ®
can detect this. There is
a risk of an accident.
Always adapt your driving style to the prevail-
ing road and weather conditions.
Trailer stabilisation does not work if ESP ®
is
deactivated or disabled because of a mal-
function.
If your vehicle/trailer combination begins to
lurch, you can only stabilise the vehicle/
trailer combination by depressing the brake
firmly.
In this situation, ESP ®
assists you and can
detect if the vehicle/trailer combination
begins to lurch. ESP ®
slows the vehicle down Driving safety systems
63Safety Z
Page 73 of 357
neously for approximately si
xseconds until
battery chec klamp :flashes twice.
The key now functions as follows:
X To unlock the driver's door and fuel
filler flap: press the%button once.
X To unlock centrally: press the%but-
ton twice.
X To lock centrally: press the&button. Restoring factor
ysettings X
Press the %and& buttons simulta-
neously for approximately six seconds until
battery check lamp :flashes twice. Emergency key element
General notes If the vehicle can no longer be unlocked with
the key, use the emergency key element.
If you use the emergency key element to
unlock and open the driver's door, the anti-
theft alarm system will be triggered
(Y page 64).
There are several ways to tur noff the alarm:
X Press the %or& button on the key.
or
X Insert the key into the ignition lock.
If you unlock the vehicle using the emergency
key element, the fuel filler flap will not be
unlocked automatically. X
To unlock the fuel filler flap: insert the
key into the ignition lock.
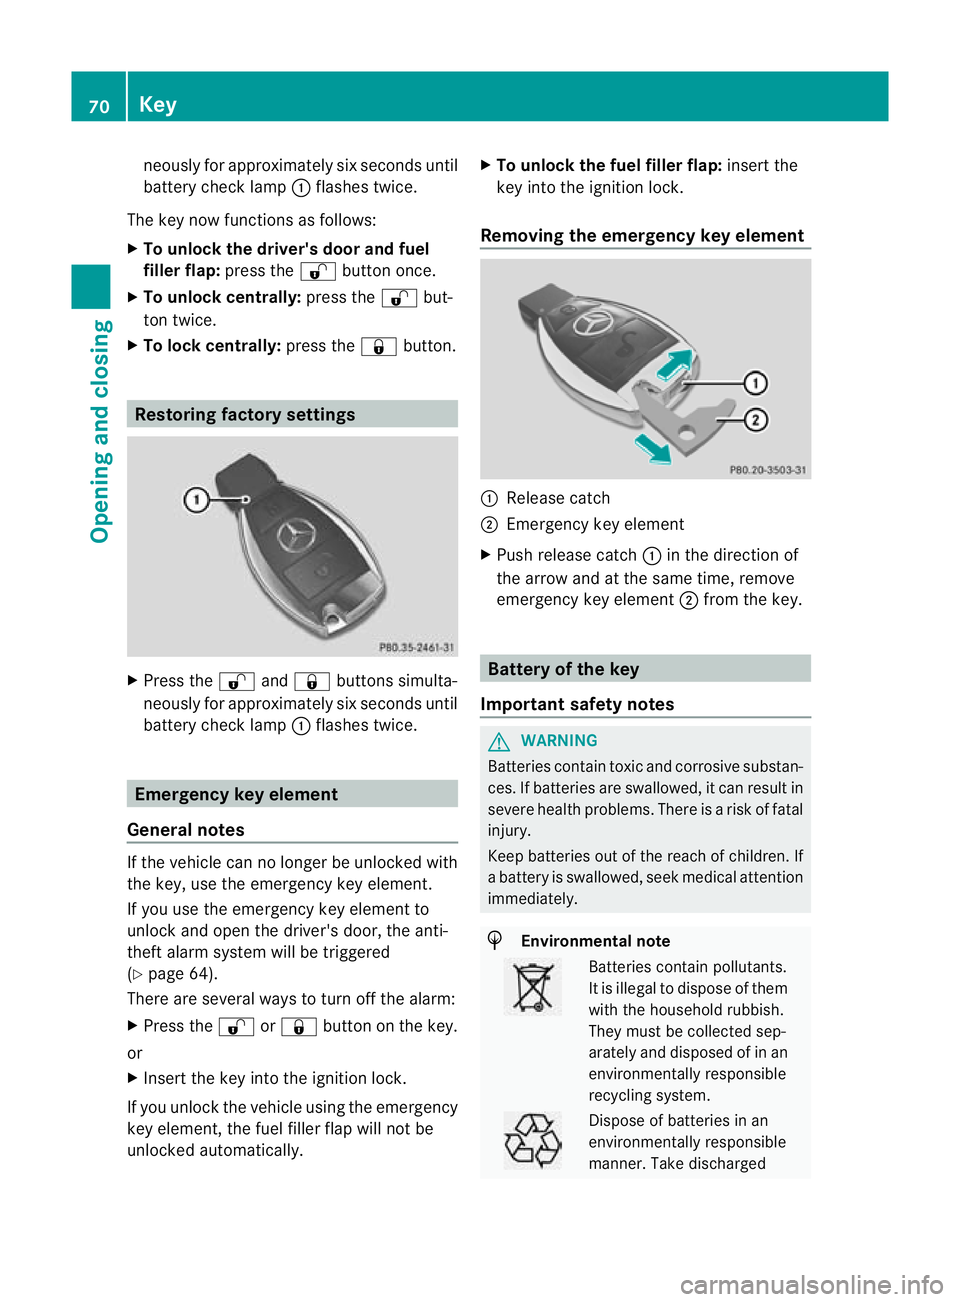
Removing the emergency key element :
Release catch
; Emergency key element
X Push release catch :in the direction of
the arrow and at the same time, remove
emergency key element ;from the key. Battery of the key
Important safety notes G
WARNING
Batteries contain toxic and corrosive substan-
ces. If batteries are swallowed, it can result in
severe health problems. There is a risk of fatal
injury.
Keep batteries out of the reach of children. If
a battery is swallowed, seek medical attention
immediately. H
Environmental note Batteries contain pollutants.
It is illegal to dispose of them
with the household rubbish.
They must be collected sep-
arately and disposed of in an
environmentally responsible
recycling system.
Dispose of batteries in an
environmentally responsible
manner. Take discharged70
KeyOpening and closing
Page 80 of 357
X
Pull handle Bupwards and push down the
tailgate. Closing
X Fold the tailgate upwards.
The tailgate engages audibly.
X If necessary, lock the vehicle with the
& button on the key.
X Zip up the tonneau cover.
X Turn the quick-release fasteners to the left.
X Swing the spare wheel bracket to the left
until it sits on the tailgate.
X Press the lever to the right until the retain-
ing hook engages audibly. Side windows
Important safety notes
G
WARNING
While opening the side windows, body parts
could become trapped between the side win-
dow and the door frame as the side window
moves. There is a risk of injury.
Make sure that nobody touches the side win-
dow during the opening procedure. If some-
body becomes trapped, release the switch or
pull the switch to close the side window again. G
WARNING
While opening the side windows, body parts
in the closing area could become trapped.
There is a risk of injury.
Make sure that no body parts are in close
proximity during the closing procedure. If
somebody becomes trapped, release the
switch or press the switch to open the side
window again. G
WARNING
If children operate the side windows they
could become trapped, particularly if they are
left unsupervised. There is a risk of injury. Activate the override feature for the rear side
windows. When leaving the vehicle, always
take the key with you and lock the vehicle.
Never leave children unattended in the vehi-
cle.
G
WARNING
If children are left unsupervised in the vehicle,
they could:
R open the doors, thus endangering other
people or road users.
R get out and disrupt traffic.
R operate the vehicle's equipment.
Additionally, children could set the vehicle in
motion if, for example, they:
R release the parking brake.
R shift the automatic transmission out of
parking position P.
R shift the manual transmission into neutral.
R start the engine.
There is a risk of an accident and injury.
When leaving the vehicle, always take the key
with you and lock the vehicle. Never leave
children or animals unattended in the vehicle.
Always keep the key out of reach of children. Opening and closing the side win-
dows
The switches for all side windows are located
on the driver's door. There is also a switch on
each door for the corresponding side window.
The switches on the driver's door take prec-
edence. Side windows
77Opening and closing Z
Page 81 of 357
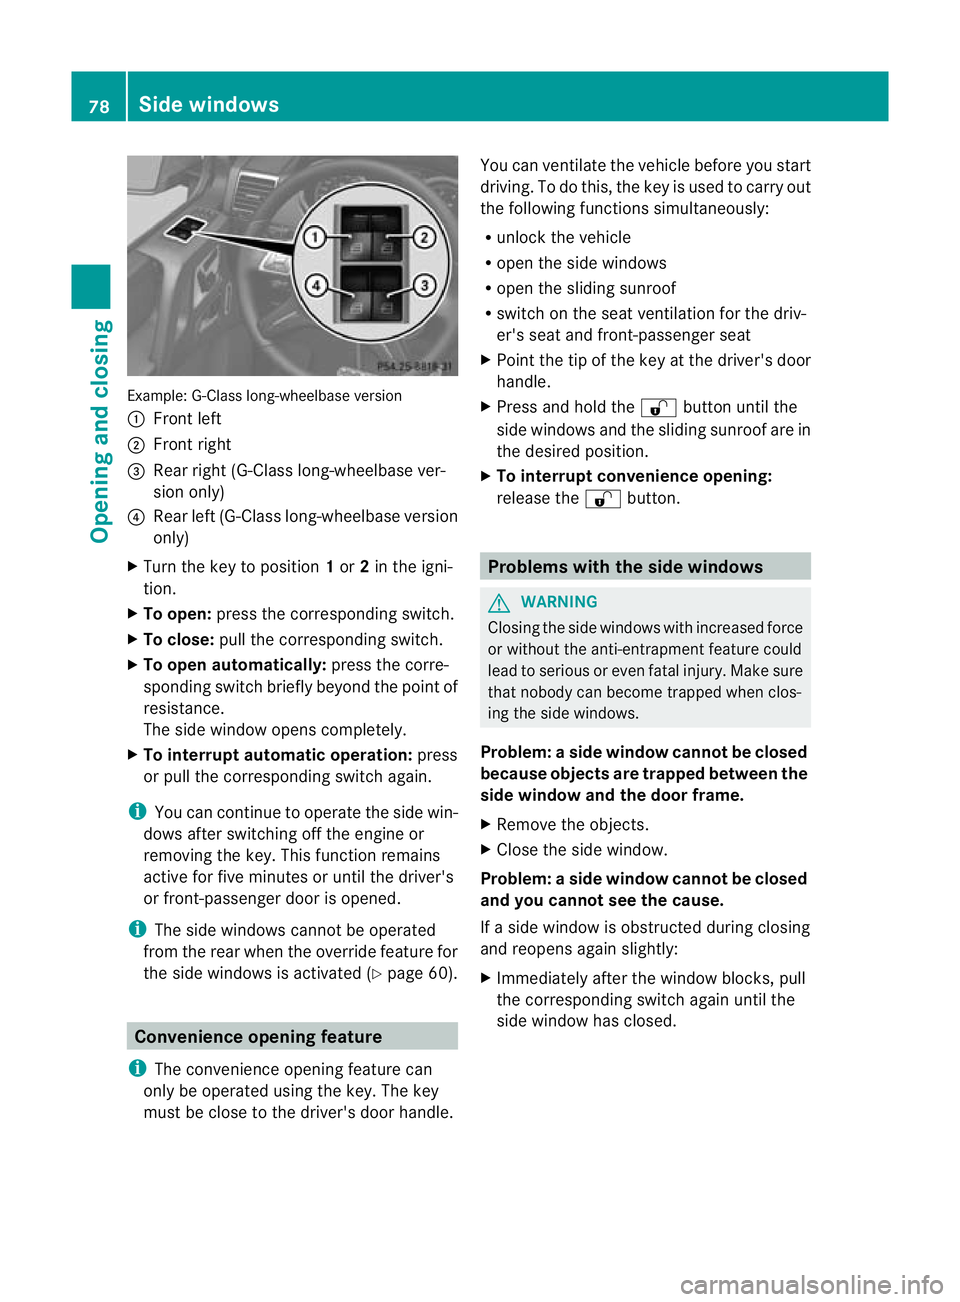
Example: G-Class long-wheelbase version
: Front left
; Front right
= Rear right (G-Class long-wheelbase ver-
sion only)
? Rear left (G-Class long-wheelbase version
only)
X Turn the key to position 1or 2in the igni-
tion.
X To open: press the corresponding switch.
X To close: pull the corresponding switch.
X To open automatically: press the corre-
sponding switch briefly beyond the point of
resistance.
The side window opens completely.
X To interrupt automatic operation: press
or pull the corresponding switch again.
i You can continue to operate the side win-
dows after switching off the engine or
removing the key. This function remains
active for five minutes or until the driver's
or front-passenger door is opened.
i The side windows canno tbe operated
from the rear when the override feature for
the side windows is activated (Y page 60).Convenience opening feature
i The convenience opening feature can
only be operated using the key. The key
must be close to the driver's door handle. You can ventilate the vehicle before you start
driving. To do this, the key is used to carry out
the following functions simultaneously:
R unlock the vehicle
R open the side windows
R open the sliding sunroof
R switch on the seat ventilation for the driv-
er's seat and front-passenger seat
X Point the tip of the key at the driver's door
handle.
X Press and hold the %button until the
side windows and the sliding sunroof are in
the desired position.
X To interrupt convenience opening:
release the %button. Problems with the side windows
G
WARNING
Closing the side windows with increased force
or without the anti-entrapment feature could
lead to serious or even fatal injury. Make sure
that nobody can become trapped when clos-
ing the side windows.
Problem: aside window cannot be closed
because objects are trapped between the
side window and the door frame.
X Remove the objects.
X Close the side window.
Problem :aside window cannot be closed
and you cannot see the cause.
If a side window is obstructed during closing
and reopens again slightly:
X Immediately afte rthe window blocks, pull
the corresponding switch again until the
side window has closed. 78
Side windowsOpening and closing
Page 82 of 357
If a side window is obstructed again during
closing and reopens again slightly:
X Immediately after the window blocks, pull
the corresponding switch again until the
side window has closed.
i If a side window no longer opens or closes
due to a malfunction, contact a qualified
specialist workshop. Sliding sunroof
Important safety notes
G
WARNING
While opening and closing the sliding sunroof,
body parts in close proximity could become
trapped .There is a risk of injury.
Make sure that no body parts are in close
proximity during the opening and closing pro-
cedures.
If somebody becomes trapped:
R release the switch immediately, or
R during automatic operation, push the
switch briefly in any direction
The opening or closing procedure will be stop-
ped. G
WARNING
If children operate the sliding sunroof they
could become trapped, particularly if they are
left unsupervised. There is a risk of injury.
When leaving the vehicle, always take the key
with you and lock the vehicle. Never leave
children unattended in the vehicle.
! Only open the panorama sliding sunroof
if it is free of snow and ice. Otherwise, mal-
functions may occur.
Do not allow anything to protrude from the
sliding sunroof. Otherwise, the seals could
be damaged.
i Resonance noises can occur in addition
to the usual airflow noises when the sliding
sunroof is open. They are caused by minor
pressure fluctuations in the vehicle interior. Change the position of the sliding sunroof
or open a side window slightly to reduce or
eliminate these noises. Opening and closing the sliding sun-
roof
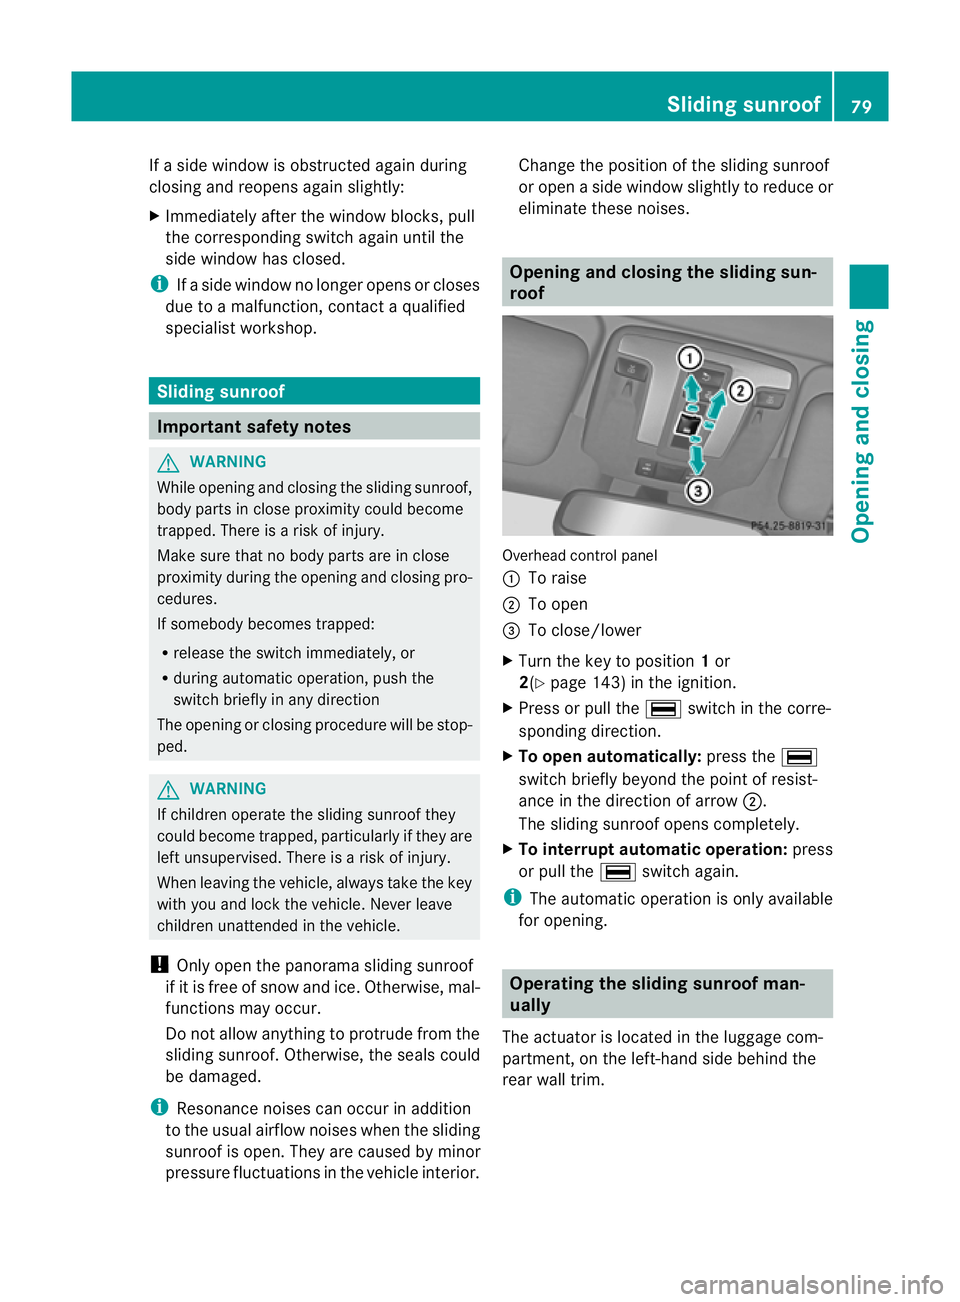
Overhead control panel
:
To raise
; To open
= To close/lower
X Turn the key to position 1or
2(Y page 143) in the ignition.
X Press or pull the ¡switch in the corre-
sponding direction.
X To open automatically: press the¡
switch briefly beyond the point of resist-
ance in the direction of arrow ;.
The sliding sunroof opens completely.
X To interrupt automatic operation: press
or pull the ¡switch again.
i The automatic operation is only available
for opening. Operating the sliding sunroof man-
ually
The actuator is located in the luggage com-
partment, on the left-hand side behind the
rear wall trim. Sliding sunroof
79Opening and closing Z
Page 88 of 357
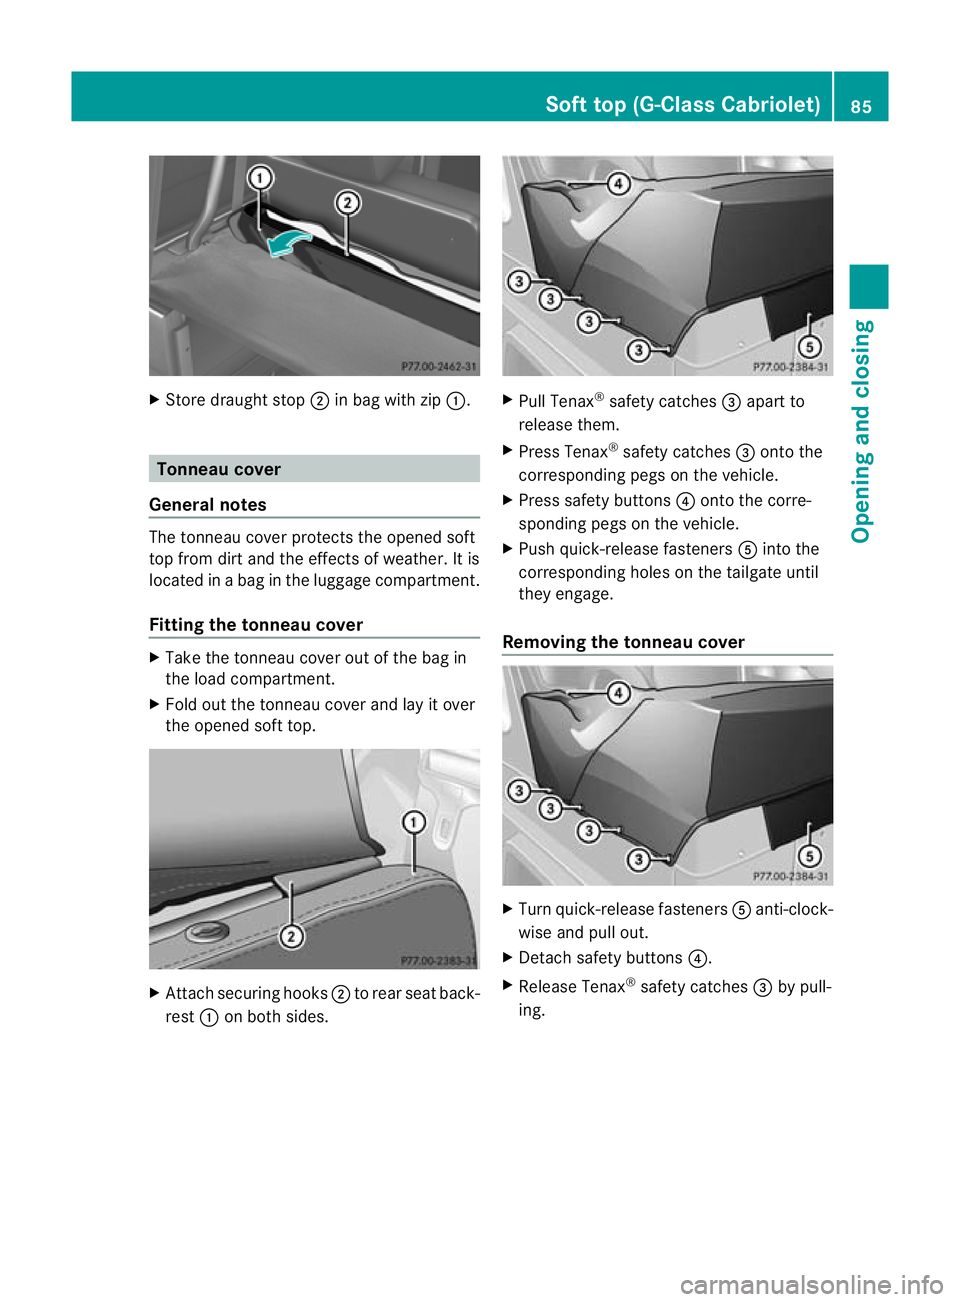
X
Store draught stop ;in bag with zip :. Tonneau cover
General notes The tonneau cove
rprotects the opened soft
top from dirt and the effects of weather. It is
located in a bag in the luggage compartment.
Fitting the tonneau cover X
Take the tonneau cover out of the bag in
the load compartment.
X Fold out the tonneau cover and lay it over
the opened soft top. X
Attach securing hooks ;to rear seat back-
rest :on both sides. X
Pull Tenax ®
safety catches =apart to
release them.
X Press Tenax ®
safety catches =onto the
corresponding pegs on the vehicle.
X Press safety buttons ?onto the corre-
sponding pegs on the vehicle.
X Push quick-release fasteners Ainto the
corresponding holes on the tailgate until
they engage.
Removing the tonneau cover X
Turn quick-release fasteners Aanti-clock-
wise and pull out.
X Detach safety buttons ?.
X Release Tenax ®
safety catches =by pull-
ing. Soft top (G-Class Cabriolet)
85Opening and closing Z
Page 105 of 357
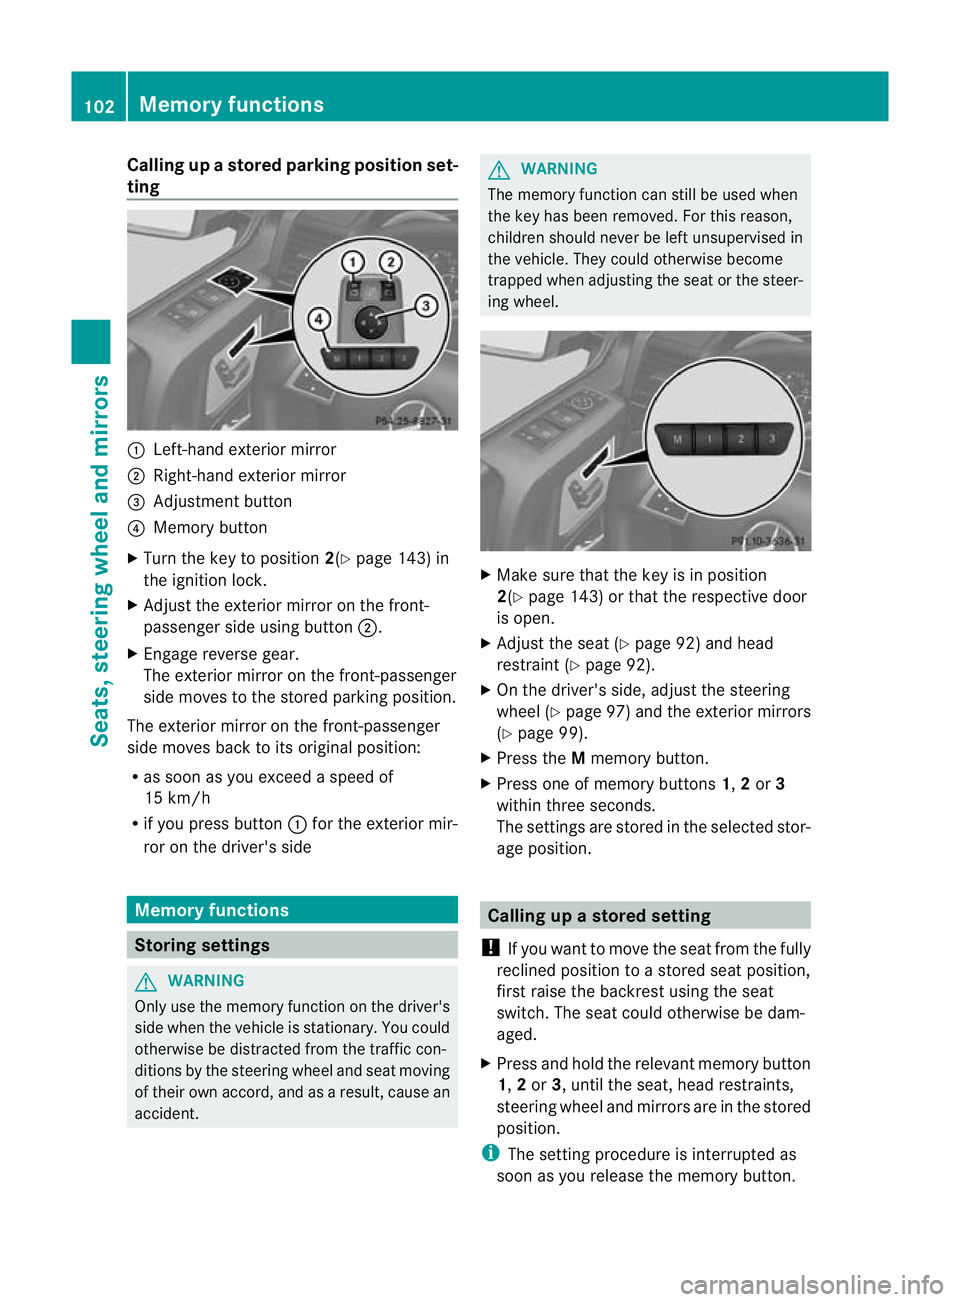
Calling up
astore dparking position set-
ting :
Left-hand exterior mirror
; Right-hand exterio rmirror
= Adjustment button
? Memory button
X Turn the key to position 2(Ypage 143) in
the ignition lock.
X Adjust the exterior mirror on the front-
passenger side using button ;.
X Engage reverse gear.
The exterior mirror on the front-passenger
side moves to the stored parking position.
The exterior mirror on the front-passenger
side moves back to its original position:
R as soon as you exceed a speed of
15 km/h
R if you press button :for the exterior mir-
ror on the driver's side Memory functions
Storing settings
G
WARNING
Only use the memory function on the driver's
side when the vehicle is stationary. You could
otherwise be distracted from the traffic con-
ditions by the steering wheel and seat moving
of their own accord, and as a result, cause an
accident. G
WARNING
The memory function can still be used when
the key has been removed. For this reason,
children should never be left unsupervised in
the vehicle. They could otherwise become
trapped when adjusting the seat or the steer-
ing wheel. X
Make sure that the key is in position
2(Y page 143) or that the respective door
is open.
X Adjust the seat (Y page 92) and head
restraint (Y page 92).
X On the driver's side, adjust the steering
wheel (Y page 97) and the exterior mirrors
(Y page 99).
X Press the Mmemory button.
X Press one of memory buttons 1,2or 3
within three seconds.
The settings are stored in the selected stor-
age position. Calling up
astore dsetting
! If you want to move the seat from the fully
reclined position to a stored seat position,
first raise the backres tusing the seat
switch. The seat could otherwise be dam-
aged.
X Press and hold the relevant memory button
1, 2or 3, until the seat, head restraints,
steering wheel and mirrors are in the stored
position.
i The setting procedure is interrupted as
soon as you release the memory button. 102
Memory functionsSeats, steering wheel and mirrors
Page 109 of 357
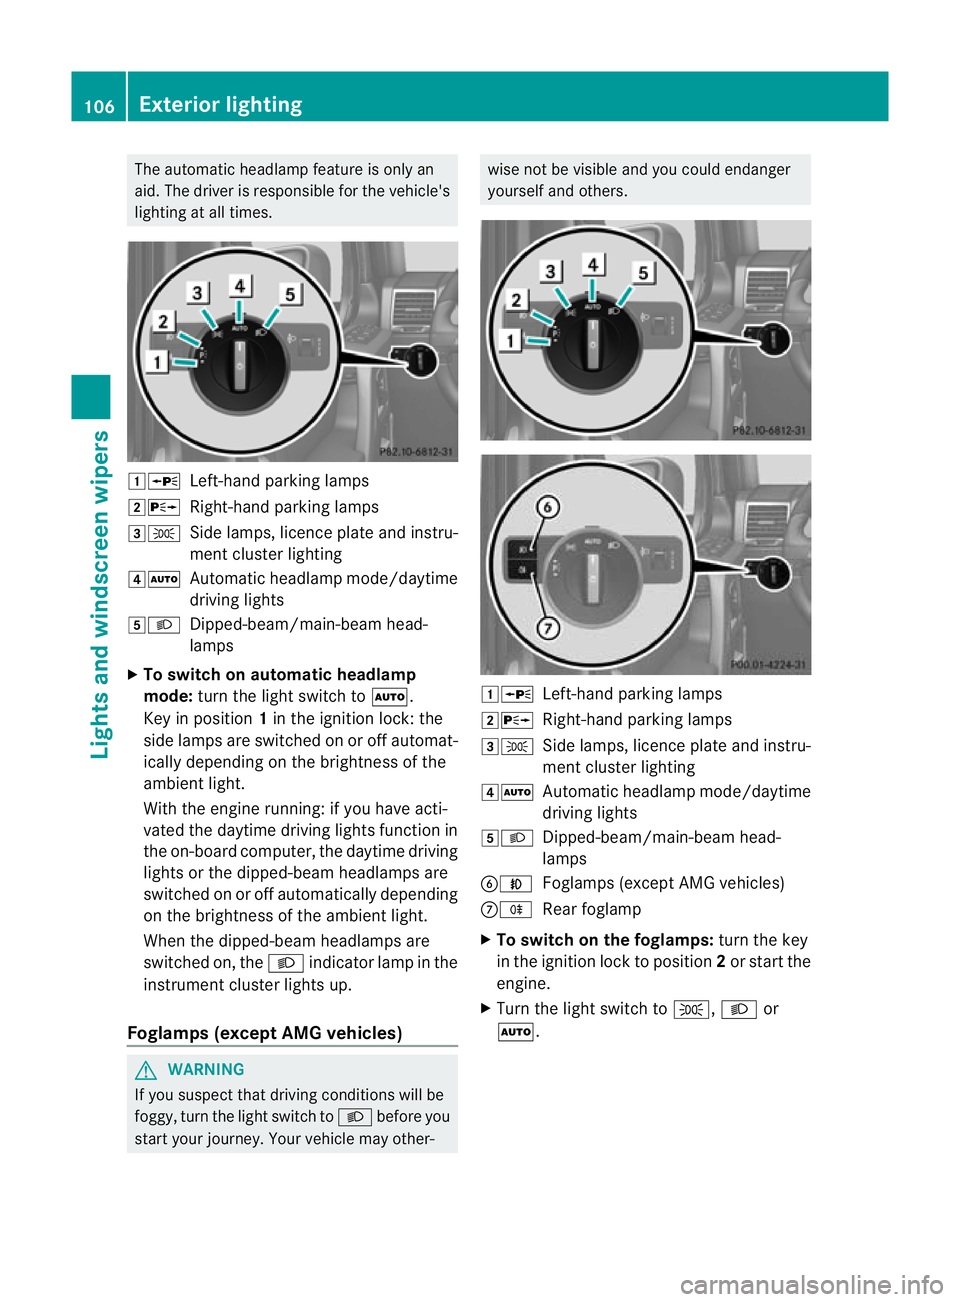
The automatic headlamp feature is only an
aid. The driver is responsible for the vehicle's
lighting at all times. 1W
Left-hand parking lamps
2X Right-hand parking lamps
3T Side lamps, licence plate and instru-
ment cluster lighting
4Ã Automatic headlamp mode/daytime
driving lights
5L Dipped-beam/main-beam head-
lamps
X To switch on automatic headlamp
mode: turn the light switch to Ã.
Key in position 1in the ignition lock: the
side lamps are switched on or off automat-
ically depending on the brightness of the
ambient light.
With the engine running: if you have acti-
vated the daytime driving lights function in
the on-board computer, the daytime driving
lights or the dipped-beam headlamps are
switched on or off automatically depending
on the brightness of the ambient light.
When the dipped-beam headlamps are
switched on, the Lindicator lamp in the
instrument cluster lights up.
Foglamps (except AMG vehicles) G
WARNING
If you suspect that driving conditions will be
foggy, turn the light switch to Lbefore you
start your journey. Your vehicle may other- wise not be visible and you could endanger
yourself and others.
1W
Left-hand parking lamps
2X Right-hand parking lamps
3T Side lamps, licence plate and instru-
ment cluster lighting
4Ã Automatic headlamp mode/daytime
driving lights
5L Dipped-beam/main-beam head-
lamps
BN Foglamps (except AMG vehicles)
CR Rear foglamp
X To switch on the foglamps: turn the key
in the ignition lock to position 2or start the
engine.
X Turn the light switch to T,Lor
Ã. 106
Exterior lightingLights and windscreen wipers