2012 MERCEDES-BENZ CLS SHOOTING BRAKE start stop button
[x] Cancel search: start stop buttonPage 232 of 405
X
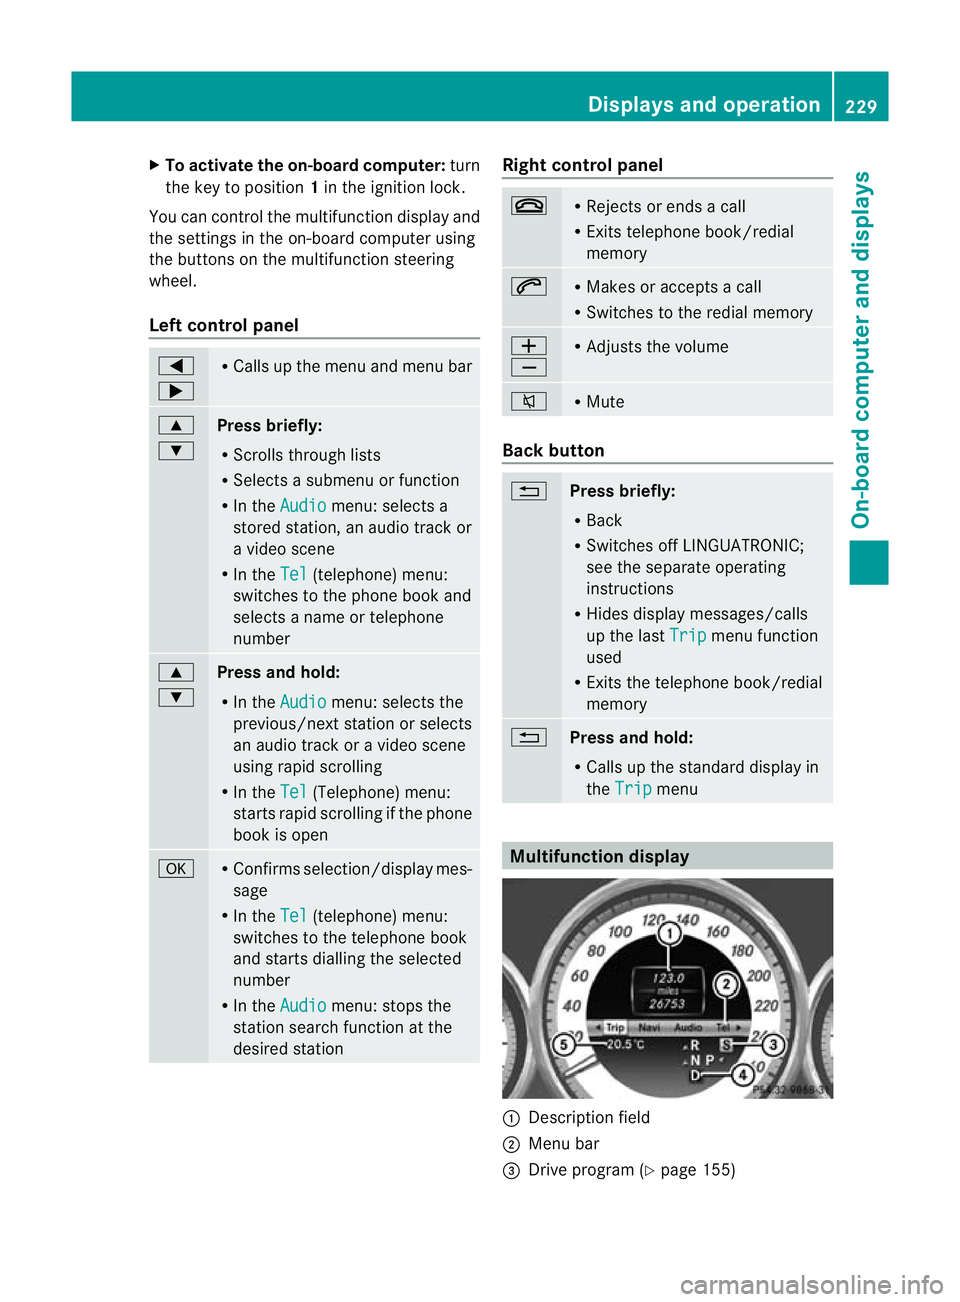
To activate the on-board computer: turn
the key to position 1in the ignition lock.
You can control the multifunctio ndisplay and
the settings in the on-board computer using
the buttons on the multifunction steering
wheel.
Left control panel =
; R
Calls up the menu and menu bar 9
:
Press briefly:
R
Scrolls through lists
R Selects a submenu or function
R In the Audio menu: selects a
stored station, an audio track or
a video scene
R In the Tel (telephone) menu:
switches to the phone book and
selects a name or telephone
number 9
:
Press and hold:
R
In the Audio menu: selects the
previous/next station or selects
an audio track or a video scene
using rapid scrolling
R In the Tel (Telephone) menu:
starts rapid scrolling if the phone
book is open a R
Confirms selection/display mes-
sage
R In the Tel (telephone) menu:
switches to the telephone book
and starts dialling the selected
number
R In the Audio menu: stops the
station search function at the
desired station Righ
tcontrol panel ~ R
Rejects or ends a call
R Exits telephone book/redial
memory 6 R
Makes or accepts a call
R Switches to the redial memory W
X R
Adjusts the volume 8 R
Mute Back button
%
Press briefly:
R
Back
R Switches off LINGUATRONIC;
see the separate operating
instructions
R Hides display messages/calls
up the last Trip menu function
used
R Exits the telephone book/redial
memory %
Press and hold:
R
Calls up the standard display in
the Trip menu
Multifunction display
:
Description field
; Menu bar
= Drive program (Y page 155) Displays and operation
229On-board computer and displays Z
Page 233 of 405
?
Transmission position (Y page 155)
A Permanen tdisplay: outside temperature
or speed (Y page 239)
X To show the menu bar ;:press the
= or; button on the steerin gwheel.
Menu bar ;disappears after a few seconds.
Text field :shows the selected menu or
submenu as well as display messages.
The following messages can appearint he
multifunction display:
XjY Active Parking Assist
(Ypage 194)
¯ Cruise control (Y page 171)
È SPEEDTRONIC (Y page 174)
_ Adaptive Highbeam Assist
(Ypage 121)
À ATTENTION ASSIST
(Ypage 202)
¤ ECO start/stop function
(Ypage 150)
Ä Speed Limit Assist
(Ypage 204)
à Lane Keeping Assist
(Ypage 210)
à Active Lane Keeping Assist
(Ypage 215)
ë HOLD function (Y page 186)
Ä PRE-SAFE®
Brake (Y page 70)
120 km/h! Maximum permissible speed
exceeded (only for certain coun-
tries)
Menus and submenus
Menu overview
Press the =or; button on the steer-
ing wheel to call up the menu bar and select
a menu.
Operating the on-board computer
(Y page 228). Depending on the equipment fitted in the
vehicle, you can call up the following menus:
R
Trip menu (Y
page 230)
R Navi menu (navigation instructions)
(Y page 232)
R Audio menu (Y
page 233)
R Tel menu (telephone) (Y
page 235)
R Assist. menu (assistance) (Y
page 236)
R Serv. menu (Y
page 239)
R Settings menu (Y
page 239)
R AMG menu in AMG vehicles (Y
page 246)
The Audio ,
Navi and
Tel menus differ slightly
in vehicles with an audio system and in vehi-
cles with COMAND Online. The examples
given in this Owner's Manual apply to vehicles
equipped with COMAND Online. Trip menu
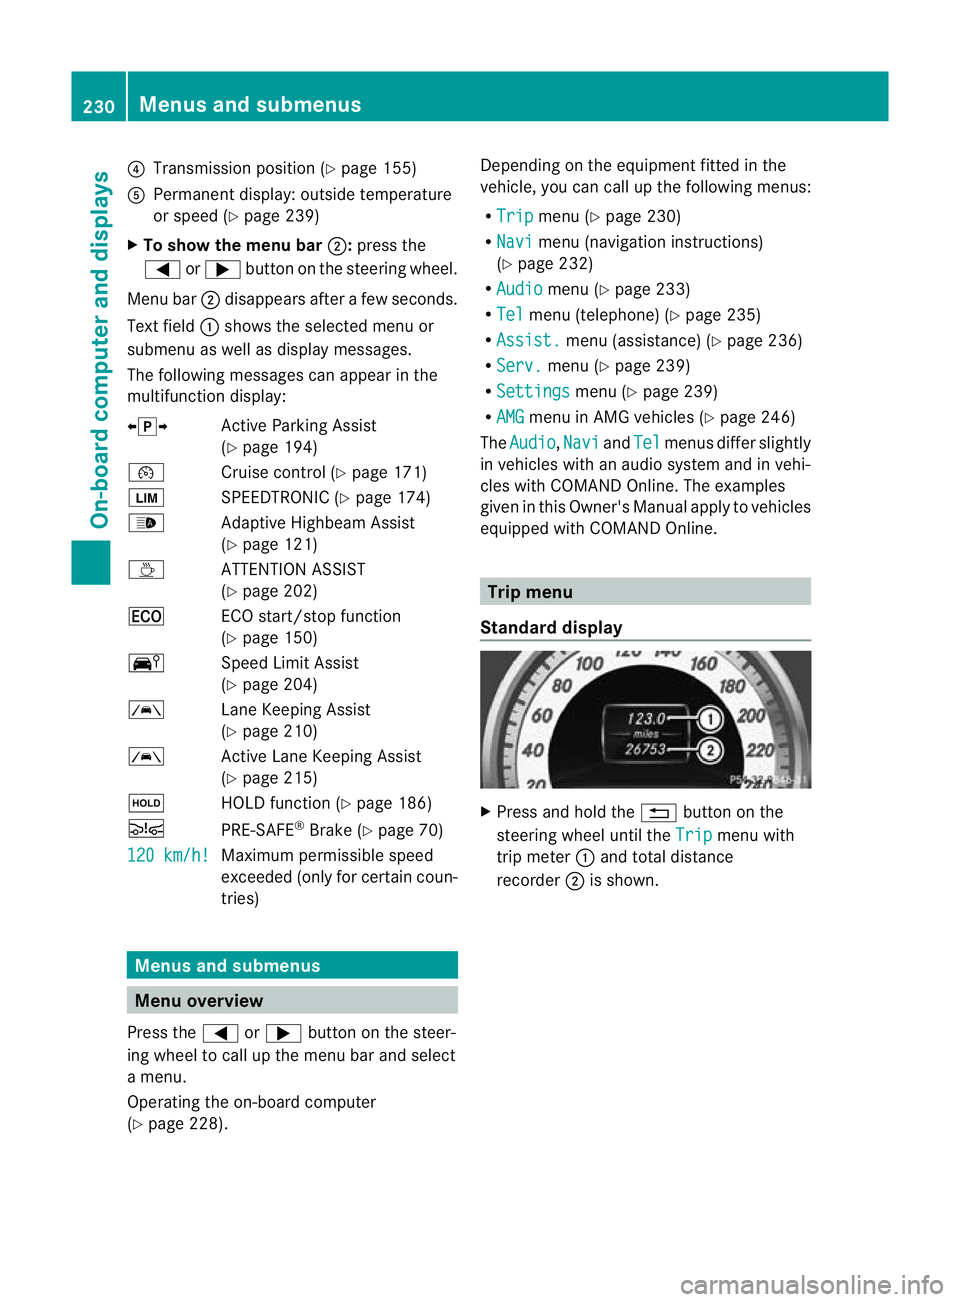
Standard display X
Press and hold the %button on the
steering wheel until the Trip menu with
trip meter :and total distance
recorder ;is shown. 230
Menus and submenusOn-board computer and displays
Page 239 of 405
X
Press the 9or: button to select the
desired name.
or
X To begin rapid scrolling: press and hold
the 9 or: button for longer than
one second.
Rapid scrolling stops when you release the
button or reach the end of the list.
X If only one telephone number is stored
for a name: press the6ora button
to start dialling.
or
X If there is more than one number for a
particular name: press the6ora
button to display the numbers.
X Press the 9or: button to select the
number you want to dial.
X Press the 6ora button to start dial-
ling.
or
X To exit the telephone book: press the
~ or% button.
Redialling The on-board computer saves the last names
or numbers dialled in the redial memory.
X
Press the =or; button on the steer-
ing wheel to select the Tel menu.
X Press the 6button to switch to the
redial memory.
X Press the 9or: button to select the
desired name or number.
X Press the 6ora button to start dial-
ling.
or
X To exit the redial memory: press the
~ or% button. Assistance menu
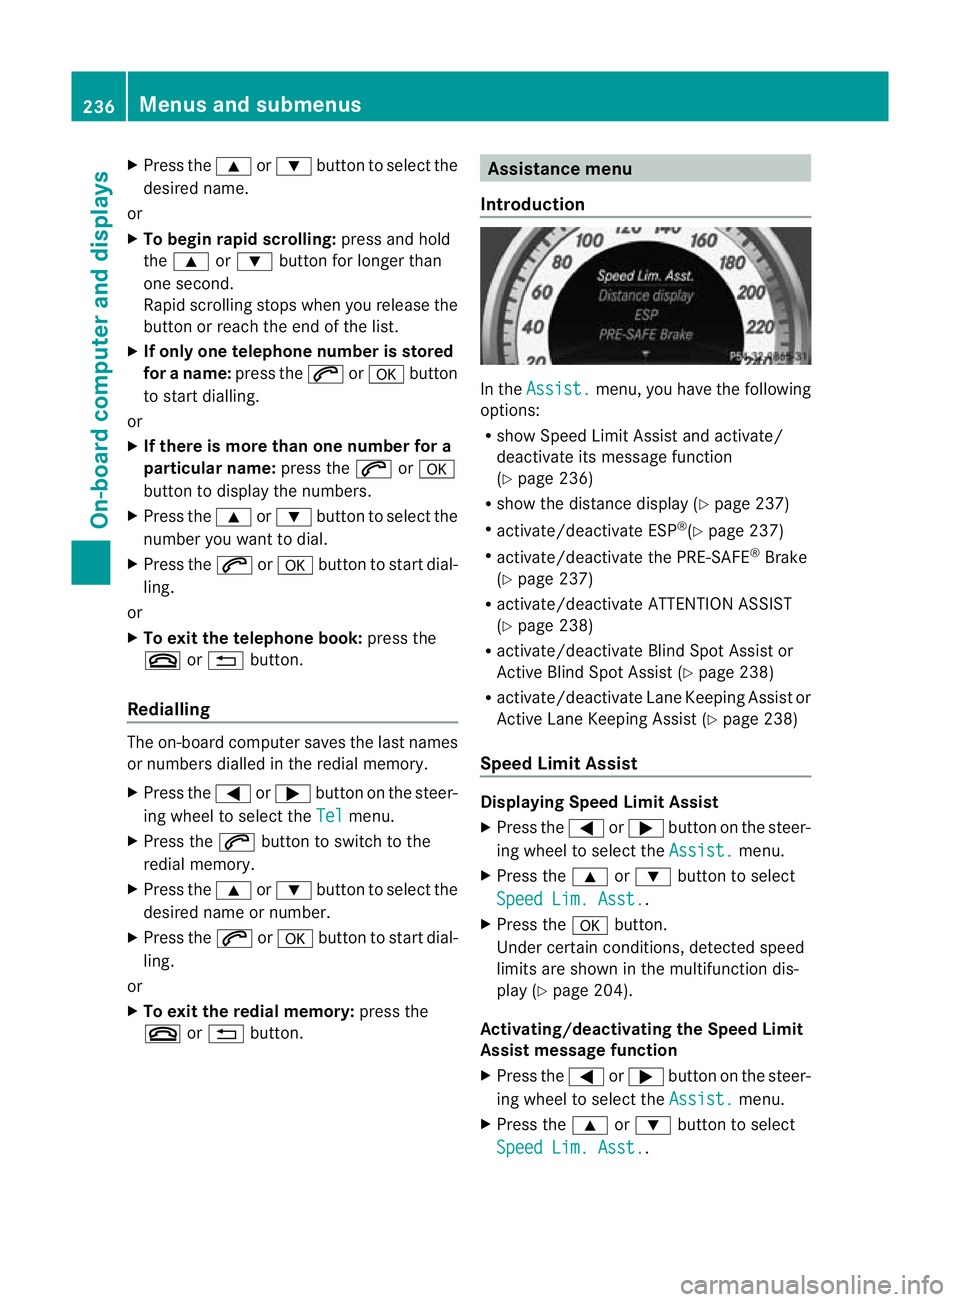
Introduction In the
Assist. menu, you have the following
options:
R show Speed Limit Assist and activate/
deactivate its message function
(Y page 236)
R show the distance display ( Ypage 237)
R activate/deactivate ESP ®
(Y page 237)
R activate/deactivate the PRE-SAFE ®
Brake
(Y page 237)
R activate/deactivate ATTENTION ASSIST
(Y page 238)
R activate/deactivate Blind Spot Assist or
Active Blind Spot Assist (Y page 238)
R activate/deactivate Lane Keeping Assist or
Active Lane Keeping Assist (Y page 238)
Speed Limit Assist Displaying Speed Limit Assist
X
Press the =or; button on the steer-
ing wheel to select the Assist. menu.
X Press the 9or: button to select
Speed Lim. Asst. .
X Press the abutton.
Under certain conditions, detected speed
limits are shown in the multifunction dis-
play (Y page 204).
Activating/deactivating the Speed Limit
Assist message function
X Press the =or; button on the steer-
ing wheel to select the Assist. menu.
X Press the 9or: button to select
Speed Lim. Asst. .236
Menus and submenusOn-board computer and displays
Page 249 of 405
submenu, you must turn the key to position
1
in the ignition lock. AMG menu in AMG vehicles
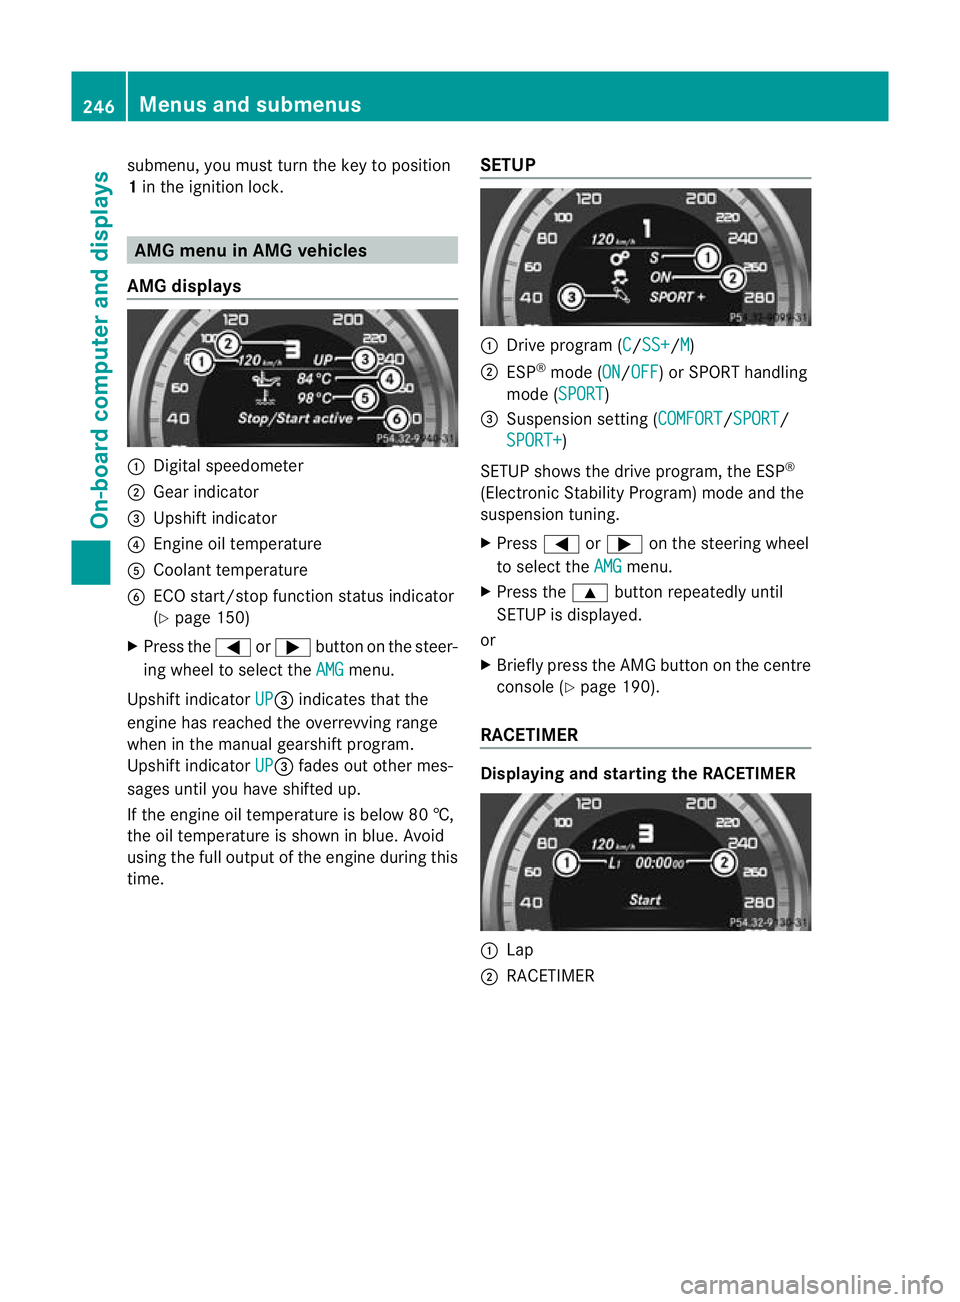
AMG displays :
Digital speedometer
; Gear indicator
= Upshift indicator
? Engine oil temperature
A Coolant temperature
B ECO start/stop function status indicator
(Y page 150)
X Press the =or; button on the steer-
ing wheel to select the AMG menu.
Upshift indicator UP =
indicates that the
engine has reached the overrevving range
when in the manual gearshift program.
Upshift indicator UP =
fades out other mes-
sages until you have shifted up.
If the engine oil temperature is below 80 †,
the oil temperature is shown in blue. Avoid
using the full output of the engine during this
time. SETUP :
Drive program (C /SS+ /M )
; ESP ®
mode (ON /OFF ) or SPORT handling
mode (SPORT )
= Suspension setting (COMFORT /SPORT /
SPORT+ )
SETUP shows the drive program, the ESP ®
(Electronic Stability Program) mode and the
suspension tuning.
X Press =or; on the steering wheel
to select the AMG menu.
X Press the 9button repeatedly until
SETUP is displayed.
or
X Briefly press the AMG button on the centre
console (Y page 190).
RACETIMER Displaying and starting the RACETIMER
:
Lap
; RACETIMER 246
Menus and submenusOn-board computer and displays
Page 250 of 405
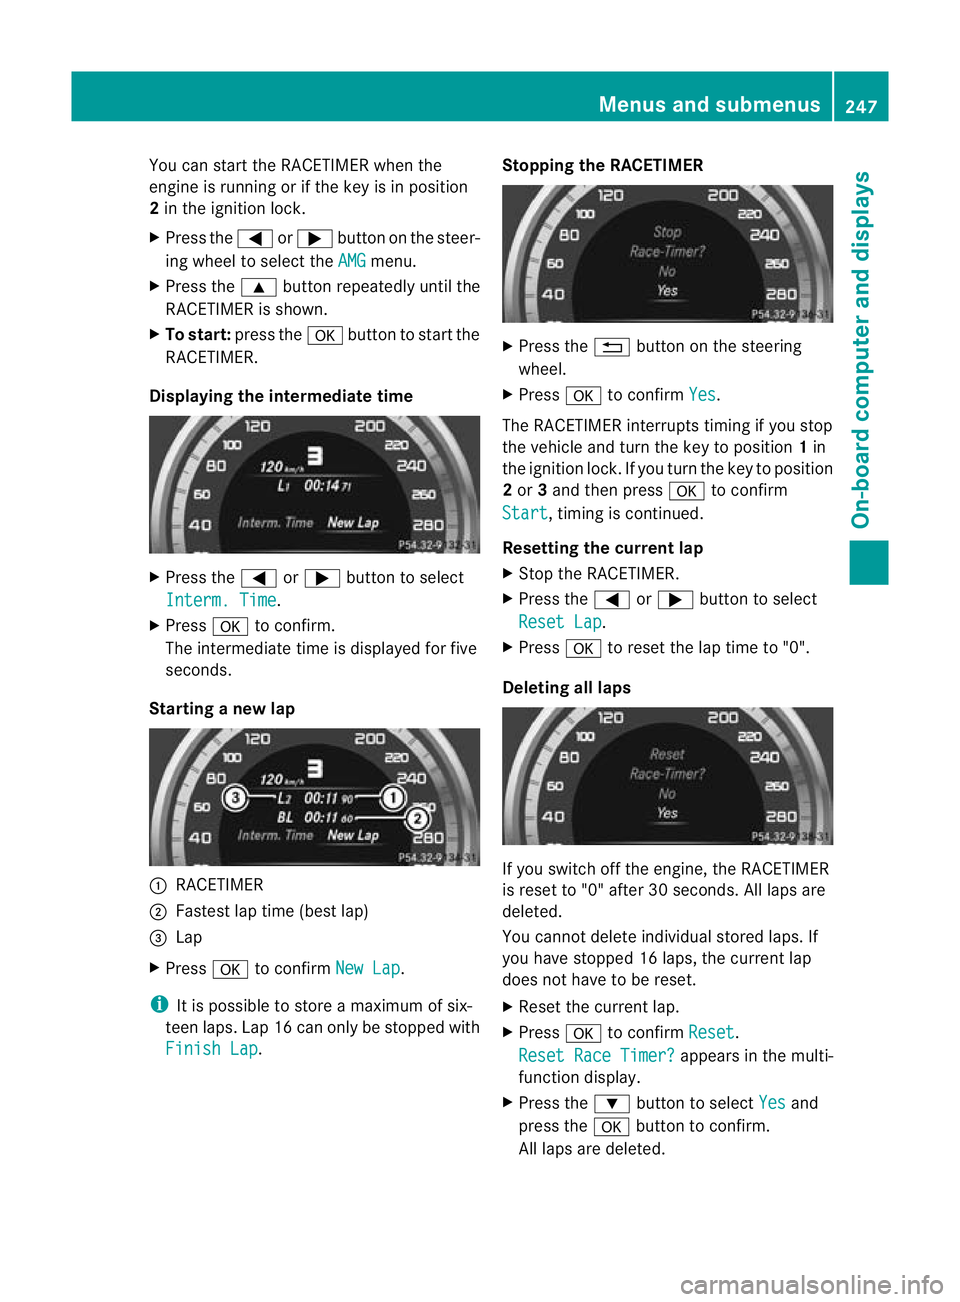
You can start the RACETIMER when the
engine is running or if the key is in position
2 in the ignition lock.
X Press the =or; button on the steer-
ing wheel to selec tthe AMG menu.
X Press the 9button repeatedly until the
RACETIMER is shown.
X To start: press the abutton to start the
RACETIMER.
Displaying the intermediate time X
Press the =or; button to select
Interm. Time .
X Press ato confirm.
The intermediate time is displayed for five
seconds.
Starting a new lap :
RACETIMER
; Fastest lap time (best lap)
= Lap
X Press ato confirm New Lap .
i It is possible to store a maximum of six-
teen laps. Lap 16 can only be stopped with
Finish Lap .Stopping the RACETIMER X
Press the %button on the steering
wheel.
X Press ato confirm Yes .
The RACETIMER interrupts timing if you stop
the vehicle and turn the key to position 1in
the ignition lock. If you turn the key to position
2 or 3and then press ato confirm
Start , timing is continued.
Resetting the current lap
X Stop the RACETIMER.
X Press the =or; button to select
Reset Lap .
X Press ato reset the lap time to "0".
Deleting all laps If you switch off the engine, the RACETIMER
is reset to "0" after 30 seconds. All laps are
deleted.
You cannot delete individual stored laps. If
you have stopped 16 laps, the current lap
does not have to be reset.
X
Reset the current lap.
X Press ato confirm Reset .
Reset Race Timer? appears in the multi-
function display.
X Press the :button to select Yes and
press the abutton to confirm.
All laps are deleted. Menus and submenus
247On-board computer and displays Z
Page 326 of 405
X
Replace cap :on the filler neck and turn
clockwise.
Make sure that the cap locks securely into
place.
X Chec kthe oil level again with the oil dip-
stick (Y page 322).
For further information on engine oil, see
(Y page 391). Other service products
Checking the coolant level G
WARNING
The cooling system is pressurised. Therefore,
only unscrew the cap once the engine has
cooled down. The coolant temperature gauge
must display less than 70 †.Otherwise, you
could be scalded if hot coolant escapes. X
Park the vehicle on a level surface.
Only check the coolant level if the vehicle
is on a level surface and the engine has
cooled down.
X Turn the key to position 2in the ignition
lock (Y page 147).
On vehicles with KEYLESS-GO, press the
Start/Stop button twice (Y page 147).
X Check the coolant temperature display in
the instrument cluster.
The coolant temperature must be below
70 †.
X Turn the key to position 0(Y page 147) in
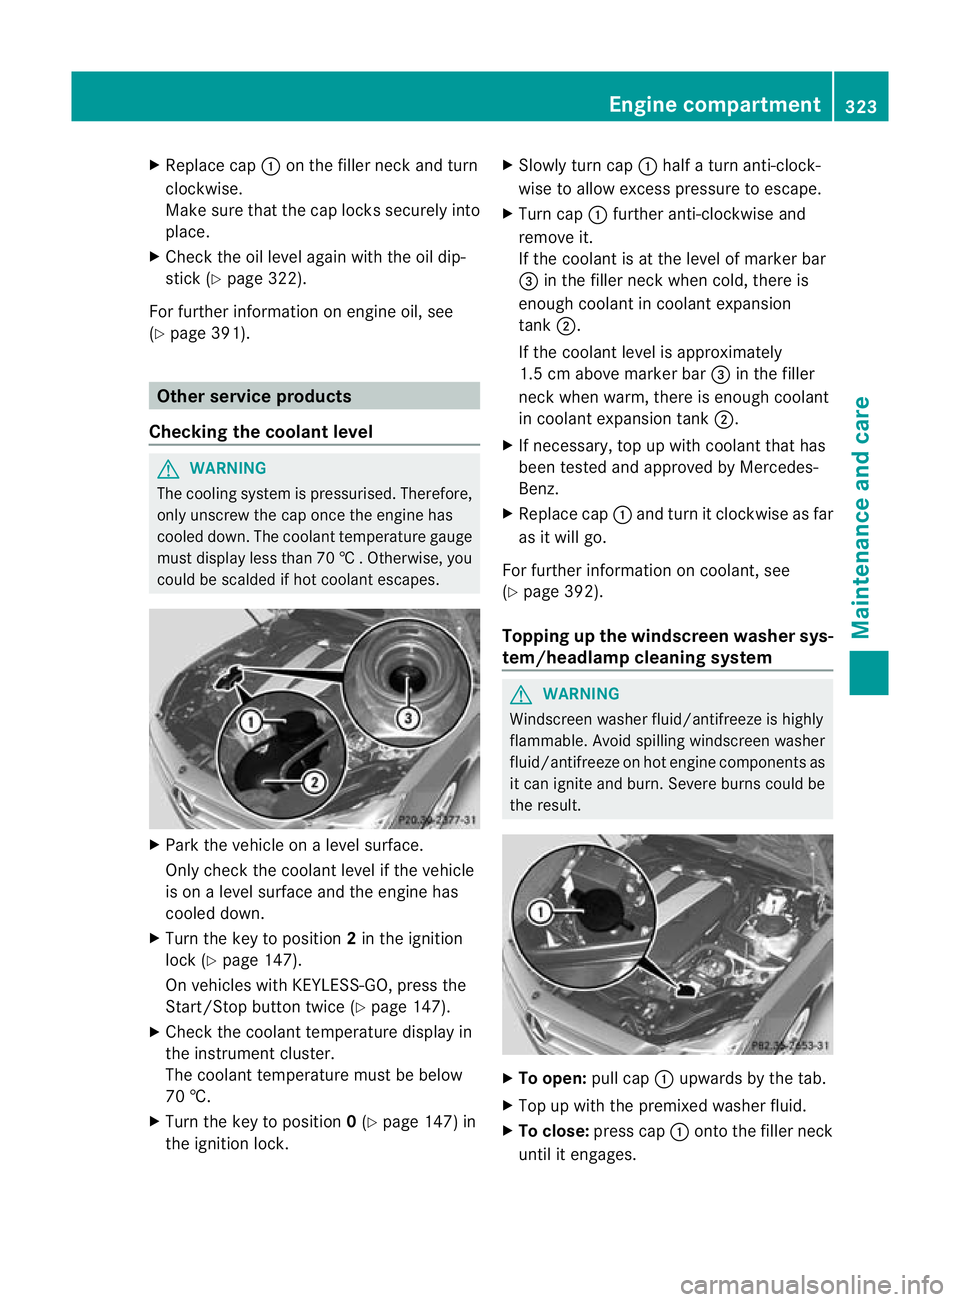
the ignition lock. X
Slowly tur ncap : half a turn anti-clock-
wise to allow excess pressure to escape.
X Turn cap :further anti-clockwise and
remove it.
If the coolant is at the level of marker bar
= in the fille rneck when cold, there is
enough coolant in coolant expansion
tank ;.
If the coolant level is approximately
1.5 cm above marker bar =in the filler
neckw hen warm, there is enough coolant
in coolant expansion tank ;.
X If necessary, top up with coolant that has
been tested and approved by Mercedes-
Benz.
X Replace cap :and turn it clockwise as far
as it will go.
For further information on coolant, see
(Y page 392).
Topping up the windscreen washer sys-
tem/headlampc leaning system G
WARNING
Windscreen washer fluid/antifreeze is highly
flammable. Avoid spilling windscreen washer
fluid/antifreeze on hot engine components as
it can ignite and burn. Severe burns could be
the result. X
To open: pull cap:upwards by the tab.
X Top up with the premixed washer fluid.
X To close: press cap :onto the filler neck
until it engages. Engine compartment
323Maintenance and care Z
Page 331 of 405
Cleaning the windows
G
WARNING
Switch off the windscree nwipers and remove
the key fro mthe ignition lock before cleaning
the windscreen or the wiper blades. On vehi-
cles with KEYLESS-GO, press the Start/Stop
button repeatedly until all indicator lamps in
the instrument cluster have gone off. The
windscreen wipers could otherwise move and
injure you.
! Do not use dry cloths, abrasive products,
solvents or cleaning agents containing sol-
vents to clean the inside of the windows.
Do not touch the insides of the windows
with hard objects, e.g. an ice scraper or
ring. There is otherwise a risk of damaging
the windows.
! Cleant he water drainage channels of the
windscreen and the rear window at regular
intervals. Deposits such as leaves, petals
and pollen may under certain circumstan-
ces prevent water from draining away.T his
can lead to corrosion damage and damage
to electronic components.
X Cleant he inside and outside of the win-
dows with a damp cloth and a cleaning
agent that is recommended and approved
by Mercedes-Benz.
Cleaning the wiper blades G
WARNING
Switch off the windscreen wipers and remove
the key from the ignition lock before cleaning
the windscreen or the wiper blades. On vehi-
cles with KEYLESS-GO, press the Start/Stop
button repeatedly until all indicator lamps in
the instrument cluster have gone off. The
windscreen wipers could otherwise move and
injure you.
! Do not pull on the wiper blade. Otherwise,
the wiper blade could be damaged.
! Do not clean wiper blades too often and
do not rub them too hard. Otherwise, the graphite coating could be damaged. This
could cause wiper noise.
! Hold the wiper arm securely when folding
back. The windscreen could be damaged if
the wiper arm hits against it suddenly.
X Fold the wiper arms away from the wind-
screen.
X Carefully clean the wiper blades with a
damp cloth.
X Fold the windscreen wipers back again
before switching on the ignition.
Cleaning the exterior lighting !
Only use cleaning agents or cleaning
cloths that are suitable for plastic lenses.
Unsuitable cleaning agents or cleaning
cloths could scratch or damage the plastic
lenses of the exterior lighting.
X Cleant he plastic lenses of the exterior
lighting using a wet sponge and a mild
cleaning agent, e.g. Mercedes-Ben zcar
shampoo or cleaning cloths.
Mirror turn signal !
Only use cleaning agents or cleaning
cloths that are suitable for plastic lenses.
Unsuitable cleaning agents or cleaning
cloths could scratch or damage the plastic
lenses of the mirror tur nsignals.
X Clean the plasti clenses of the mirror turn
signals in the exterior mirror housing using
a wet sponge and mild cleaning agent, e.g.
Mercedes-Benzc ar shampoo or cleaning
cloths.
Cleaning the sensors !
If you clean the sensors with a high-pres-
sure cleaner, make sure that you keep a
distance of at least 30 cm between the
vehicle and the high-pressure cleane rnoz-
zle. Information about the correct distance
is available from the equipment manufac-
turer. 328
CareMaintenance and care
Page 340 of 405
X
Stop the vehicle as far away as possible
from traffic on solid ,non-slippery and level
ground.
X Switch on the hazard warning lamps.
X Engage the parking brake.
X Bring the front wheels into the straight-
ahead position.
X Shift the transmission to position P.
X Vehicles with AIRMATIC: make sure that
"normal" level is selected (Y page 188).
X Switch off the engine.
X Vehicles without KEYLESS-GO: remove
the key from the ignition lock.
X Vehicles with KEYLESS-GO: open the
driver's door.
The on-board electronics have status 0,
which is the same as the key having been
removed.
X Vehicles with KEYLESS-GO: remove the
Start/Stop button from the ignition lock
(Y page 147).
X All occupants must get out of the vehicle.
Make sure that they are not endangered as
they do so.
X Occupants should stand clear of danger
whilst a wheel is being changed, e.g. behind
the barrier.
X Get out of the vehicle. Pay attention to traf-
fic conditions when doing so.
X Close the driver's door.
X Place the warning triangle a suitable dis-
tance away (Y page 334). Observe legal
requirements. MOExtended tyres (tyres with run-flat
characteristics) G
WARNING
When driving in emergency mode, the driving
characteristics deteriorate, e.g. when corner-
ing, accelerating quickly and when braking.
There is a risk of accident.
Do not exceed the stated maximum speed.
Avoid abrupt steering and driving manoeu- vres, and driving over obstacles (kerbs, pot-
holes, off-road). This applies in particular to a
laden vehicle.
Stop driving in emergency mode if:
R
you hear banging noises.
R the vehicle starts to shake.
R you see smoke and smell rubber.
R ESP ®
is intervening constantly.
R there are tears in the sidewalls of the tyre.
After driving in emergency mode, have the
wheel rims checked at a qualified specialist
workshop with regard to their further use. The
faulty tyre must be replaced.
With MOExtended tyres (tyres with run-flat
characteristics), you can continue to drive
your vehicle even if there is a total loss of
pressure in one or more tyres.
MOExtended tyres may only be used in con-
junction with an active tyre pressure loss
warning system or with an active tyre pres-
sure monitor.
The maximum driving distance is approx-
imately 80 km when the vehicle is partially
laden, and approximately 30 km when the
vehicle is fully laden.
In addition to the vehicle load, the driving dis-
tance possible depends upon:
R speed
R road condition
R outside temperature
The driving distance possible in run-flat mode
may be reduced by extreme driving condi-
tions/manoeuvres, or it can be increased
through a moderate style of driving.
The maximum permissible distance which
can be driven in run-flat mode is counted from
the moment the tyre pressure loss warning
appears in the multifunction display.
You must not exceed a maximum speed of
80 km/h.
i When replacing one or all tyres, make
sure that you only use tyres marked Flat tyre
337Breakdown assistance Z