2012 MERCEDES-BENZ CLS SHOOTING BRAKE reset
[x] Cancel search: resetPage 8 of 405

Ashtray
.............................................. .306
Assistance menu (on-board com-
puter) ................................................. .236
ASSYST PLUS Displaying a service message ........324
Hiding a service message ..............324
Notes ............................................. 324
Resetting the service interval dis-
pla y................................................ 324
Service message ............................ 324
Special service requirements ......... 325
ATA (Anti-Theft Alarm system)
Activating/deactivating ...................72
Function .......................................... .72
Interior motion sensor .....................73
Switching off the alarm ....................72
Tow-away protection ........................ 73
ATTENTIO NASSIST
Activating/deactivating .................238
Display message ............................ 261
Function/notes ............................. 202
Authorised workshop
see Qualified specialist workshop
AUTO lights
Display message ............................ 258
see Lights
Automatic engine start (ECO start/
stop function) .................................... 151
Automatic engine switch-off (ECO
start/stop function) ..........................150
Automatic headlamp mode ..............115
Automatic transmission Accelerator pedal position .............157
Automatic drive program ...............158
Changing gea r............................... 157
DIRECT SELECT leve r..................... 155
Display message ............................ 272
Drive program displa y.................... 155
Driving tips .................................... 157
Emergency running mode ..............161
Engaging drive position .................. 156
Engaging neutra l............................ 156
Engaging revers egear ................... 156
Engaging the par kposition ............ 155
Kickdow n....................................... 157
Manual drive program ....................160
Overview ........................................ 154
Problem (fault) ............................... 161Progra
mselecto rbutton ................ 157
Pulling away ................................... 149
Selector leve r................................ 154
Shift range s................................... 159
Starting the engine ........................149
Steering wheel gearshift paddle s... 158
Trailer towing ................................. 157
Transmissio nposition display ........155
Transmission position display
(DIRECT SELECT lever) ................... 155
Transmission positions ..................156
Automatic transmission emer-
gency running mode .........................161
Auxiliary heating Activating/deactivating .................139
Activating/deactivating (on the
centre console ).............................. 139
Display message ............................ 274
Important safety notes ..................138
Problem (display message) ............142
Remote control .............................. 139
Setting ........................................... 243
Setting the departur etime ............ .141
Auxiliary ventilation
Activating/deactivating .................139
Activating/deactivating (on the
centre console ).............................. 139
Problem (display message) ............142
Remote control .............................. 139
Axle load, permissible (traile rtow-
ing) ...................................................... 398 B
Bag hook ............................................ 296
Ball coupling Folding in ....................................... 221
Folding out ..................................... 220
BAS (Brake Assist System) .................64
BAS PLUS (Brake Assist System
PLUS) .................................................... 65
Battery (key) Checking .......................................... 79
Important safety notes ....................79
Replacing ......................................... 79
Battery (vehicle)
Charging ........................................ 343
Display message ............................ 260 Index
5
Page 14 of 405
Folding in whe
nlocking (on-board
computer) ...................................... 245
Out of position (troubleshooting) ...109
Parking position ............................. 110
Resetting ....................................... 109
Storing settings (memory func-
tion) ............................................... 111F
Faul tmessage
see Display messages
Filler cap
see Fuel filler flap
Fire extinguisher ............................... 335
First-aid kit ......................................... 334
Fitting awheel
Removing awheel .......................... 365
Fitting wheels
Fitting awheel ............................... 366
Lowering the vehicle ......................366
Raising the vehicle .........................364
Securing the vehicle against roll-
ing away ........................................ 363
Flat tyre
MOExtended tyres .........................337
Preparing the vehicle .....................336
TIREFIT kit ...................................... 338
Floormat ............................................ .317
Foglamps (extende drange) .............. 120
Frequencies Garage door opener .......................314
Mobile phone ................................. 383
Two-way radio ................................ 383
Front foglamps
Display message ............................ 257
Fuel
Additives ........................................ 389
Consumption information ..............390
Consumption statistics ..................231
Displaying the current consump-
tion ................................................ 231
Displaying the range ......................231
Fuel gauge ............................... 30, 227
Grade (petrol) ................................ 387
Important safety notes ..................386
Notes for AMG vehicles .................388
Problem (malfunction) ...................164Quality (diesel
)............................... 389
Refuelling ...................................... .161
Tank content/reserve fuel .............387
Fuel filler flap
Emergency release ........................163
Opening/closing ............................ 162
Fuel filte r(white display message) .261
Fuel level Calling up the range (on-board
computer) ...................................... 231
Gauge ...................................... 30, 227
Fuel reserve
see Fuel
Fuel tank
Capacity ........................................ 387
Problem (malfunction) ...................164
Fuse allocation chart (vehicle tool
kit) ...................................................... 335
Fuses Allocation chart ............................. 350
Before changing ............................. 350
Fuse box in the boot ......................351
Fuse box in the engine compart-
ment .............................................. 350
Fuse box in the luggage compart-
ment .............................................. 351
Important safety notes ..................350 G
Garage door opener Clearing the memory .....................313
Frequencies ................................... 314
Important safety notes ..................311
Opening/closing the garage door ..313
Programming (button in the rear-
view mirror) ................................... 312
Gear indicator (on-board com-
puter) ................................................. .246
Gearshift program SETUP (on-board computer) ..........246
Genuine Mercedes-Benz parts .........382
Glove compartment ..........................291 Index
11
Page 17 of 405
Luggage compartment enlarge-
ment
................................................... 294
Luggage compartment floor opening/closing ............................ 302
stowage well, unde r....................... 302
Luggage cover
Removing and fitting ......................298
Luggage holde r(EASY-PACK load-
securing kit) ...................................... .300
Lumbar support Adjusting ....................................... 104
Adjusting the 4-way lumba rsup-
por t................................................ 104
Luxu ry head restraint .......................101 M
M+S tyres ........................................... 356
Main-beam headlamps Display message ............................ 257
Switching Adaptive Highbeam
Assist on/off ................................. 121
Switching on/off ........................... 117
Massage function (PULSE) ...............103
Matt finish (cleaning instructions) ..327
Memory card (audio) .........................234
Memory function ............................... 111
Mercedes-Benz Service Centre see Qualified specialist workshop
Message memory (on-board com-
puter) ................................................. .249
Messages see Display messages
Mirror
see Vanity mirror (in sun visor)
Mirrors
see Exterior mirrors
see Rear-view mirror
Mobile phone
Frequencies ................................... 383
Installatio n..................................... 383
Menu (on-board computer) ............235
Notes/placing in the bracket ......... 309
Sliding adapter ............................... 311
Transmission output (maximum) .... 383
Modifying the programming (key) .....78
MOExtended tyres .............................337
Motorway mode ................................ 119MP3
Operating ...................................... .234
see Separate operating instructions
Multifunction display
Function/notes ............................. 229
Permanent displa y......................... 239
Multifunction steering wheel
Operating the on-board computer .228
Overview .......................................... 33 N
Navigation Menu (on-board computer) ............232
NECK-PRO head restraints
Operation ........................................ .46
Resetting after being triggered ........47
NECK-PRO luxury head restraints
Operation ........................................ .46
Resetting after being triggered ........48
Night View Assist Plus
Activating/deactivating .................206
Cleaning ......................................... 330
Function/notes ............................. 205
Problem (fault) ............................... 208
Notes on running in anew vehicle ..146 O
Occupant safety Childre ninthe vehicle ..................... 53
Important safety notes ....................40
Odometer
see Total distance recorder
see Trip meter
Oil
see Engine oil
On-board computer
AMG menu ..................................... 246
Assistance menu ........................... 236
Audi omenu ................................... 233
Convenience submenu ..................244
Displaying a service message ........324
Display messages ..........................249
DISTRONI CPLUS ........................... 183
Factory setting submenu ...............245
Heating submenu ........................... 243
Important safety notes ..................22614
Index
Page 20 of 405

Seats
Adjusting (electrically) ...................100
Adjusting lumba rsuppor t.............. 104
Adjusting the 4-way lumba rsup-
por t................................................ 104
Adjusting the head restraint ..........100
Cleaning the cover .........................331
Correct driver's seat position ........... 98
Important safety notes ....................99
Overview .......................................... 99
Seat heating problem ....................105
Seat ventilation problem ................105
Storing settings (memory func-
tion) ............................................... 111
Switching sea theating on/off .......104
Switching the sea tventilation on/
off .................................................. 105
Selector lever
Cleaning ......................................... 331
Sensors (cleaning instructions) .......328
Service see ASSYST PLUS
Service Centre
see Qualified specialist workshop
Service menu (on-board computer) .239
Service products Brake fluid ..................................... 392
Coolant (engine) ............................ 392
Engine oil ....................................... 391
Fuel ................................................ 386
Important safety notes ..................385
Washer fluid .................................. .393
Settings
Factory (on-board computer) .........245
On-board computer .......................239
Setting the air distribution ...............135
Setting the airflow ............................135
SETUP (on-board computer) .............246
Short journeys (diesel particle fil-
ter) ...................................................... 168
Sidebag ................................................ 45
Side lamps Switching on/off ........................... 116
Side windows
Convenience closing ........................90
Convenience opening ......................90
Important safety notes ....................89Opening/closing
.............................. 89
Problem (malfunction) .....................92
resetting .......................................... 91
Sliding sunroof
Important safety information ...........92
Opening/closing .............................. 93
Problem (malfunction) .....................95
Rain closing feature .........................93
Resetting ......................................... 93
Snow chains ...................................... 357
Socket Centre console .............................. 308
Luggage compartment ...................309
Rea rcompartmen t......................... 309
Under the armrest .........................308
Sockets
General notes ................................ 308
Spare wheel
Storing ........................................... 378
Specialist workshop ............................ 24
Spectacles compartment .................291
Speed, controlling see Cruise control
Spee dLimit Assist
Activating/deactivating the warn-
ing function .................................... 236
Displayin g...................................... 236
Display message ............................ 262
Display message in the multifunc-
tion displa y.................................... 204
Important safety notes ..................204
Speedometer
Digita l............................................ 231
In the Instrument cluster .........30, 227
Segments ...................................... 228
Selecting the unit of measure-
ment .............................................. 239
see Instrument cluster
SPEEDTRONIC
Deactivating variabl e..................... 176
Display message ............................ 267
Function/notes ............................. 174
Important safety notes ..................174
LIM indicator lamp .........................175
Permanent ..................................... 177
Selecting ........................................ 175
Storing the current spee d.............. 175
Variabl e......................................... 175 Index
17
Page 22 of 405
Temperature
Coolant .......................................... 228
Coolant (on-board computer) ......... 246
Engine oil (on-board computer) ...... 246
Outside temperature ..................... .228
Setting (climate control) ................134
TEMPOMAT
Function/notes ............................. 171
Theft-deterrent system
ATA (Anti-Theft Alarm system) .........72
Immobiliser ...................................... 72
Through-loading feature ...................293
Timing (RACETIMER) .........................246
Tiredness Assist see ATTENTION ASSIST
TIREFIT kit .......................................... 338
Top Tether ............................................ 57
Total distance recorder ....................230
Tow-away protection ..........................73
Towing Important safety notes ..................346
With the rear axle raised ................348
Towing atrailer
Activ eBlind Spot Assist .................215
Active Lane Keeping Assist ............217
Active Parking Assist .....................197
Axle load, permissible ....................398
Bulb failure indicator for LED
lamps ............................................. 223
ESP ®
(Electroni cStability Pro-
gram) ............................................... 69
Towing away
Fitting the towing eye. ...................347
Removing the towing eye. ..............348
With both axles on the ground .......348
Tow-starting
Emergency engine starting ............349
Important safety notes ..................346
Trailer
Display message ............................ 274
Trailer coupling
see Towing atrailer
Trailer towing
7-pin connector ............................. 223
Blind Spot Assist ............................ 210
Cleaning the trailer tow hitch ......... 329
Coupling up atrailer ...................... 221Decoupling
atrailer ....................... 221
Driving tips .................................... 219
Folding in the ball coupling ............221
Folding out the ball coupling ..........220
Important safety notes ..................217
Lights displa ymessage .................. 255
Mounting dimensions ....................396
Parktroni c...................................... 193
Power supply ................................. 222
Shift range ..................................... 157
Trailer loads ................................... 398
Transmission
see Automatic transmission
Transmission position display .........155
Transmission position display
(DIRECT SELECTl ever)...................... 155
Transporting the vehicle ..................349
Trim pieces (cleaning instructions) .331
Trip computer (on-board com-
puter) ................................................. .231
Trip meter Calling up ....................................... 230
Resetting (on-board computer) ......232
Turn signal
see Turn signals
Turn signals
Switching on/off ........................... 117
TV
Operating (on-board computer) .....234
see Separate operating instructions
Two-way radio
Frequencies ................................... 383
Installatio n..................................... 383
Transmission output (maximum) .... 383
Type identification plate
see Vehicle identification plate
Tyre pressure
Calling up (on-board computer) .....360
Display message ............................ 268
Not reached (TIREFIT) ....................339
Reached (TIREFIT) ..........................339
Recommended ............................... 357
Tyre pressure loss warning
Important safety notes ..................358
Restarting ...................................... 359 Index
19
Page 27 of 405
functions in systems which have not been
modified .Malfunctions such as these can
seriously jeopardise the vehicle's operating
safety and therefore your own safety.
You should therefore have all work and mod-
ifications to electronic components carried
out at a qualified specialist workshop. Declarations of conformity
Wireless vehicle components The following informatio
napplies to all com-
ponents of the vehicle and the COMAND sys-
tem which receive and/or transmit radio
waves:
The components of this vehicle which receive
and/or transmit radio waves are compliant
with the basic requirements and other rele-
vant provision sof Directive 1999/5/EC. You
can obtain further information from any
Mercedes-Benz Service Centre.
Electromagnetic compatibility The electromagnetic compatibility of the vehi-
cle components has been checked and certi-
fied according to the currently valid version
of Directive 72/245/EEC or the equivalent
ECE Regulation ECE-R 10. Diagnostics connection
G
WARNING
If you connect equipment to a diagnostics
connection, it can affect the operation of the
vehicle systems. This could compromise the
operating safety of you rvehicle while driving.
There is a risk of an accident.
Do not connect any equipment to a diagnos-
tics connection. G
WARNING
Loose equipment or cables hanging from a
device which are connected to a diagnostic
connection could impede pedal clearance. The equipment or cables could get caught
between the pedals when driving and braking
suddenly. This could impair the function of the
pedals. There is a risk of accident.
Do not attach any equipment or cables in the
driver's footwell.
! If the engine is switched off and equip-
ment on the diagnostics connection is
used, the starter batter ymay discharge.
The diagnostics connection is only intended
for the connection of diagnostic equipmen tat
a qualified specialist workshop.
Connecting equipmen tto the diagnostics
connection can lead to emissions monitoring
information being reset, for example. This
may lead to the vehicle failing to meet the
requirements of the next emissions test dur-
ing the main inspection. Qualified specialist workshop
Aq ualified specialist workshop has the nec-
essary special skills, tools and qualifications
to correctly carry out any necessary work on
your vehicle. This particularly applies to work
relevan tto safety.
Observe the notes in the Service Booklet.
Always have the following work carried out at
a qualified specialist workshop:
R work relevant to safety
R service and maintenance work
R repair work
R modifications, installations and conver-
sions
R work on electronic components
Mercedes-Benz recommends that you use a
Mercedes-Benz Service Centre. Vehicle registration
Mercedes-Benz may ask its Service Centres
to carry out technical inspections on certain 24
Introduction
Page 50 of 405
The use of non-approved head restraint cov-
ers may prevent NECK-PRO head restraints/
NECK-PRO luxury head restraints from trig-
gering properly. The NECK-PRO head
restraints/NECK-PRO luxury head restraints
can therefore not provide the intended pro-
tection.
Consult a Mercedes-Benz Service Centre
regarding availability.
NECK-PRO head restraints/NECK-PRO luxury
head restraints increase protection of the
driver's and front-passenger's head and
neck.Int he event of a rear collision of a cer-
tain severity, the NECK-PRO head restraints/
NECK-PRO luxury head restraints on the driv-
er's and front-passenger seats are moved for-
wards and upwards. This provides better
head support.
If the NECK-PRO head restraints/NECK-PRO
luxury head restraints have been triggered in
an accident, reset the NECK-PRO head
restraints/NECK-PRO luxury head restraints
on the driver's and front-passenger seats
(Y page 48). Otherwise, the additional pro-
tection will not be available in the event of
another rear-end collision. NECK-PRO head
restraints/NECK-PRO luxury head restraints
that have been triggered are moved forwards
and can no longer be adjusted.
Mercedes-Ben zrecommends that you have
the NECK-PRO head restraints/NECK-PRO
luxury head restraints checked at a qualified
specialist workshop after a rear-end collision. Resetting
atriggered NECK-PRO head
restraint/NECK-PRO luxury head
restraint NECK-PRO head restraints
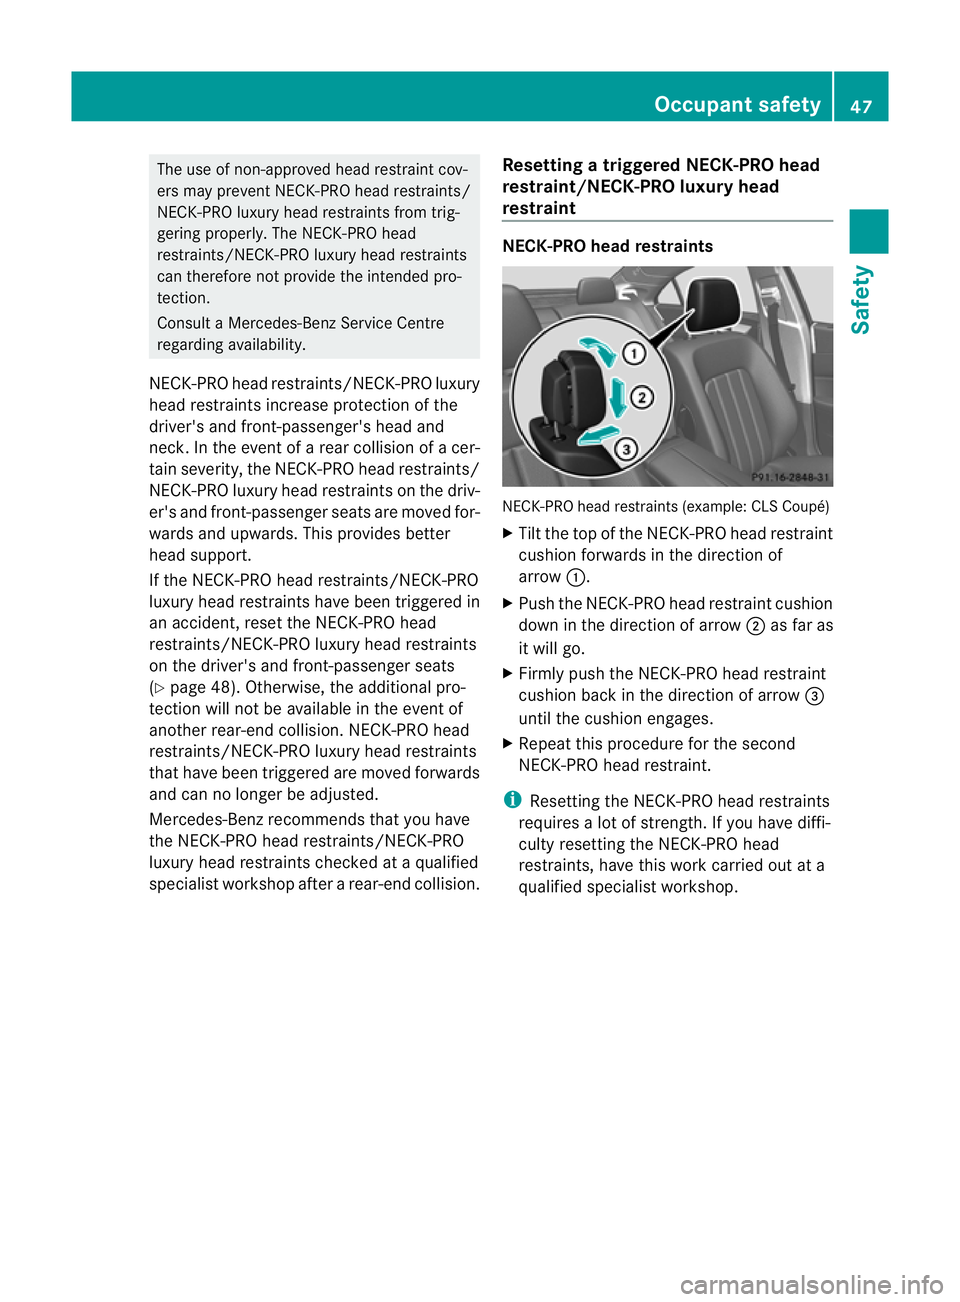
NECK-PRO head restraints (example: CL
SCoupé)
X Tilt the top of the NECK-PRO head restraint
cushion forwards in the direction of
arrow :.
X Push the NECK-PRO head restraint cushion
down in the direction of arrow ;as far as
it will go.
X Firmly push the NECK-PRO head restraint
cushion back in the direction of arrow =
until the cushion engages.
X Repeat this procedure for the second
NECK-PRO head restraint.
i Resetting the NECK-PRO head restraints
requires a lot of strength. If you have diffi-
culty resetting the NECK-PRO head
restraints, have this work carried out at a
qualified specialist workshop. Occupant safety
47Safety Z
Page 51 of 405
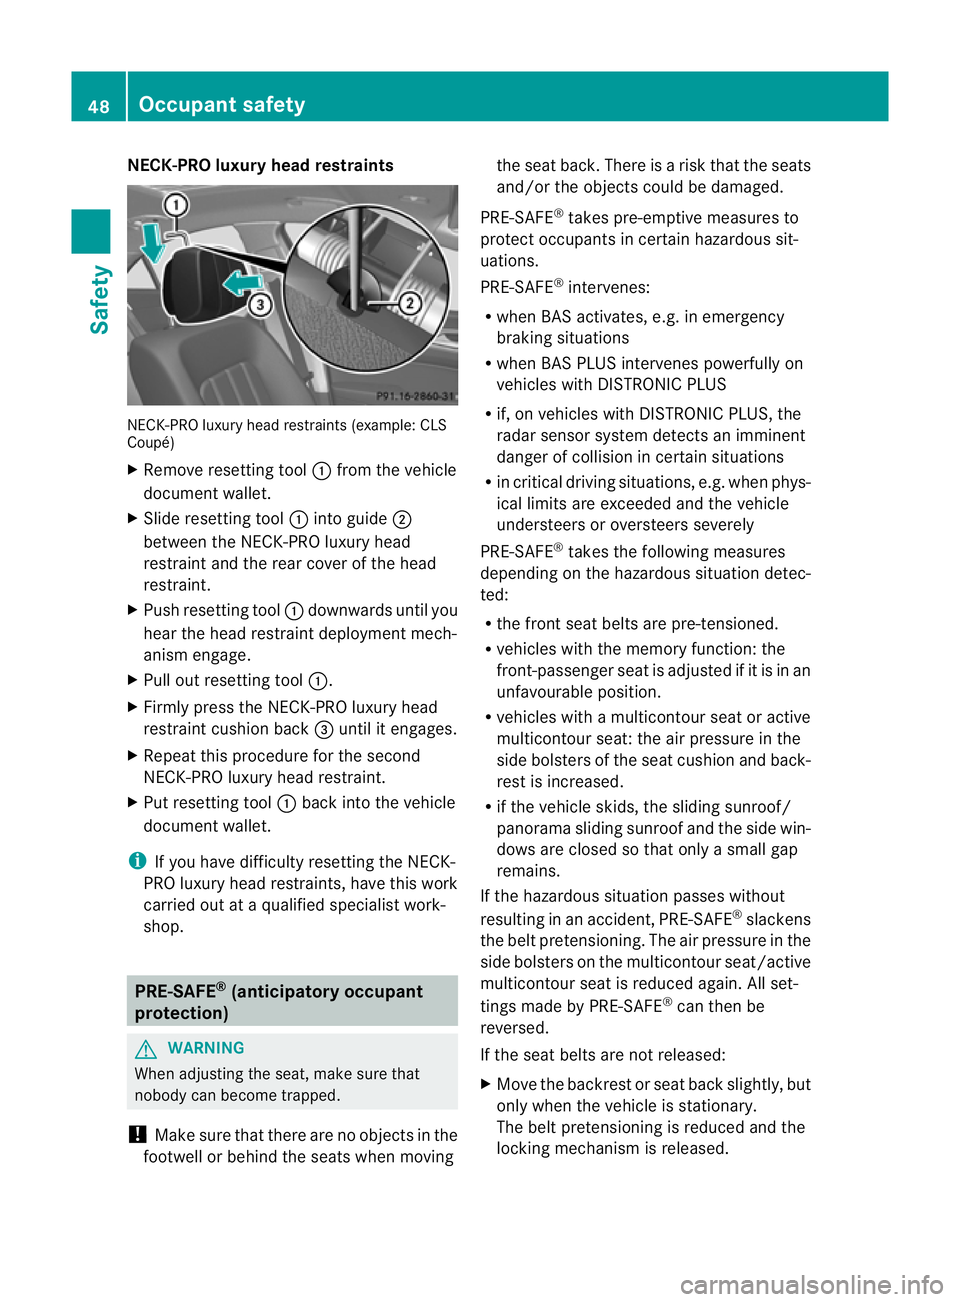
NECK-PRO luxury head restraints
NECK-PRO luxury head restraints (example: CLS
Coupé)
X
Remove resetting tool :from the vehicle
document wallet.
X Slide resetting tool :into guide ;
between the NECK-PRO luxury head
restraint and the rear cover of the head
restraint.
X Push resetting tool :downwards until you
hear the head restraint deployment mech-
anism engage.
X Pull ou tresetting tool :.
X Firmly press the NECK-PRO luxury head
restraint cushion back =until it engages.
X Repeat this procedure for the second
NECK-PRO luxury head restraint.
X Put resetting tool :back into the vehicle
documen twallet.
i If you have difficulty resetting the NECK-
PRO luxury head restraints, have this work
carried out at a qualified specialist work-
shop. PRE-SAFE
®
(anticipatory occupant
protection) G
WARNING
When adjusting the seat, make sure that
nobody can become trapped.
! Make sure that there are no objects in the
footwell or behind the seats when moving the seat back
.There is a risk that the seats
and/or the objects could be damaged.
PRE-SAFE ®
takes pre-emptive measures to
protect occupants in certain hazardous sit-
uations.
PRE-SAFE ®
intervenes:
R when BAS activates, e.g. in emergency
braking situations
R when BAS PLUS intervenes powerfully on
vehicles with DISTRONIC PLUS
R if, on vehicles with DISTRONIC PLUS, the
radar sensor system detectsani mminent
dange rofcollision in certain situations
R in critical driving situations, e.g. when phys-
ical limits are exceeded and the vehicle
understeers or oversteers severely
PRE-SAFE ®
takes the following measures
depending on the hazardous situation detec-
ted:
R the front seat belts are pre-tensioned.
R vehicles with the memory function: the
front-passenger seat is adjusted if it is in an
unfavourable position.
R vehicles with a multicontour seat or active
multicontour seat: the air pressure in the
side bolsters of the seat cushion and back-
rest is increased.
R if the vehicle skids, the sliding sunroof/
panorama sliding sunroof and the side win-
dows are closed so that only a small gap
remains.
If the hazardous situation passes without
resulting in an accident, PRE-SAFE ®
slackens
the belt pretensioning. The air pressure in the
side bolsters on the multicontour seat/active
multicontour seat is reduced again. All set-
tings made by PRE-SAFE ®
can then be
reversed.
If the seat belts are not released:
X Move the backrest or seat back slightly, but
only when the vehicle is stationary.
The belt pretensioning is reduced and the
locking mechanism is released. 48
Occupant safetySafety